1. Introduction
1.1. ConfigSeeder
ConfigSeeder® is a configuration management tool that is capable of
-
managing configuration values at a central place
-
manage their validity based on environment, application version, dates or contexts
-
provide configuration data to different runtime environments and technologies (Kubernetes Connector, OS Connector, Ansible Plugin)
-
provide easy integration into different programming languages and frameworks (Client Libraries)
See the description of our Features for more details about what ConfigSeeder® can do.
1.2. Ecosystem
ConfigSeeder® consists of different components:

See our article about the ConfigSeeder® Components for more details.
1.3. Document content
This document describes the use of ConfigSeeder® from the users point of view. It describes the core concepts and how to use them.
If you are looking for information regarding setting up and configuring ConfigSeeder, please have a look at our system documentation or quickstart guides available at Documentation.
2. Concepts
2.1. Environments
2.1.1. Description
Companies usually have multiple stages or environments:
-
Production
-
Development
-
One or more Test-Environments
ConfigSeeder® models these stages with the concept Environment.
2.1.2. Use of Environments
Environments are used in concert with the following other concepts:
-
The validity of a Configuration Value can be restricted to an Environment.
-
An API Key can be allowed to access all Environments or only one or multiple specific Environment.
-
A User can be restricted in which Environments he is allowed to see and/or edit.
-
The maximum number of supported Environments depends on the license.
2.1.3. Access management
It can be defined per Environment which access permissions are required to access Configuration Values restricted to the Environment. See access management.
2.2. Configuration Groups
2.2.1. Description
Configuration Groups are an element to organize and group configuration data belonging to different services and/or applications.
A normal use-case would be to create a Configuration Group per application.
So if you have Application A and Application B that share some common properties you could have the following Configuration Groups:
-
Application A -
Application B -
Common Properties
2.2.2. Use of Configuration Groups
Configuration Groups are used in concert with the following other concepts:
-
A Configuration Group can hold 1-n Configuration Assemblies
-
A Configuration Group can hold 0-n Configuration Nodes
-
An API Key can be allowed to access all Configuration Groups or only one or multiple specific Configuration Group.
-
A User can be restricted in which Configuration Groups he is allowed to see and/or edit.
-
The maximum number of supported Configuration Groups depends on the license.
-
For every Configuration Group it can be defined which Filter criterias are relevant.
2.2.3. Access management
It can be defined per Configuration Group which access permissions are required to access Configuration Values contained in the Configuration Group. See access management.
2.3. Configuration Nodes
2.3.1. Description
Configuration Nodes represent the key of a configuration property like a port or an url. A Configuration Node doesn’t define a value by itself but can have 1-n Configuration Values for different Filter criteria.
A Configuration Node
-
has a type (like
String,Number,Regex, …) -
can be nullable for some types (default is not nullable)
-
can be deprecated (useful if a configuration property isn’t used anymore)
-
can hold conditions / boundaries valid for all Configuration Values
2.3.2. Use of Configuration Nodes
Configuration Nodes are used in concert with the following other concepts:
-
A Configuration Node can be contained in a Configuration Group
-
A Configuration Node can be contained in a Configuration Assembly
-
A Configuration Node can have 1-n Configuration Values
2.3.3. Access management
Not relevant.
2.4. Configuration Values
2.4.1. Description
Configuration Values represent the values of a configuration property like a port or an url. A Configuration Value defines a value of a Configuration Node for defined Filter criteria.
2.4.2. Use of Configuration Values
Configuration Nodes are used in concert with the following other concepts:
-
A Configuration Value holds the value of a Configuration Node for defined Filter criteria
-
A Configuration Value belongs to a Configuration Node
-
All Configuration Value belonging to a Configuration Node must have the same type.
-
A Configuration Value can be a Secured Value
2.4.3. Access management
All Configuration Values of a Configuration Group and Environment can be accessed with the same access permission. Exception can be Secured Values. It is possible to require separate access permissions to access the Secured Values of a Configuration Group and Environment. See access management.
2.5. Secured Value
2.5.1. Description
A Secured Value is a Configuration Value that holds sensitive data like a password, token, private key or similar information.
You can control if a Configuration Value is a Secured Value or not by toggling the secured-flag of the Configuration Value.
2.5.2. Use of Secured Values
Secured Values are used in concert with the following other concepts:
-
A Secured Value is a Configuration Value holding sensitive data
2.5.3. Access management
All Secured Values of a Configration Group and Environment can be accessed with the same access permission. See access management.
2.6. Filter criteria
2.6.1. Description
Filter criterias are used to restrict the validity of a Configuration Value.
There are multiple Filter criterias:
| Filter criteria | Description |
|---|---|
|
A Configuration Value could be valid only for |
|
A Configuration Value like a Certificate could only be valid in a defined time range. |
|
A Configuration Value like an URL could be different for two versions of the same service. |
|
User defined filter criteria that can be used, if the predefined filter criteria aren’t precise enough. Context could be used to
|
2.6.1.1. Filter criteria weight
The weight of the filter criteria is configurable (e.g. in every _ConfigSeeder® installation it can be defined, if the environment has a higher or lower weight then a matching context.
The default Filter criteria weight is:
| Filter criteria | Weight |
|---|---|
|
|
|
|
|
|
|
|
|
|
The most precise one is selected based on the weight calculation
2.6.2. Use of Filter criterias
Filter criterias are used in concert with the following other concepts:
-
A Configuration Value can have one or multiple Filter criteria set
-
For every Configuration Group it can be defined which Filter criterias are relevant.
-
When retrieving configuration data from ConfigSeeder®, the Filter criterias have to be specified
2.6.3. Access management
Not relevant.
If configuration data are retrieved with the Filter condition Environment, the accessor must have permissions to retrieve Configuration Values of the specified Environment.
2.7. Configuration Assemblies
2.7.1. Description
Configuration Assemblies are an element to further organize and group configuration data contained in a Configuration Group.
Every Configuration Node belongs to a Configuration Assembly.
'Normal' Configuration Nodes belong to the Configuration Assembly default, this dependency is not visible for the user.
Configuration Assemblies are mainly used together with the Kubernetes Connector and OS Connector.
For the Configuration Assemblies != default it is defined which Configuration Nodes can be contained in the Assembly.
See the documentation of our connectors for more details about the use of assemblies.
2.7.2. Use of Configuration Assemblies
Configuration Assemblies are used in concert with the following other concepts:
-
A Configuration Group can hold 1-n Configuration Assemblies
-
A Configuration Assemblies can hold 0-n Configuration Nodes
2.7.3. Access management
Not relevant.
The same rules as for Configuration Values apply for accessing Configuration Assemblies.
2.8. API Keys
2.8.1. Description
ConfigSeeder® can be accessed by real users (normally via our web-based UI) and by applications (via our clients or Rest-API). An application accessing ConfigSeeder® requires an API Key that grants access to the requested resource.
An API Key is always of a defined type:
| Type | Description |
|---|---|
Client |
Standard Type, used by applications to read configuration data directly via our Rest-API or our Clients. |
Kubernetes Connector |
An API Key of this type is used by the ConfigSeeder® Kubernetes Connector. This type is only visible if the license allows the use of the Kubernetes Connector. |
OS Connector |
An API Key of this type is used by the ConfigSeeder® OS Connector. This type is only visible if the license allows the use of the OS Connector. |
User Token |
An API Key of this type can be used if the Rest-API should be called under the name of a User. |
Value Provider |
An API Key of this type is used by the ConfigSeeder® Value Provider. |
Validity:
-
An API Key has always a defined lifetime (can be choosen at the time of creation).
-
An API Key that has a valid lifetime can be revoked. Future access by revoked API Keys is denied.
2.8.2. Use of API Keys
API Keys are used in concert with the following other concepts:
-
An API Key can be allowed to access all Environments or only one or multiple specific Environment.
-
An API Key can be allowed to access all Configuration Groups or only one or multiple specific Configuration Group.
2.8.3. Access management
ConfigSeeder® will validate if a given API Key is permitted to access the requested configuration data. the following conditions must be met:
-
The API Key grants access to all Environments or the requested Environment(s)
-
The API Key grants access to all Configuration Groups or the requested Configuration Group(s)
-
The API Key is still valid and was not revoked.
2.8.4. Notifications
When the lifetime of an API Key is ending, a notification is sent to the owner of the API Key.
2.9. Access Management
To be able to access configuration data, a user must pass several hurdles:
The user must be allowed to access data stored in
-
the tenant (only relevant for multi-tenant installations)
-
the environment
-
the configuration group
-
the configuration value (which is perhaps marked as secured)
Depending if the user wants to read or write data, he needs the corresponding version of the access right.
|
If you don’t care about access management for users, just create the environments and configuration groups. As long as the security settings for environment and configuration groups are not changed, everybody will have access to everything. |
|
If you set up ConfigSeeder® for production use, take the time to understand the security model. Otherwise all users with access to ConfigSeeder® will have access to your confidential configuration data even on production. Please contact us if we can with setting up the access management (or other parts of ConfigSeeder®), |
2.9.1. Access management for Environments
Access restrictions for environments can be configured when an environment is created or edited.
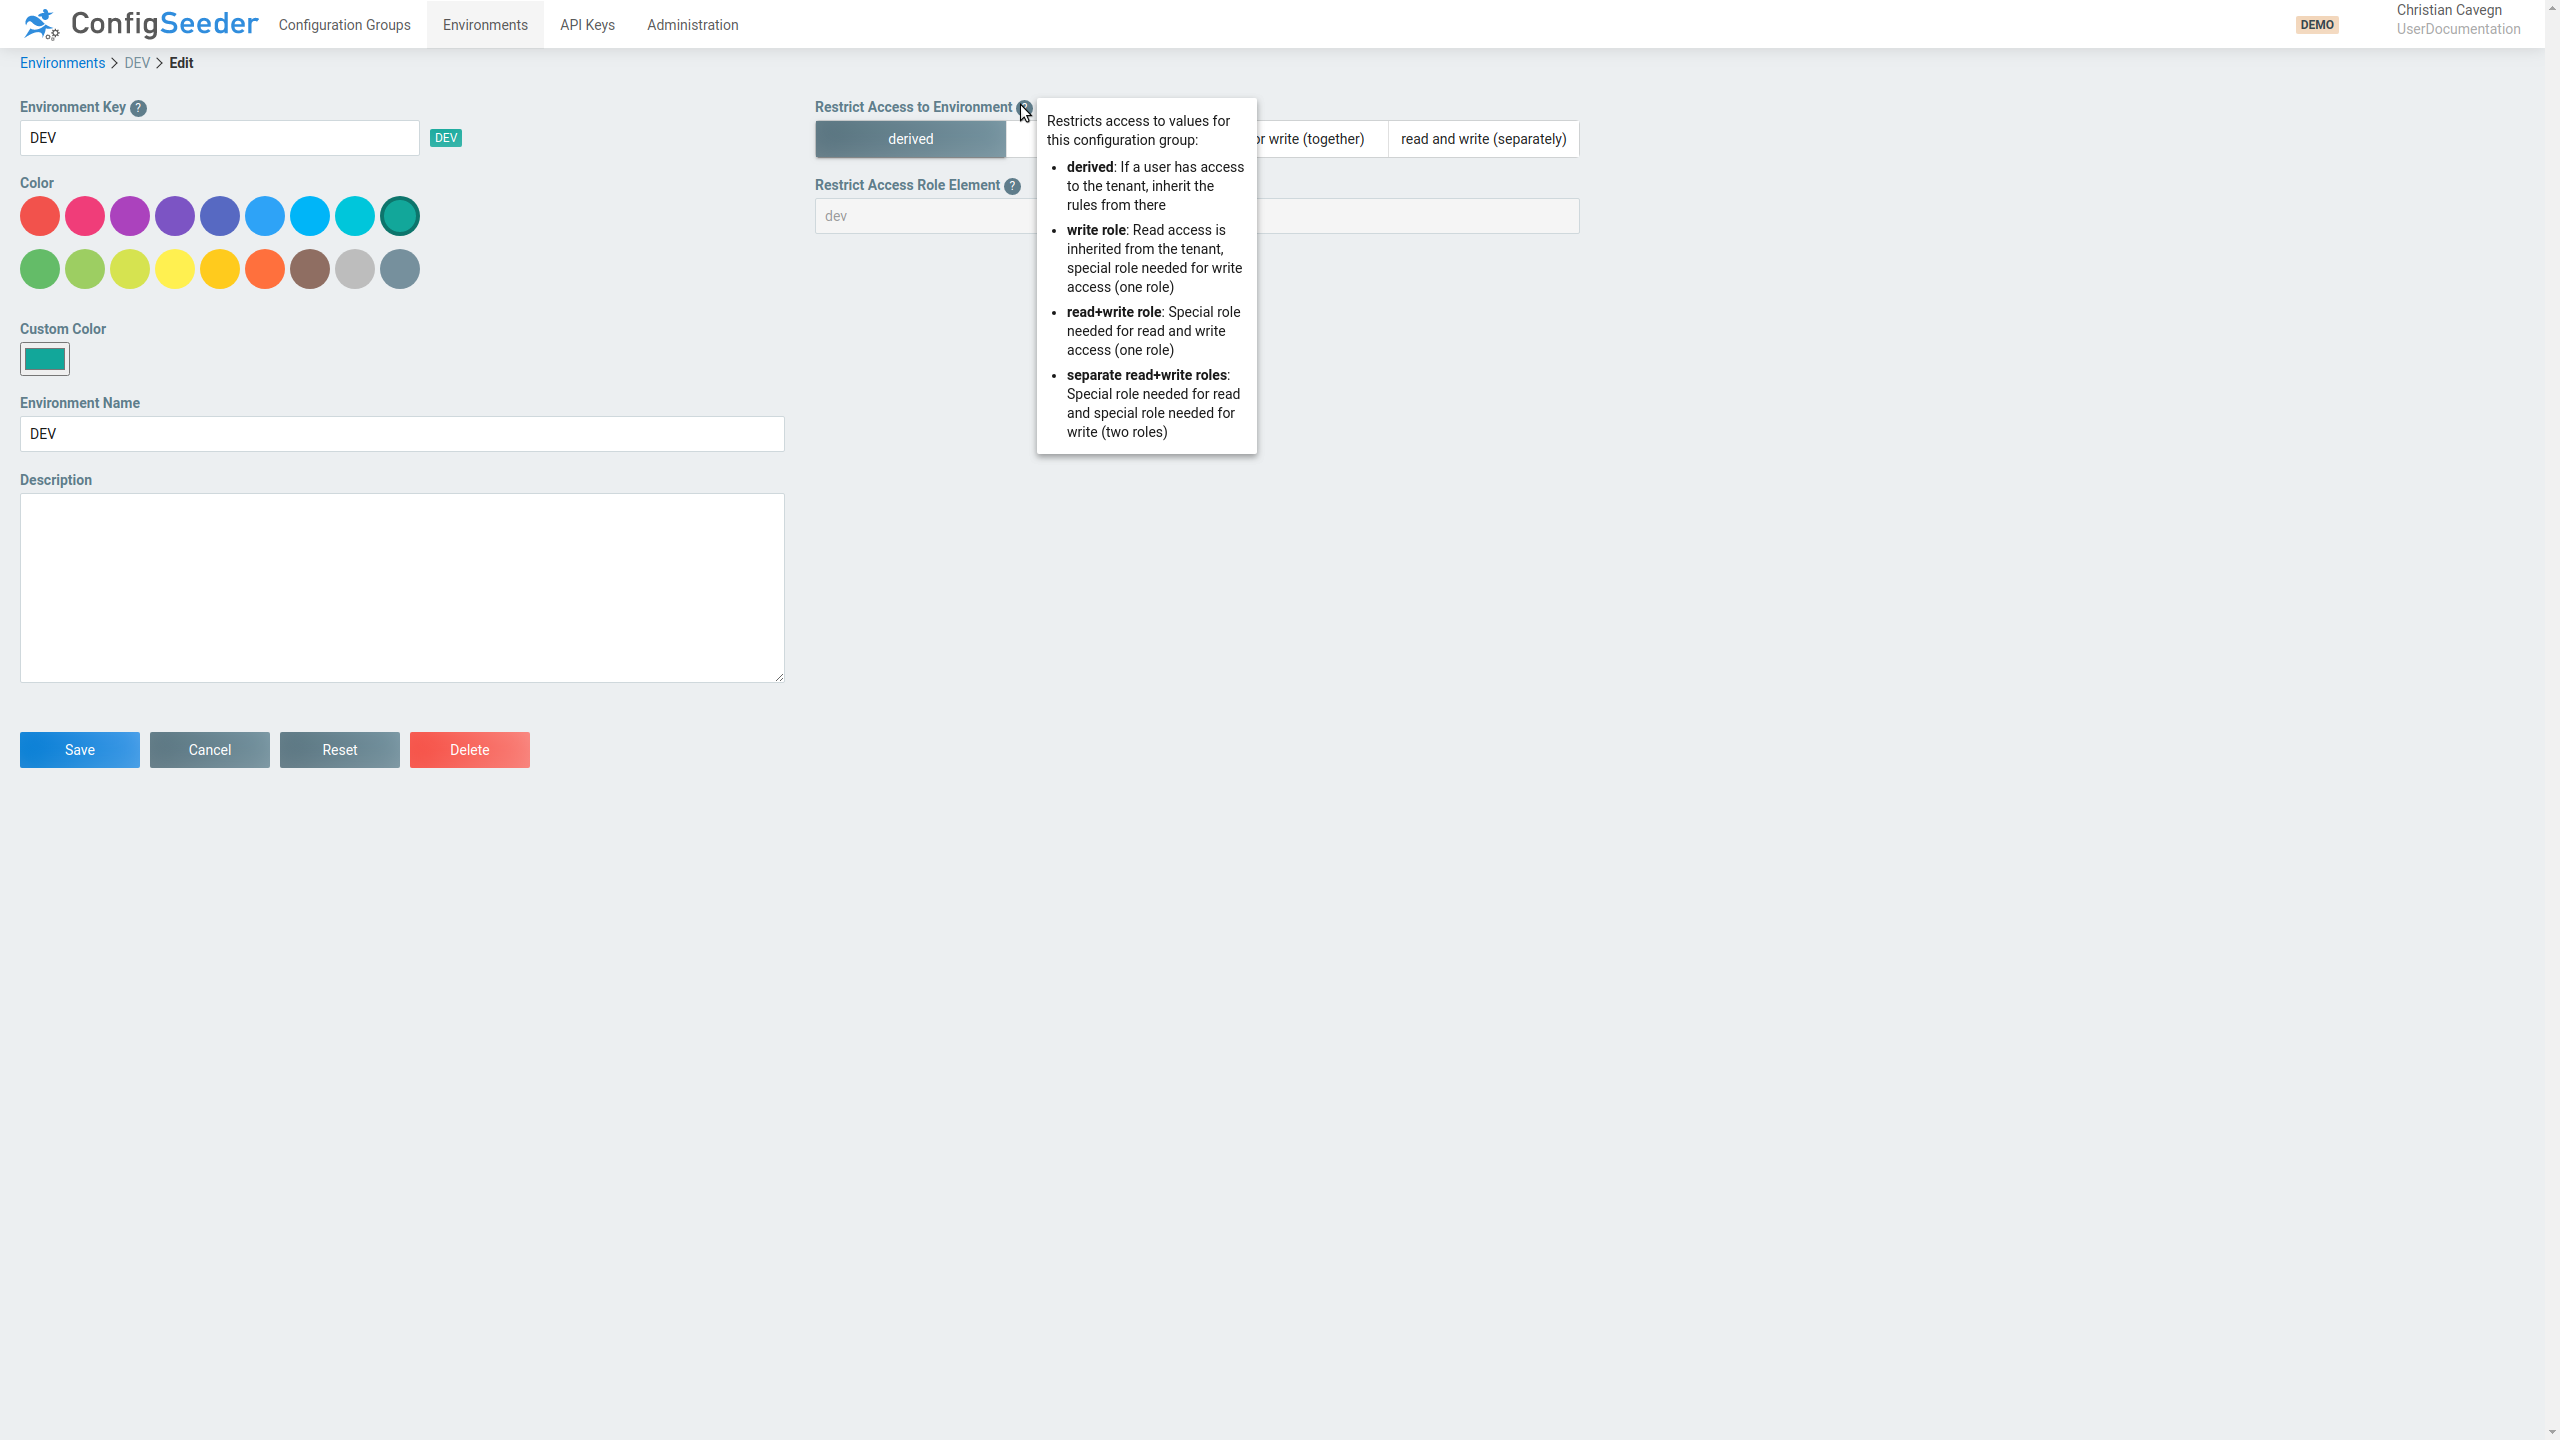
The following steps are required to change the access configuration for an environment:
-
Choose the access mode that best suits your needs:
Mode Description derived-
Access to the environment is inherited from the access to the tenant
-
If a user is able to access the tenant, he will be able to access the environment
-
derivedis the default access mode
write-
Read access is inherited from te access to the tenant
-
If a user is able to access the tenant, he will be able to read data for this environment
-
To change data for this environment, a special role is required
read or write-
No access permissions are inherited from the tenant
-
To read or write data for this environment, a special role is required (one role for read/write access)
read and write-
No access permissions are inherited from the tenant
-
To read data for this environment, a special role is required
-
To write data for this environment, another special role is required
-
-
If access mode is not set to
derived:Set the security element. The security element is part of the role name a user needs, see construction of role names.
-
Verify the required role names.
|
Our customers usually only protect the production environment with an access mode other than Protecting more then production (and perhaps the pre-production environment) with a special access mode leads to a lot of roles that need to be maintained. See best practice for our recommendation how to set up the access management. |
2.9.2. Access management for Configuration Groups
Access restrictions for configuration groups can be configured when a configuration group is created or edited.
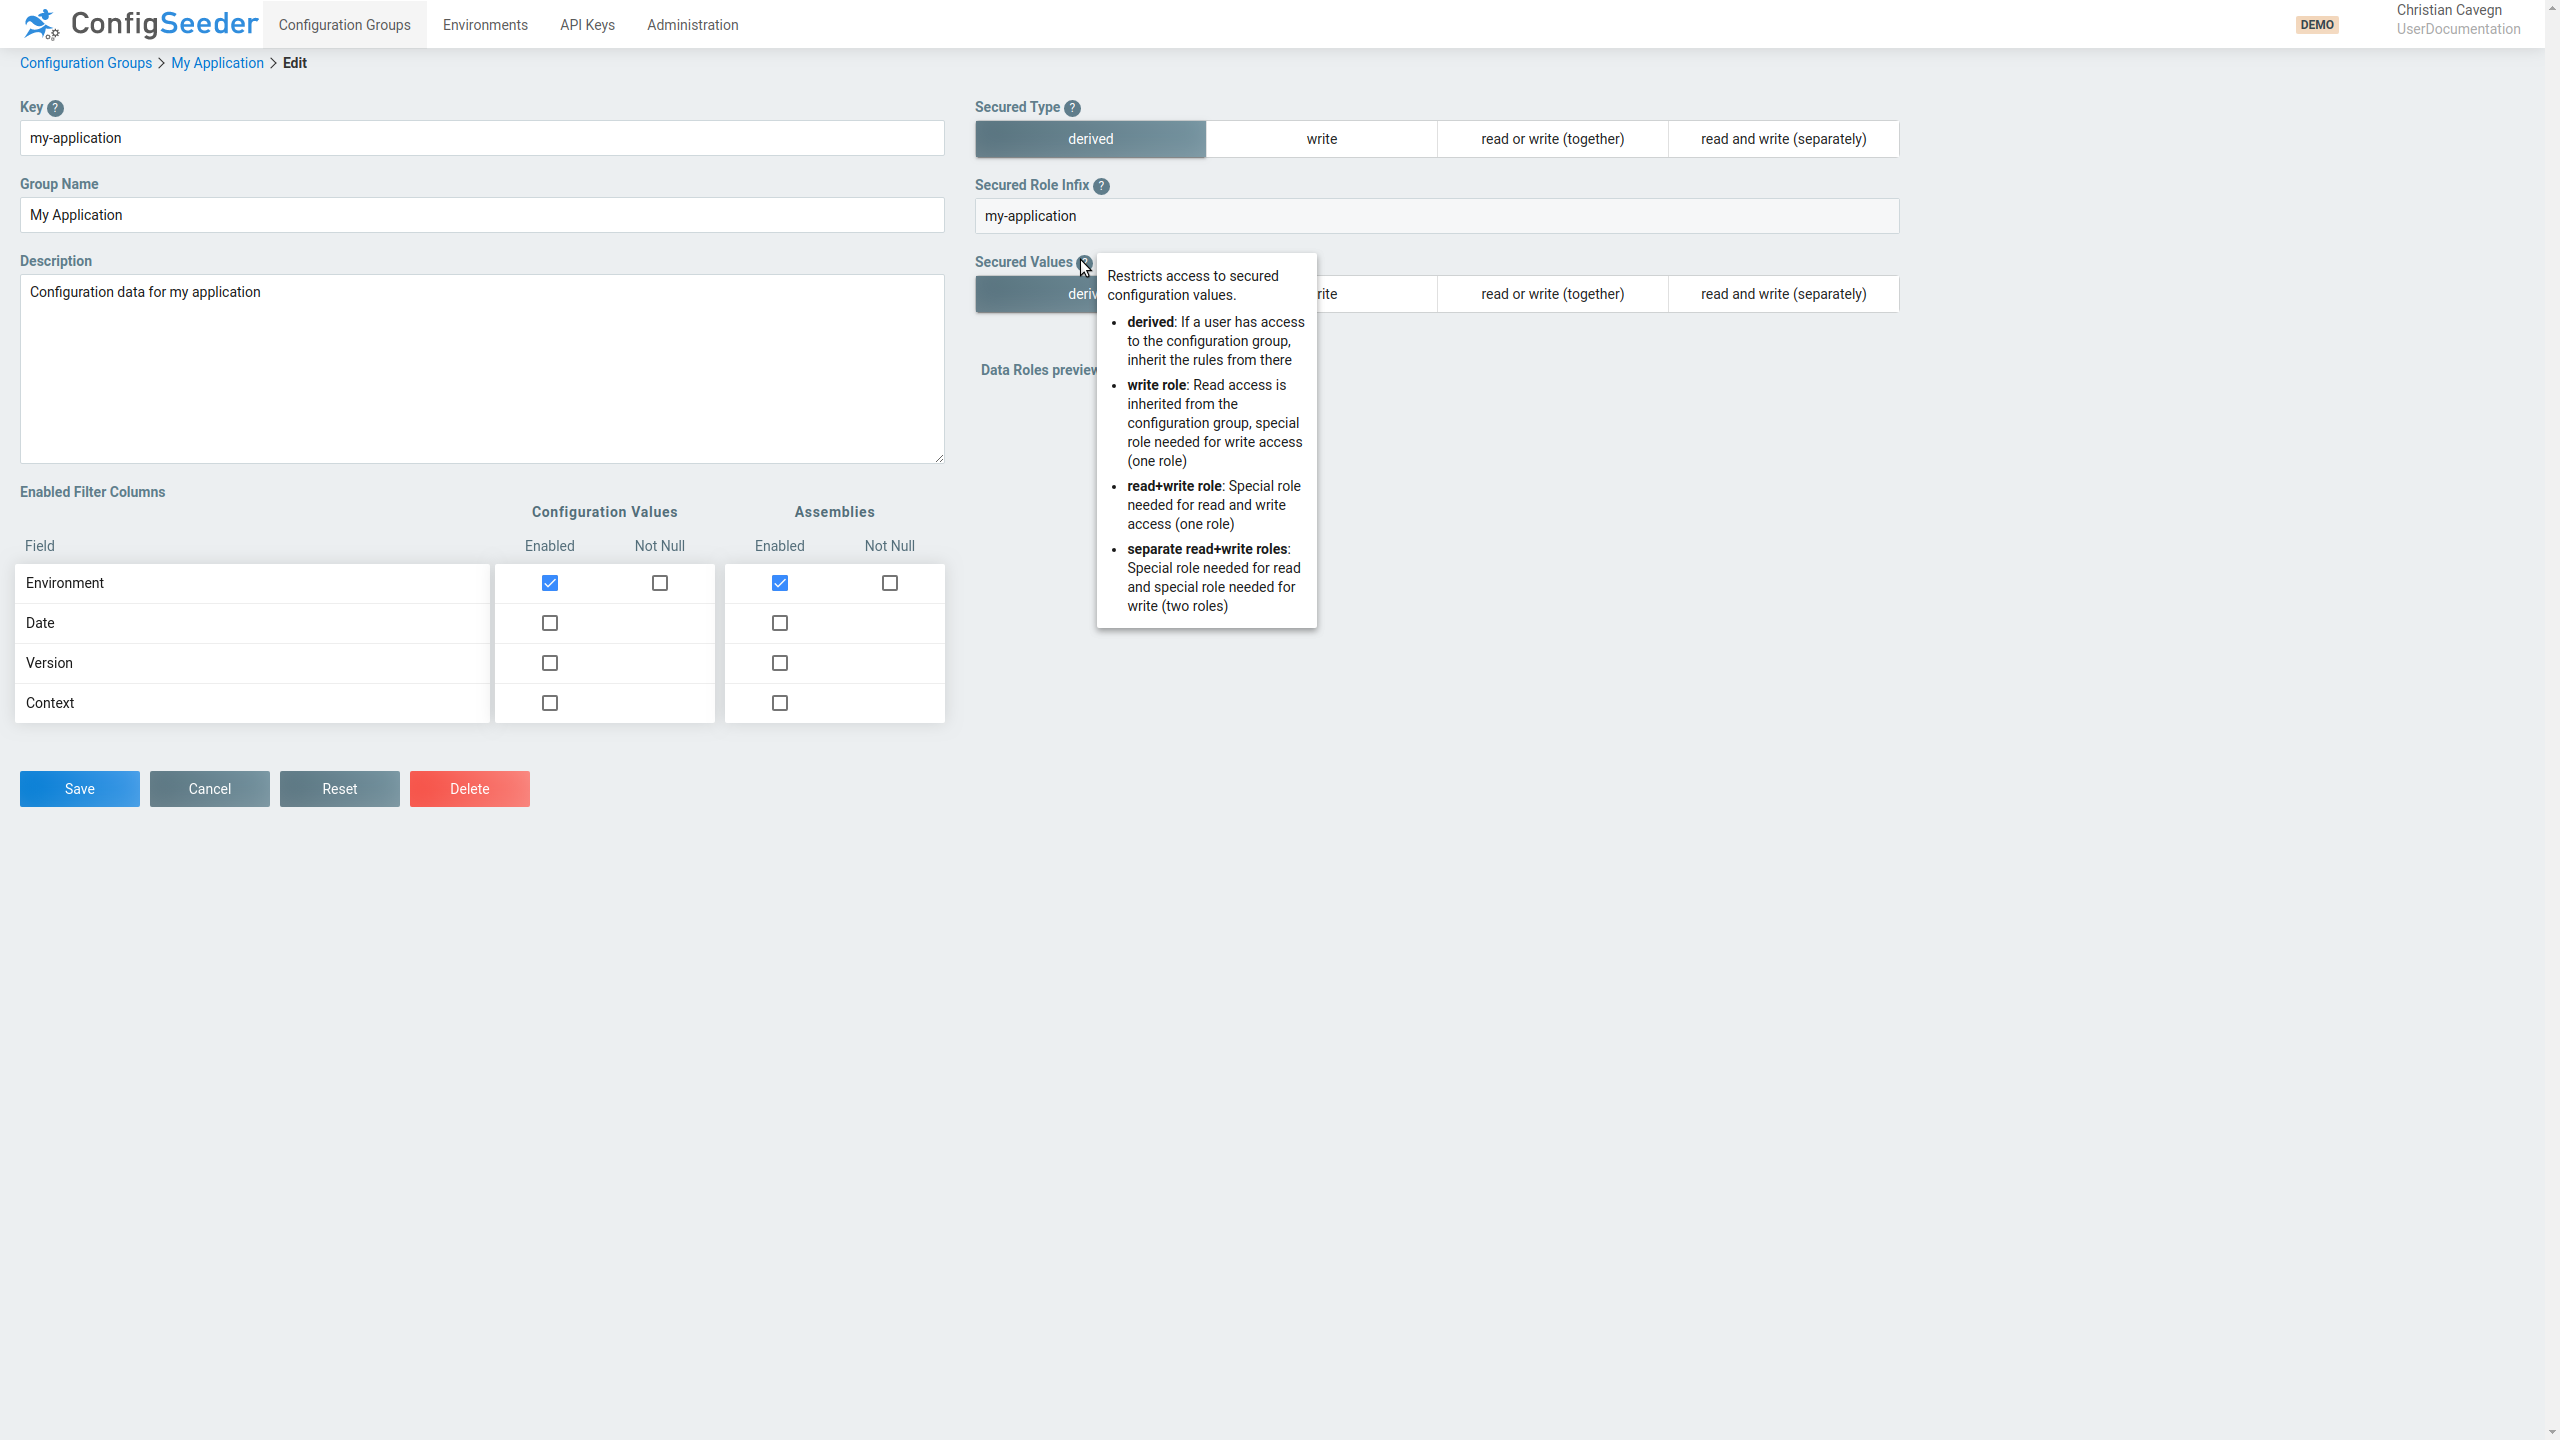
The following steps are required to change the access configuration for a configuration group:
-
Choose the access mode that best suits your needs:
Mode Description derived-
Access to the configuration group is inherited from the access to the tenant
-
If a user is able to access the tenant, he will be able to access the configuration group
-
derivedis the default access mode
write-
Read access is inherited from te access to the tenant
-
If a user is able to access the tenant, he will be able to read data for this configuration group
-
To change data for this configuration group, a special role is required
read or write-
No access permissions are inherited from the tenant
-
To read or write data for this configuration group, a special role is required (one role for read/write access)
read and write-
No access permissions are inherited from the tenant
-
To read data for this configuration group, a special role is required
-
To write data for this configuration group, another special role is required
-
-
If access mode is not set to
derived:Set the secure role infix. The secure role infix is part of the role name a user needs, see construction of role names.
You should consider how to set the role infixes:
-
You get the most fine-grained access control by setting a different infix for every application managed by ConfigSeeder®. However, this can lead to a lot of roles.
-
If you have teams responsible for multiple applications or services, you could introduce an infix per team.
-
-
Choose the access mode for secured values that best suits your needs.
Our customers usually set the access mode
-
Secured Typetowrite -
Secured Valuestoread and write (separately)
This means:
-
Everybody with access to the tenant can read configuration data from this group
-
For changing configuration data, a special role is required
-
Reading and writing
securedvalues requires special roles
See best practice for our recommendation how to set up the access management.
-
-
Verify the reqired role names.
2.9.3. Construction of role names
The roles used for access management are made up of various parts such as environment, configuration group and secured flag. The structure of a role looks like this:
<prefix>_<tenantKey>[_<configurationGroupKey>][_<environmentKey>][_<securedQualifier>][_<accessMode>]
| Part | Description |
|---|---|
|
Globally configurable prefix of all ConfigSeeder® roles. Default value is The separator between the parts of the role name can also be configured, see reference to the system documentation above. |
|
Key of the tenant in which the configuration group is contained. This part is only relevant for multi-tenant installation of ConfigSeeder®. |
|
Key of the configuration group if the access mode is set to a mode other than |
|
Key of the environment if the access mode is set to a mode other than |
`<securedQualifier>' |
The
|
|
Globally configurable postfix that is used if write and/or read operations required different roles.
This postfix will be set if either for the environment or the configuration group either |
2.9.3.1. Examples
| Role | Granted permissions | ||
|---|---|---|---|
|
Grants access permission to all configuration groups & environments in the default tenant that have access mode |
||
|
Grants access permission to all configuration groups and all tenants.
|
||
|
Grants access permission to all configuration groups & environments in the tenant |
||
|
Grants access permission to all configuration groups of tenant
|
||
|
Grants access to configuration groups with access mode |
||
cs_mytenant_myapplication |
Grants access to configuration groups with infix |
||
|
Grants read-access to secured values in configuration groups with infix |
2.9.4. Verify role names
ConfigSeeder® helps you in verifying which roles grant access to which data in a configuration group:
-
Navigate to the configuration group overview
-
Edit the configuration group for which the configuration should be verified
-
Open
Data Roles preview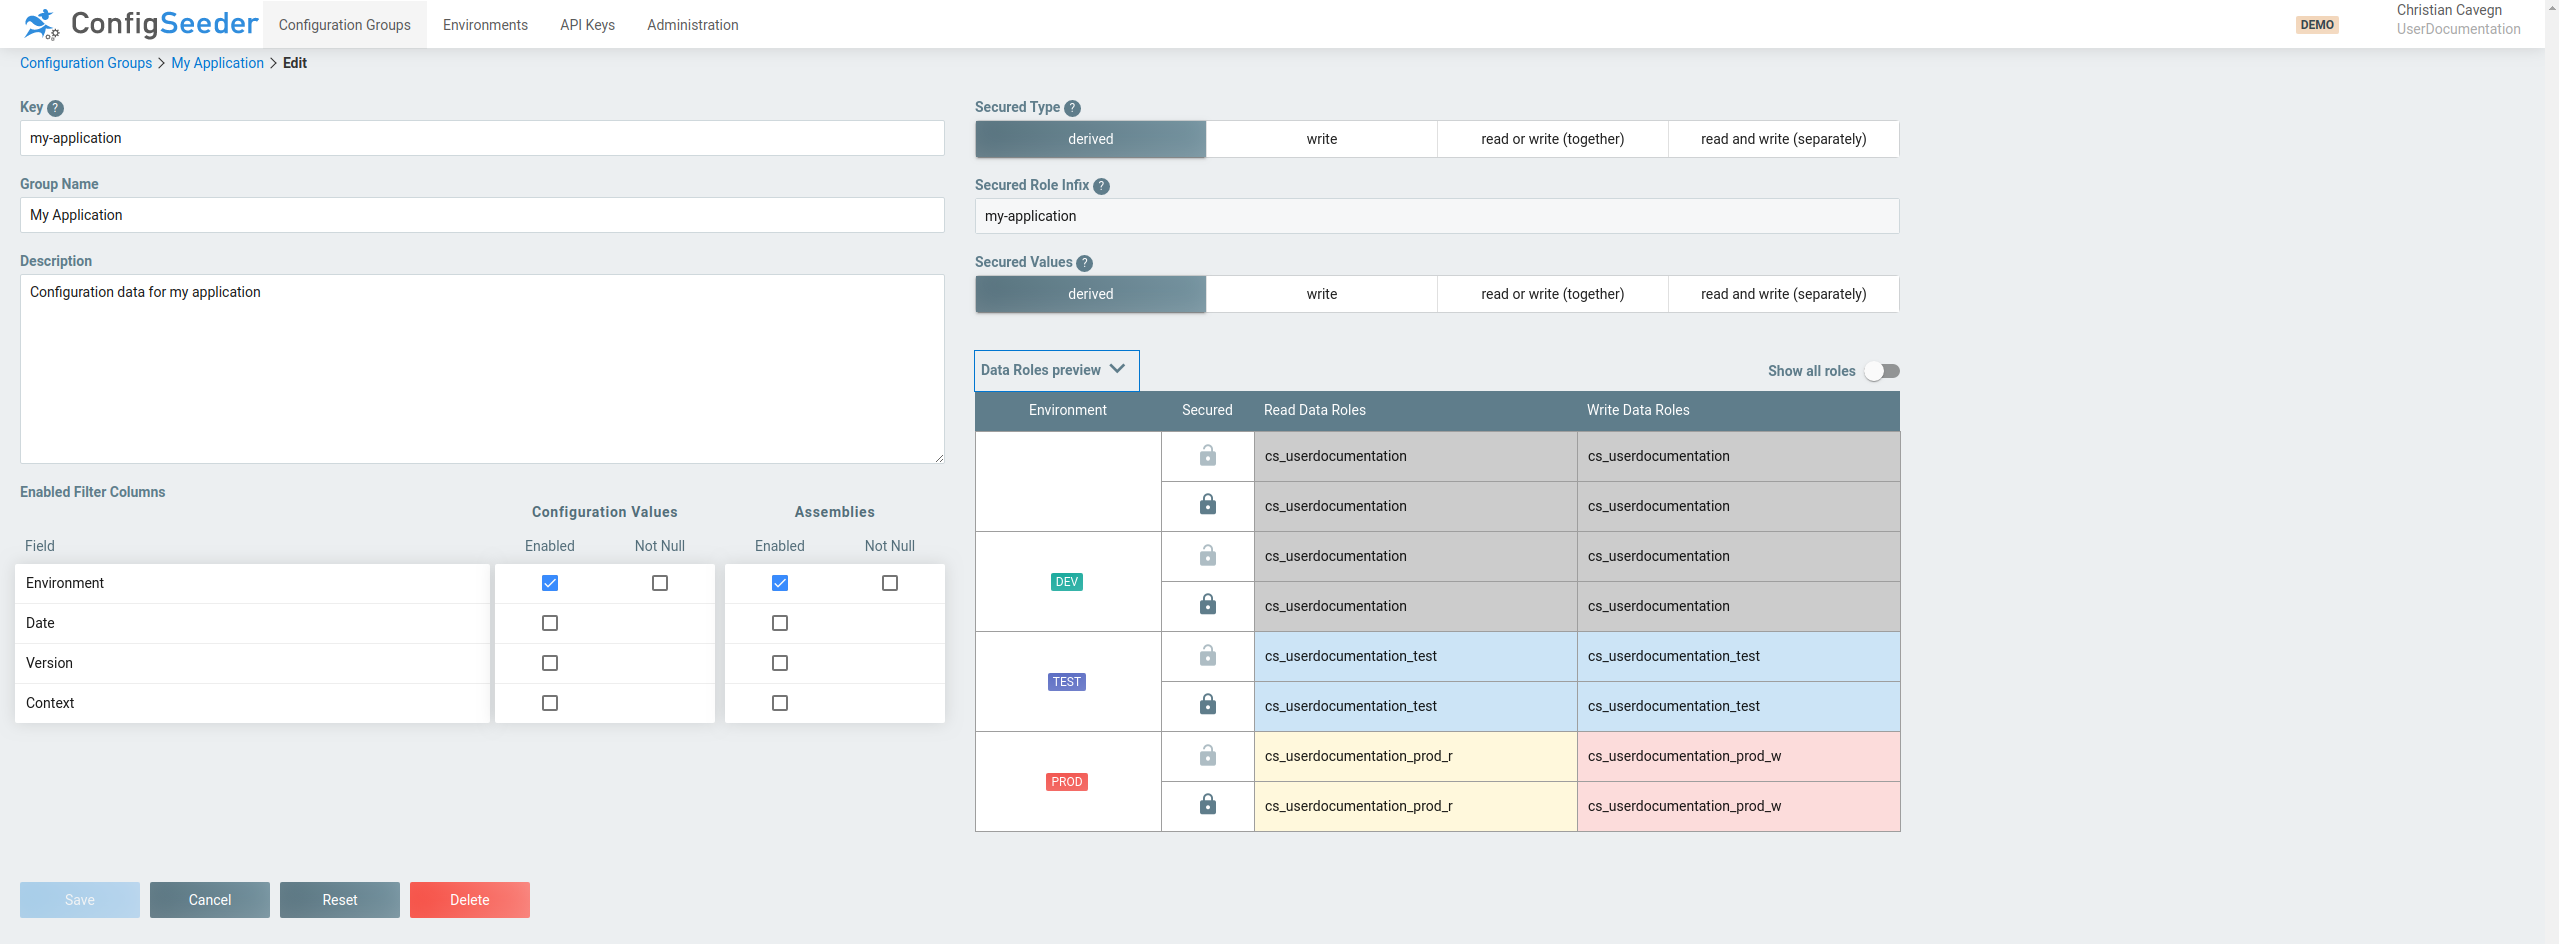
Configuration of the environments:

The default roles are hidden, toggle the flag to see the default roles as well
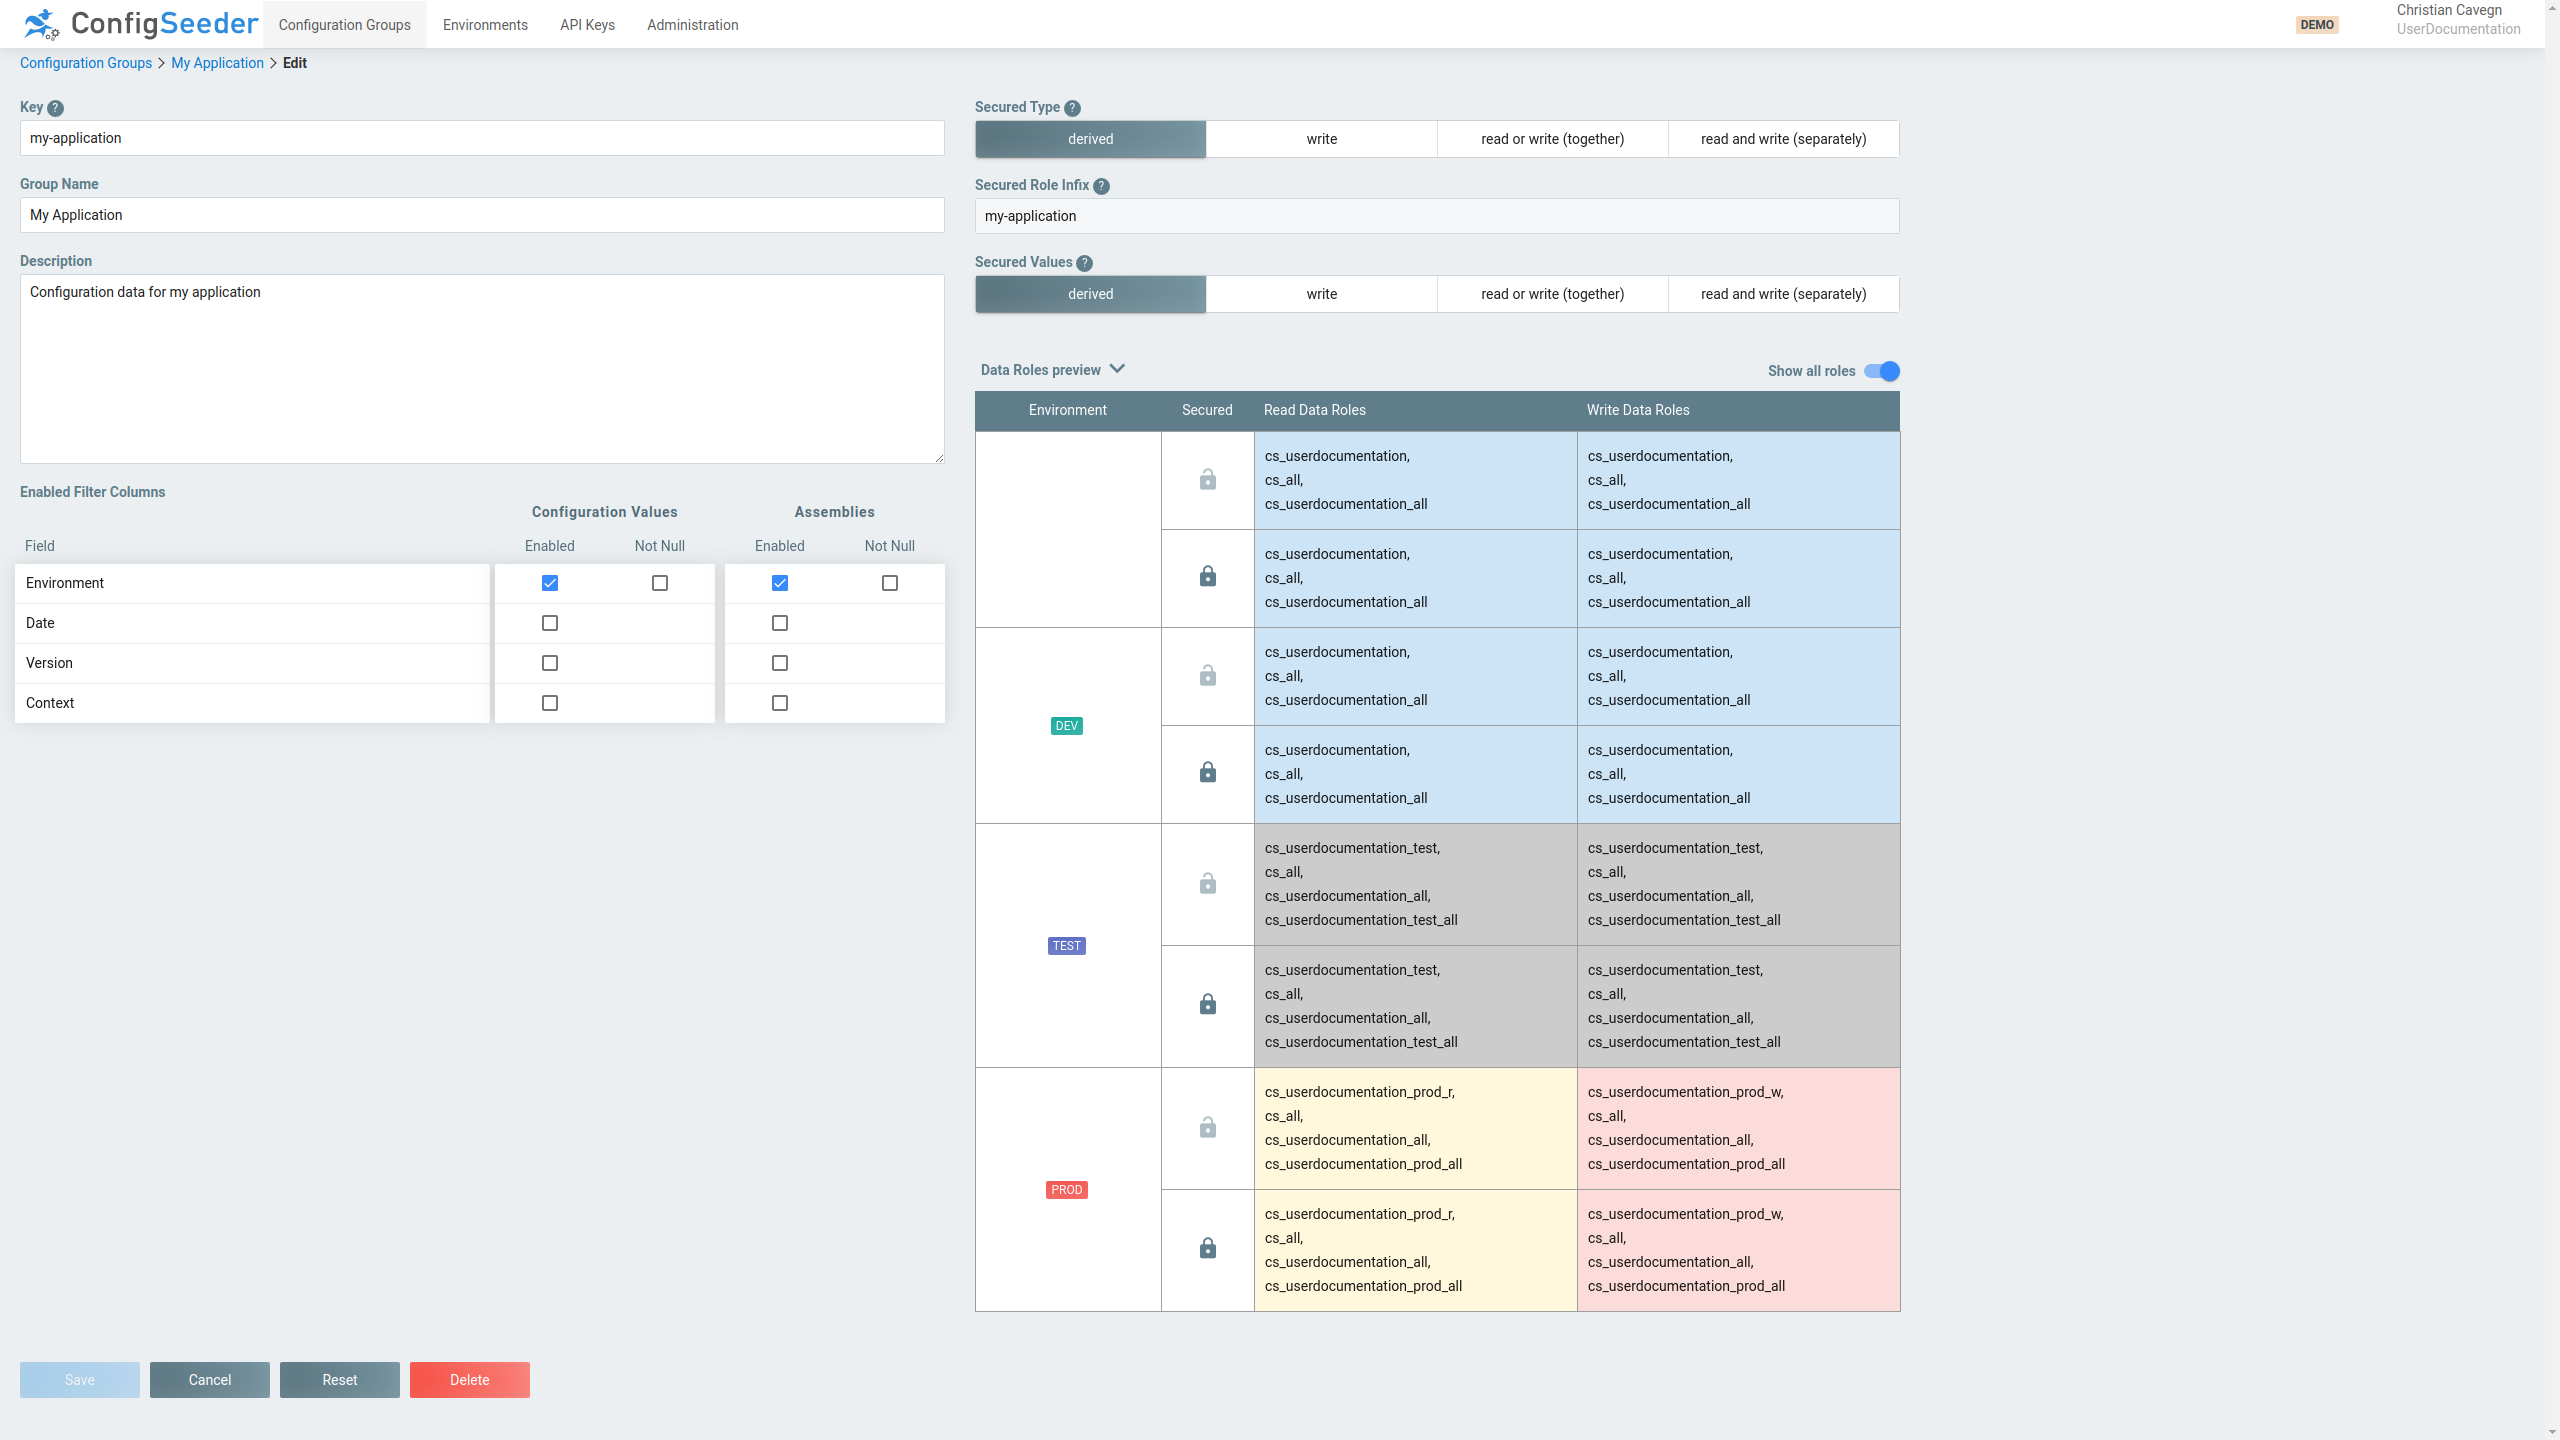
|
Be carefull with granting users the default roles.
As you can see in the last screenshot, users with the default role |
2.9.5. Best practice
The recommendations listed below are based on real usecases of ConfigSeeder®. However this doesn’t mean that you have the same requirements as other customers. Try to use the recommendations as a baseline and improve the setup so that it meets your requirements.
-
Environments
-
Only protect environments that really need to be protected. This is usually production and sometimes pre-production.
-
Use the key of the environment as restriction element
-
If a user either can read/write data configured for an environment or not, use access mode
read or write (together) -
If some user can read data configured for an environment and a subset of these users are also allowed to change data, use access mode
read and write (separately)
-
-
Configuration Groups
-
Only protect configuration groups that need to be protected.
-
If groups/teams of developers are responsible for managing more than one application, use the name of this team as security infix.
-
If a user either can read/write data configured in a configuration group or not, use access mode
read or write (together) -
If some user can read data configured in a configuration group and a subset of these users are also allowed to change data, use access mode
read and write (separately) -
If all users should be able to see data but only a few are allowed to change data, use access mode
write.
-
-
Secured Values
-
Only a restricted few users will probably have access to secured values (read and write access)
-
If so, use access mode
read or write (together)for the secured values
-
3. Manage ConfigSeeder
3.1. Manage License
3.1.1. Description
The license applied to ConfigSeeder® Management is required to use ConfigSeeder® and determines which features can be used:
-
Number of Tenants
-
Number of Environments
-
Number of Configuration Groups
-
Number of API Keys
-
Licensed Features (Connectors, …)
-
Supported Databases (PostgreSQL, MSSQL, …)
If the license expires, ConfigSeeder® Management can only be used in readonly mode until the license is renewed. The system will still return configuration data, but you won’t be able to change the configuration data when no valid license is available.
|
Please see our license terms about what rights and obligations are associated with the use of a ConfigSeeder® license. |
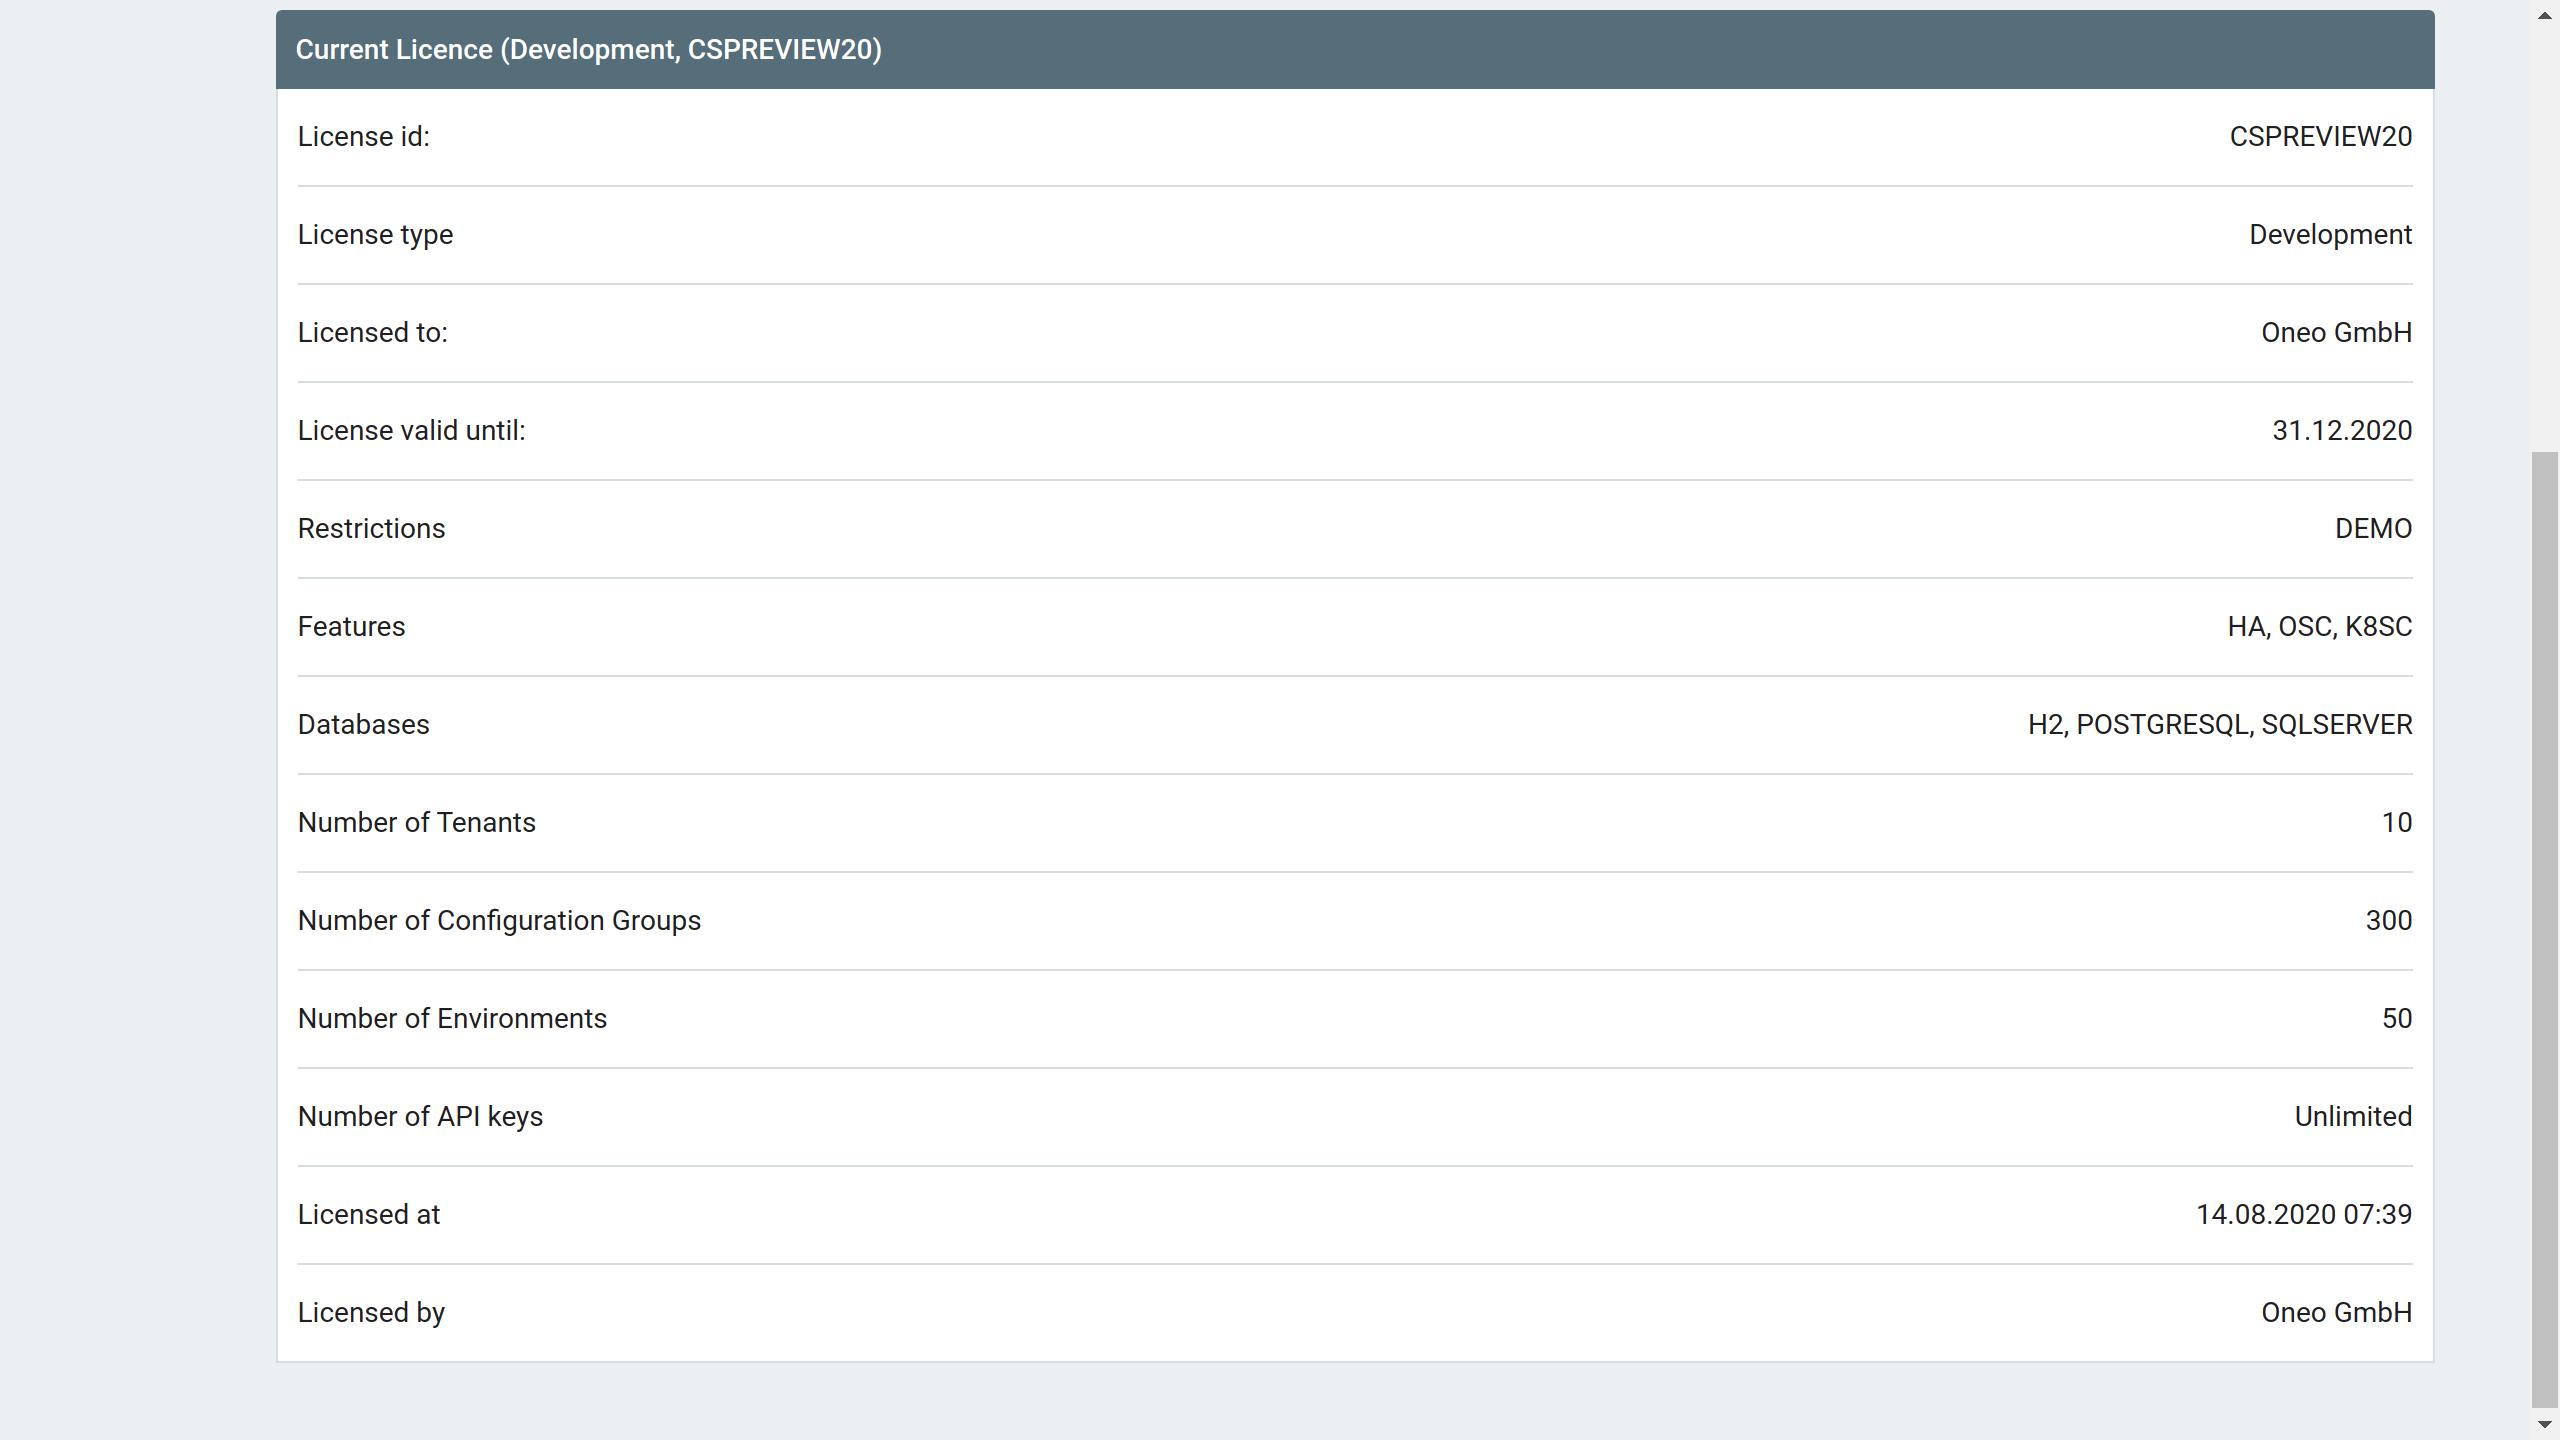
3.1.2. Get license details
-
Open the menu point
License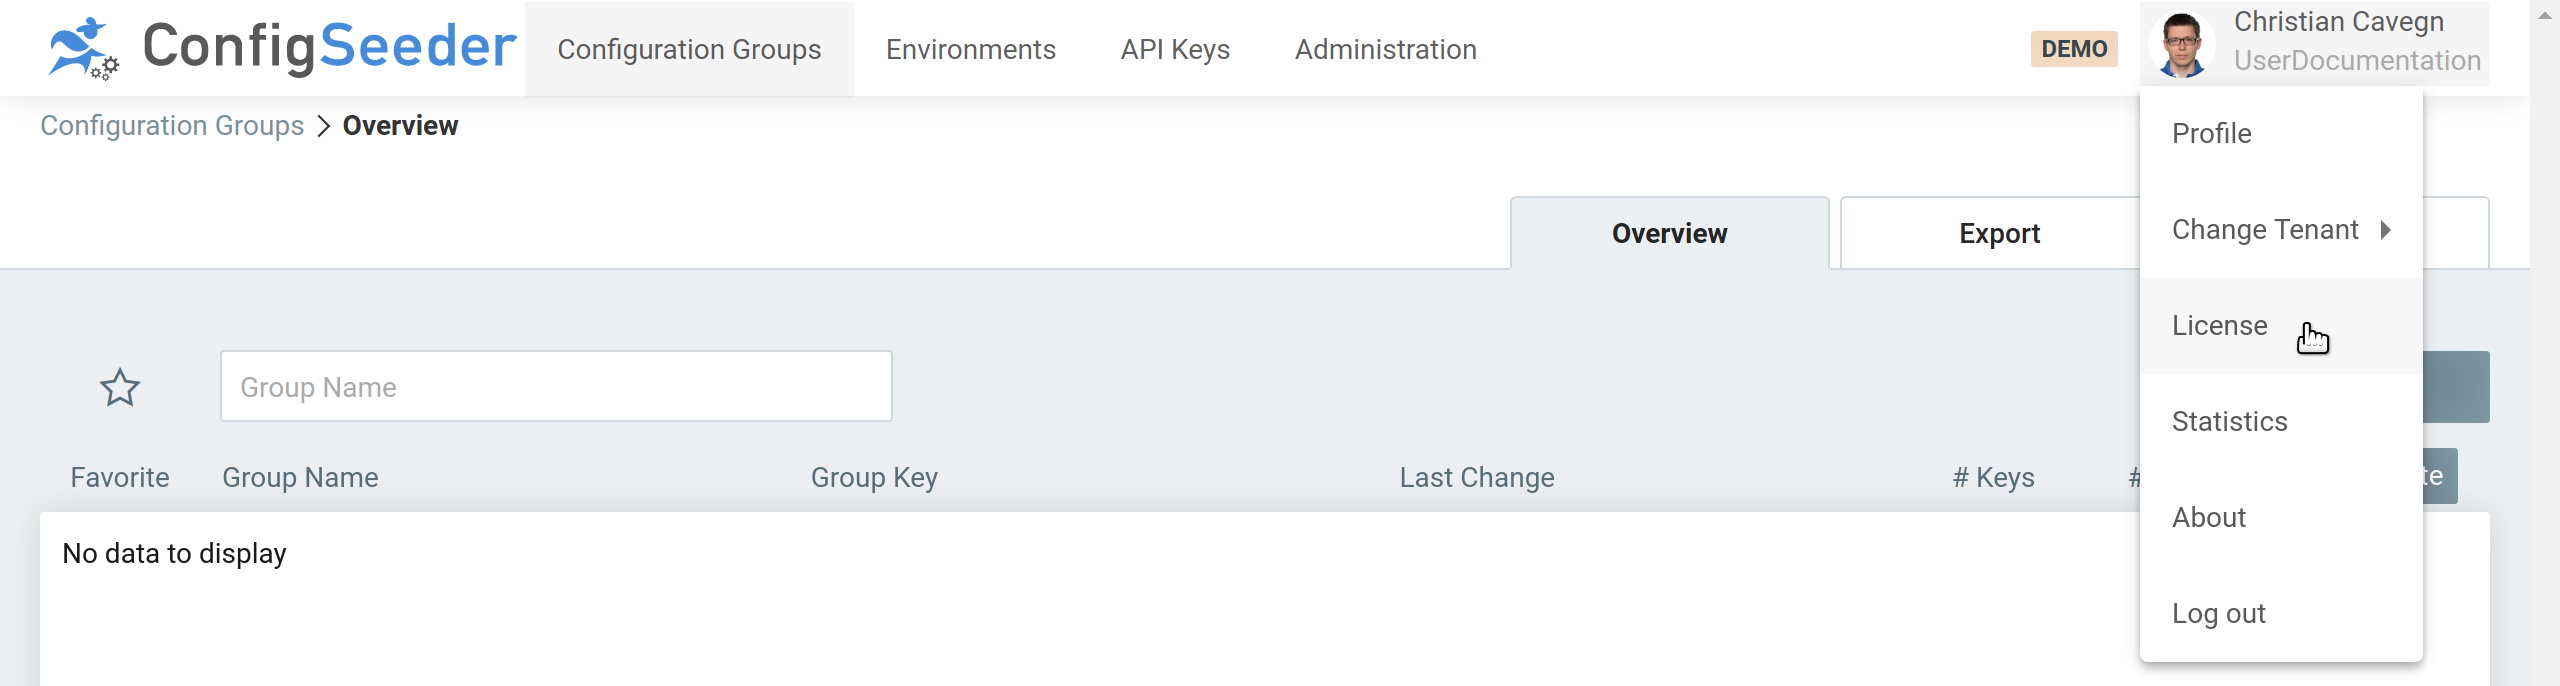
-
The license page shows all details of your current license
3.1.3. Add and renew license
Adding the first license or updating an existing license works the same:
-
Open the menu point
License -
Select the file containing the license or just paste your license to the input field
-
Compare the details and limits of the new license
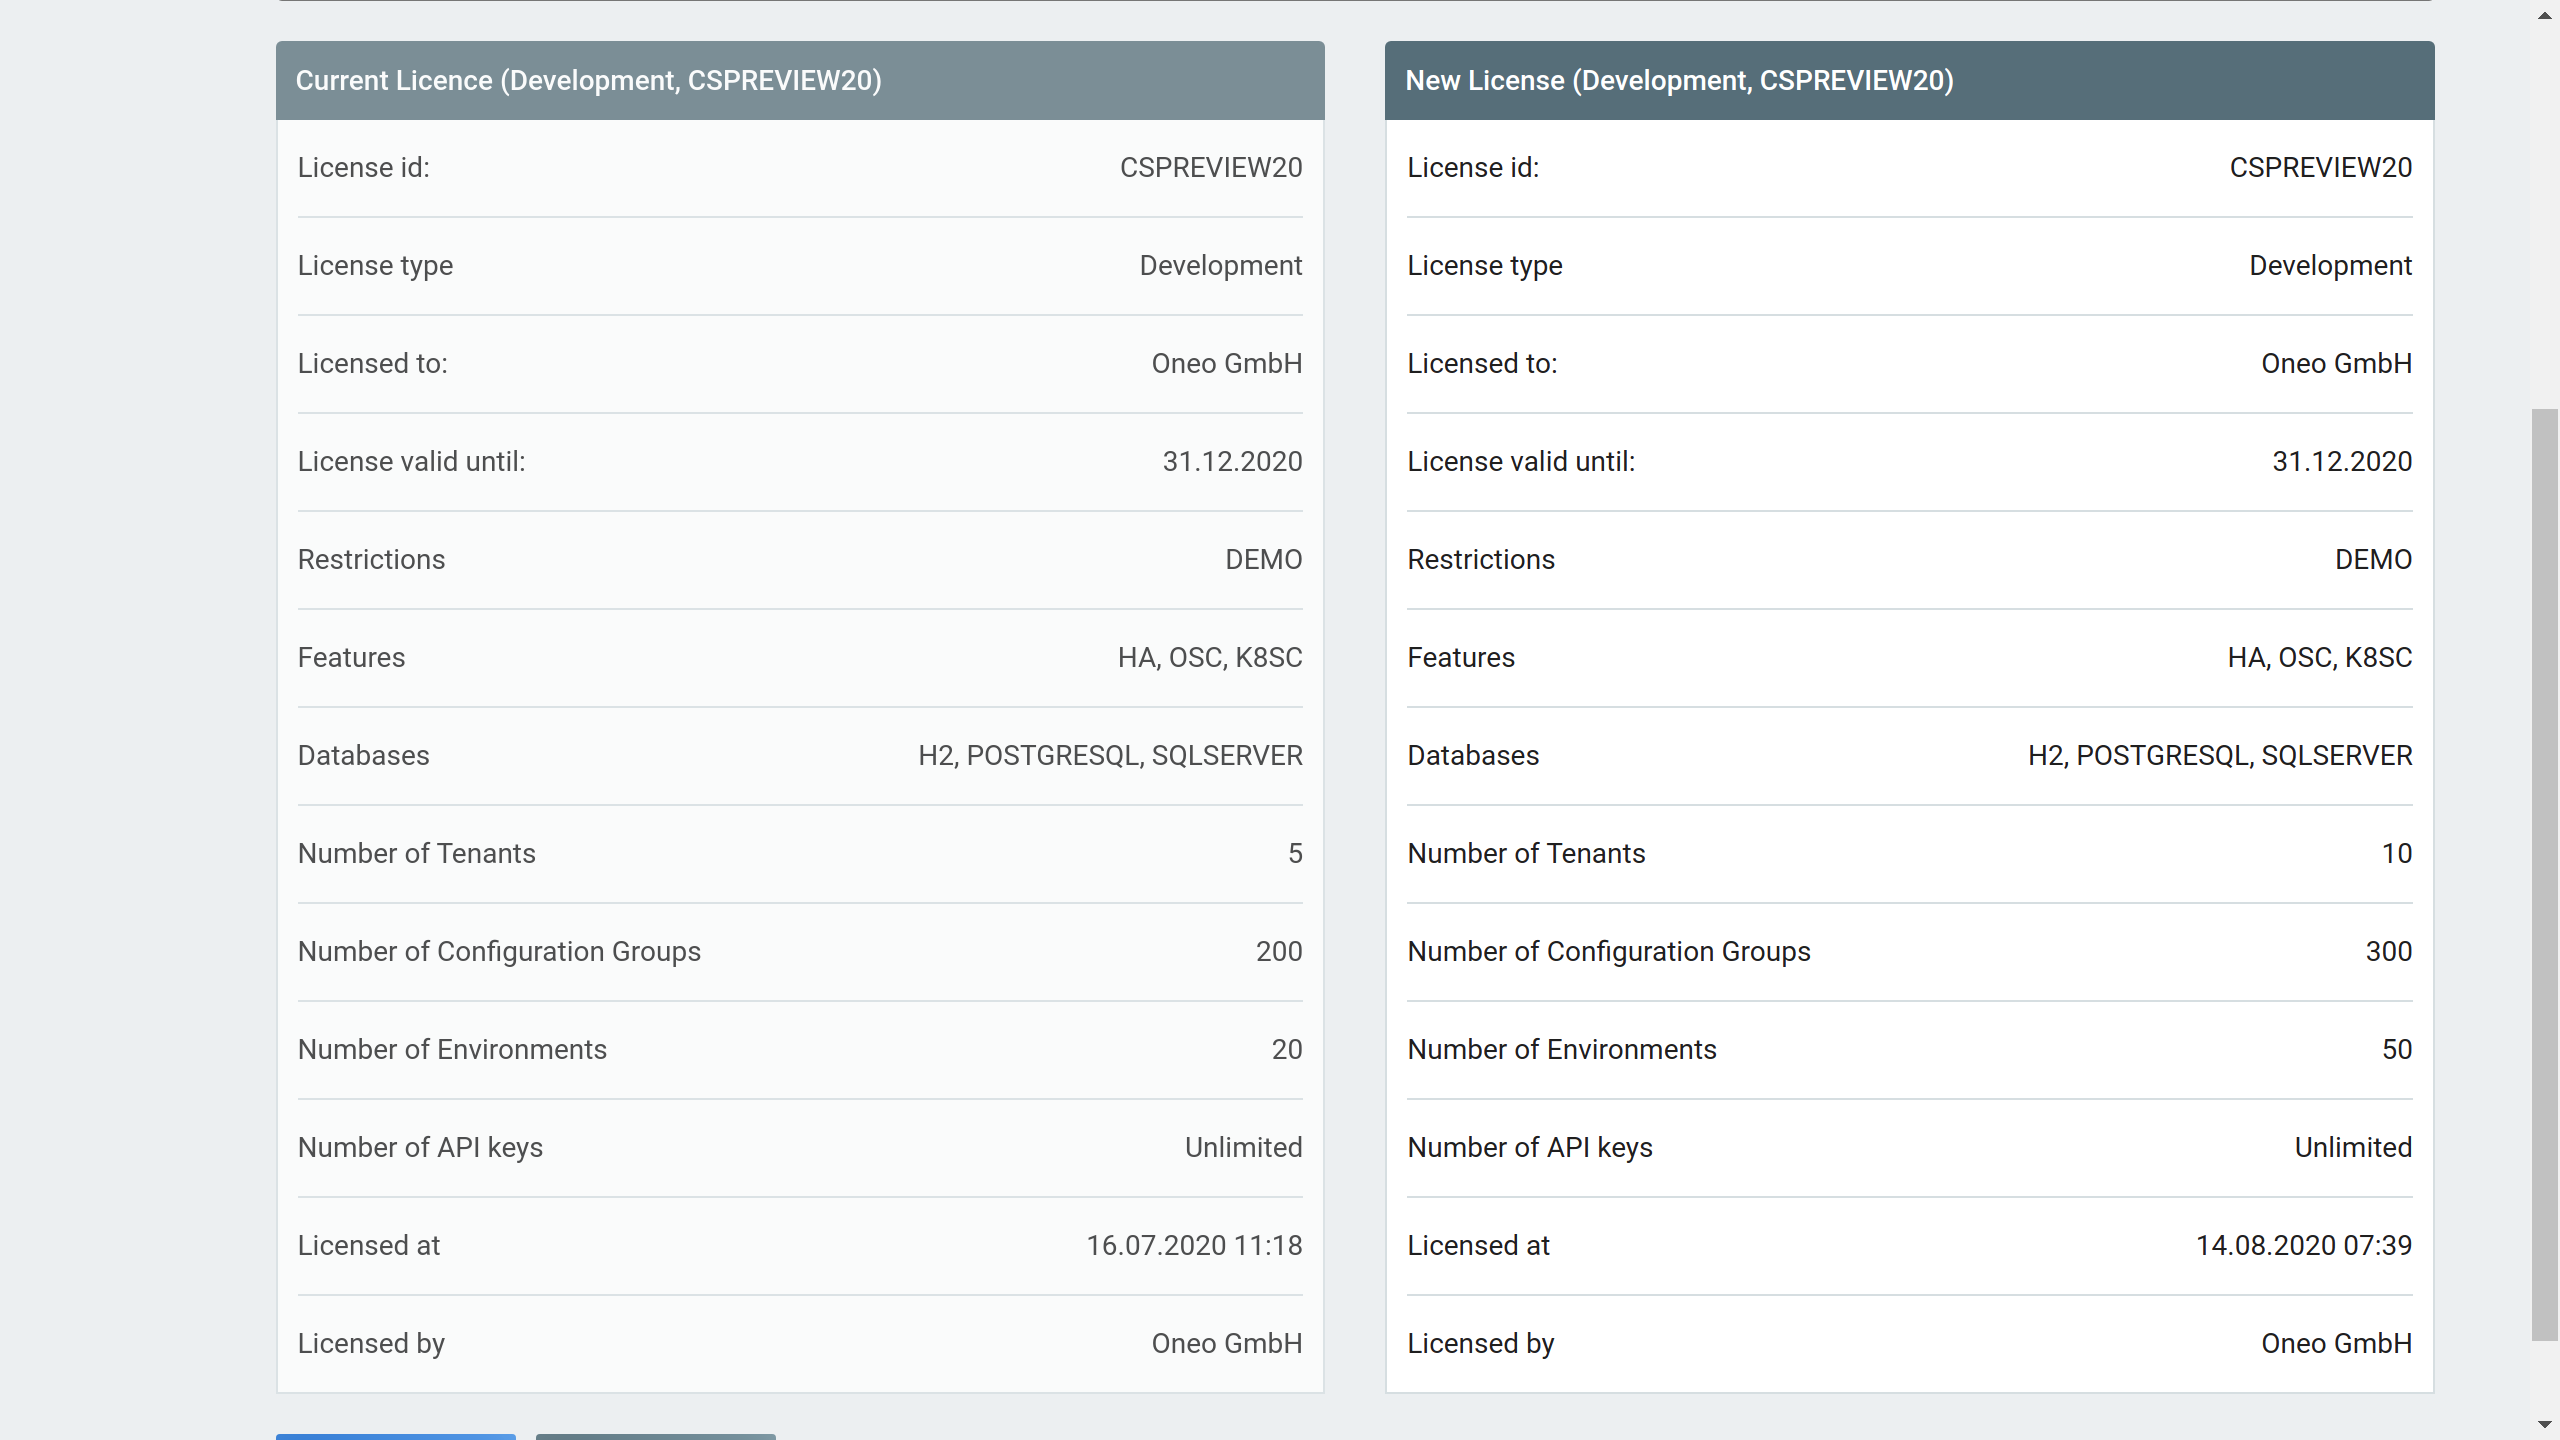
-
Apply the new license
|
When updating a license, you should check the following details and restrictions:
|
3.1.4. Access management
For managing the license, the following Functional Roles can be used:
| Operation | Required Functional_Role and/or Permission |
|---|---|
Read |
No Permission is required, user has to be logged in. |
Add/Update |
|
3.2. Manage Environments
3.2.1. Description
Environments are used to restrict the validity of a configuration value to a stage or environment. Also see the concept description for environments.
3.2.2. Show existing environments
-
Click on the navigation point
Environments
-
The environments overview page shows an overview of the existing environments.
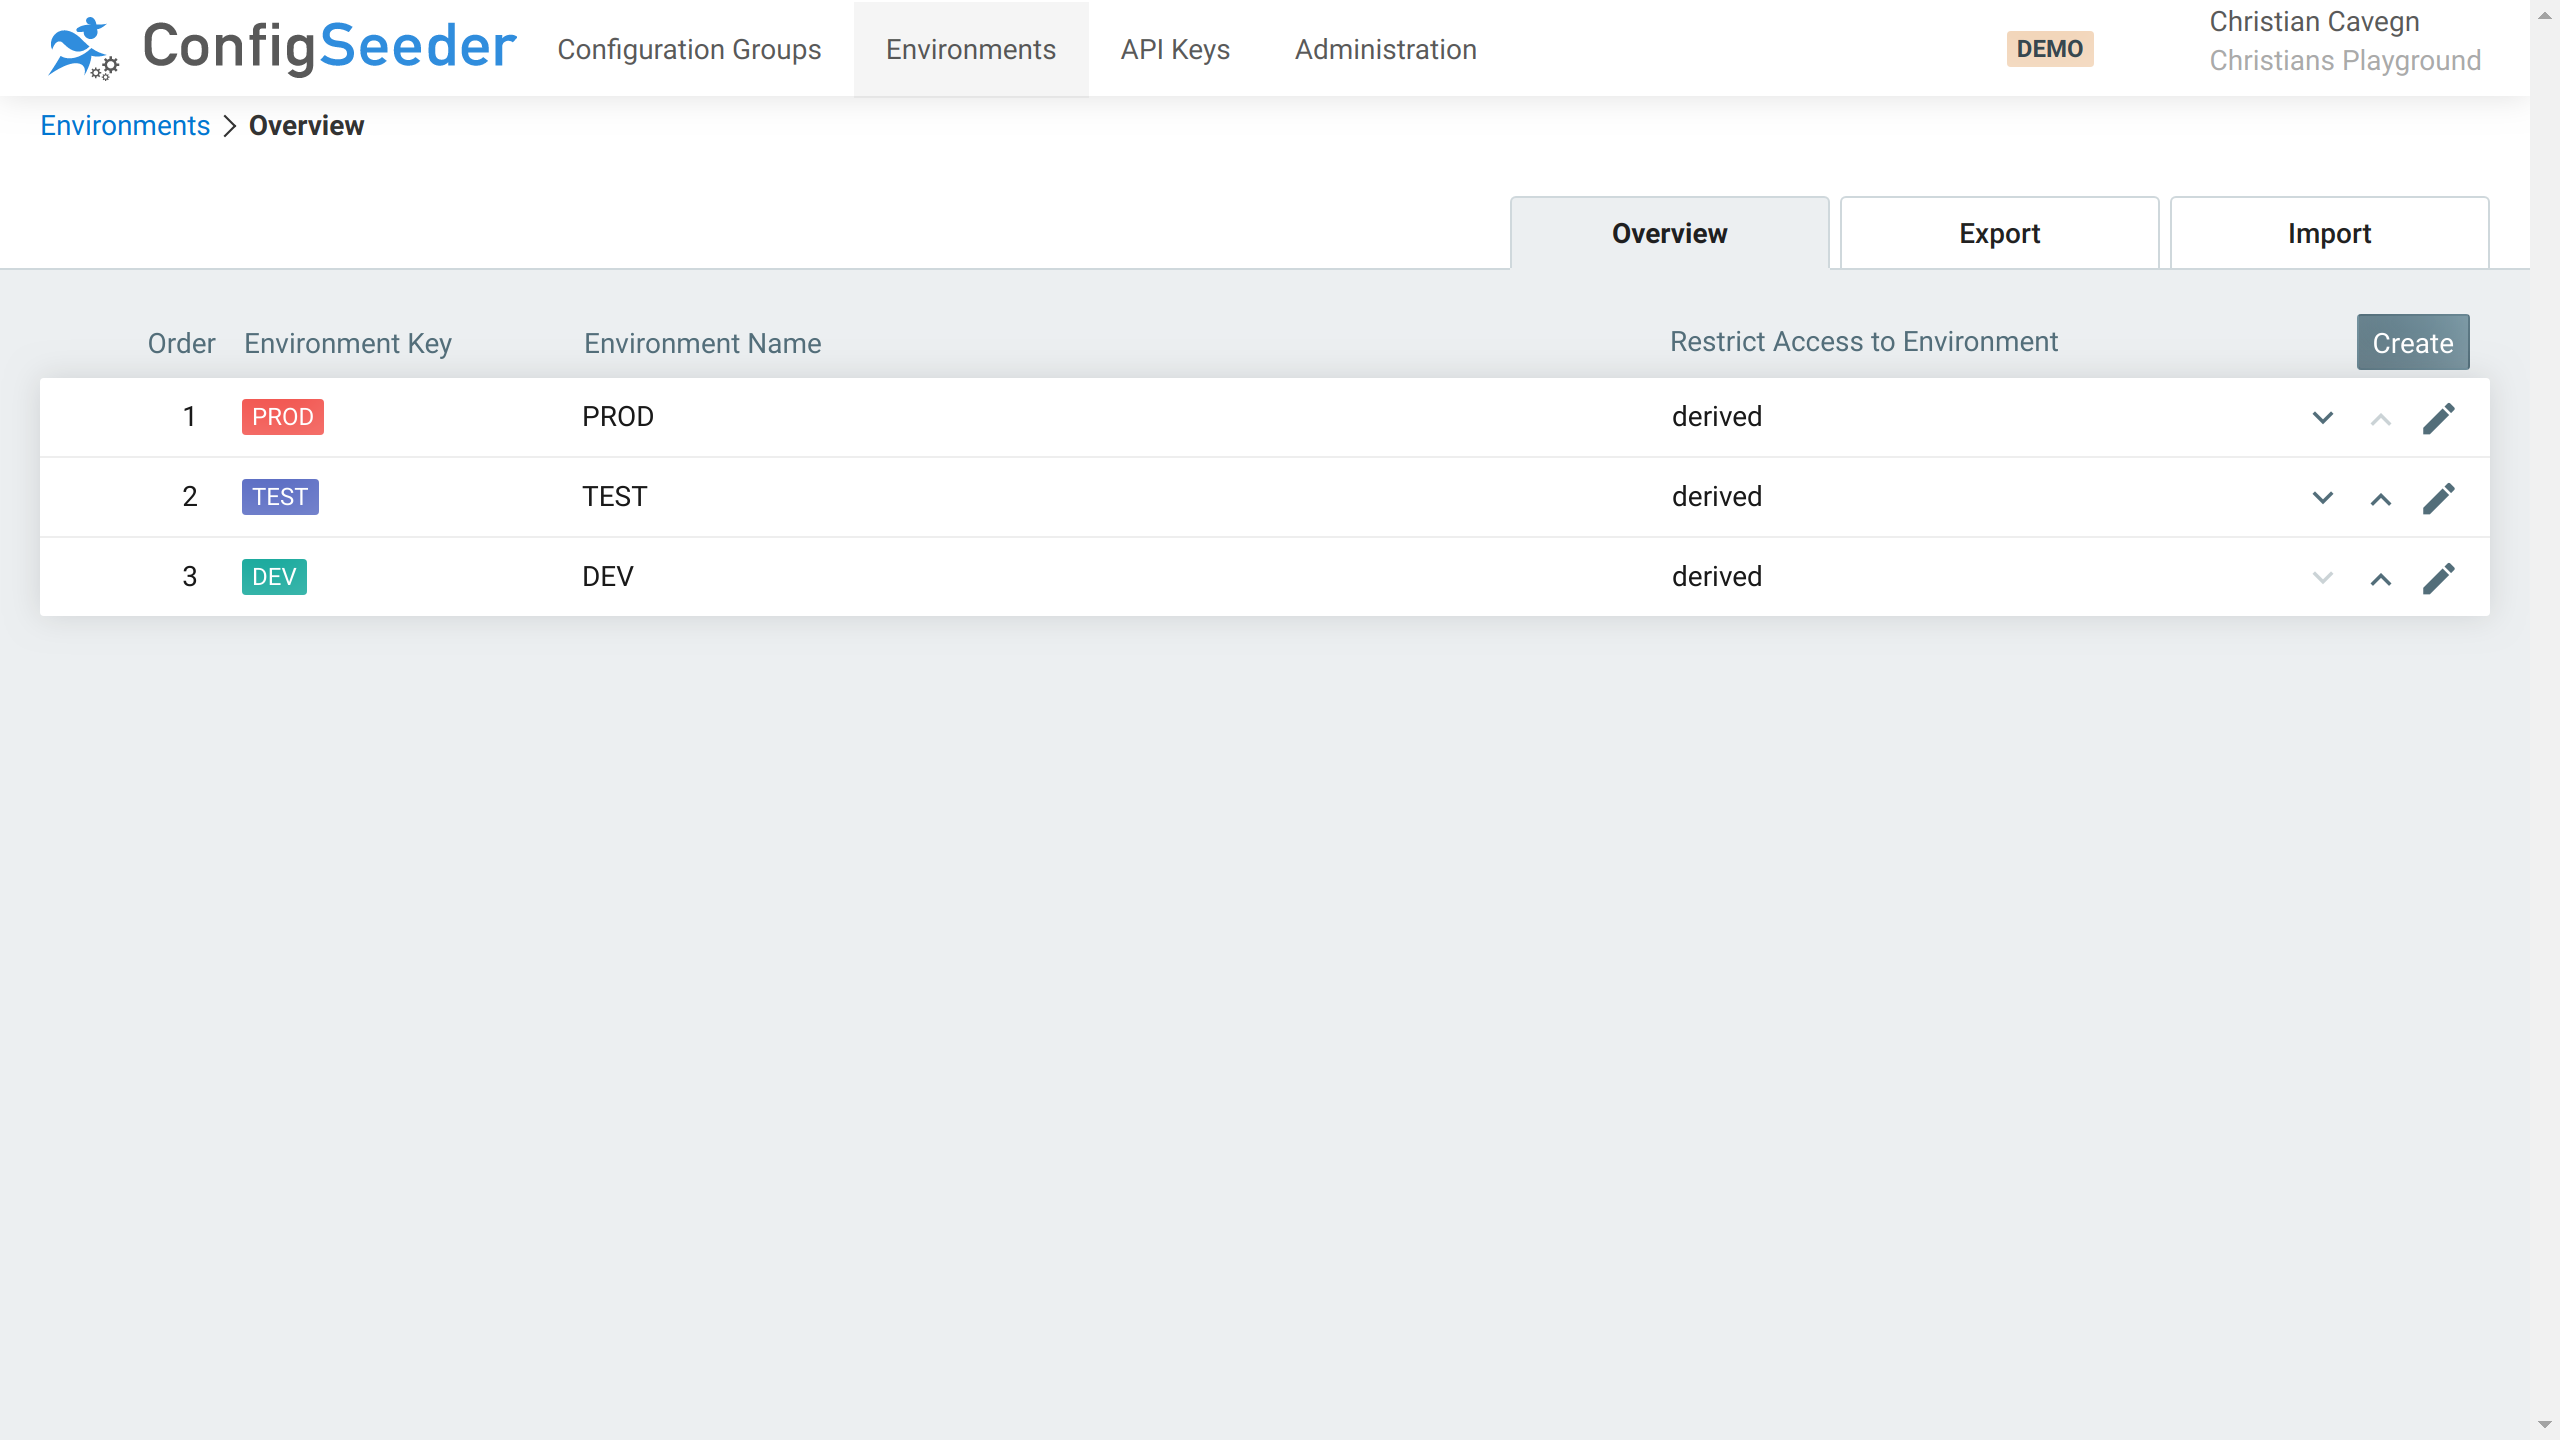
The environment overview page shows the following information:
-
All environments are shown, even if you don’t have access to see configuration values assigned to an environment.
-
Environments are represented by colored ribbons. You will see these ribbons at multiple places, see for example the Configuration Value or API Key overview page.
-
The Key of the environment is used to retrieve configuration data for a specified environment.
-
The restrict access column shows which permissions are required to access configuration values for the environment. See access management for more details.
3.2.2.1. Available Actions
| Icon | Description |
|---|---|

|
Edit the environment |
Move environment down in the sort order |
|
Move environment up in the sort order |
3.2.3. Create a new environment
-
Click on the navigation point
Environments -
Click on the
CreateButton -
Specify the details of the new environment
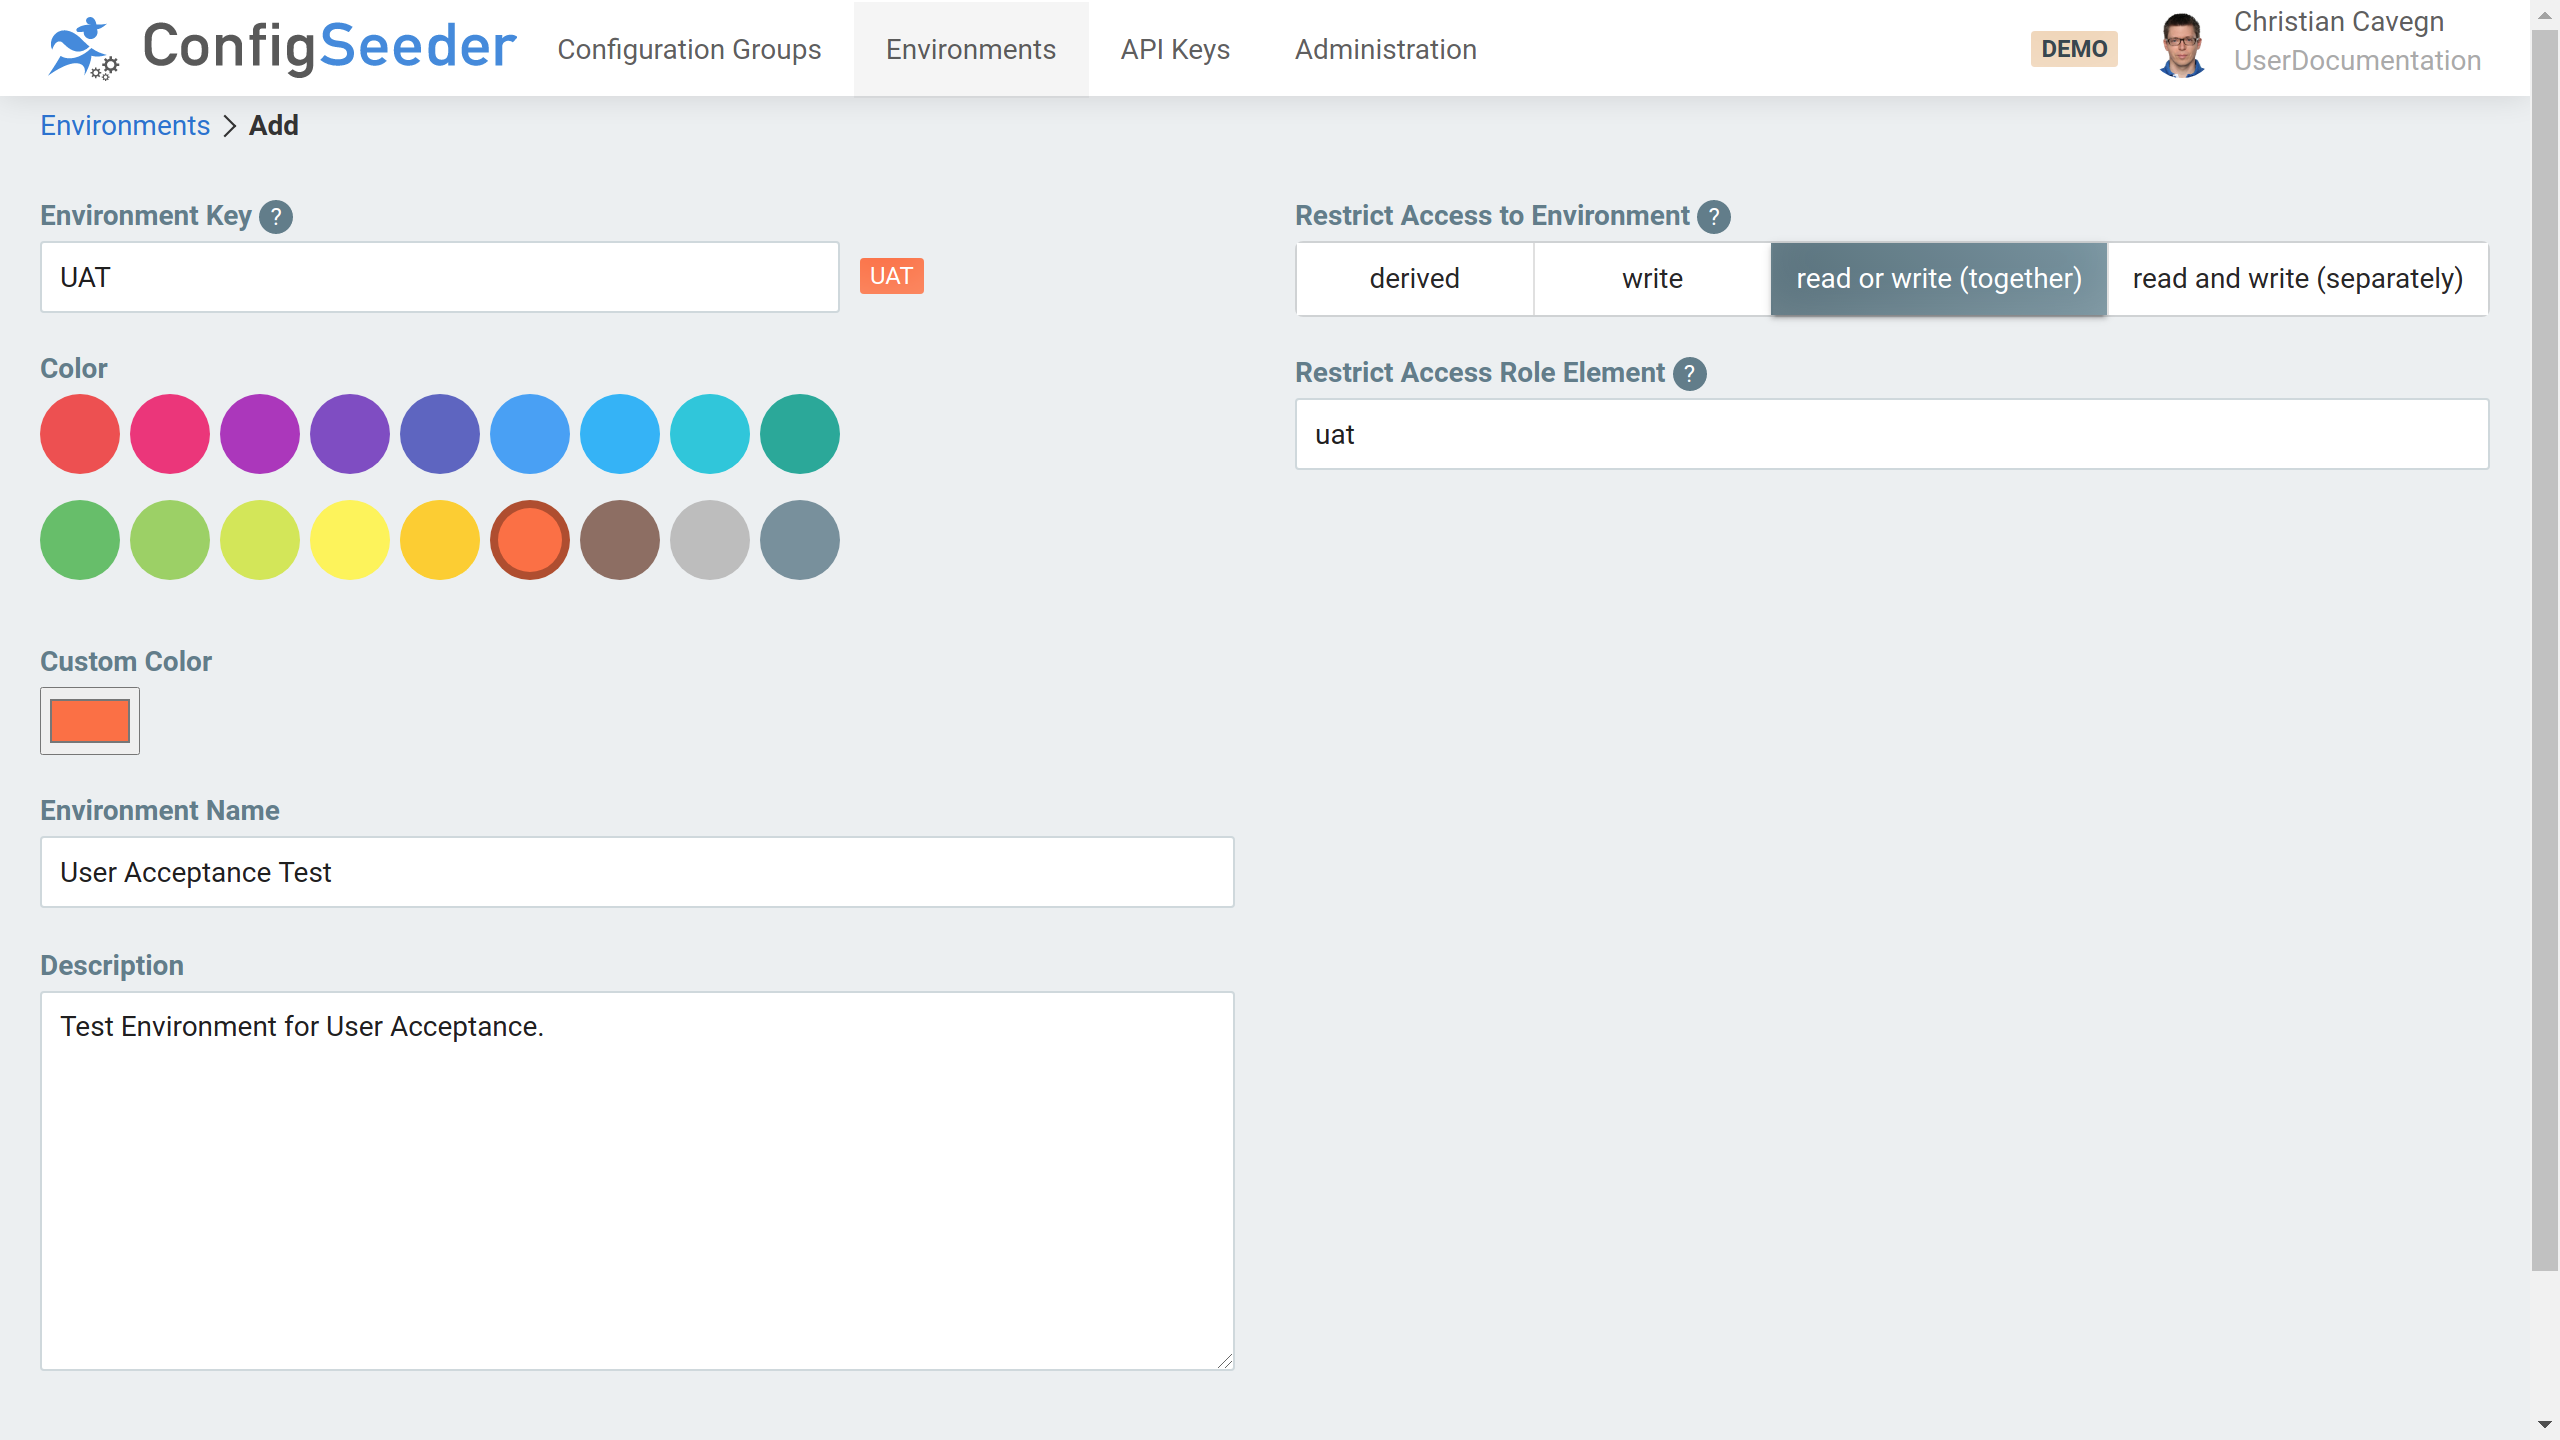
-
First of all, the
Environment Keymust be unique -
You can freely choose the color of the ribbon representing the new environment. It might be useful to choose a alarm colors like red or orange for the production and user acceptance test environment and calming colors like blue and green for dev and other test environments.
-
With 'Environment Name' you can write out how the environment is called. This attribute must not be unique.
-
With 'Description' you can tell for what use-cases an environment is used.
-
With the
Restrict Accessoptions you can define which permissions are required to access configuration values assigned to an environment. See access management for more details.
-
-
Create the new environment by clicking on the
Savebutton.
|
All data entered when creating an environment can be changed later on. |
3.2.4. Edit an existing environment
-
Click on the navigation point
Environments -
Click on the pencil-icon of the environment you want to edit
-
Change the environment like desired
-
Store changes by clicking on the
Savebutton.
3.2.5. Delete an existing environment
-
Click on the navigation point
Environments -
Click on the pencil-icon of the environment you want to delete
-
Delete the environment by clicking on the
Deletebutton.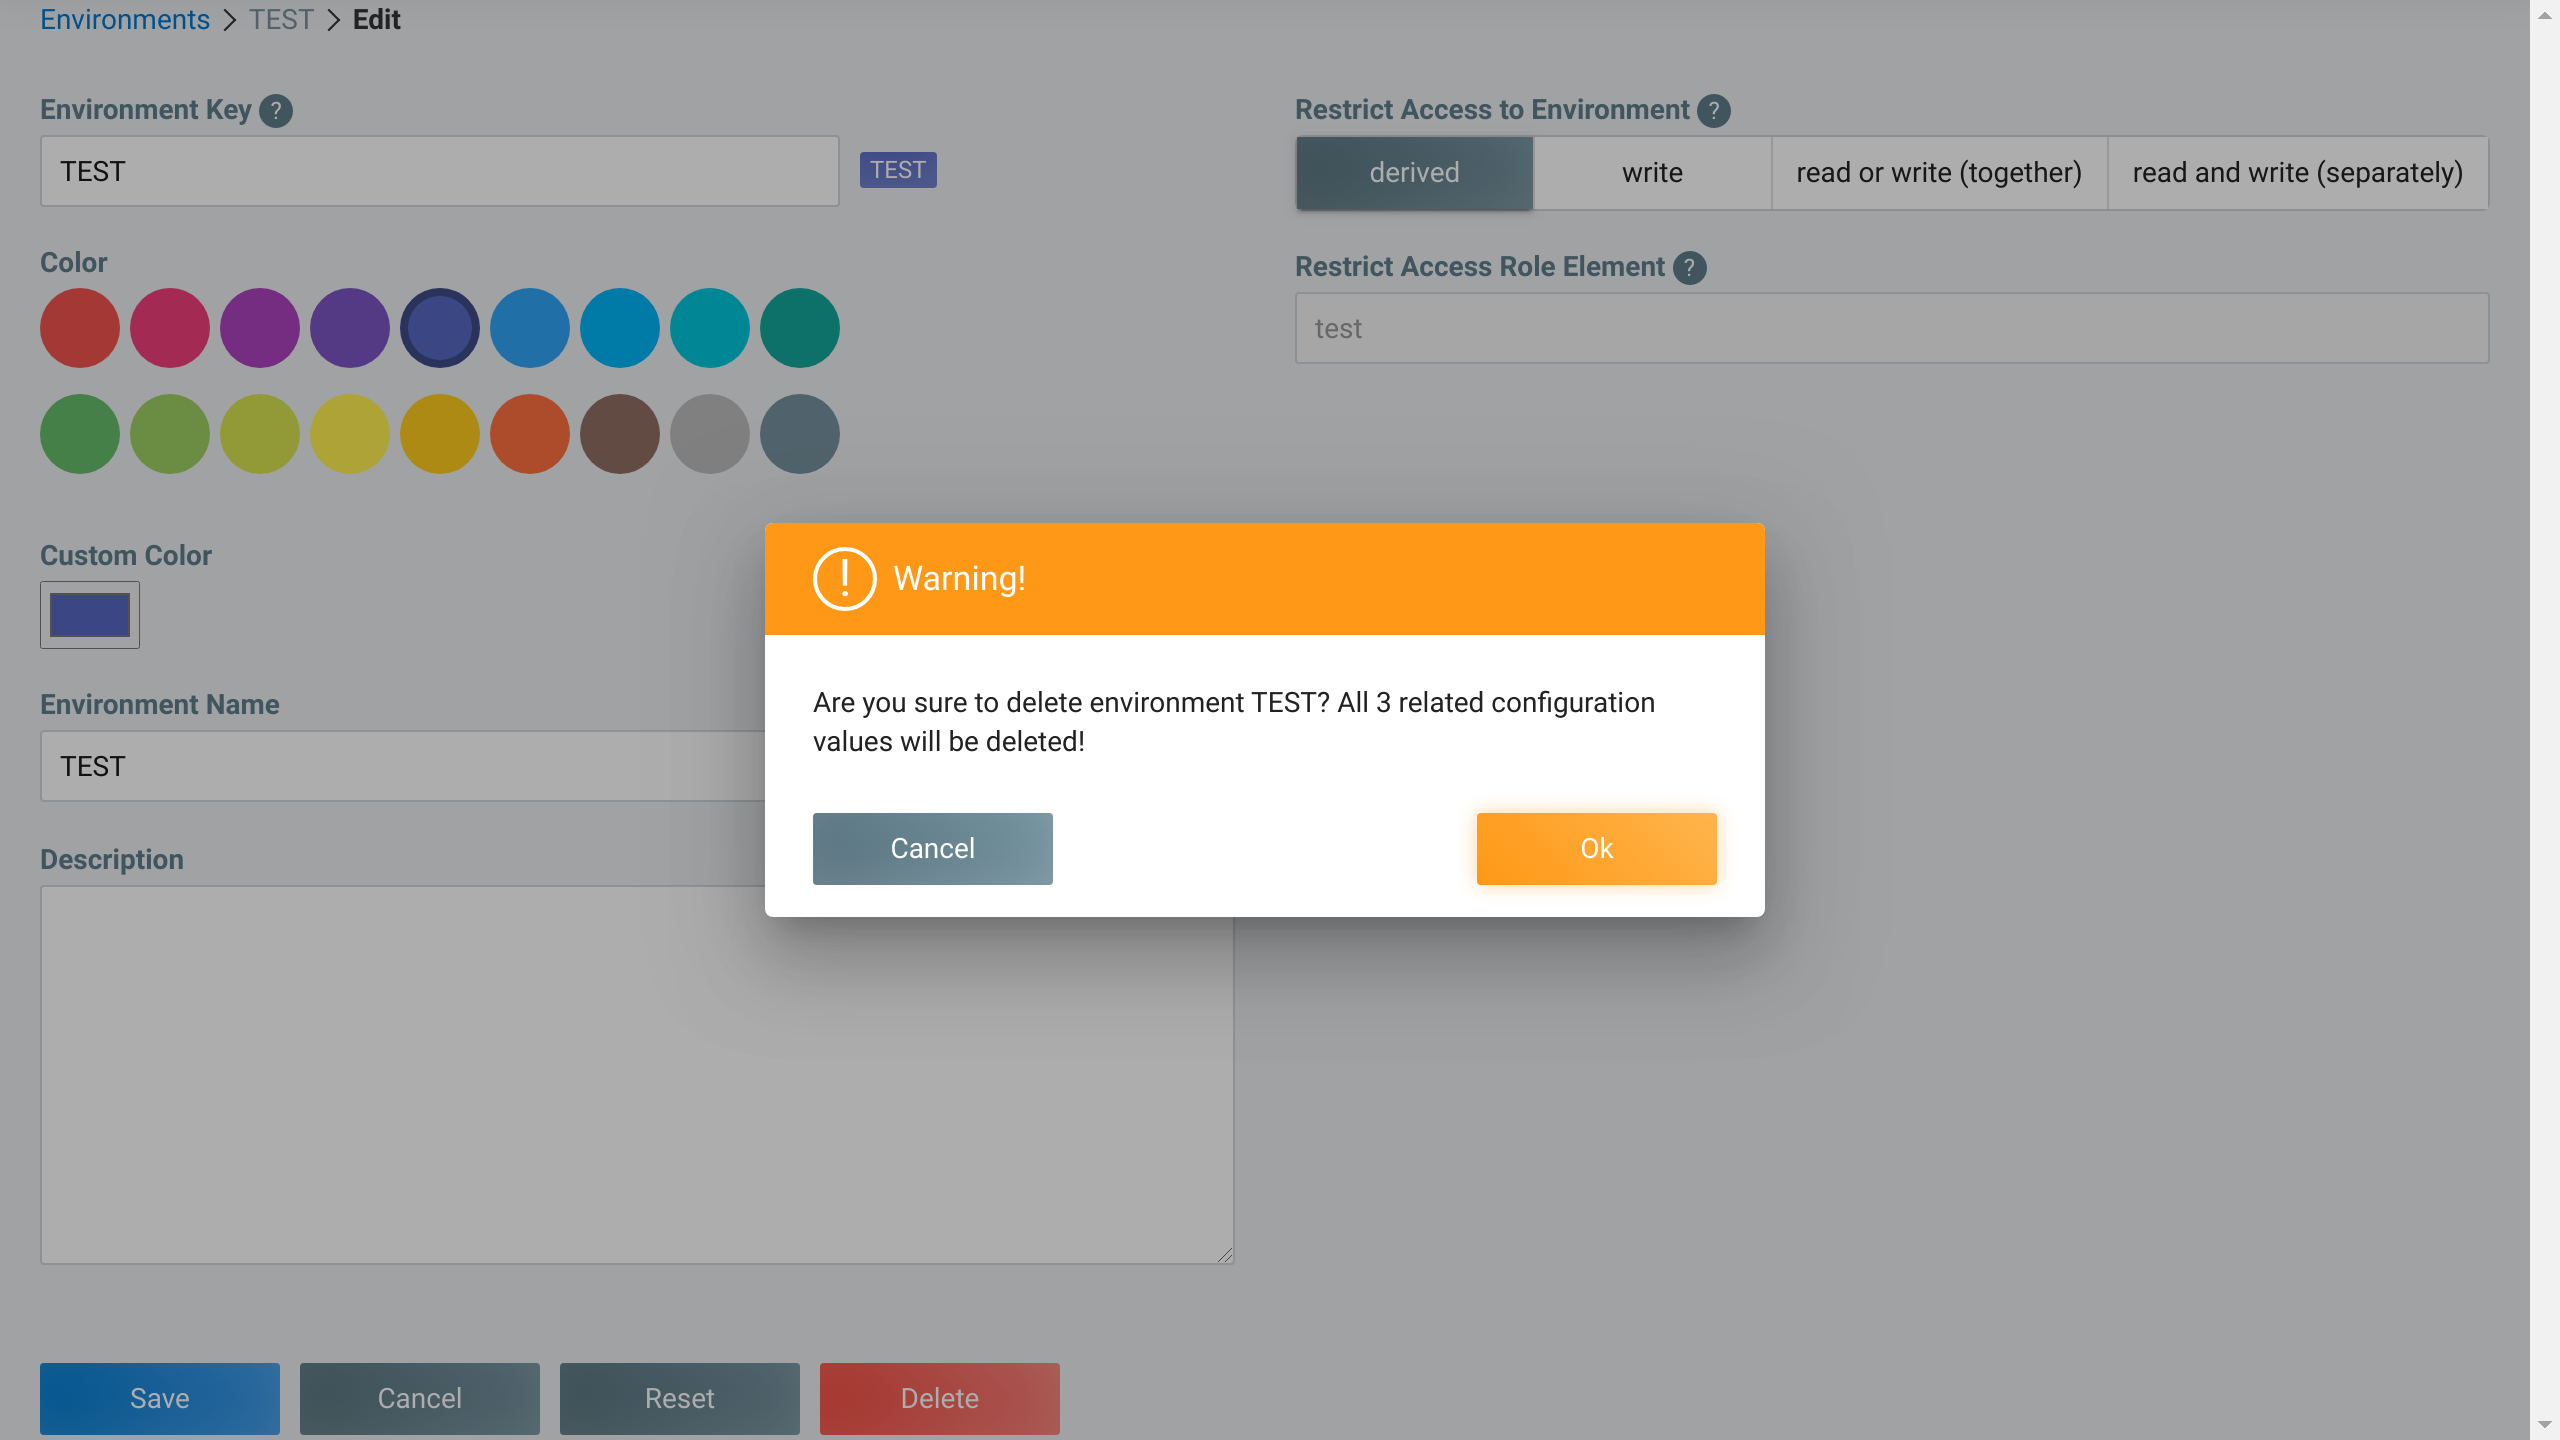
-
Accept deletion of the environment by clicking on the
OKbutton.
|
Be aware when you delete an environment, all configuration values assigned to this environment will also be deleted! |
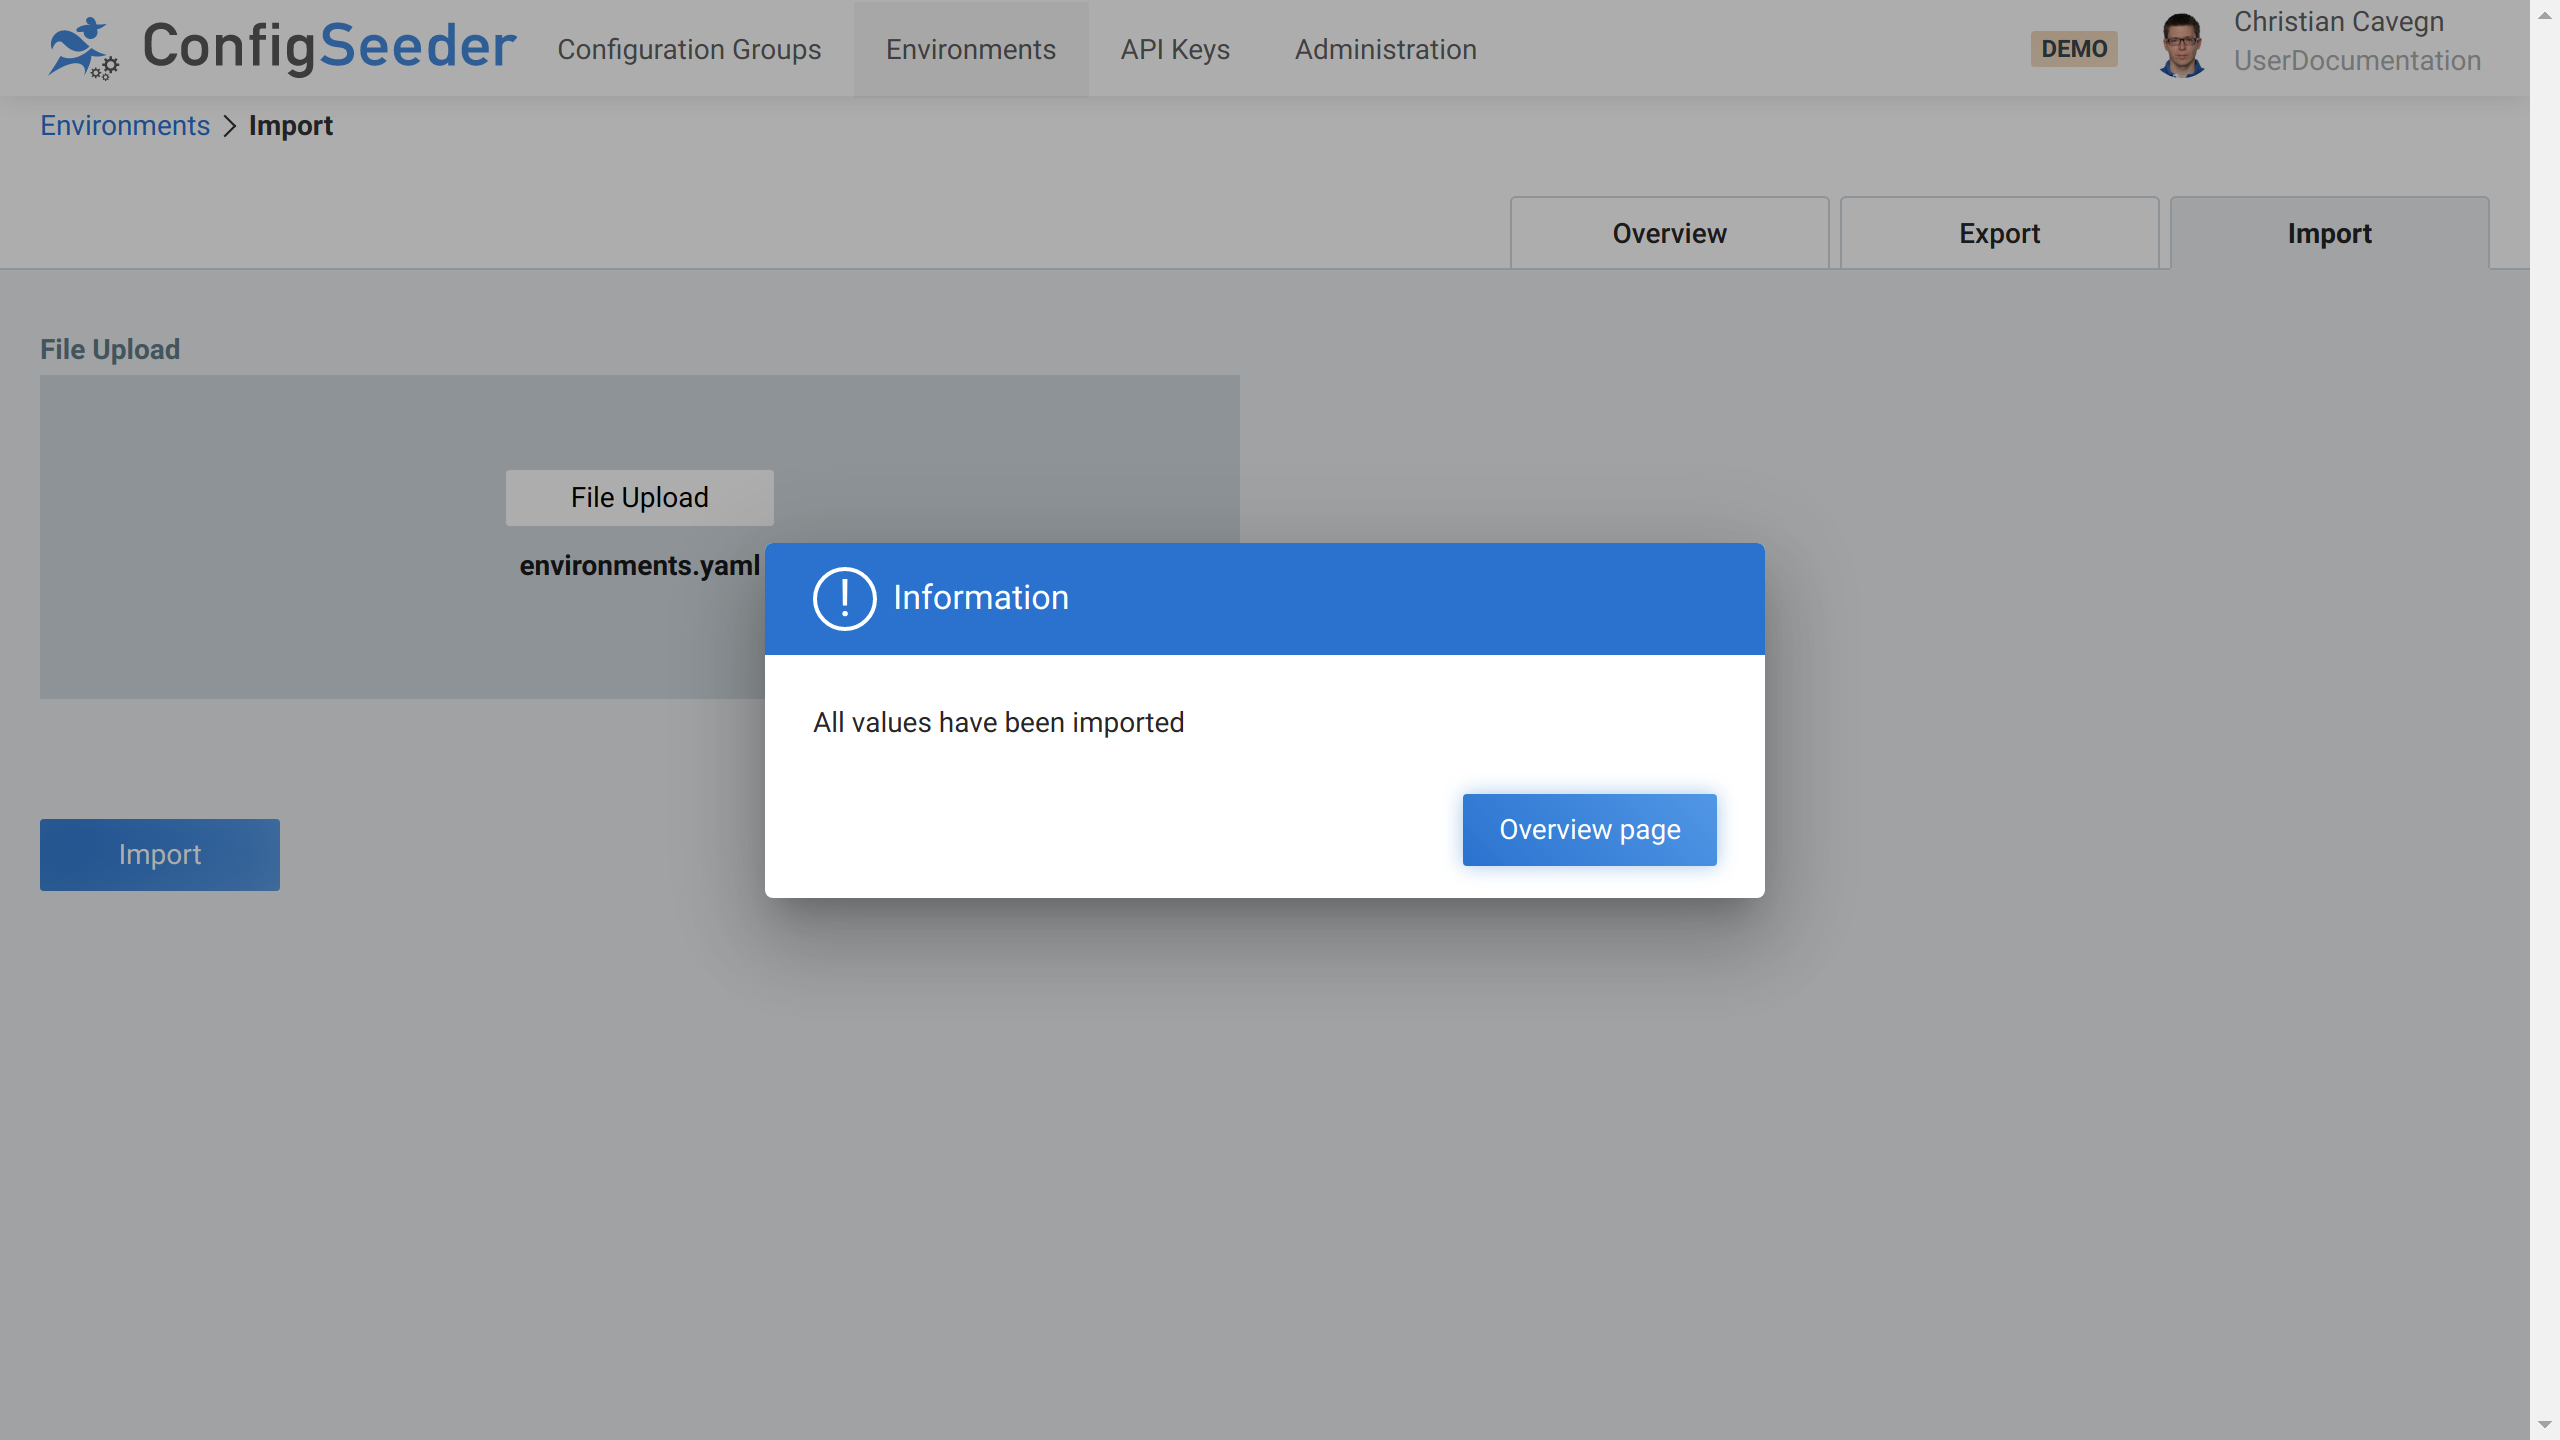
3.2.6. Import environments
Previously exported environments can be imported with ConfigSeeders® import environment functionality
-
Click on the navigation point
Environments -
Open the
Importtab -
Select the file containing the environments
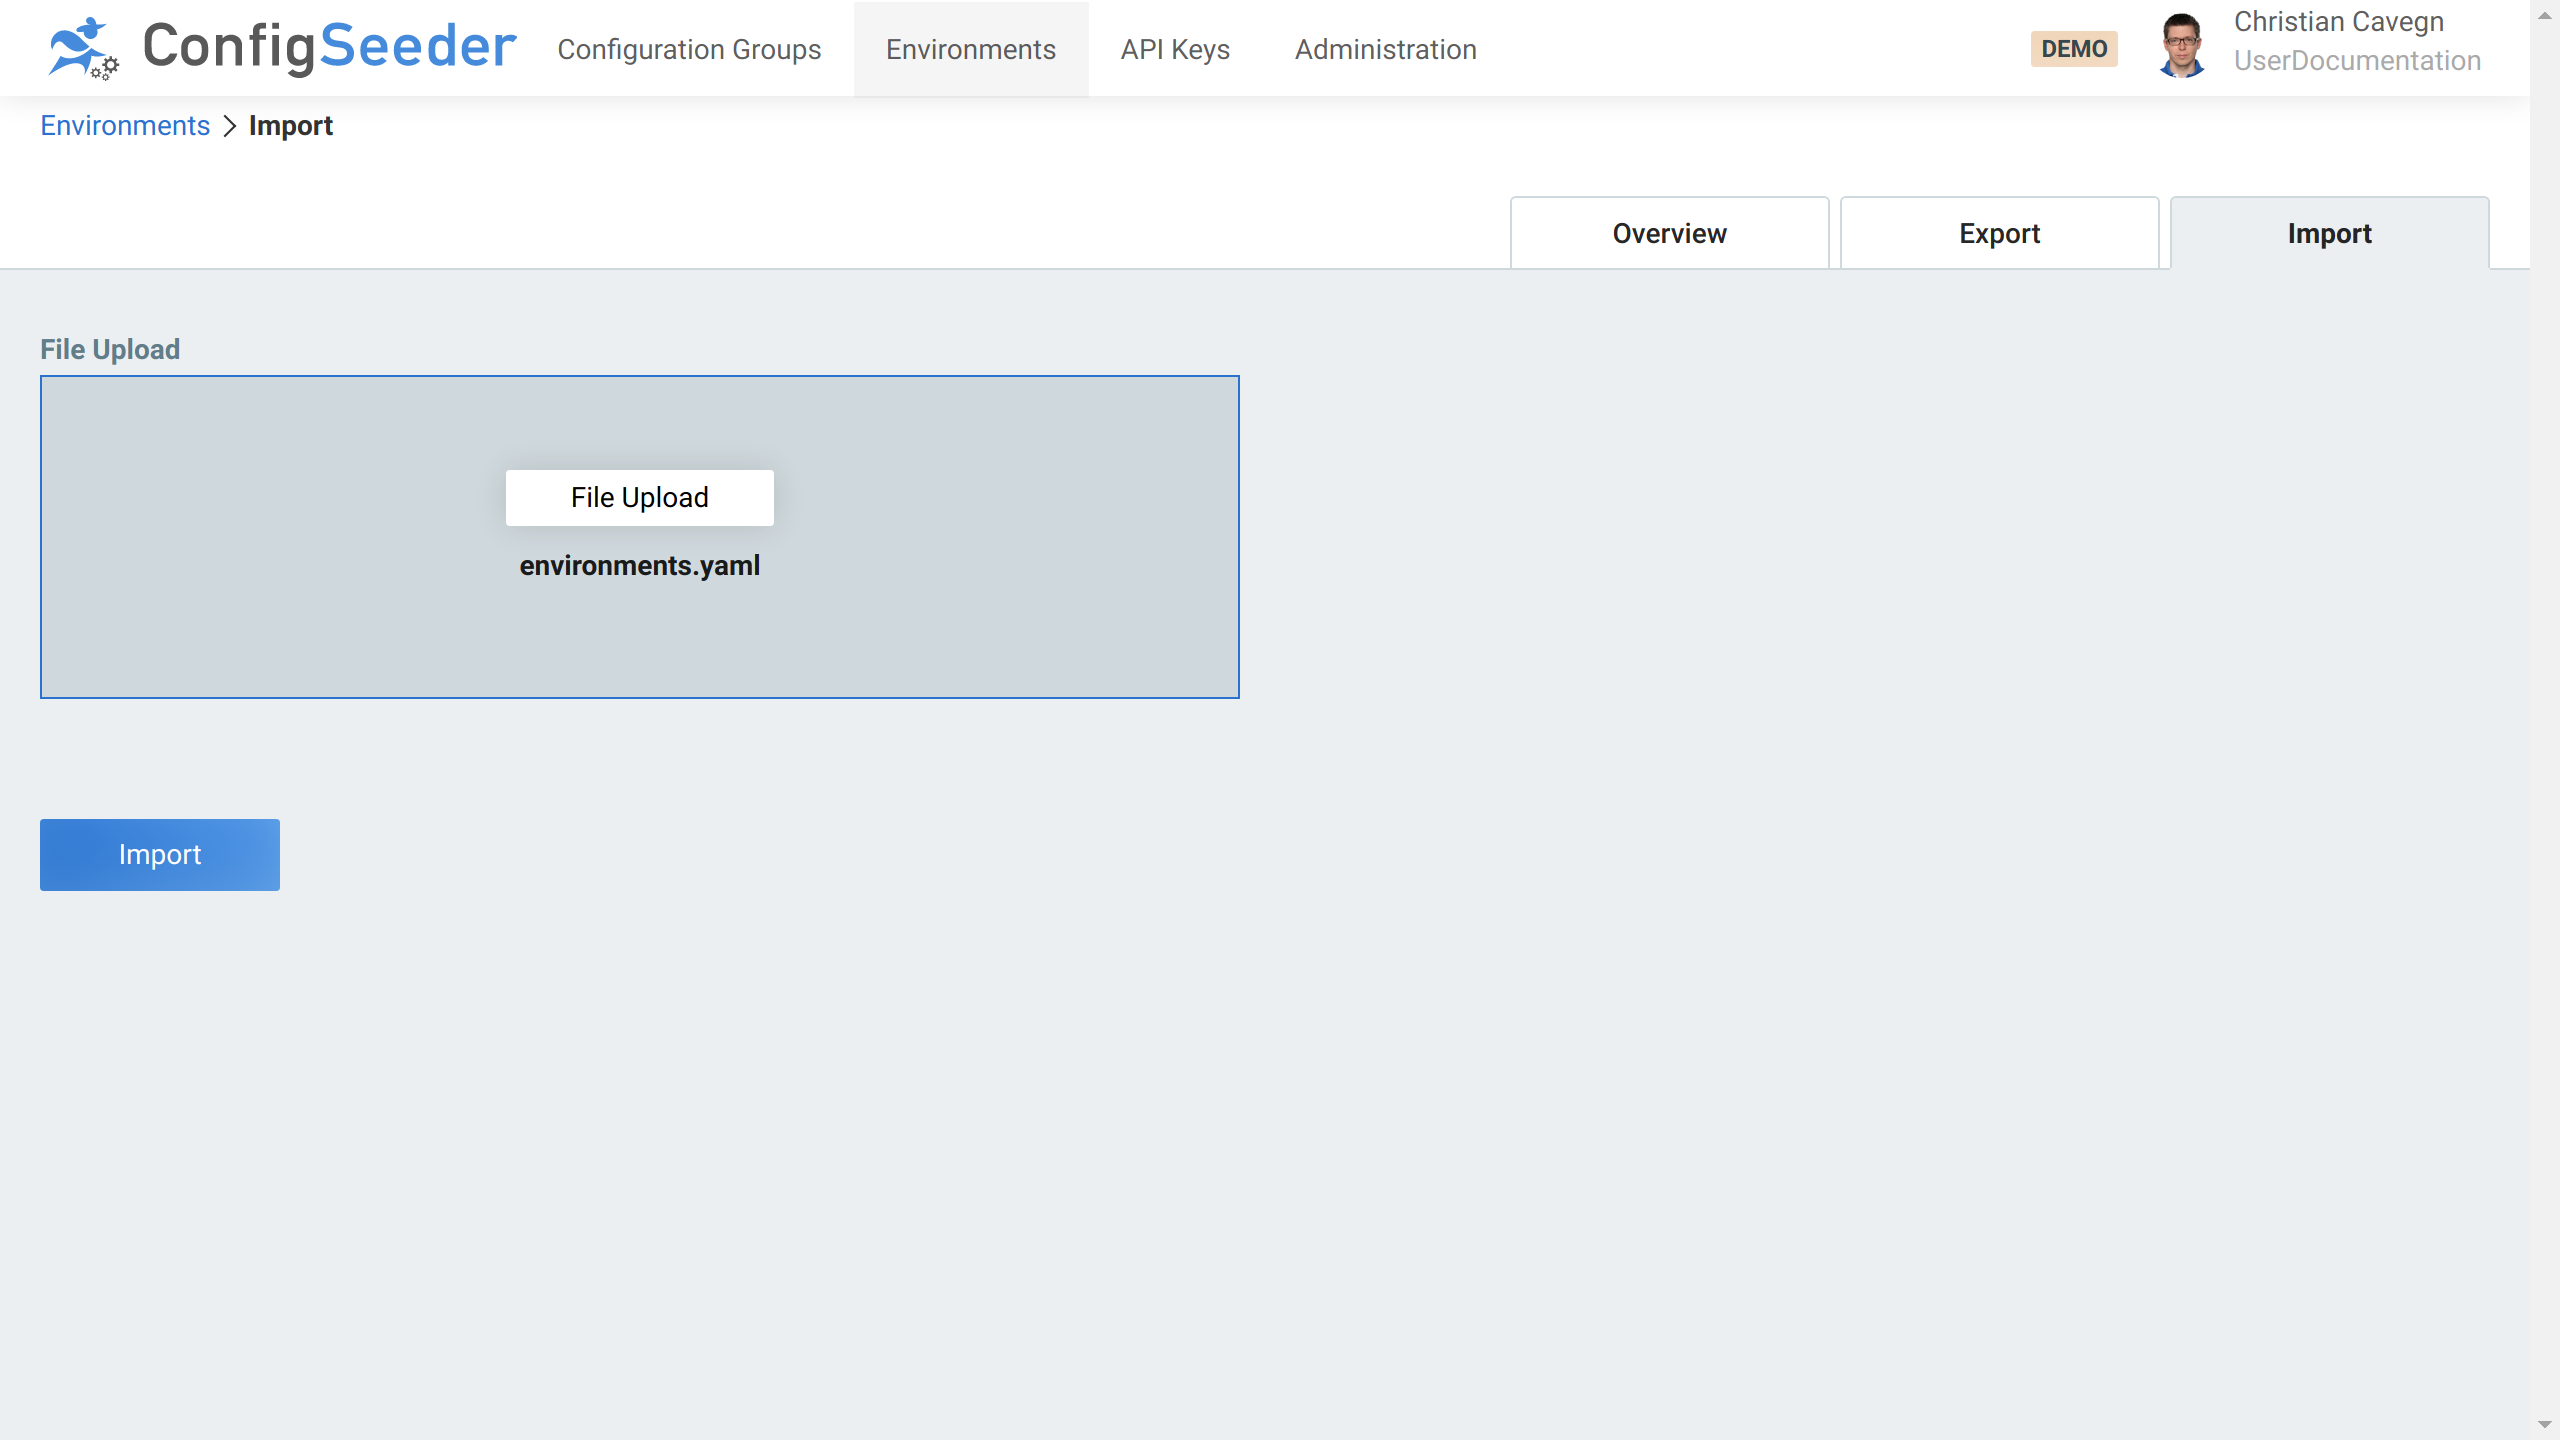
-
Click on the
Importbutton -
A popup will confirm that the environments were imported.
3.2.7. Export environments
Existing environments can be exported with ConfigSeeders® export environment functionality
-
Click on the navigation point
Environments -
Open the
Exporttab -
Hit the
Exportbutton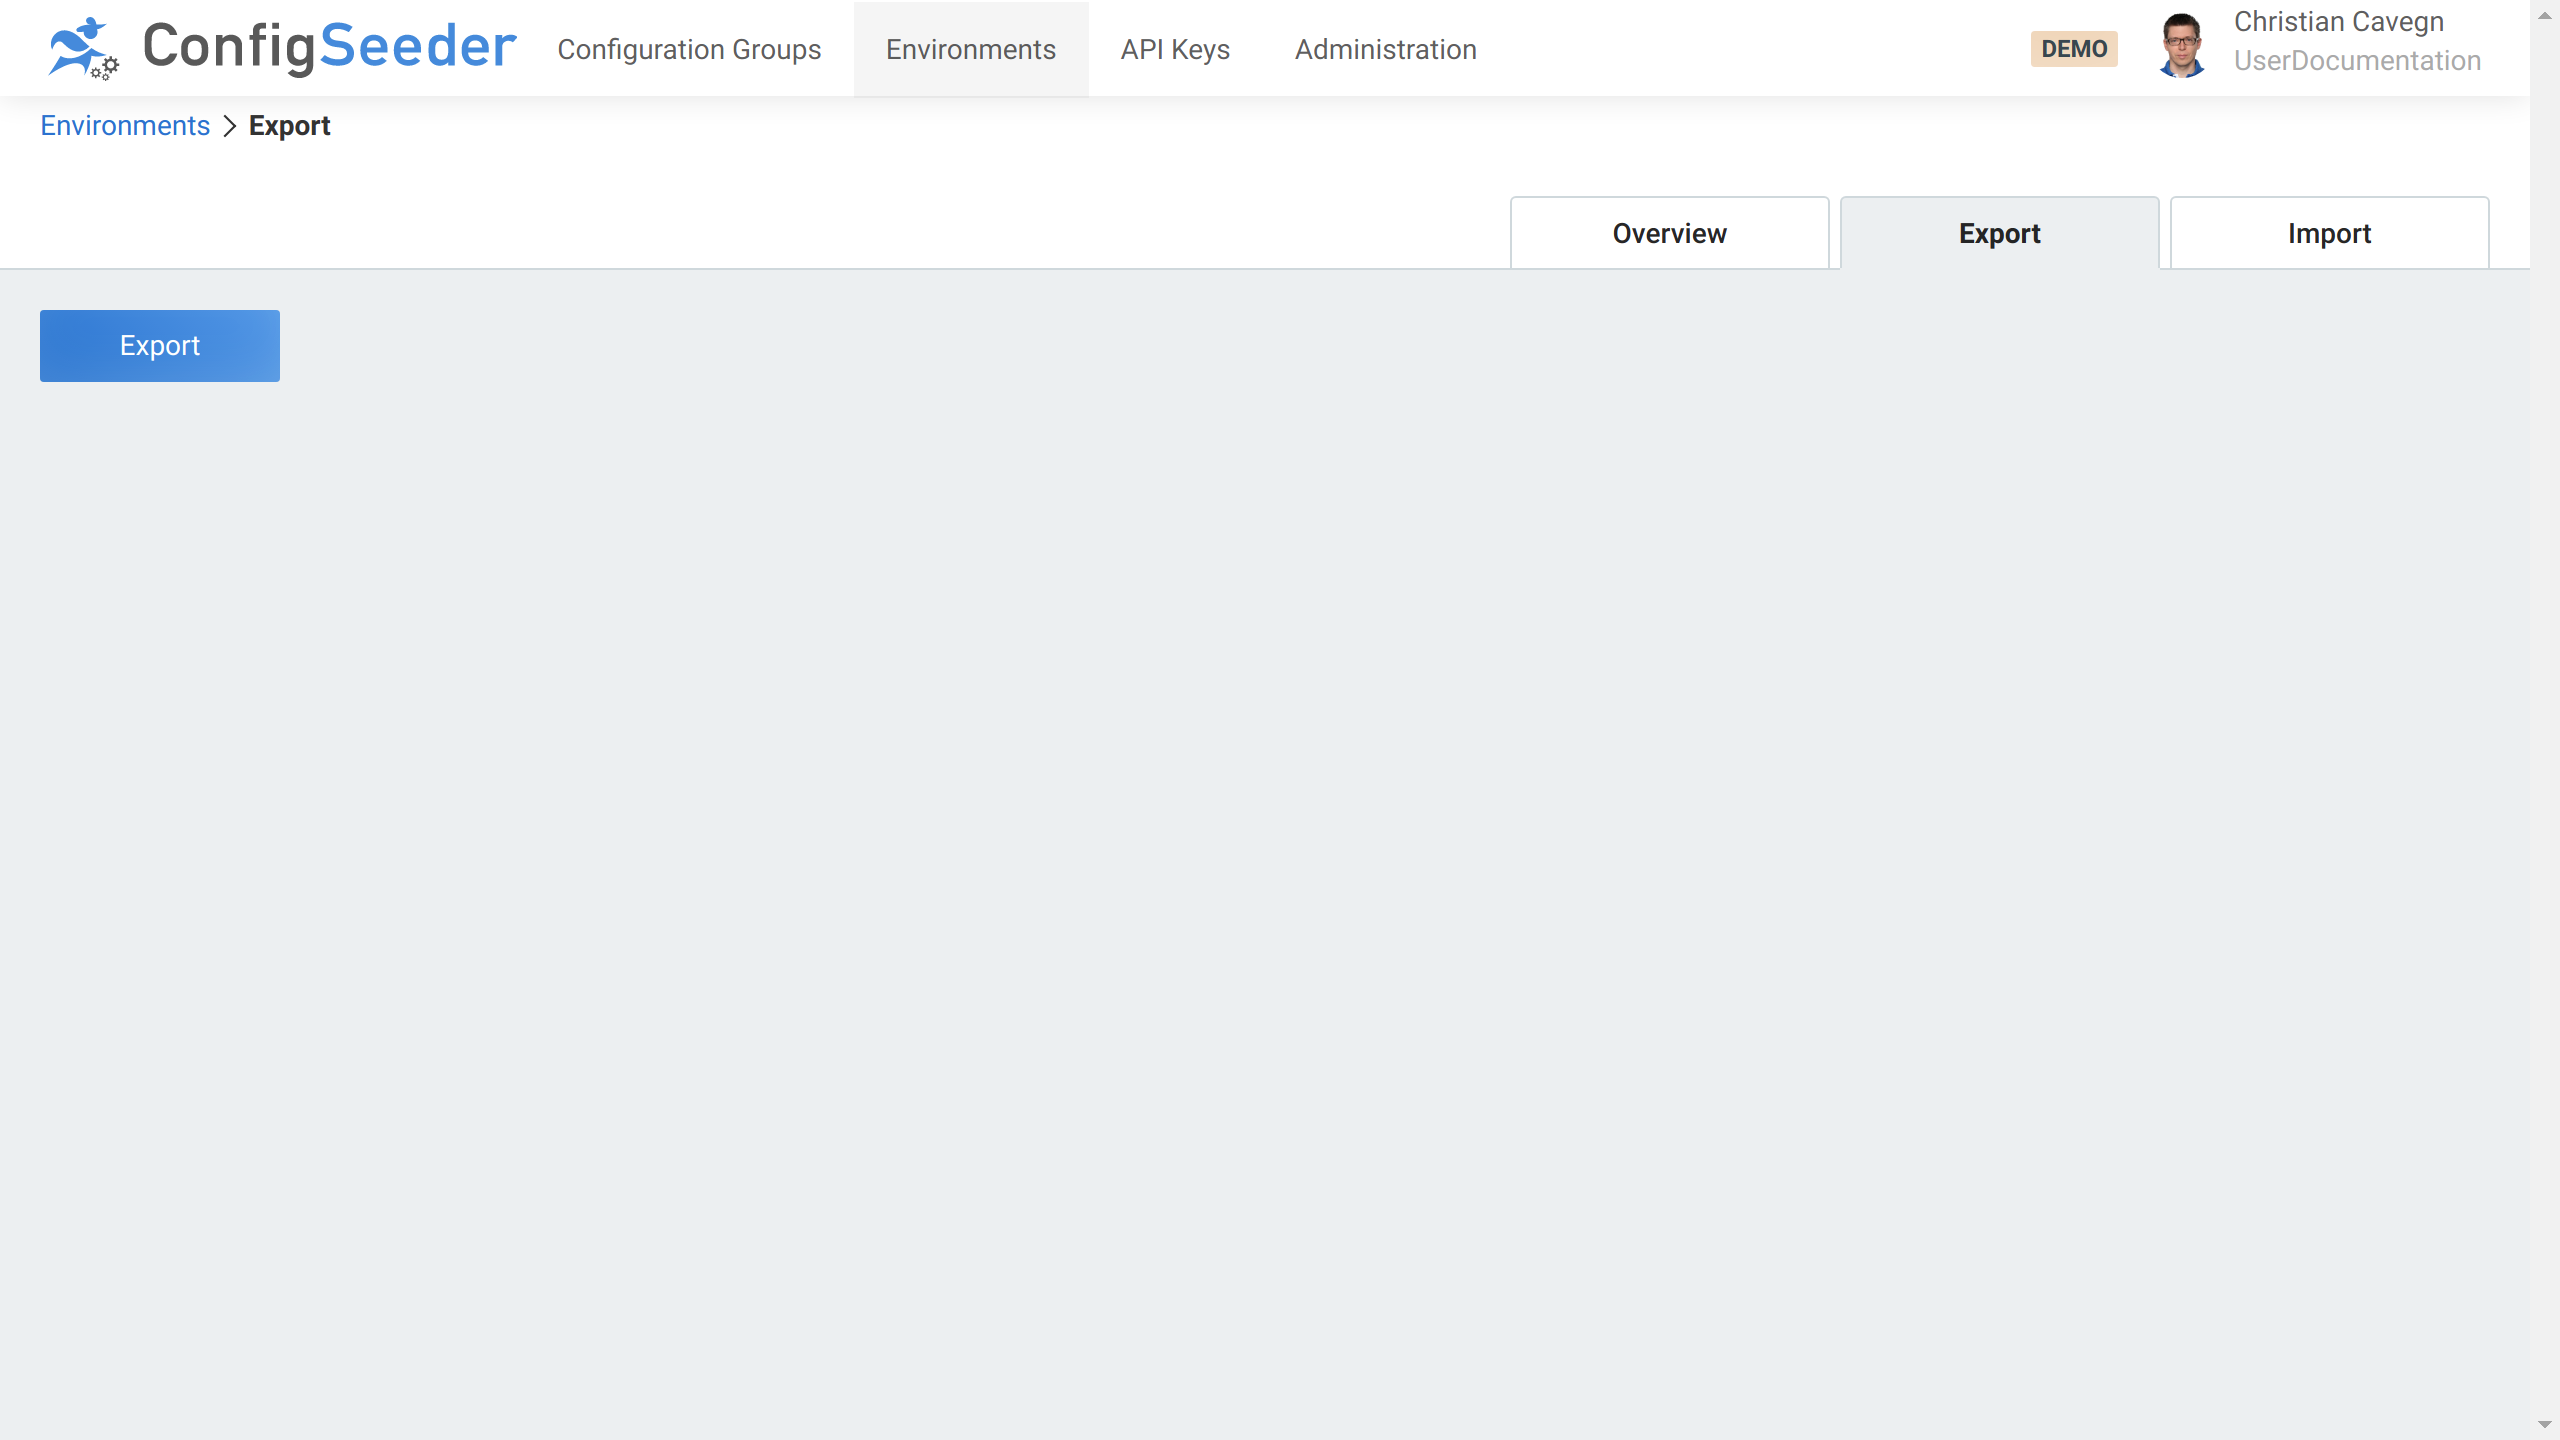
3.2.8. Access management
For managing the environments, the following Functional Roles can be used:
| Operation | Required Functional_Role and/or Permission |
|---|---|
Read |
|
Cread, Update, Delete |
|
3.3. Manage Configuration Groups
3.3.1. Description
Configuration groups are used to organize your configuration data. Also see the concept description for configuration groups.
3.3.2. Show existing configuration groups
-
Click on the navigation point
Configuration Groups
-
The configuration group page shows an overview of the existing configuration groups.
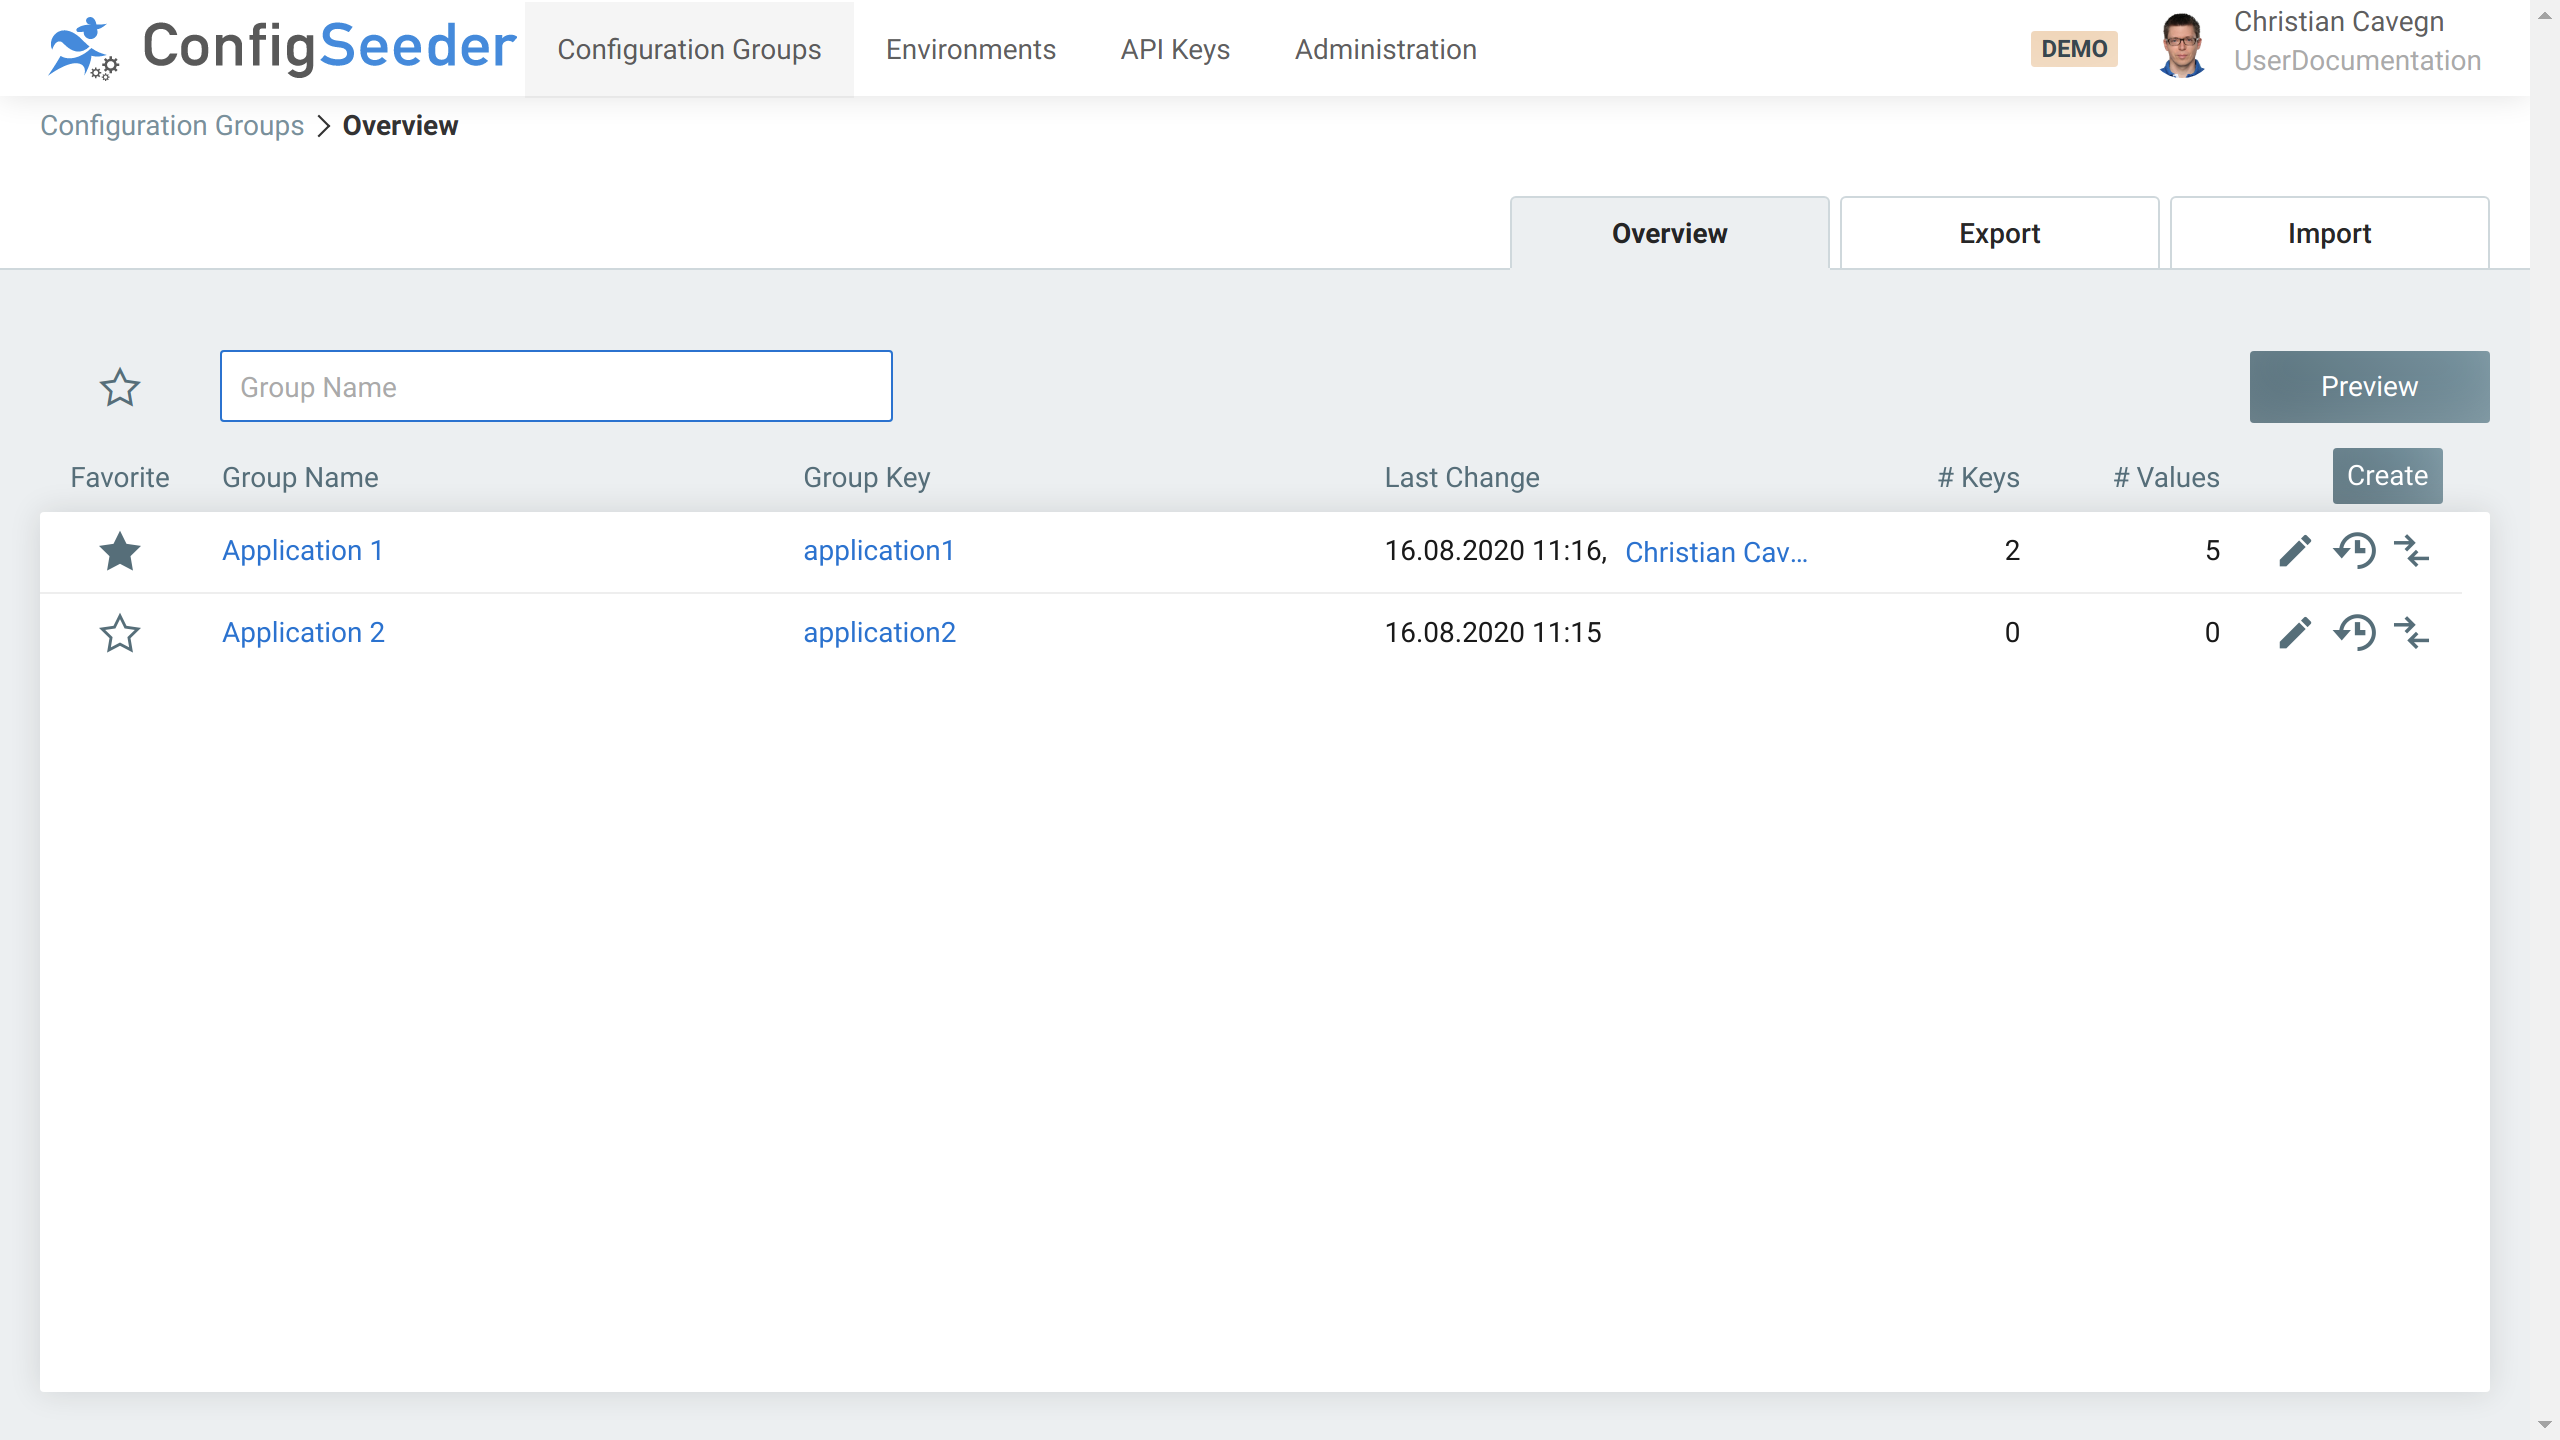
The configuration group overview page shows the following information:
-
Configuration groups
-
First of all and most importantly, all active (not deleted) configuration groups are shown.
-
Configuration groups are shown even the user has no permission to see the configuration data contained in the configuration group.
-
-
Favorites
-
Mark configuration groups as Favorites by clicking on the star in front of the name of the configuration group (in the screenshot,
Application 1is marked as a Favorite) -
Only show Favorites by clicking on the star left of the
Group Nameinput field.
-
-
The
Group Keyof a configuration group is used to retrieve the configuration data of this configuration group -
Last Changeshows, when the last change in this configuration group was done by whom -
# Keysshows how many configuration nodes are contained in the configuration group -
# Valuesshows how many configuration values are contained in the configuration group
3.3.2.1. Available Actions
| Icon | Description |
|---|---|
|
|
Edit the configuration group |

|
Open the configuration groups history |

|
Open the compare view |
3.3.3. Create a new configuration group
-
Click on the navigation point
Configuration Groups -
Click on the
CreateButton -
Specify the details of the new configuration group
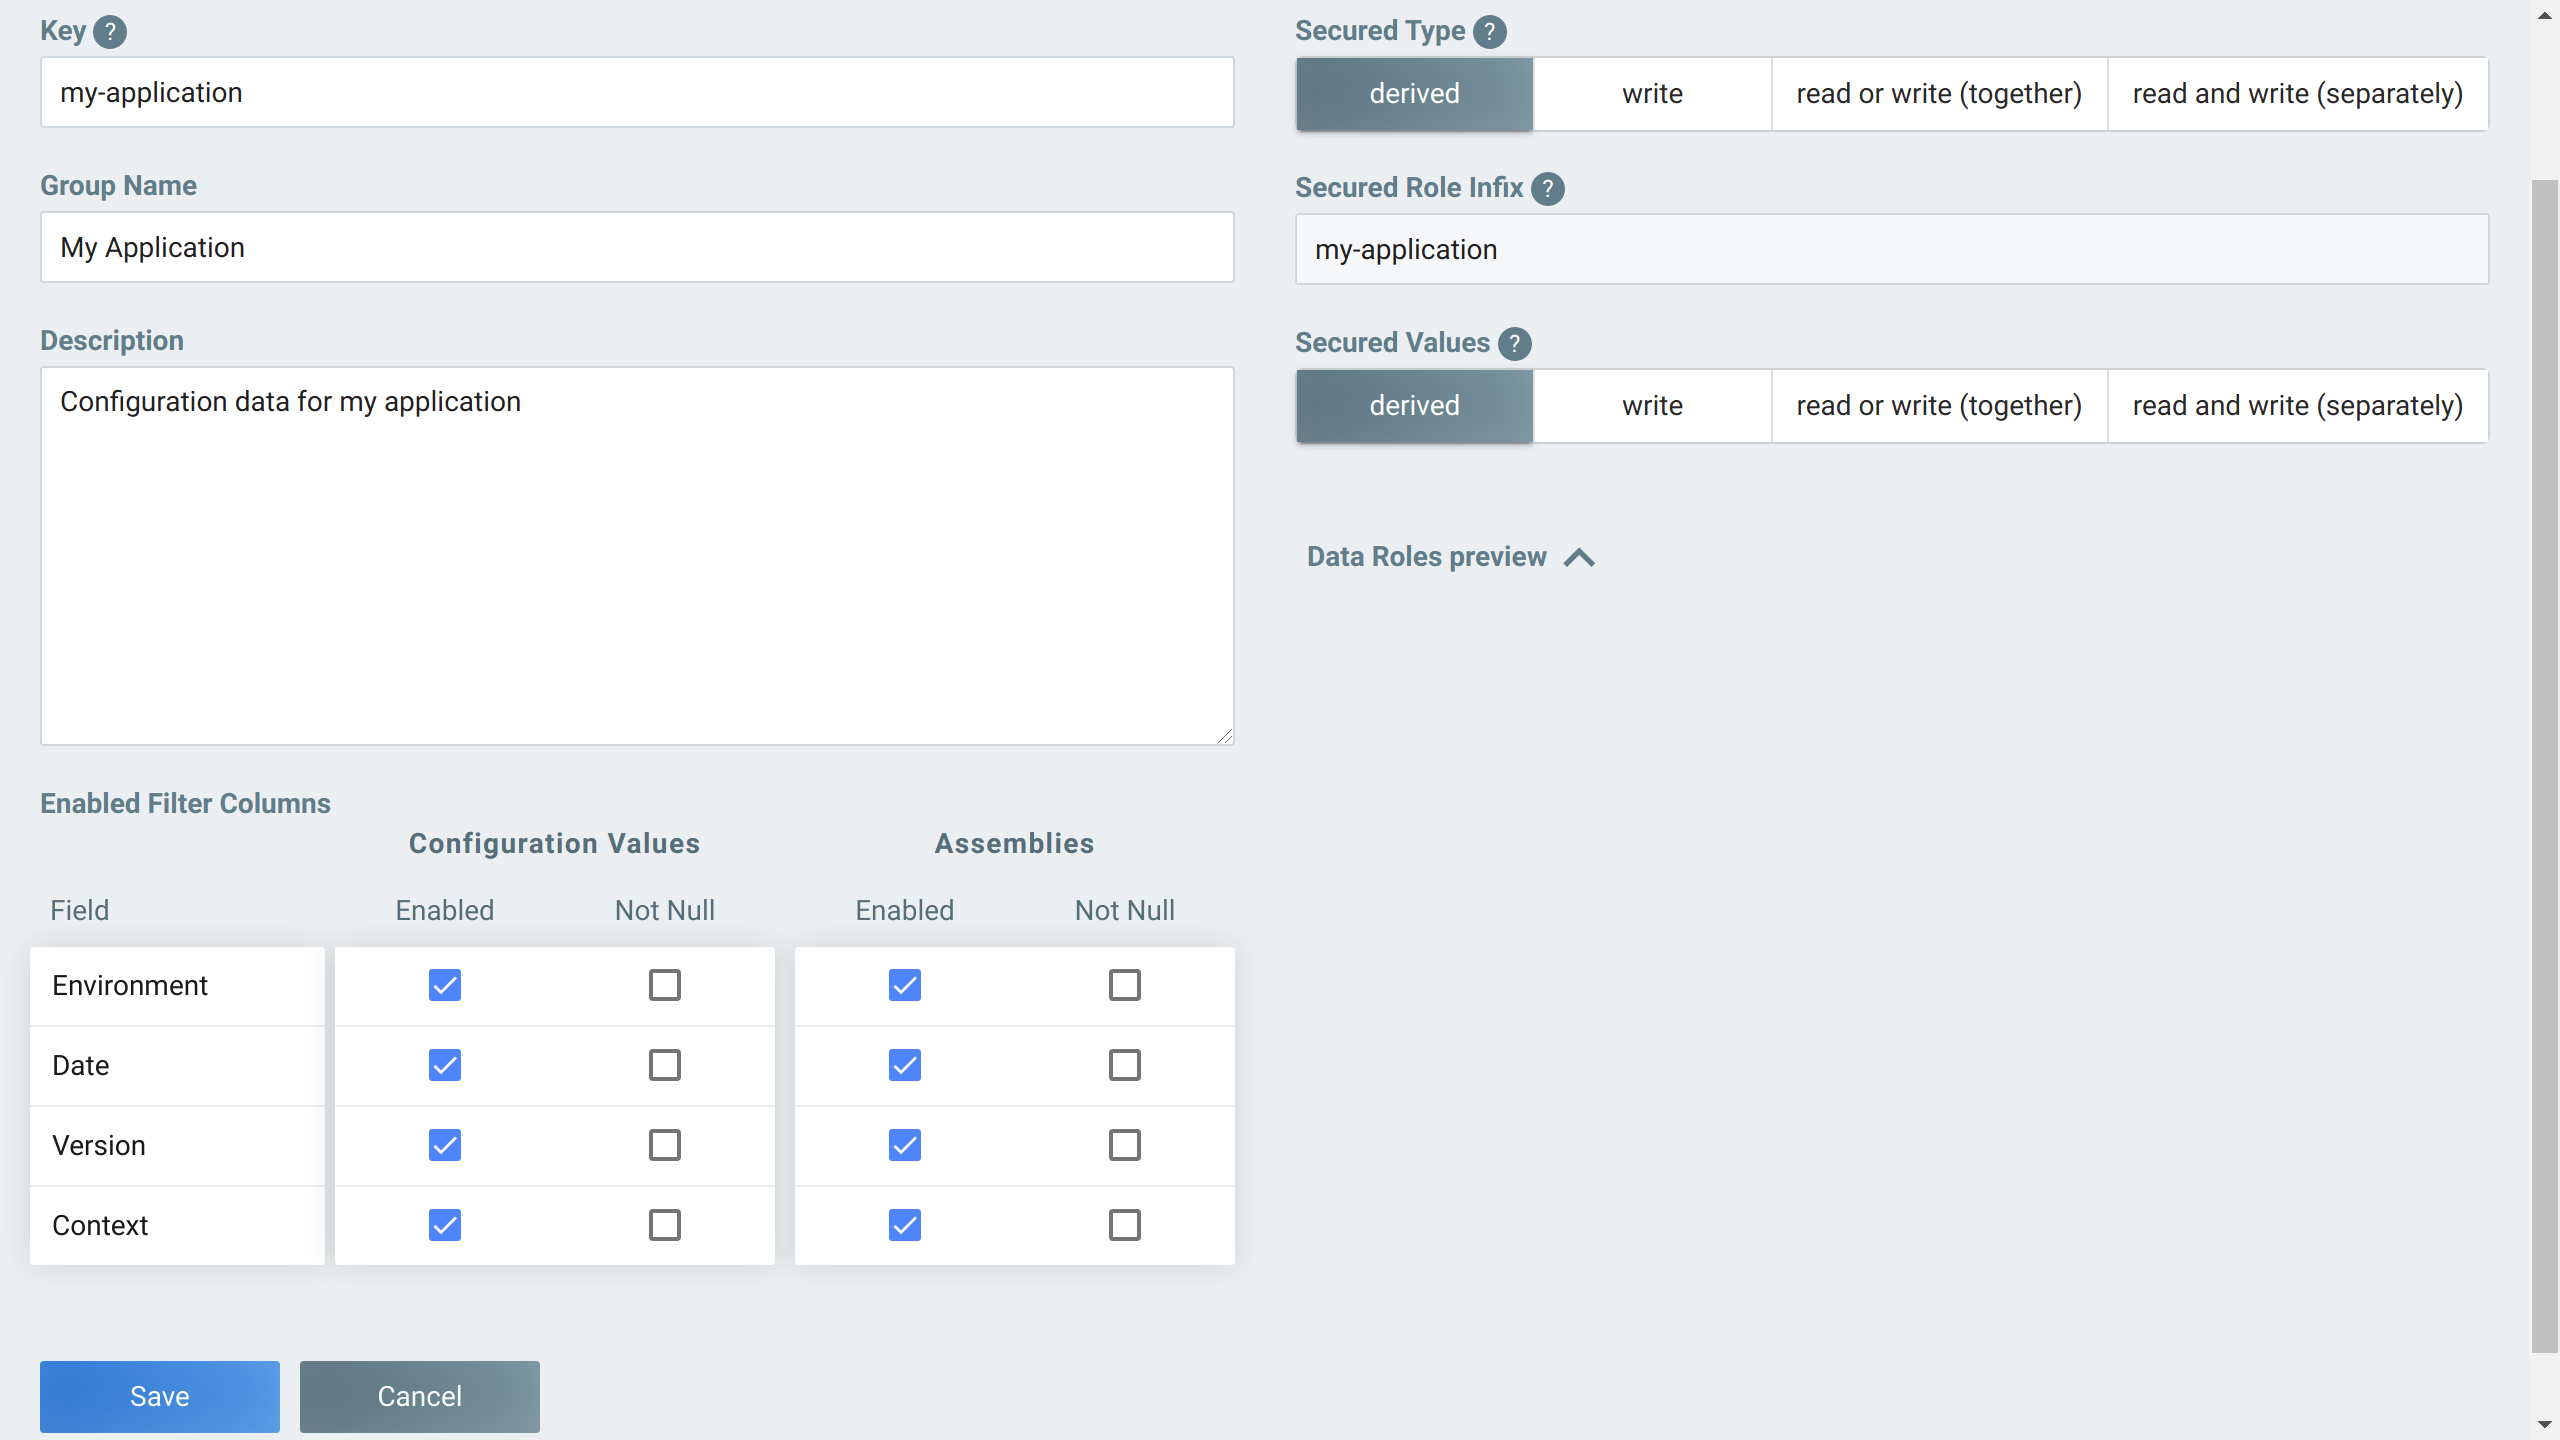
-
First of all, the
Keymust be unique -
With 'Group Name' you can write out how the configuration group is called. This attribute must not be unique.
-
With 'Description' you can tell what configuration data will be stored in this configuration group.
-
Filter Columns:-
Configuration Values: Define, which filter columns will be visible / usable fornormalconfiguration values -
Assemblies: Define, which filter columns will be visible / usable for configuration values contained in assemblies -
Set
Not Nullfor filter criteria which must always be set (be careful with this option, normally there is nearly always a reason, why in one case a filter column can’t be set.)
-
-
With the
Secured *options you can define which permissions are required to access configuration values assigned to the configuration group. See access management for more details.
-
-
Create the new configuration group by clicking on the
Savebutton.
|
All data entered when creating a configuration group can be changed later on. |
3.3.4. Edit an existing configuration group
-
Click on the navigation point
Configuration Groups -
Click on the pencil-icon of the configuration group you want to edit
-
Change the configuration group like desired
-
Store changes by clicking on the
Savebutton.
3.3.5. Delete an existing configuration group
-
Click on the navigation point
Configuration Groups -
Click on the pencil-icon of the environment you want to delete
-
Delete the configuration group by clicking on the
Deletebutton.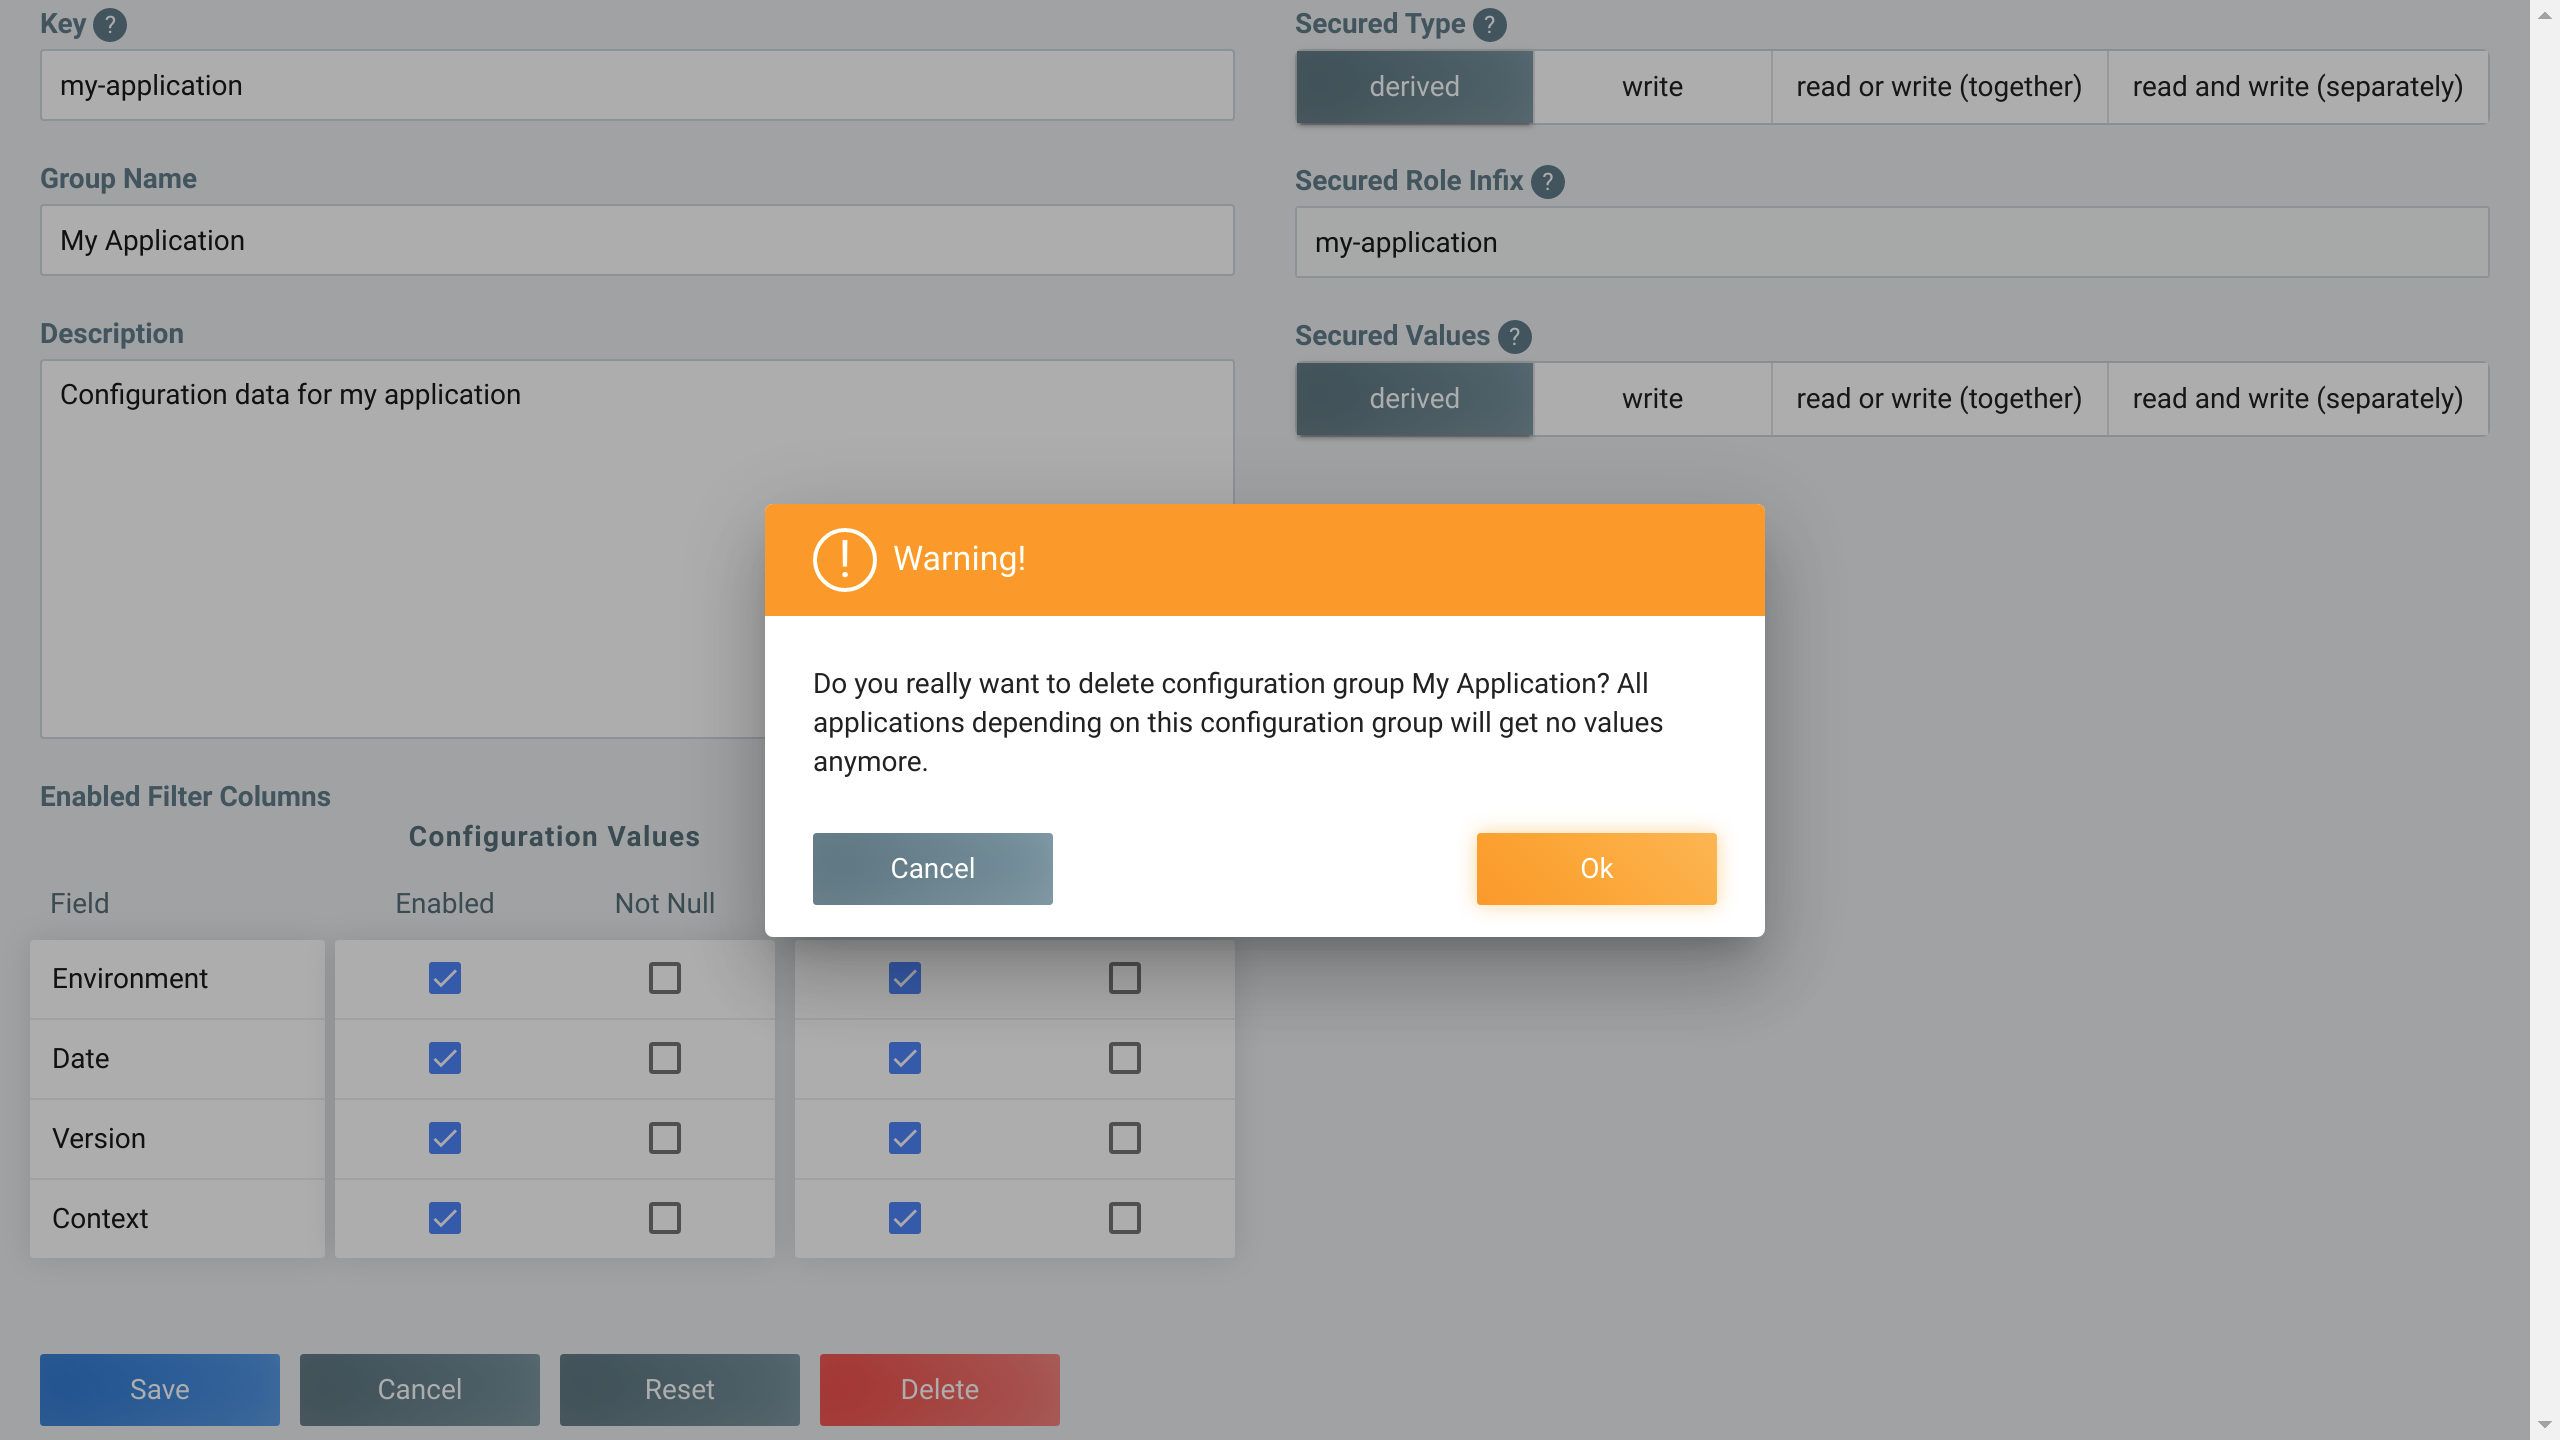
-
Accept deletion of the environment by clicking on the
OKbutton.
|
Note that once a configuration group has been deleted, it can no longer be restored via the user interface. |
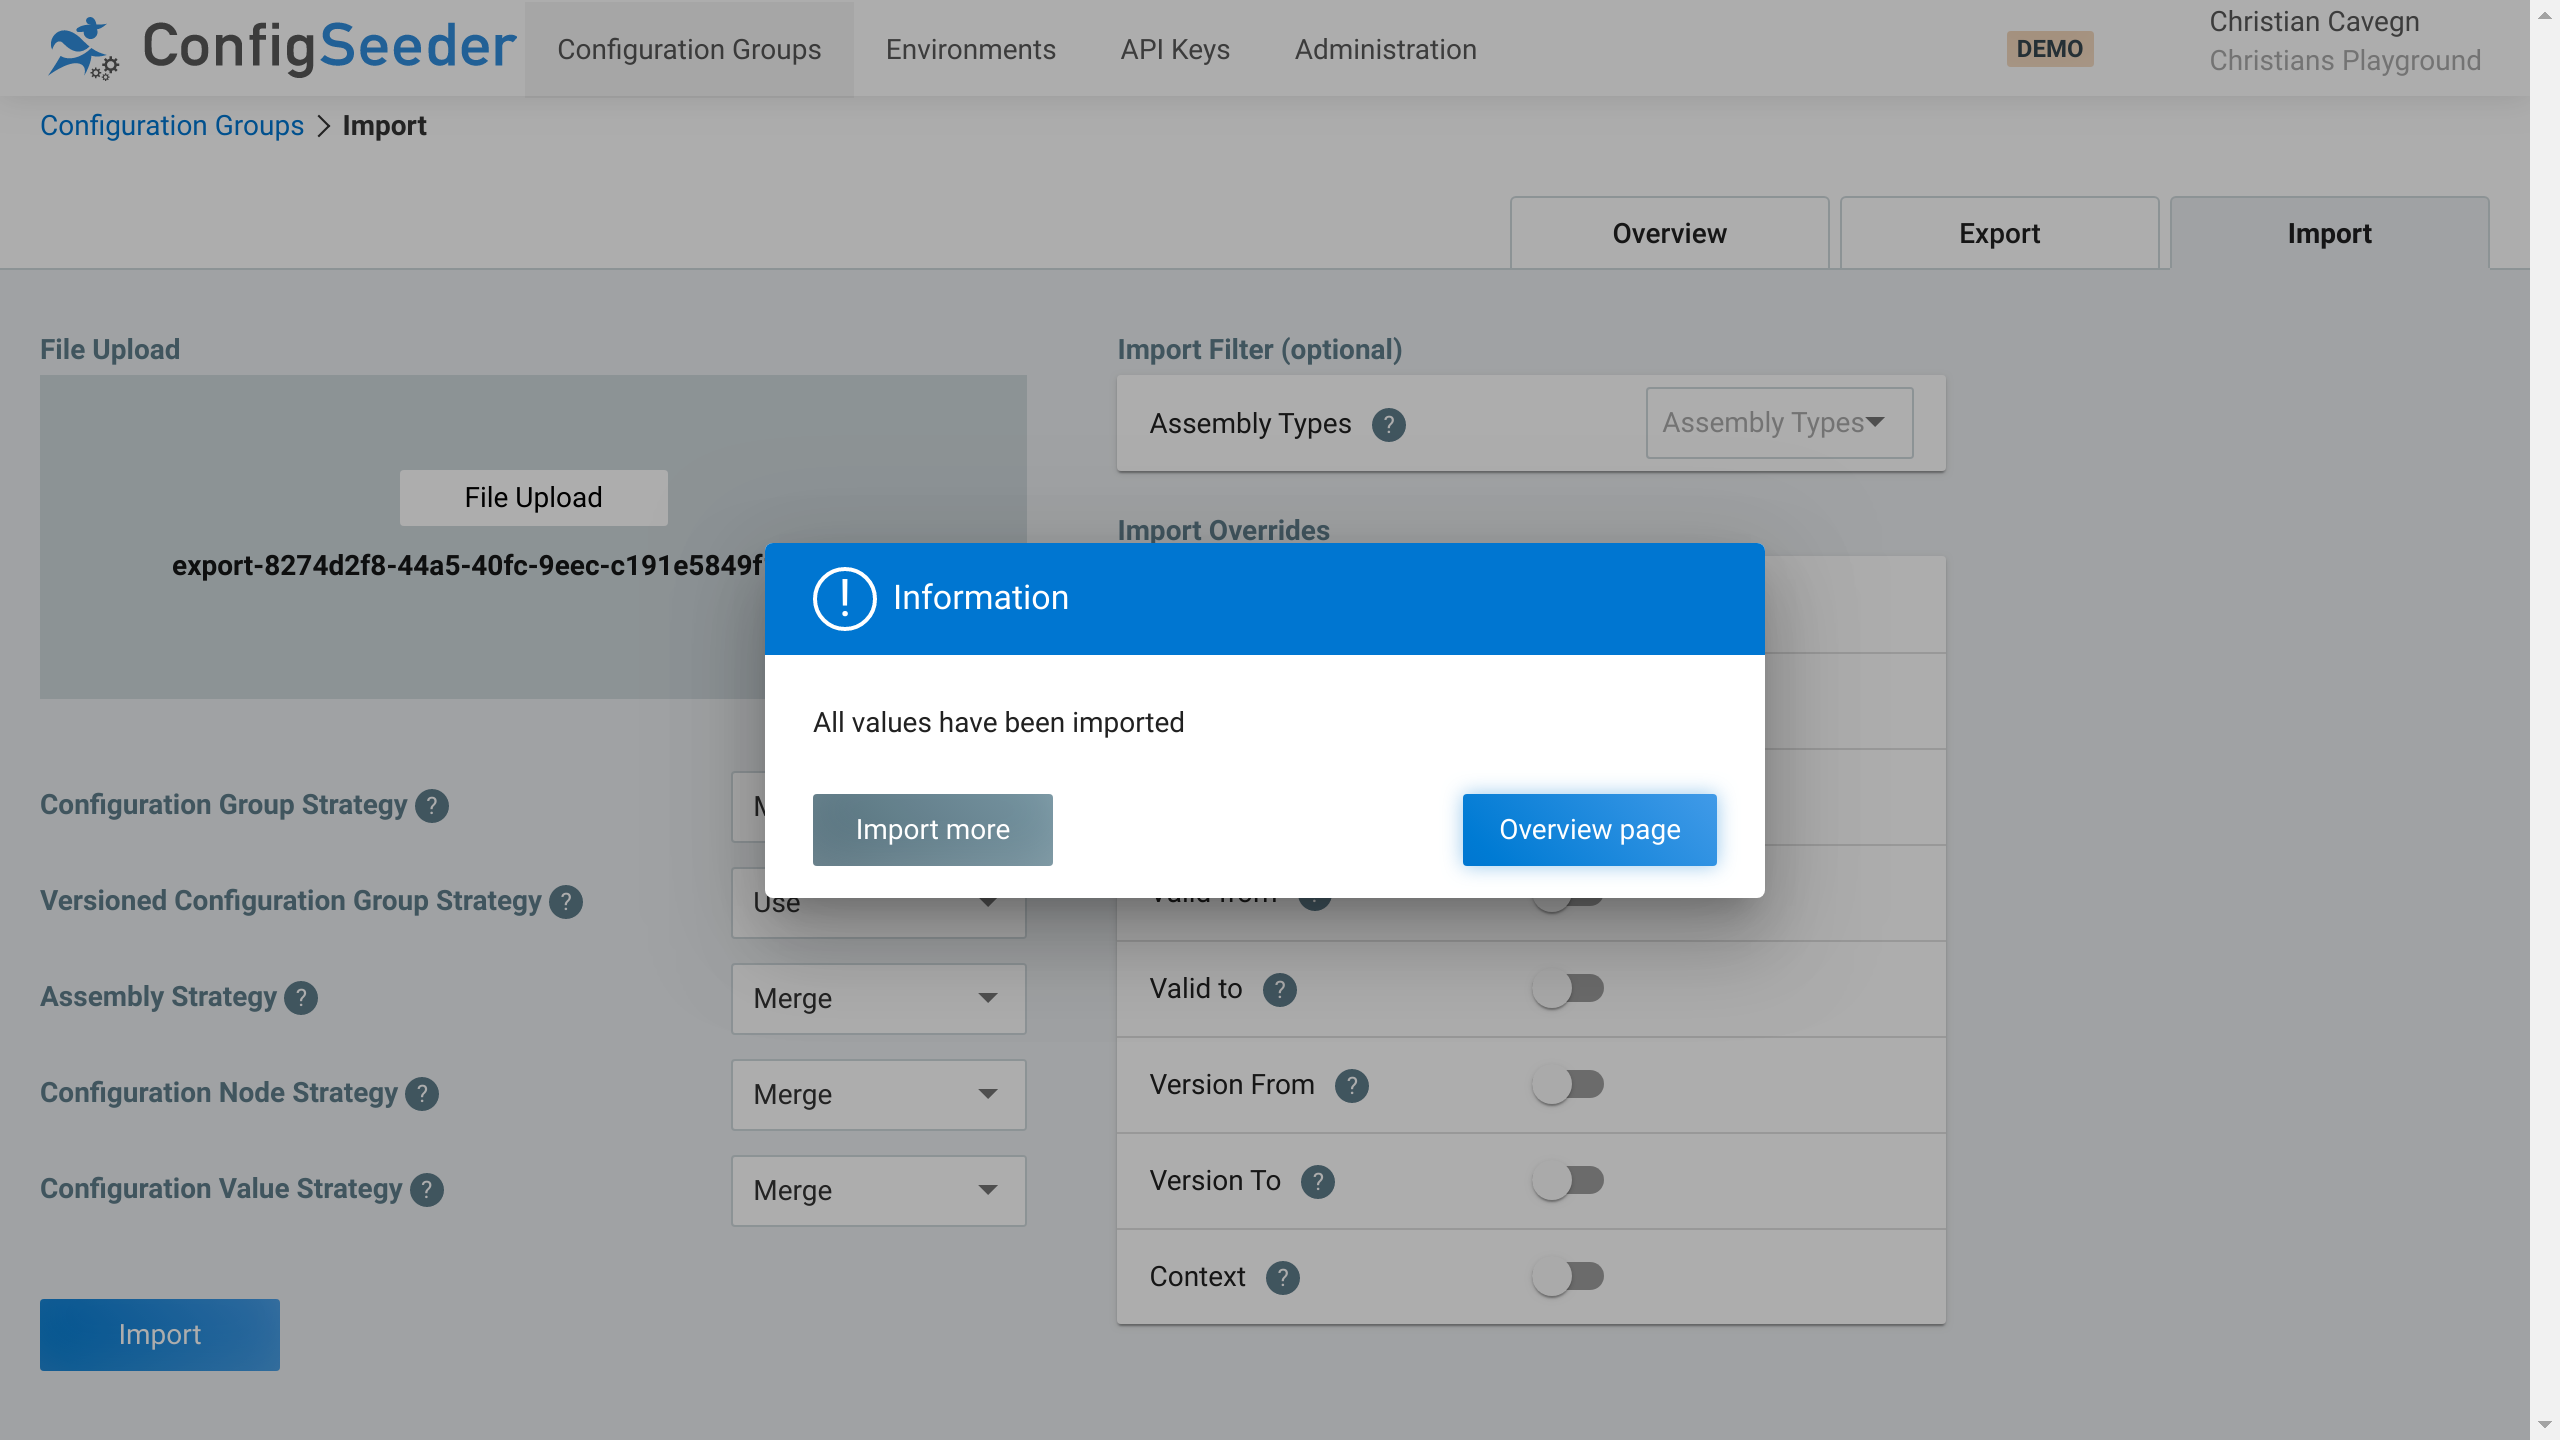
3.3.6. Import configuration groups
Previously exported configuration groups can be imported (with all contained values) with ConfigSeeders® import configuration group functionality
-
Click on the navigation point
Configuration Groups -
Open the
Importtab -
Select the file containing the configuration group(s)
-
Adapt the import settings like required
-
Import strategies: Controls how the import is done.
-
If you don’t have any special requirements, just use the defaults
-
Otherwise, see Configuration Group Import Strategies
-
-
Import Filter: The options and flags have the following meaning:
-
Assembly Types: Only import data contained in specific assemblies
-
-
Import Overrides: The options and flags have the following meaning:
-
Key prefix: Adds a prefix to every key -
Key postfix: Adds a postfix to every key -
Environment: Overrideenvironmentof all values with the selected value -
Valid from: Overridevalid fromof all values with the selected value -
Valid to: Overridevalid toof all values with the selected value -
Version from: Overrideversion fromof all values with the selected value -
Version to: Overrideversion toof all values with the selected value -
Context: Overridecontextof all values with the selected value
-
-
-
Click on the
Importbutton -
A popup will confirm that the configuration groups were imported.
3.3.6.1. Import Strategies
| Strategy | Description & Example |
|---|---|
Create |
Element will be created / must not exist
|
Merge |
Existing element will be merged, non existing element will be created:
|
Replace |
Existing element will be replaced, non existing element will be created:
|
Use |
Element must already exist and won’t be updated:
|
3.3.7. Export configuration groups
Existing configuration groups can be exported with ConfigSeeders® export configuration groups functionality
-
Click on the navigation point
Configuration Groups -
Open the
Exporttab -
Select the configuration group and -values to export
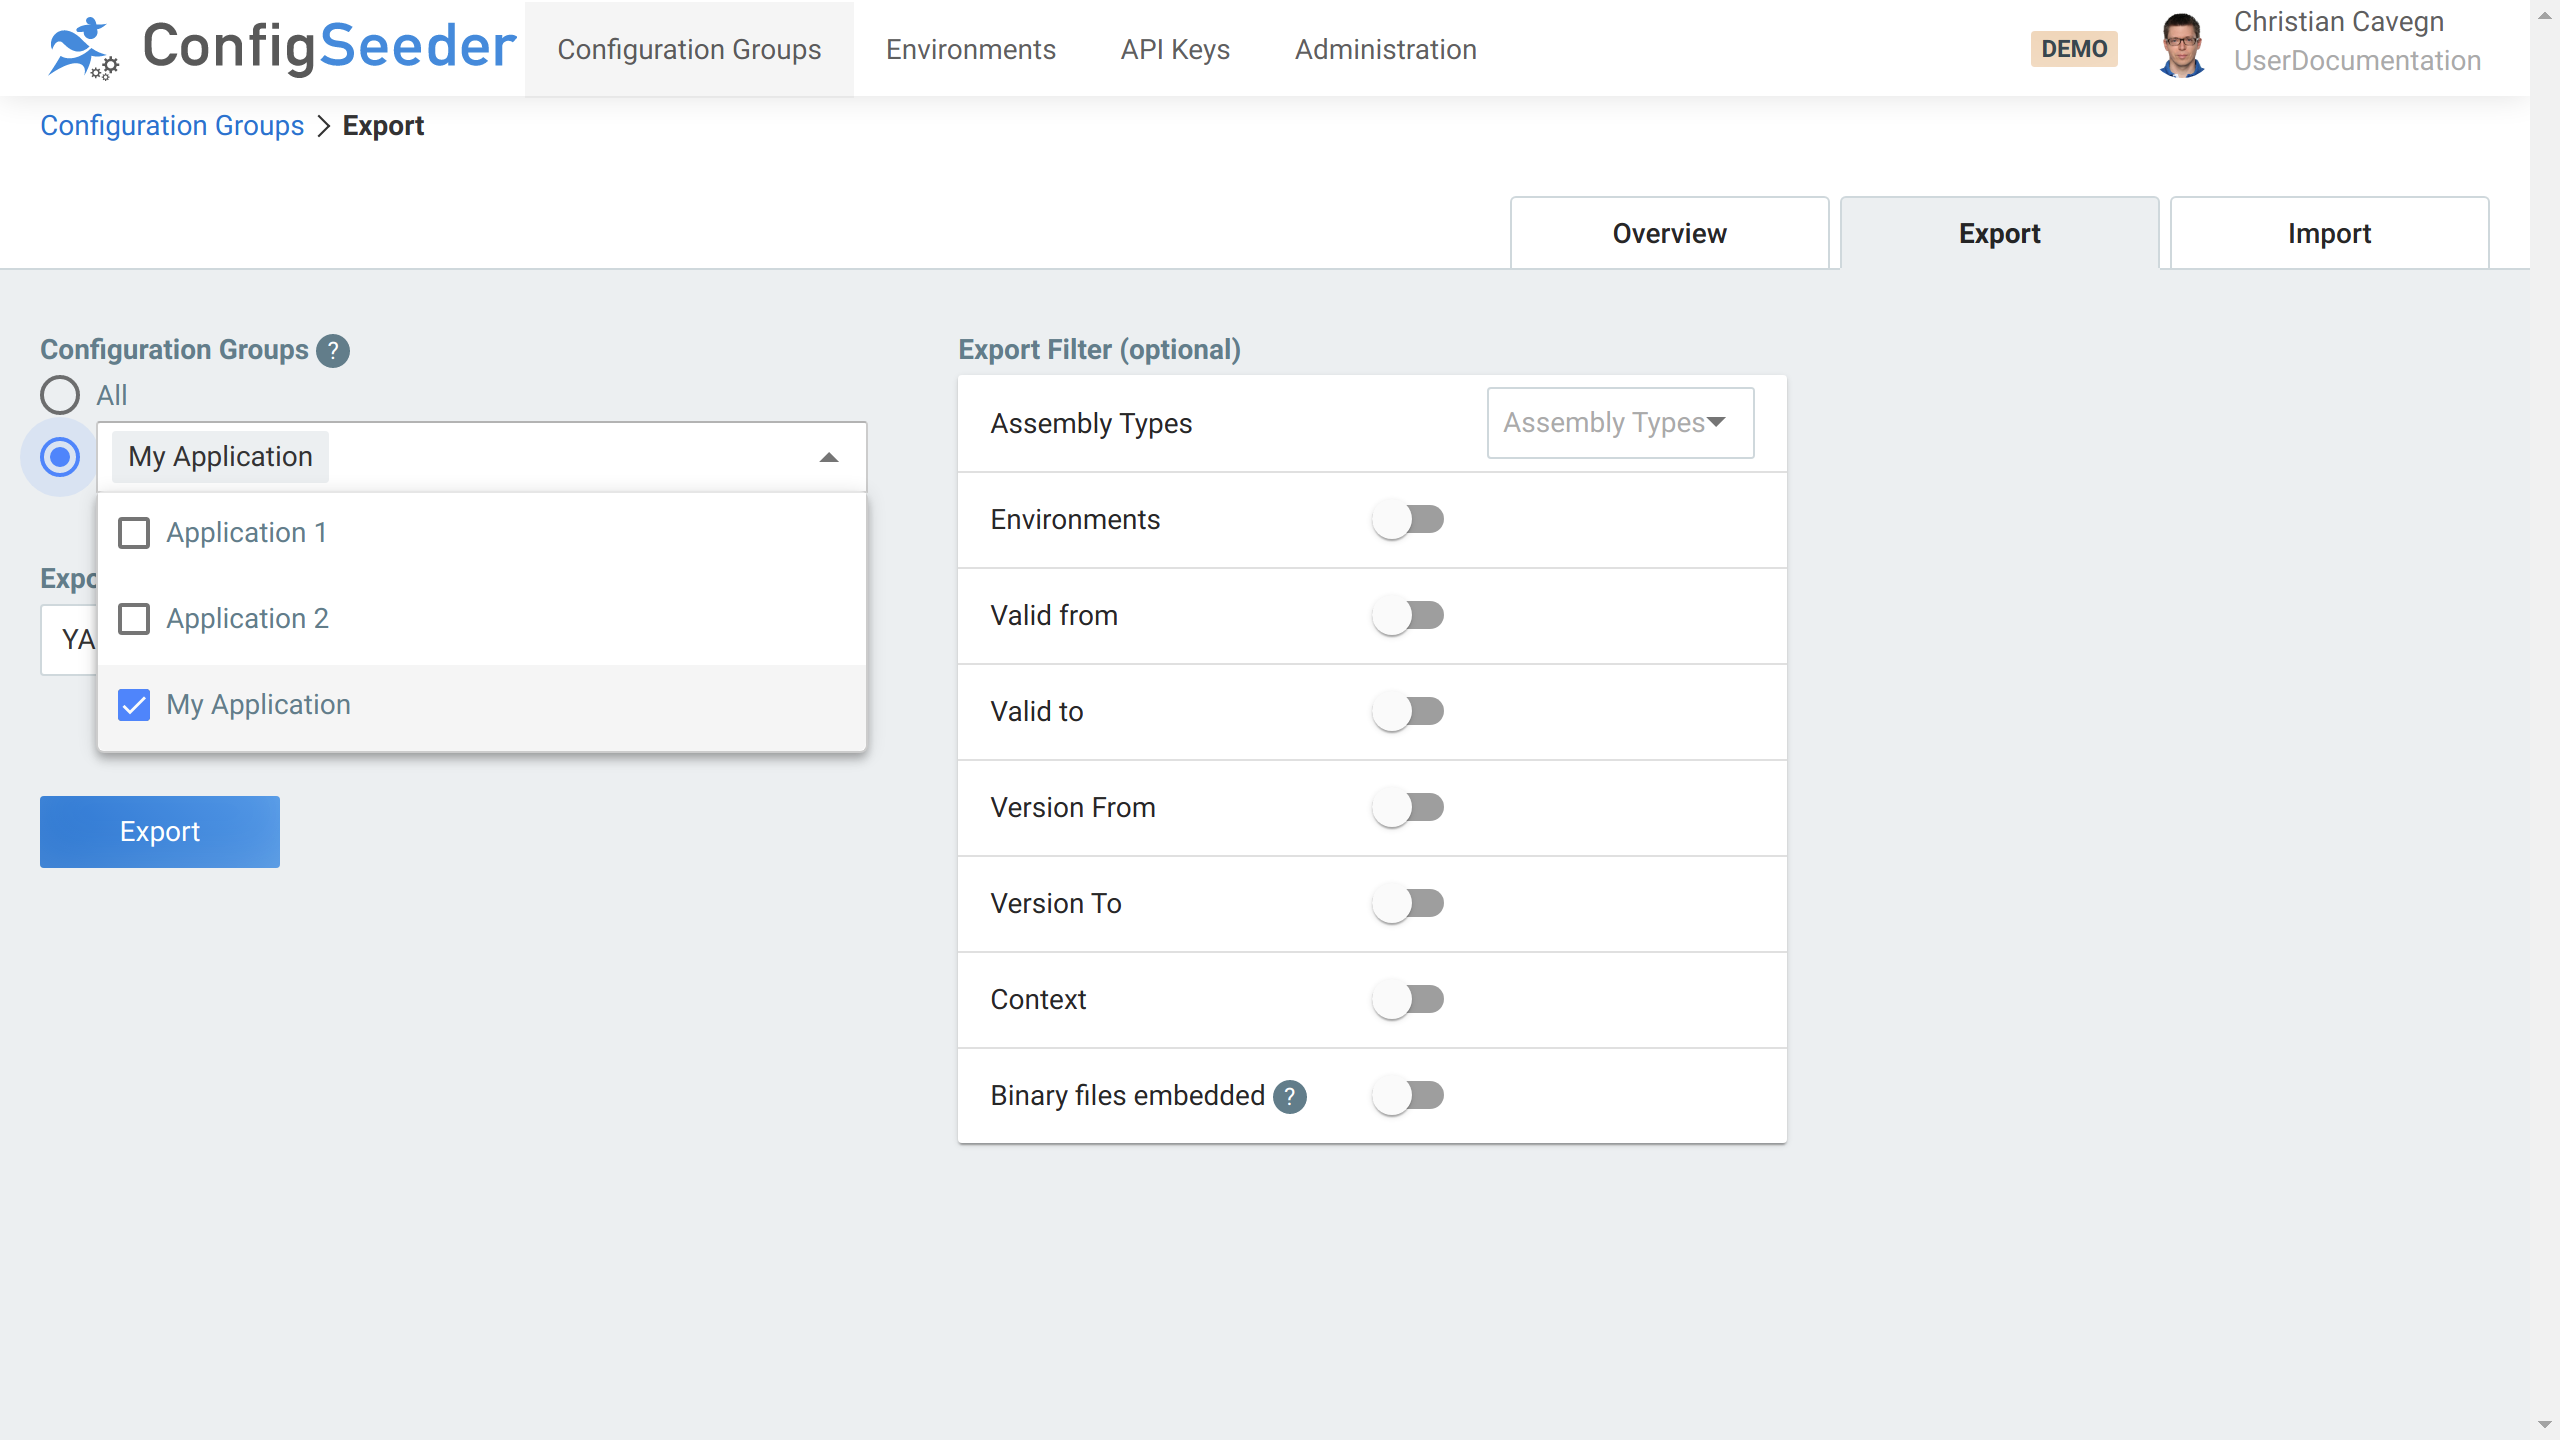
-
Configuration Groups:-
Either choose
all(if you want to export all configuration groups) -
Or select the configuration groups you need to export
-
-
Decide which export format to use (use
yamlif you don’t need the data in excel) -
Limit which configuration values should be exported
-
Use this option only if necessary (normal usecase is to export all configuration data)
-
Assembly Types: Restrict export to one or multiple assembly types -
Environments: Restrict export to one or multiple environments -
Valid from/Valid to: Restrict export to configuration values with defined validity -
Version from/Version to: Restrict export to configuration values with defined version -
Context: Restrict export to configuration values with defined context -
Binary files embedded: Only feasible foryamlexports: Decide whether binary data should be embedded in theyamlor exported as a separate file (default)
-
-
-
Hit the
Exportbutton
|
The exported configuration groups (one file per group and, if necessary, one file per binary) will be packed into a zip archive. |
3.3.8. Access management
For managing the configuration groups, the following Functional Roles can be used:
| Operation | Required Functional_Role and/or Permission |
|---|---|
Read |
|
Cread, Update, Delete |
|
|
Defining Function Roles with well-defined access to configuration data is quite challenging. Please contact us if you can’t work with the predefined roles. |
3.4. Manage API Keys
3.4.1. Description
API Keys can be used to access ConfigSeeder®. Also see the concept description for API Keys.
3.4.2. Show existing API Keys
-
Click on the navigation point
API Keys
-
The API Keys overview page shows an overview of the existing API Keys.
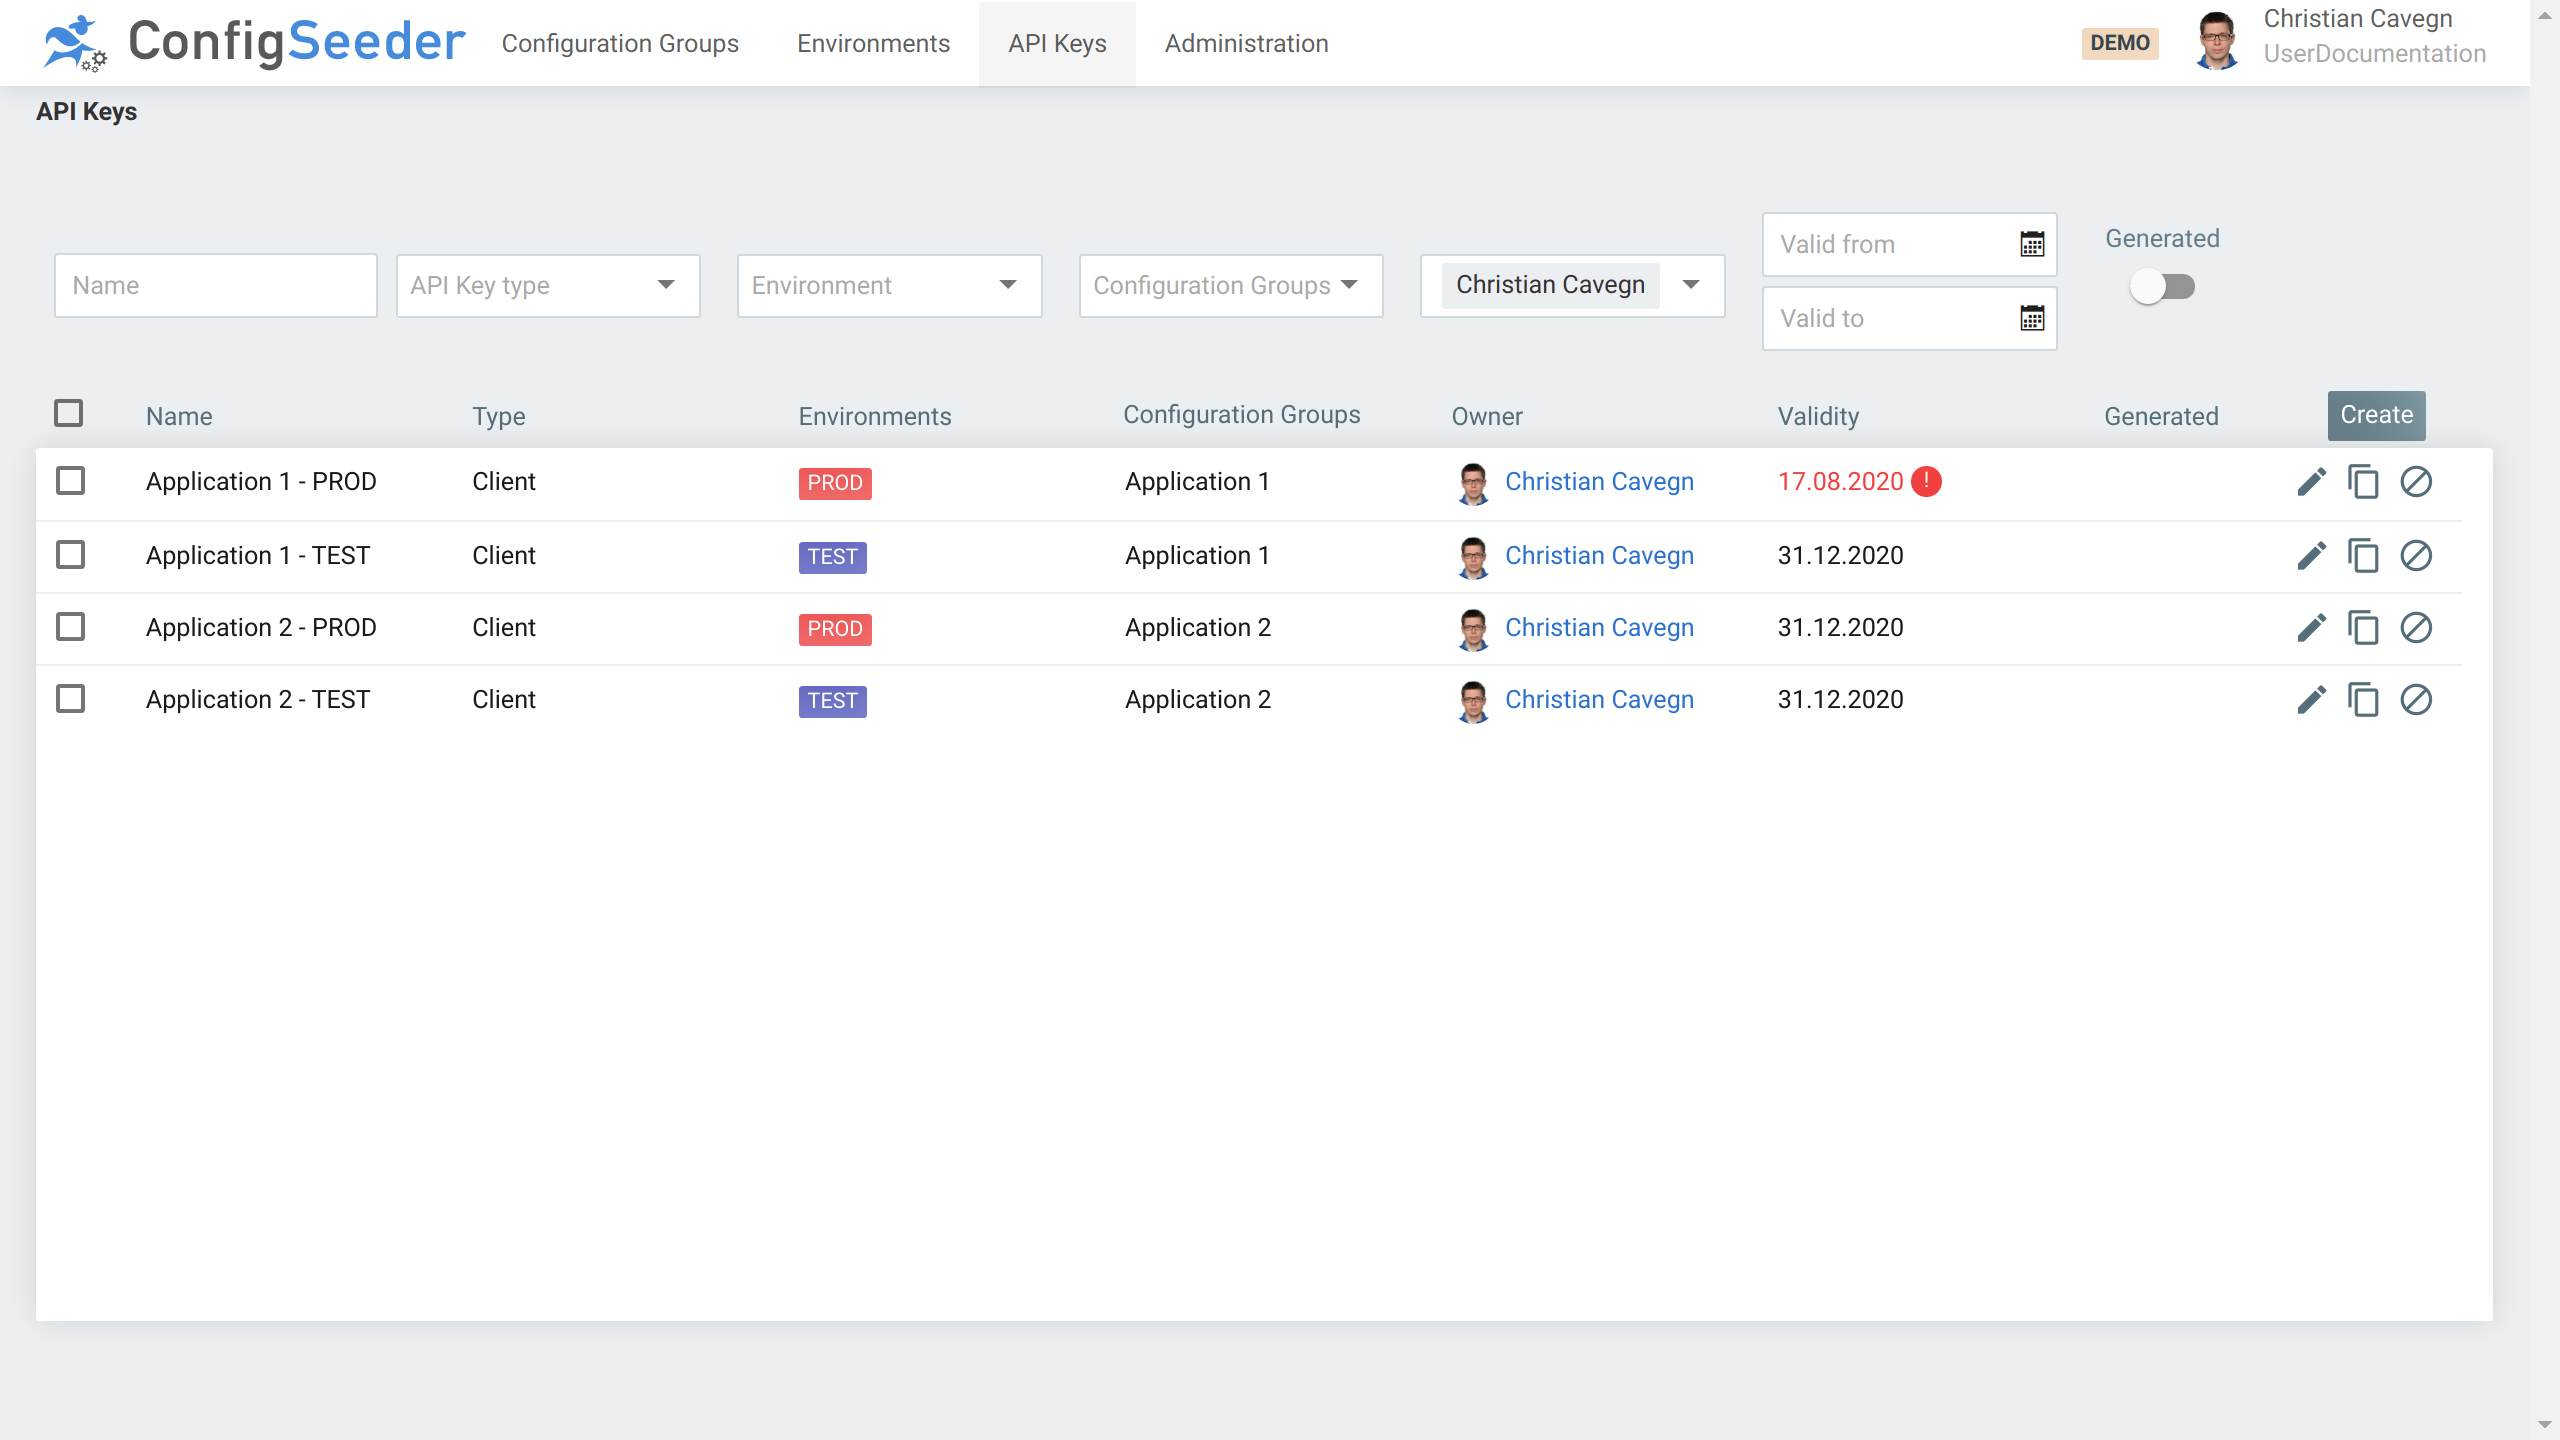
The API Key overview page shows the following information:
-
In the default view, all API Key created by the current user are shown.
-
Ownershows, who is responsible for the API Key -
Validityshows, until which date an API Key is valid.Replace API Keys with an ending lifetime (marked red) before they are not valid any more. Otherwise, your application won’t be able to access ConfigSeeder® any more!
|
Using the Screen
|
3.4.2.1. Available Actions
| Icon | Description |
|---|---|
|
|
Edit the API Key (change metadata like |

|
Renew the API Key (create a new API Key based on the existing API Key). |

|
Revoke the API Key. |
3.4.3. Create a new API Key
-
Click on the navigation point
API Keys -
Click on the
CreateButton -
Specify the details of the new API Key
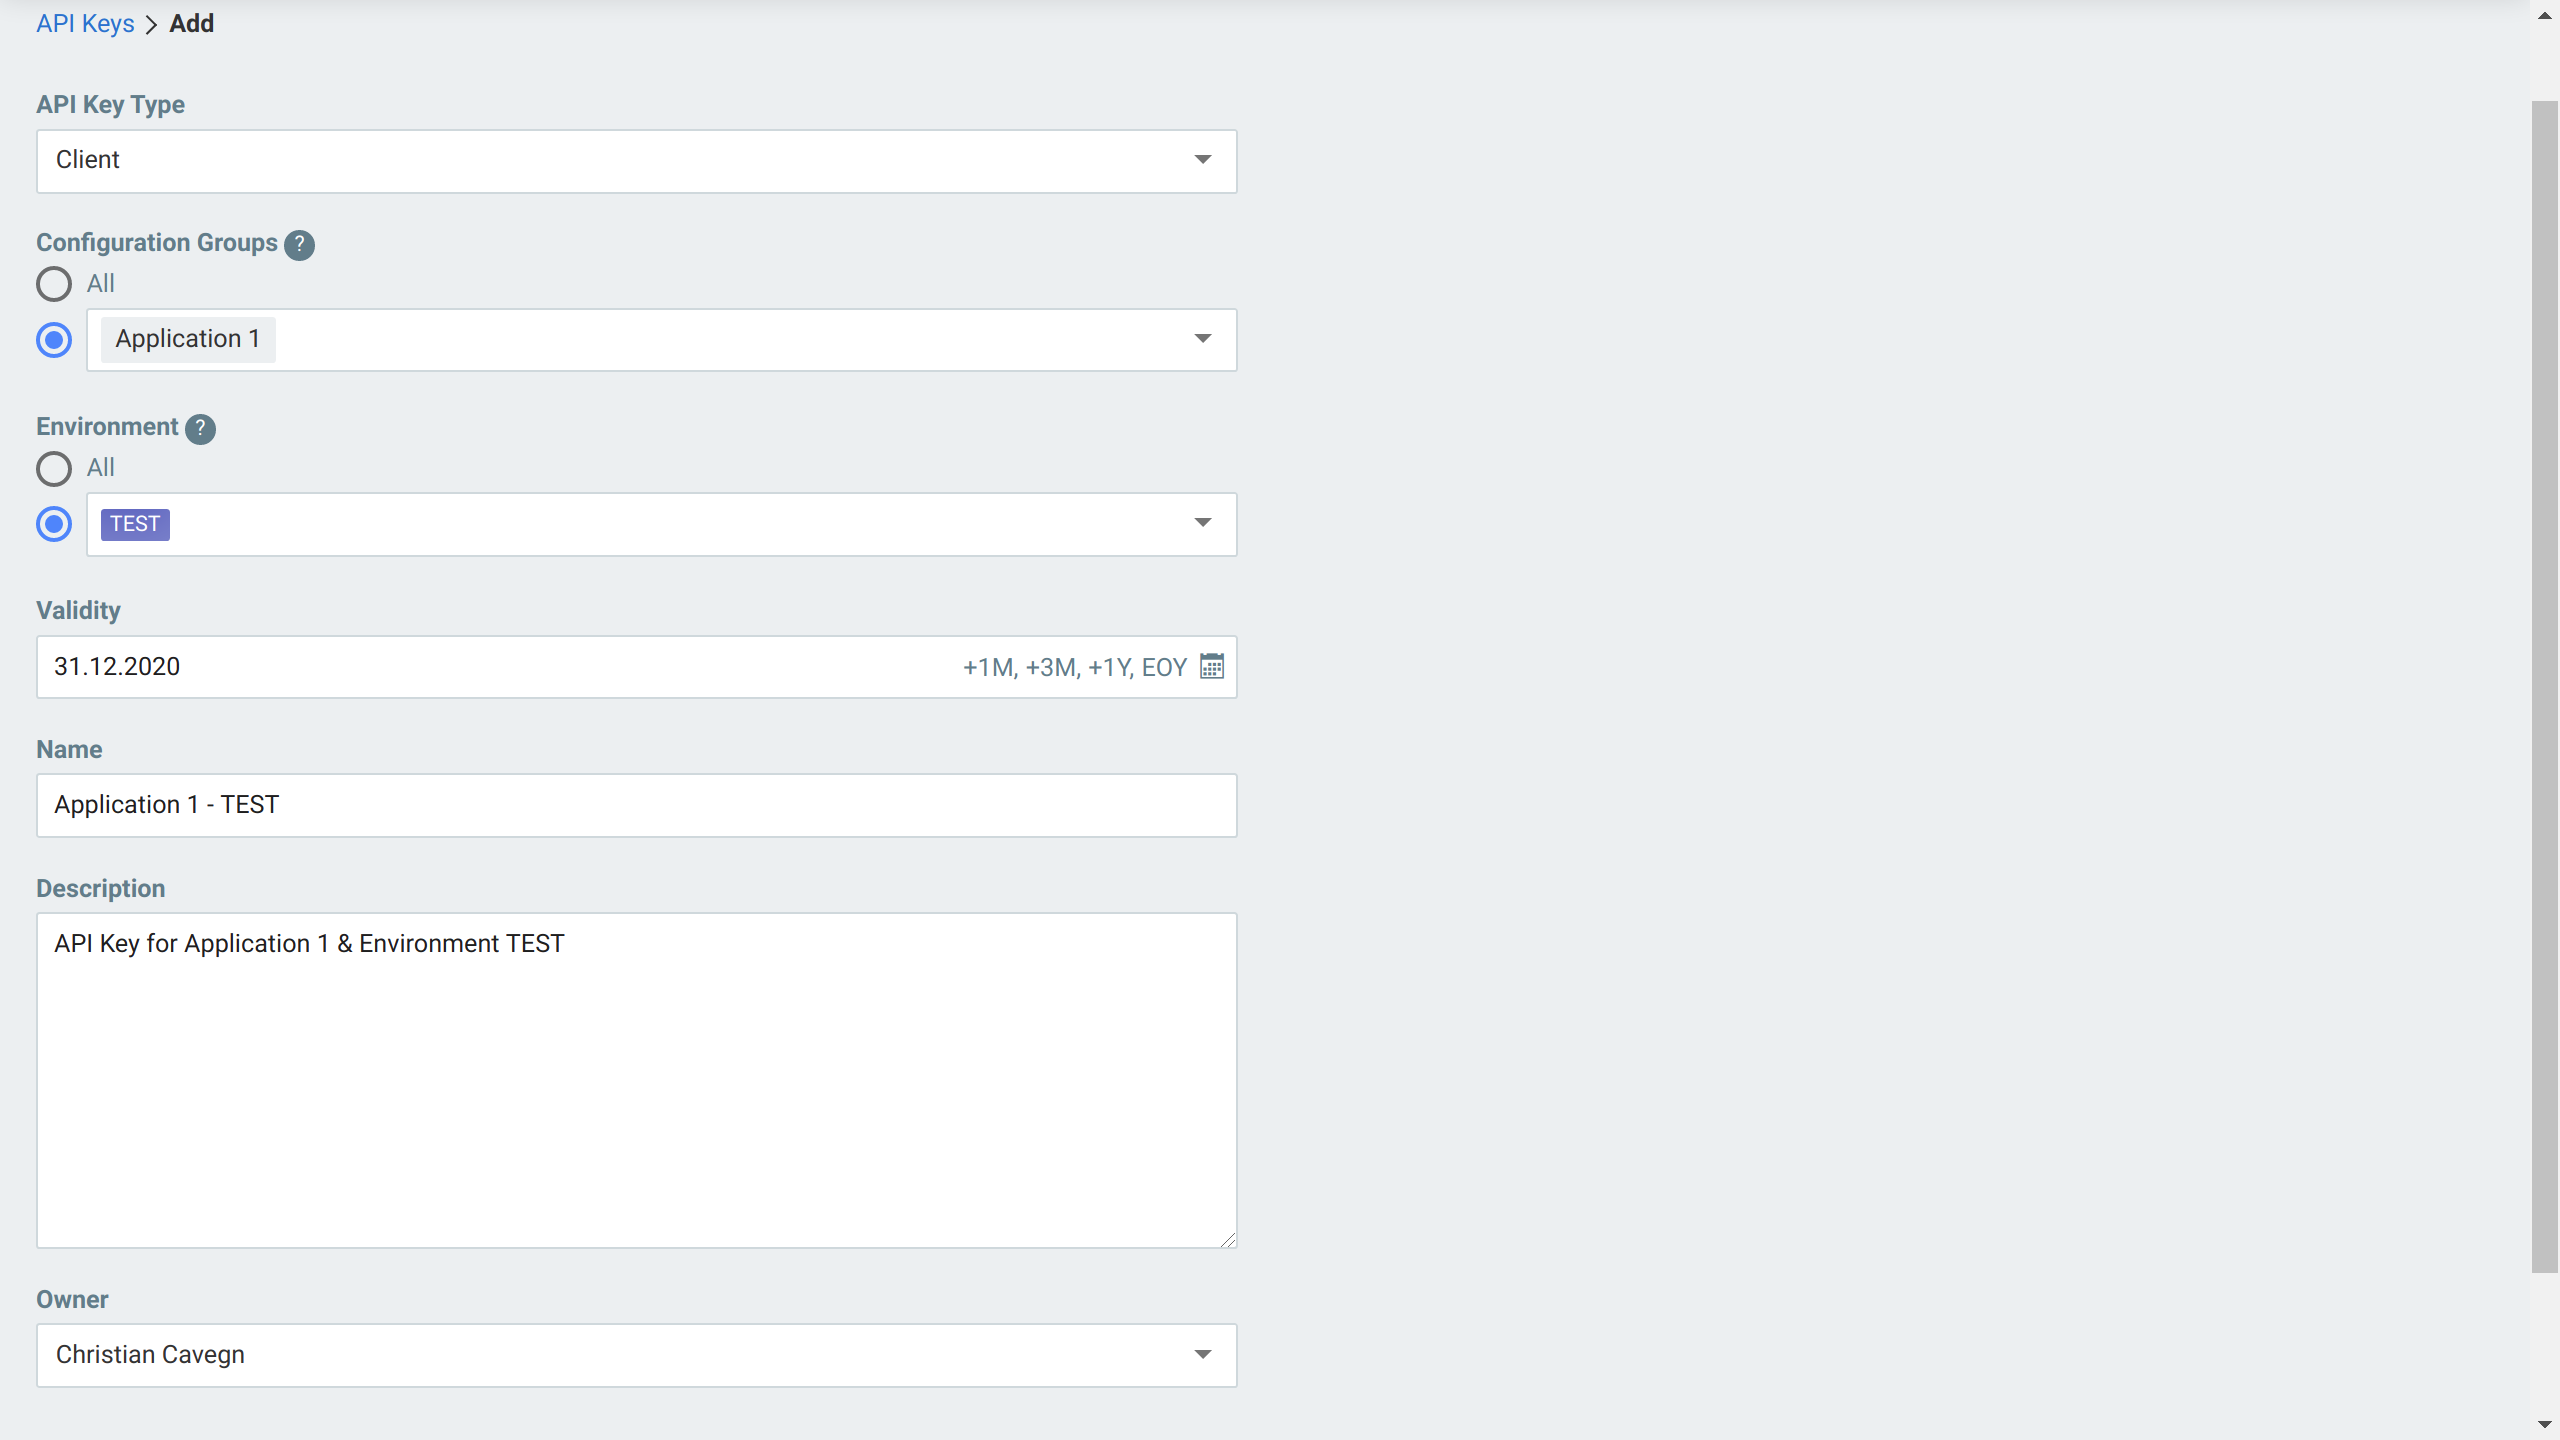
-
API Key Type: The type of the API Key to create, see API Key Types. -
Configuration Groups: Choose if the API Key should be valid for all configuration groups (be careful with this option) or specify one or more configuration groups. -
Environment: Choose if the API Key should be valid for all environments (be careful with this option) or specify one or more environment. -
Validity: Define the lifetime of the API Key. After this date, accessing ConfigSeeder® won’t be possible with this key.You can
-
increment the desired lifetime by 3 month with a click on
+3Metc. -
set the lifetime until the end of the year with a click on
EOY
-
-
Description: Leave a description of the use case of the API Key. -
Owner: Define the owner of the new API Key.You need the right permissions for overriding the Owner. See Access Management
-
-
Create the new API Key by clicking on the
Savebutton.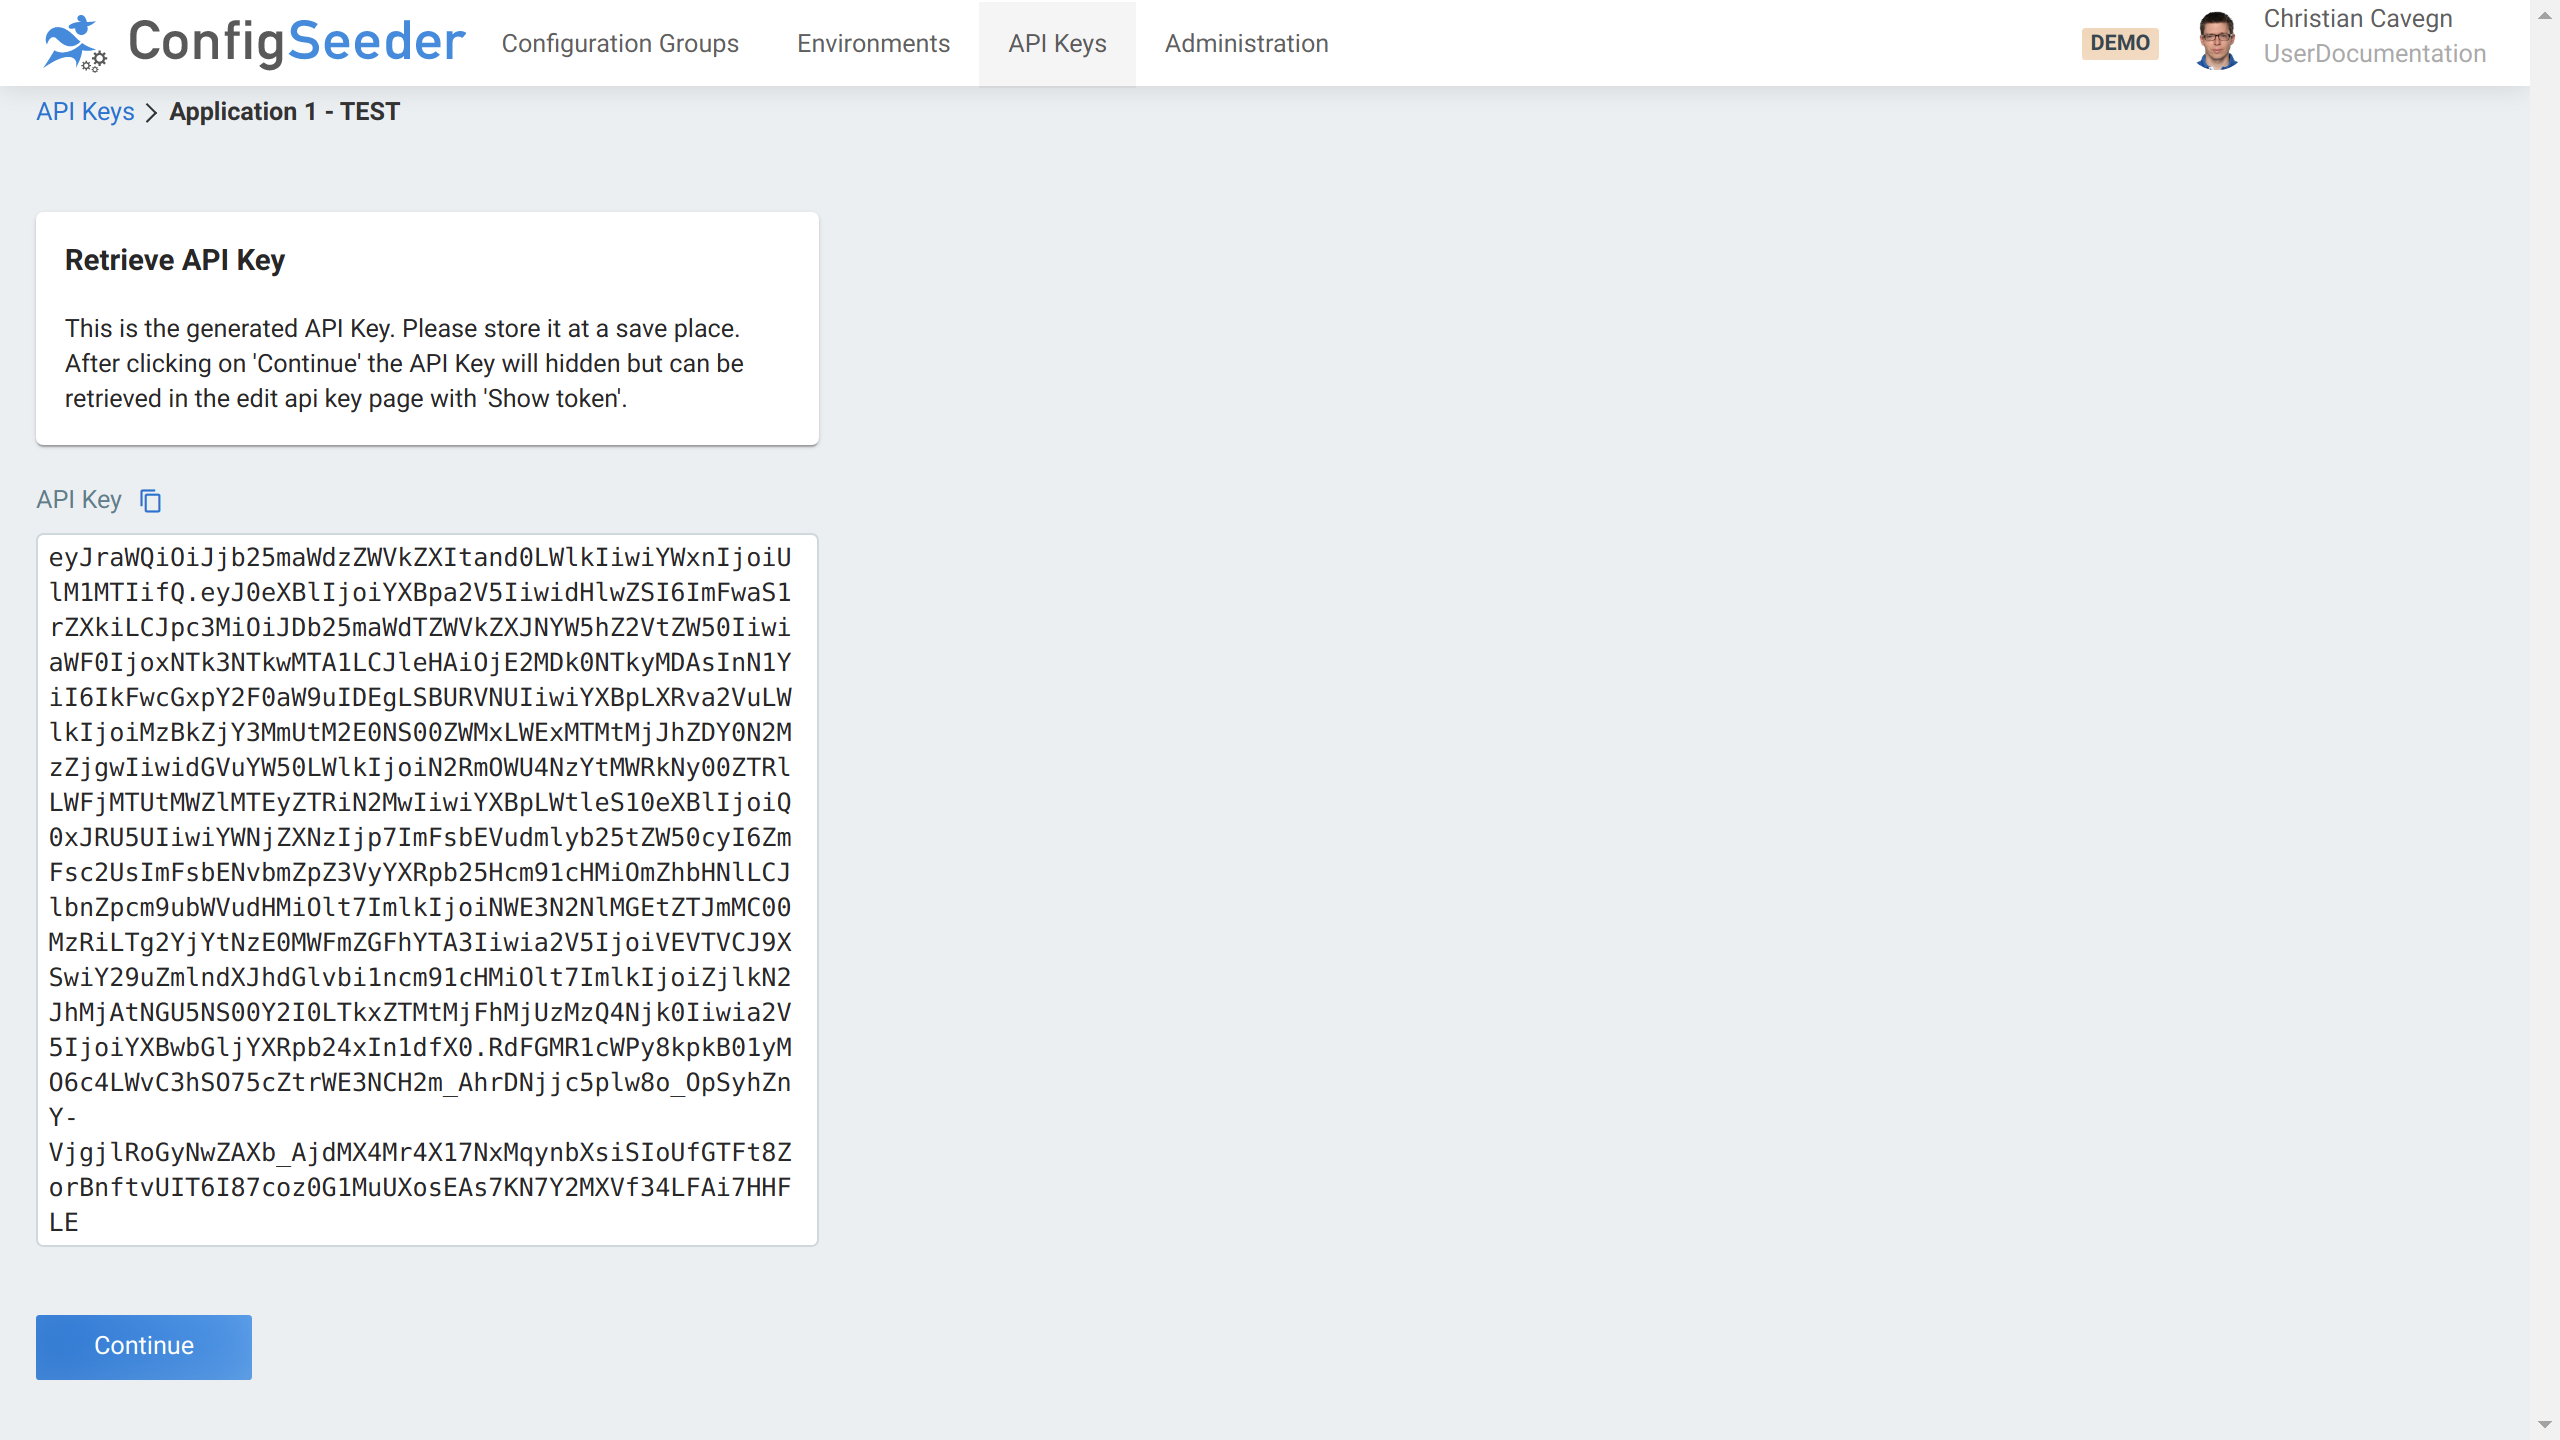
-
Copy the created Token to a secure location
The API Key can be shown again at a later date.
-
Click on
Continueto return to the API Key overview page
|
Be careful when creating an Api Key with access to all configuration groups and/or environments. Such a key is very powerful because it can grant access to all your configuration data. Such a key must be protected! |
3.4.3.1. API Key Types
| API Key Type | Description |
|---|---|
|
With an API Key of this type, configuration data can be retrieved from ConfigSeeder®.
When accessing configuration data directly with the Rest API or with one of our clients, an API Key of type |
|
With an API Key of type |
|
An API Key of this type has permission to use the synchronize Rest API and should only be used for the ConfigSeeder® extension |
|
The ConfigSeeder® extension This API Key Type is only visible of the Extension is licensed. |
|
The ConfigSeeder® extension This API Key Type is only visible of the Extension is licensed. |
|
If you don’t know which API Key Type to use, Please don’t hesitate to contact us. |
3.4.4. Edit (metadata of) an existing API Key
API Keys are created by ConfigSeeder® but stored externally. ConfigSeeder® only stores the metadata of the created keys but not the key themselves. This means, that
-
it is not possible to change any attributes relevant for access control (Type, selected environment(s), selected configuration group(s), validity/lifetime)
-
the keys metadata can be changed (Name of the Key, Description, Owner)
|
See how to renew an API Key if you have to change attributes relevant for access control. |
If you only like to change the metadata of an API Key, you can do that as follows:
-
Click on the navigation point
API Keys -
Click on the pencil-icon of the API Key you want to edit
-
Change the API Keys metadata like desired
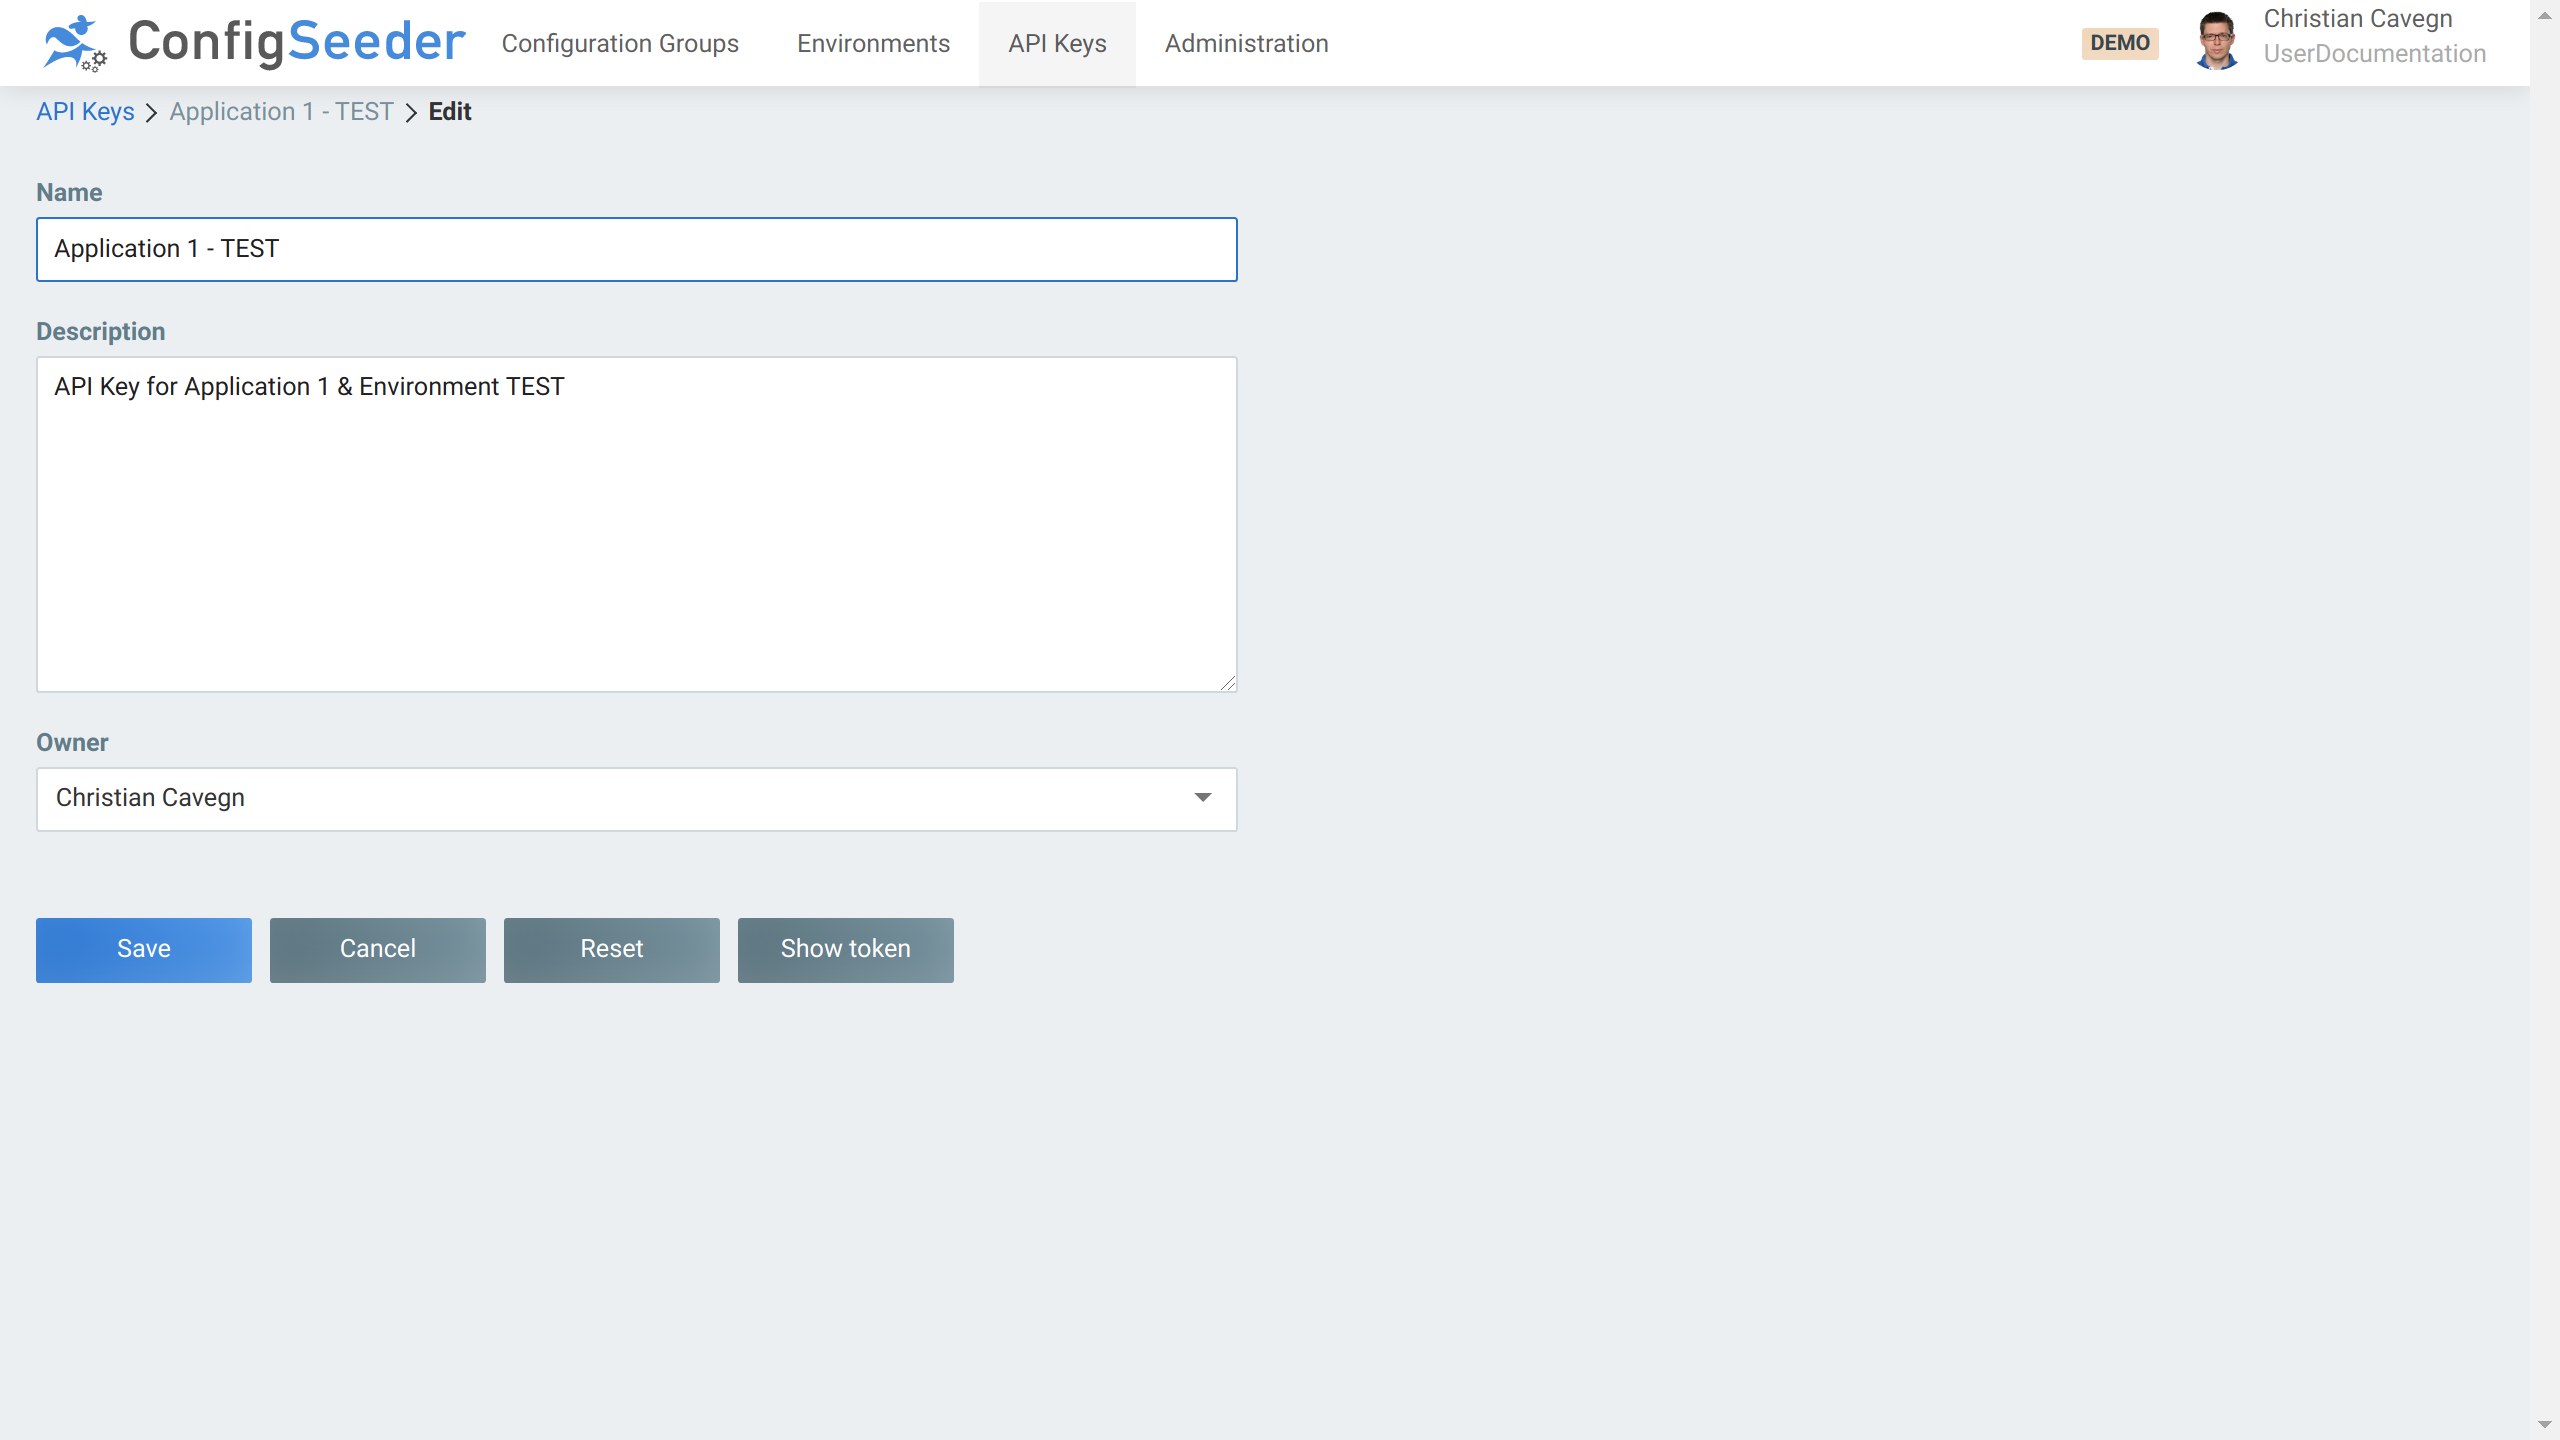
-
Store changes by clicking on the
Savebutton. -
The Token is shown
|
If you need to see the token of an API Key again, just hit the |
3.4.5. Renew an API Key
API Keys are created by ConfigSeeder® but stored externally. ConfigSeeder® only stores the metadata of the created keys but not the key themselves.
Renewing an API Key therefore means:
-
Create a new API Key based on an existing API Key
-
Update the application that uses the api key (replace the old key with the new one)
-
Test the application with the new API Key
-
Revoke the old API Key
|
Be careful about revoking API Keys. Once an API Key has been revoked, it can’t be reactivated. If testing the Application can’t be performed, delay key revocation until the application has been tested. |
-
Click on the navigation point
API Keys -
Click on the renew-icon of the API Key you want to renew
-
Change the API Key like desired
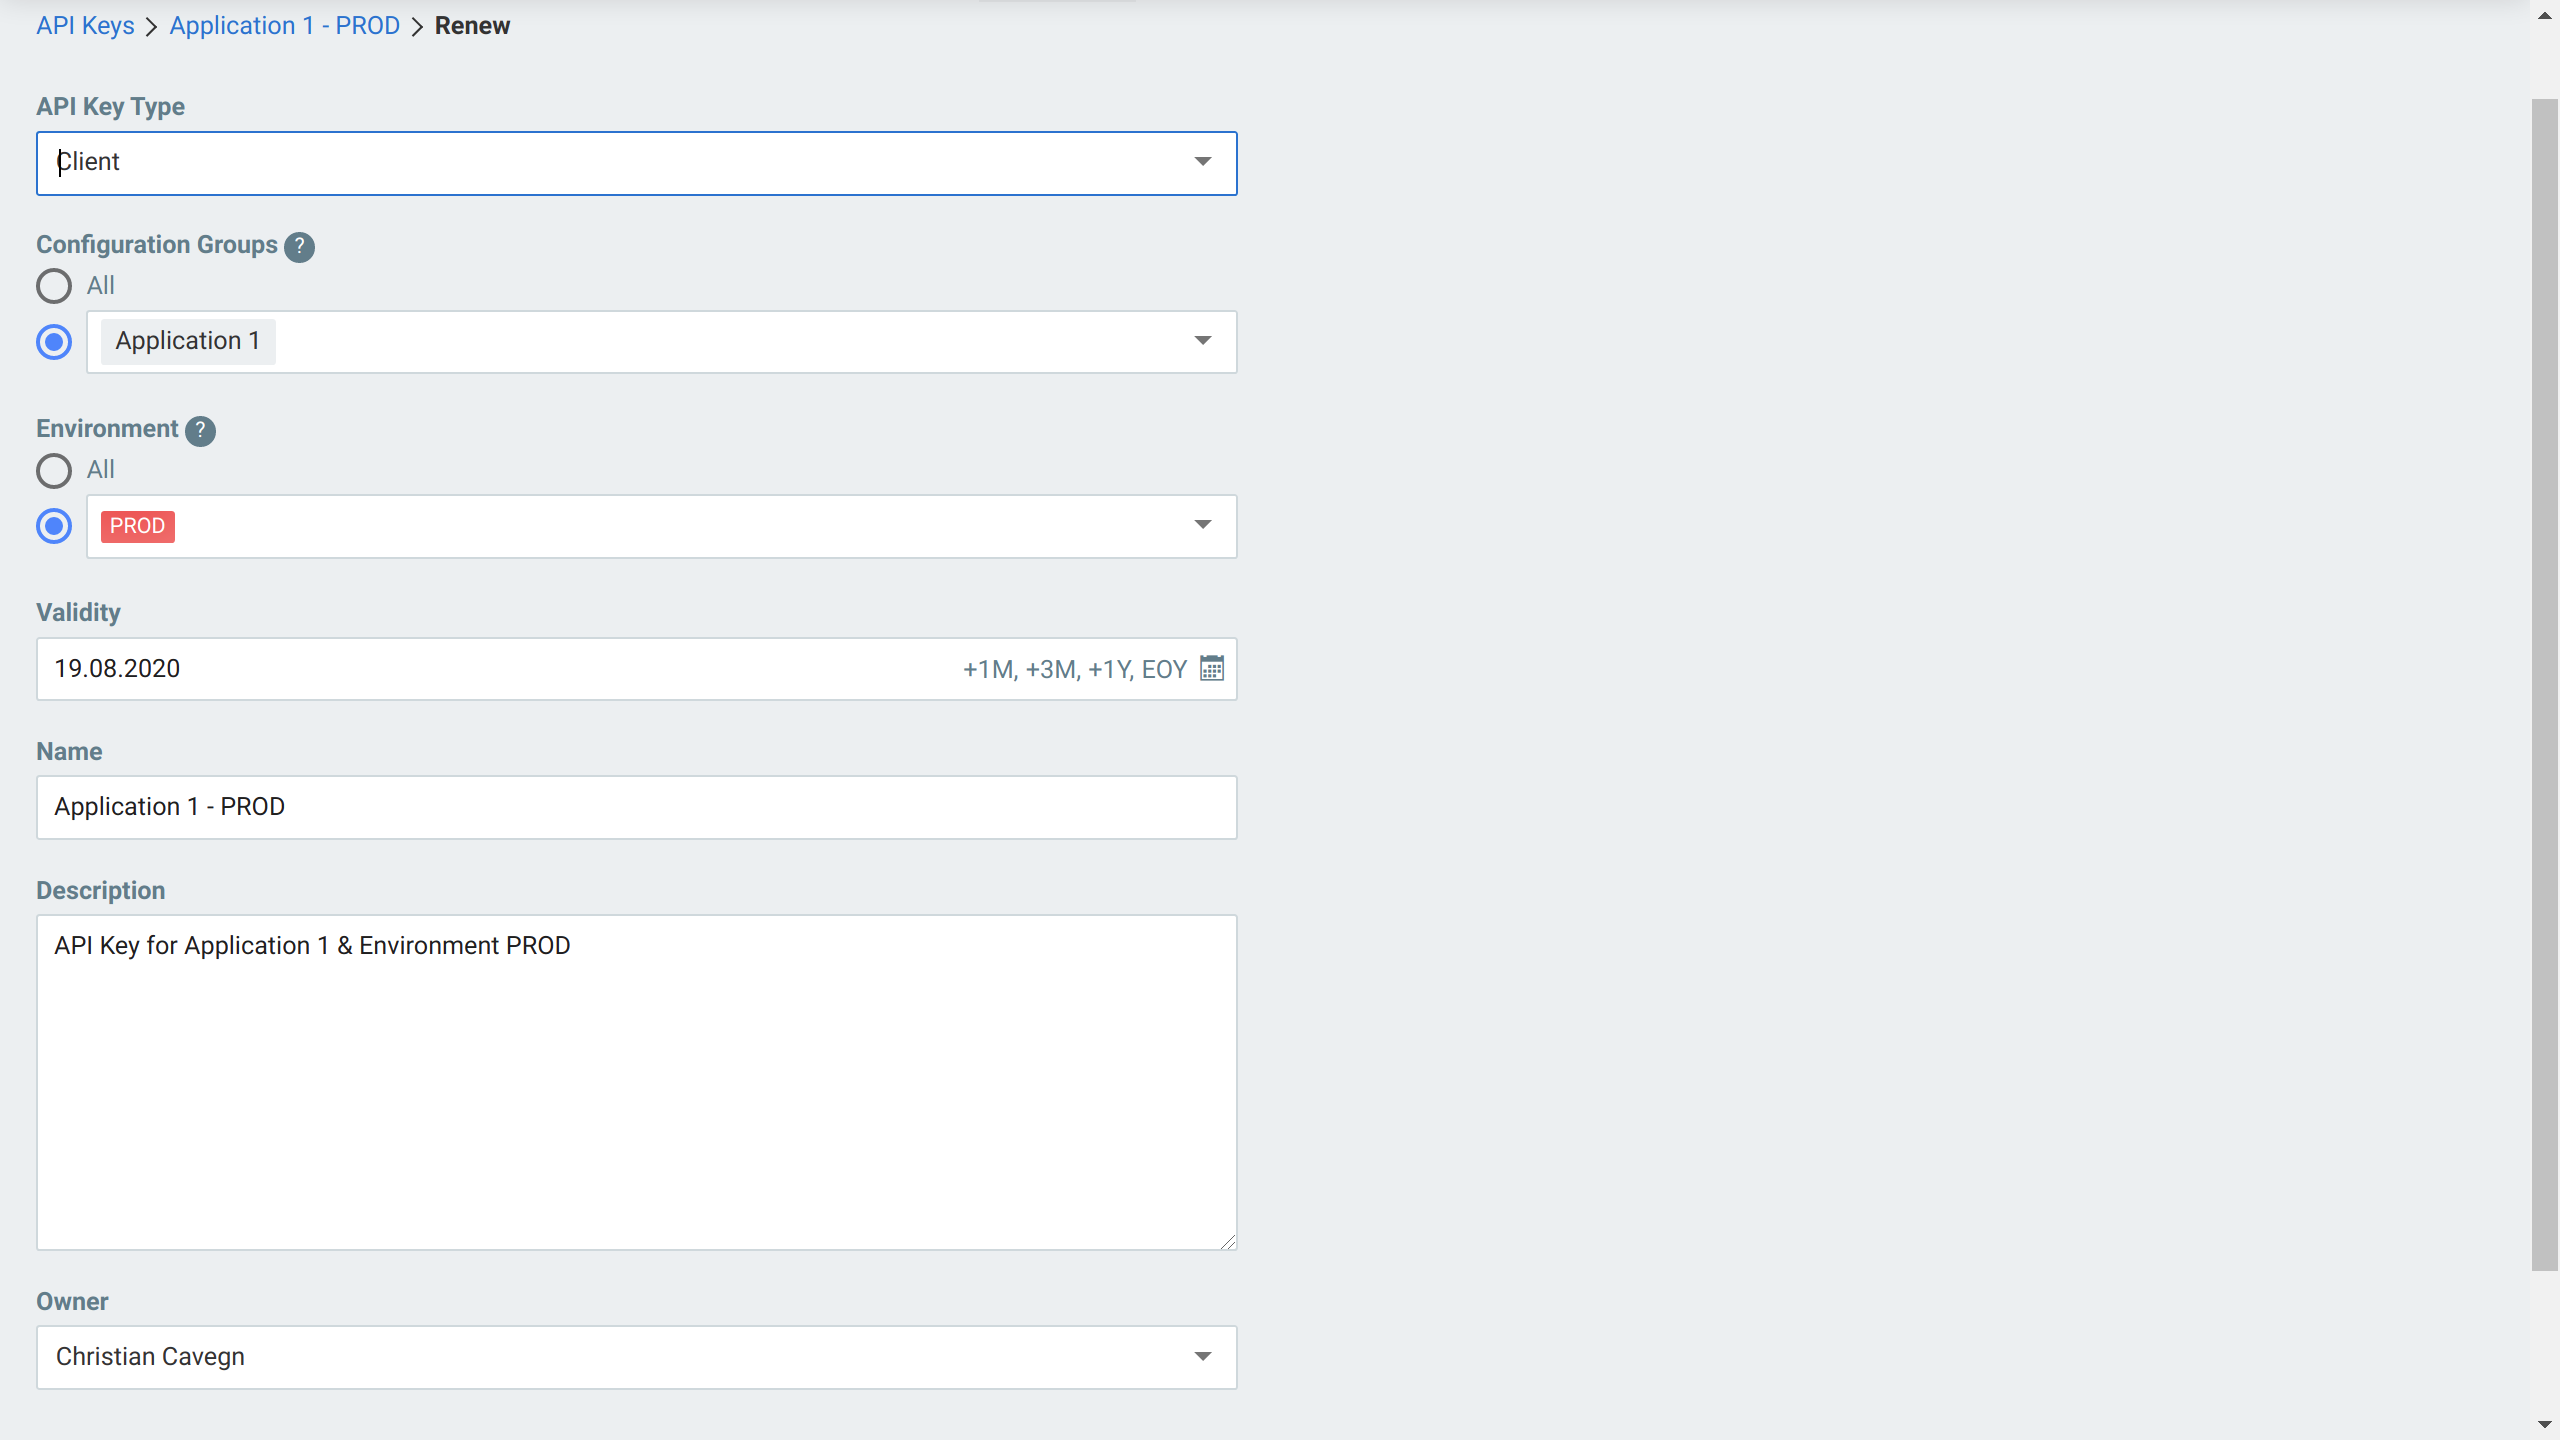
-
Copy the created Token to a secure location
3.4.6. Show the token of an API Key
-
Click on the navigation point
API Keys -
Click on the pencil-icon of the API Key you want to edit
-
Click on the
Show tokenbutton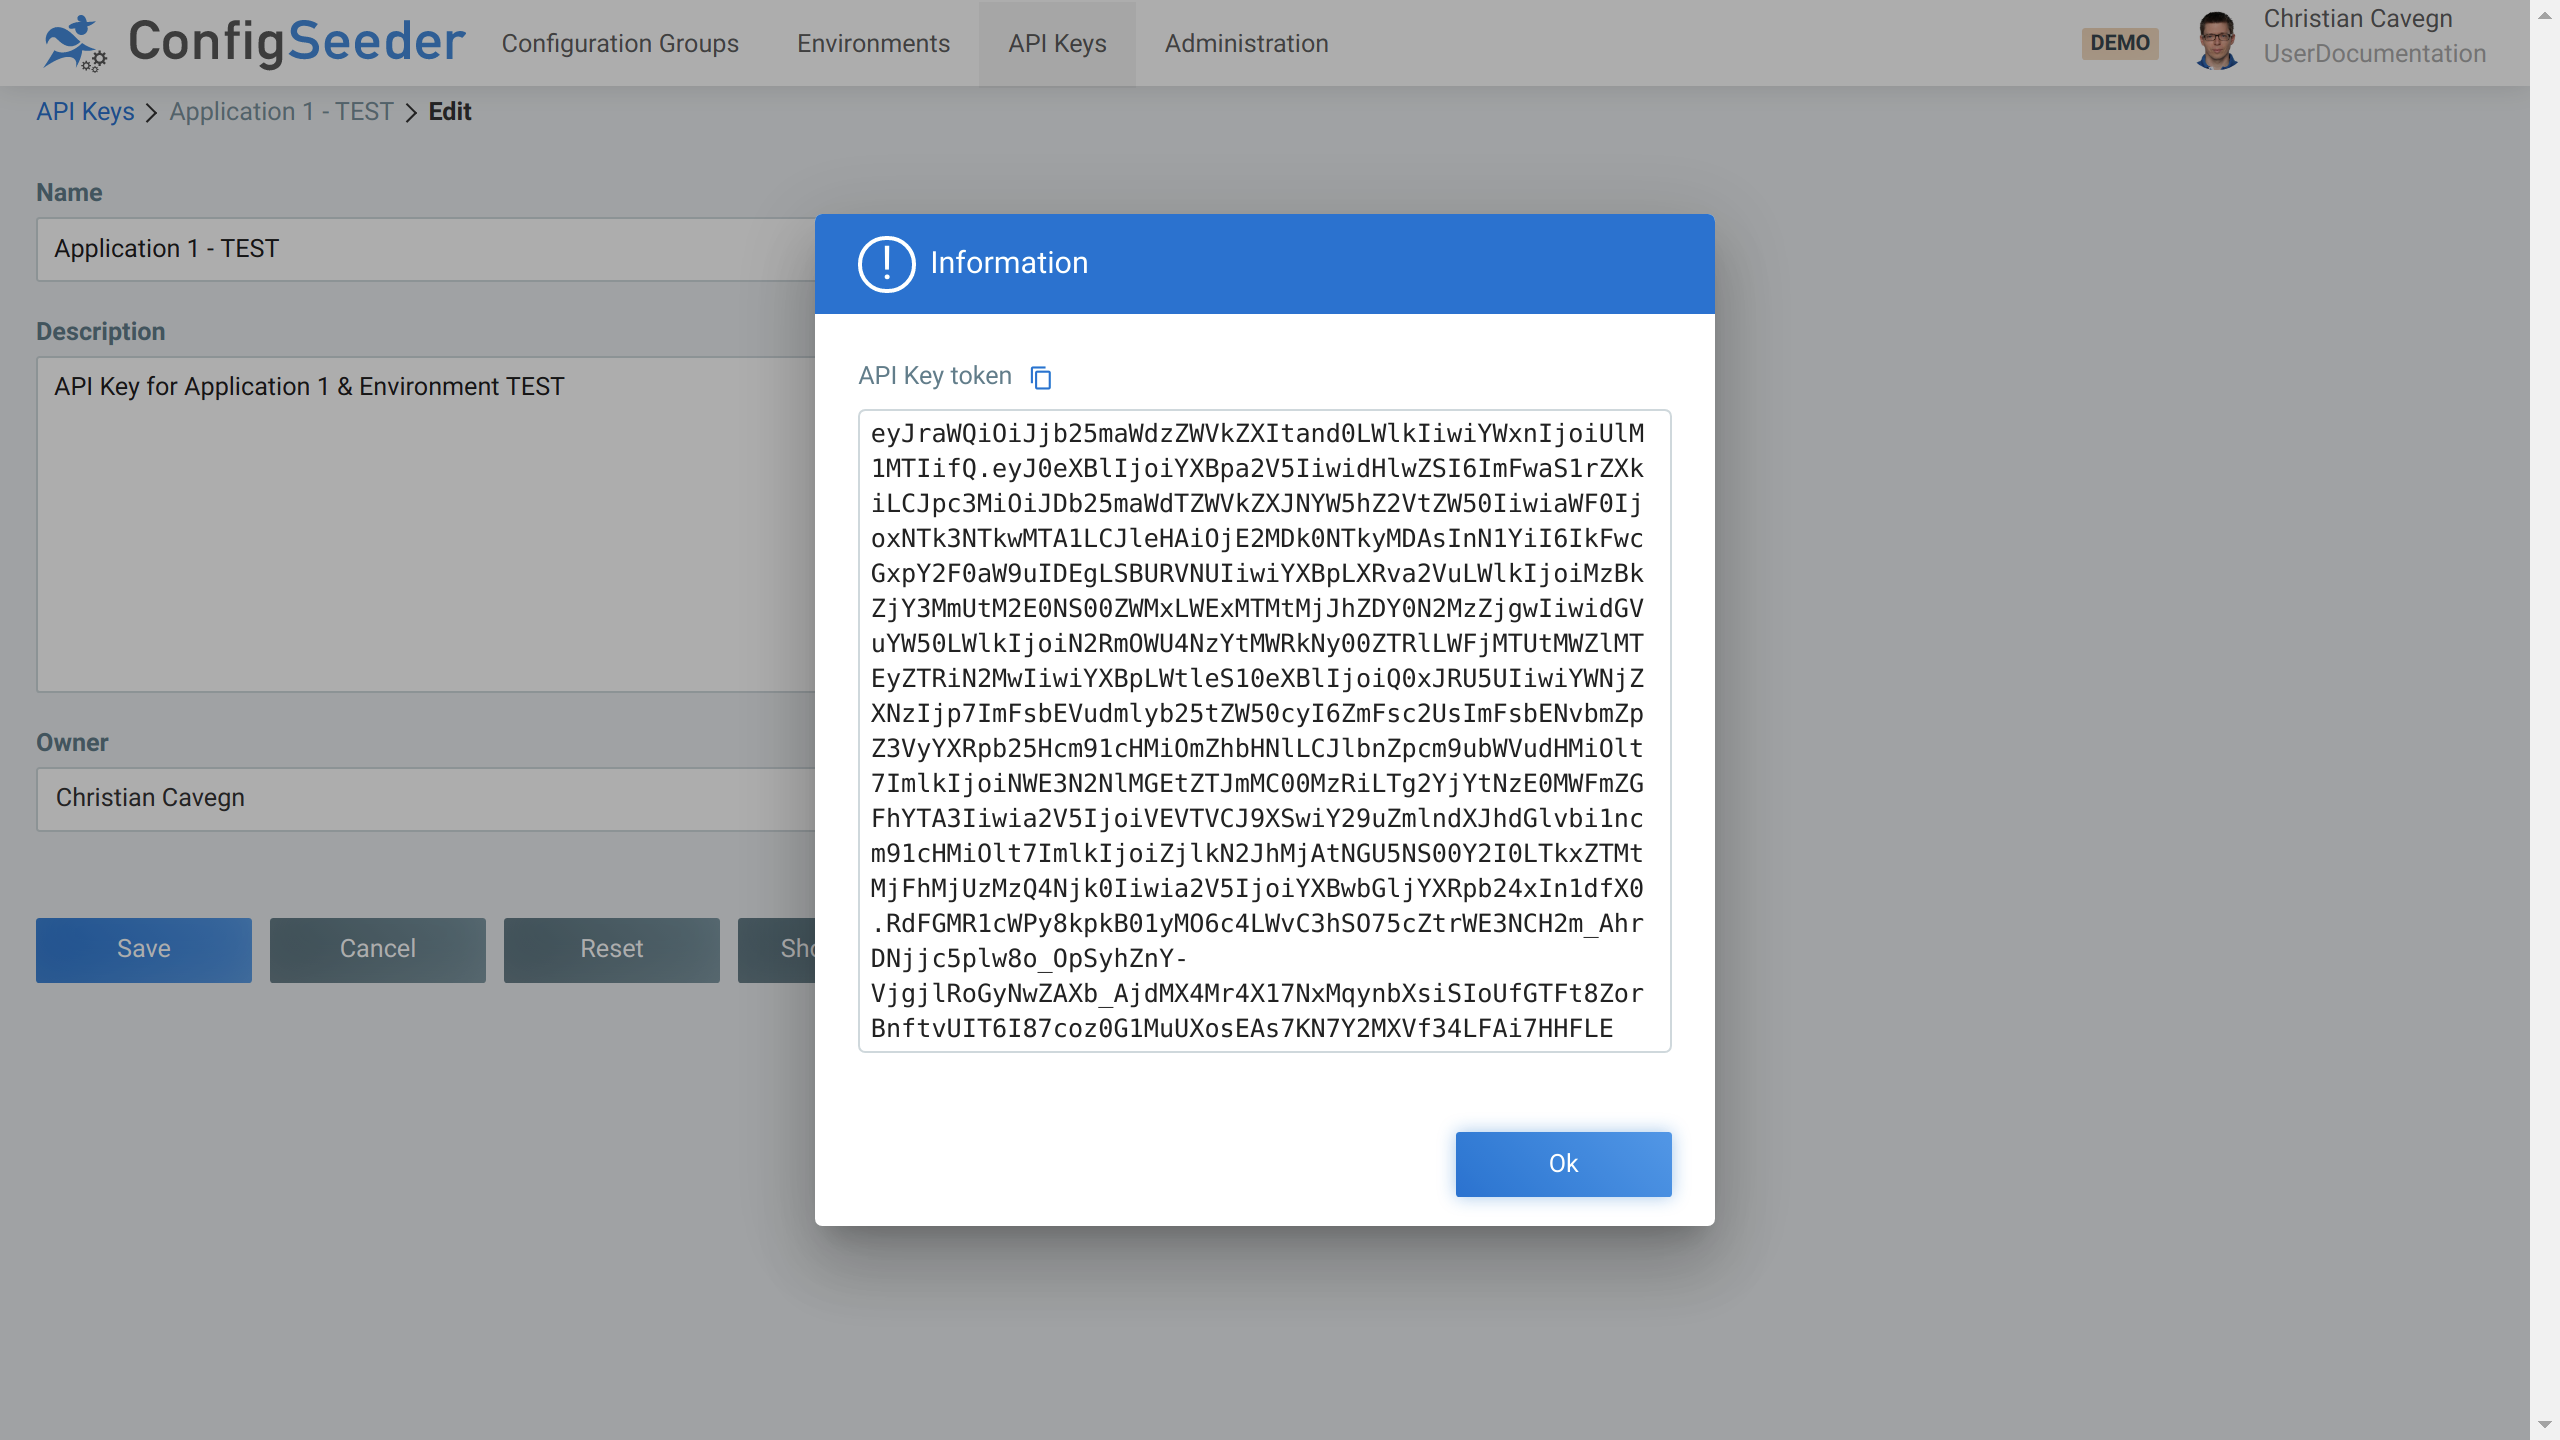
-
Store changes by clicking on the
Savebutton.
3.4.7. Revoke an API Key
-
Click on the navigation point
API Keys -
Click on the revoke-icon of the API Key you want to revoke
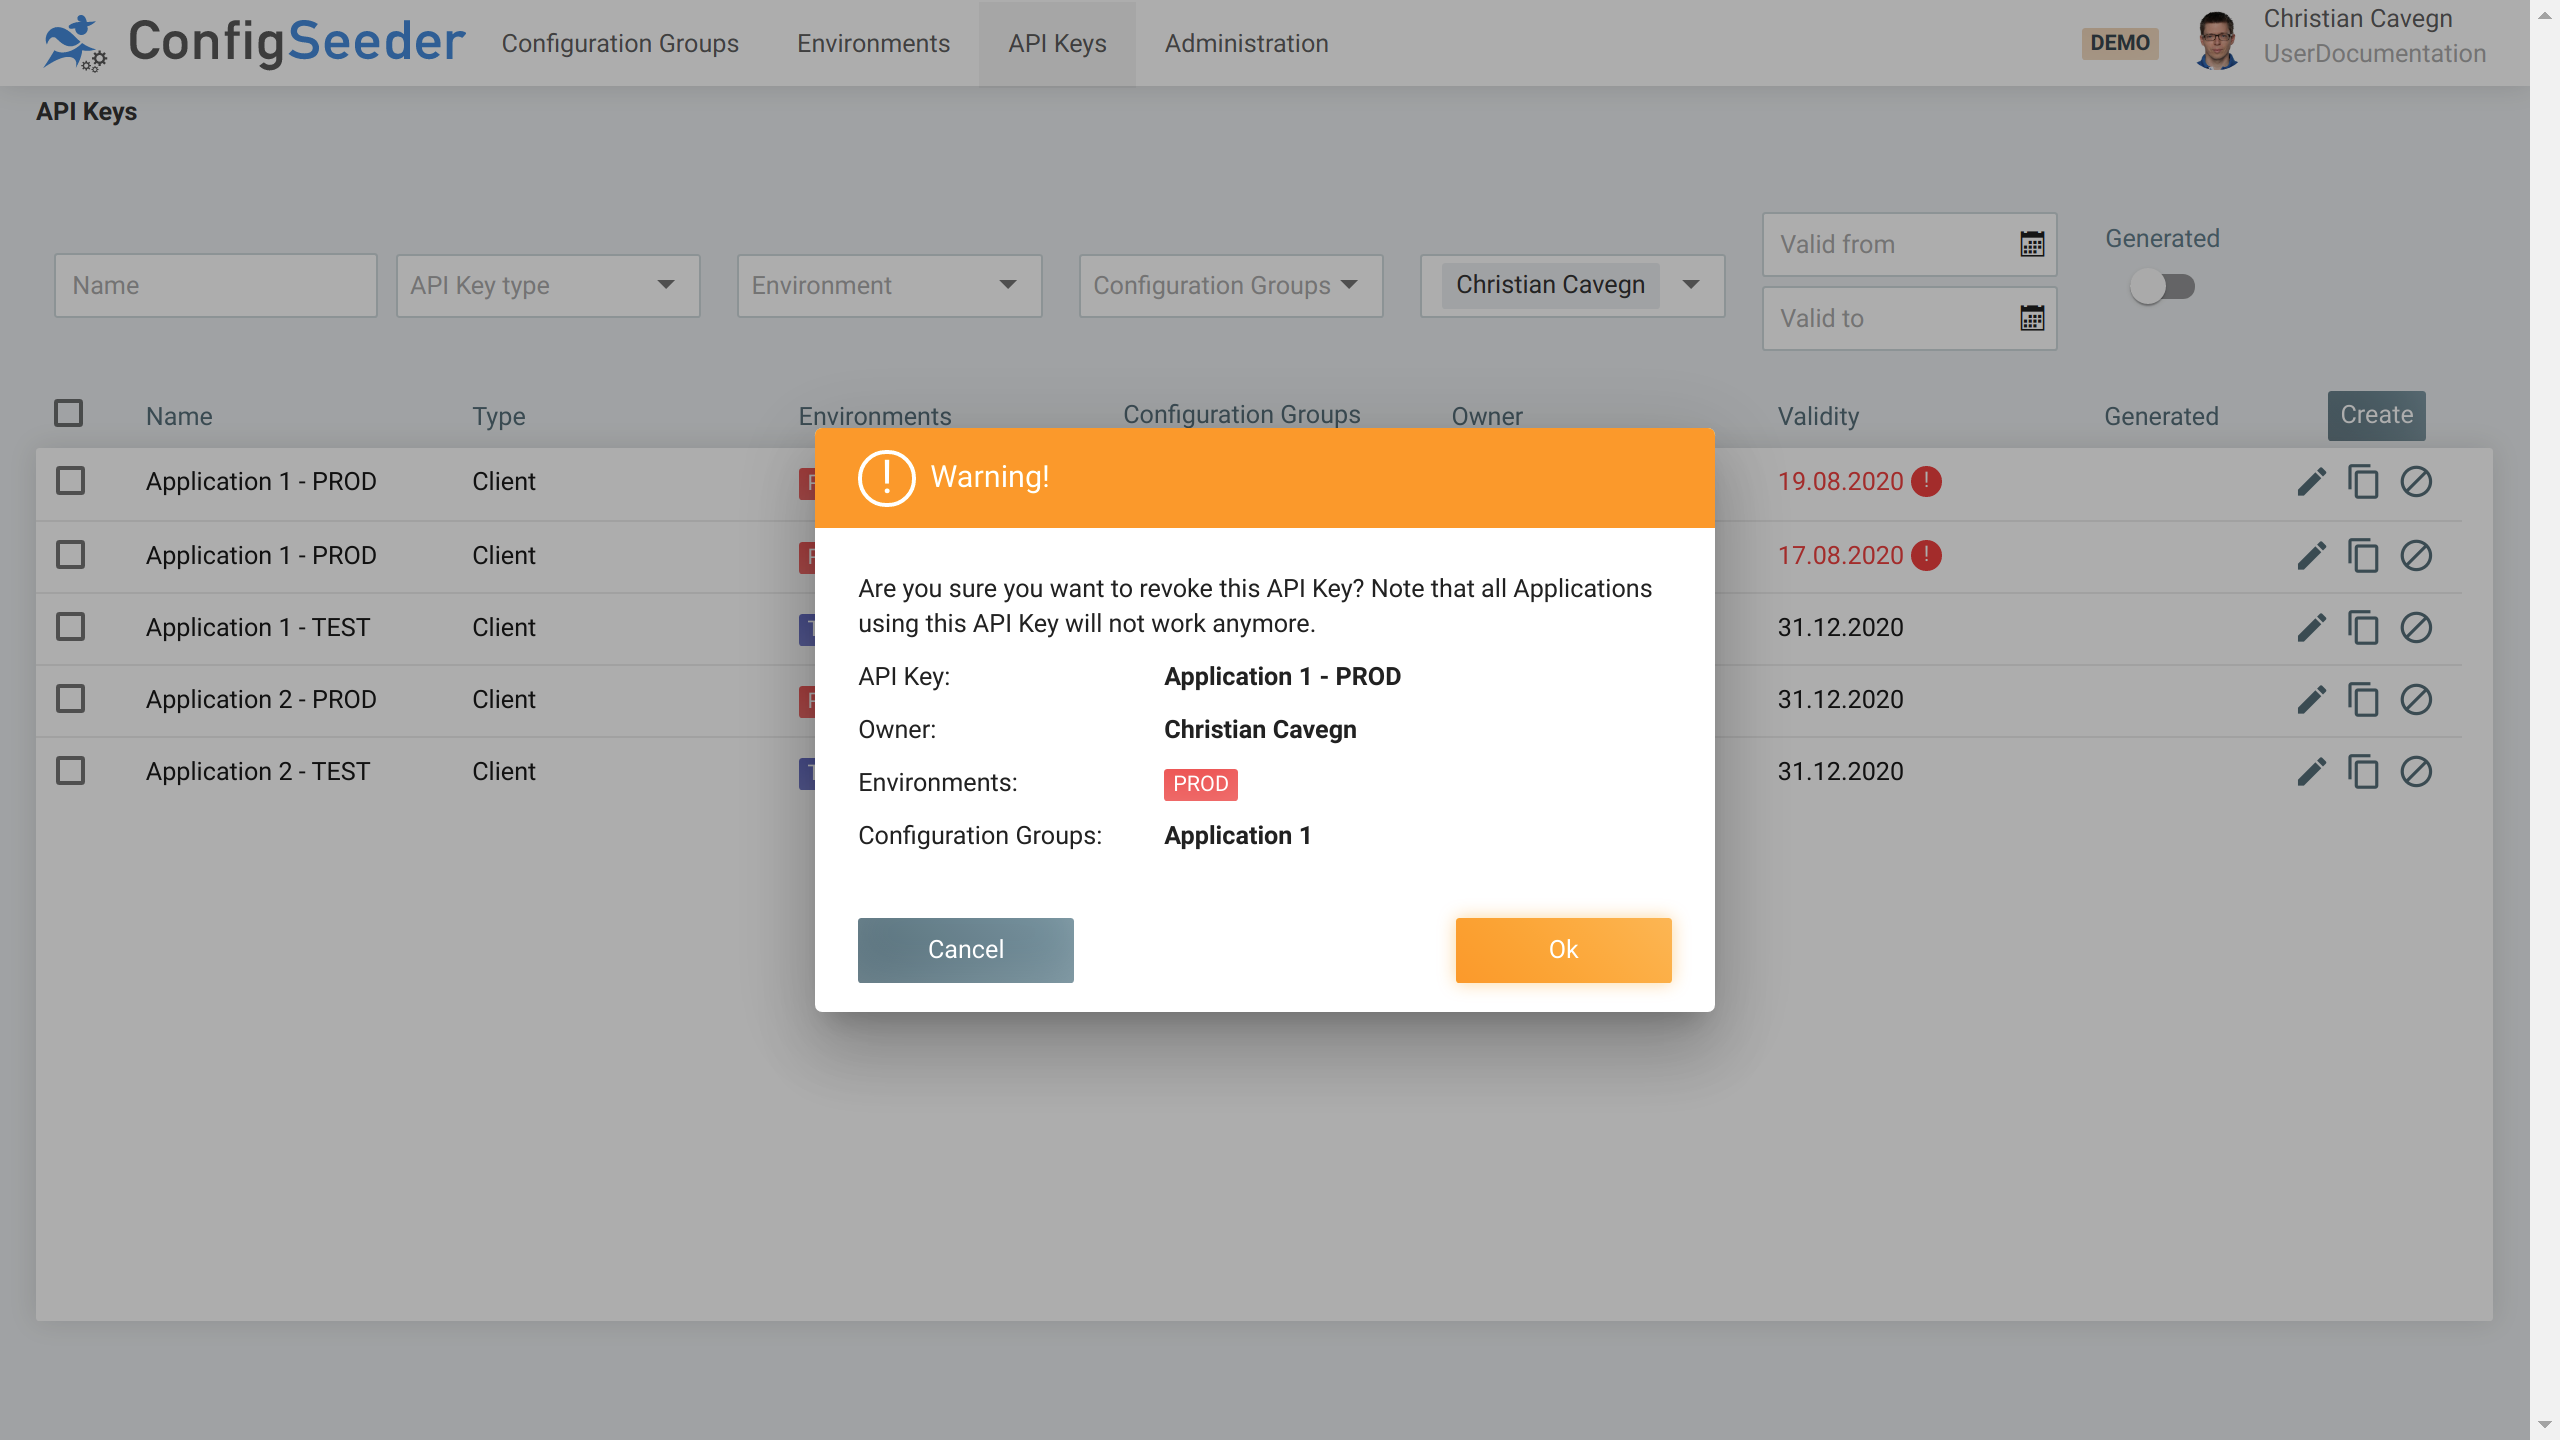
-
Accept revoking the API Key by clicking on the
OKbutton.
|
As soon as an API Key is revoked, it can’t be used any more. All access to ConfigSeeder® with a revoked API Key will be denied. |
3.4.8. Access management
For managing API Keys, the following Functional Roles can be used:
| Operation | Required Functional_Role and/or Permission |
|---|---|
Read |
|
Create Keys |
|
Update & Revoke |
|
3.5. Manage Users
3.5.1. Description
The User administration gives an overview over all known users (a known user is a user that has logged in at least one time or it is a user that has been created manually in ConfigSeeder®).
3.5.2. Show existing users
-
Click on the navigation point
Administration -
Select Tab
Users -
The users page shows an overview of the existing users
The users overview page shows the following information:
| Information | Description | ||
|---|---|---|---|
Shown Users |
Depending on the selection toggler either all users, only existing users or only deleted users are shown. |
||
Username |
Every user must have a username, the username must be unique and identifies the user. |
||
First and Last Name |
Selfexplaining, optionally provides additional information about the user. |
||
The email must normally be unique and is used to send notifications to the users, see notifications. |
|||
Groups |
Shows which Groups are assigned to the User.
|
||
Last Login |
Shows the time of the users last login. |
3.5.2.1. Available Actions
| Icon | Description |
|---|---|
|
|
Edit the user |

|
Delete user |
3.5.3. Automatic User updates
Normally, the administrator doesn’t have to manually create or update users. If Security integration is set up, ConfigSeeder® will automatically create non-existing users and update existing users.
Depending on the information available at logon time, the users metadata will be updated:
-
Username: The username is always required, log in without a username isn’t possible
-
First and Last Name: If the provided logon-information provided contains a first and/or last name, the user will be updated
-
Email: If the provided logon-information provided contains an email address, the user will be updated
If the logon-information contains Roles, they are automatically assigned to the user.
|
If the provided logon-information (SAML / OIDC Token, Preauthentication Headers) don’t contain information about
|
3.5.4. Manually create a new User
-
Click on the navigation point
Administration -
Select Tab
Users -
Click on the
CreateButton -
Specify the details of the new user
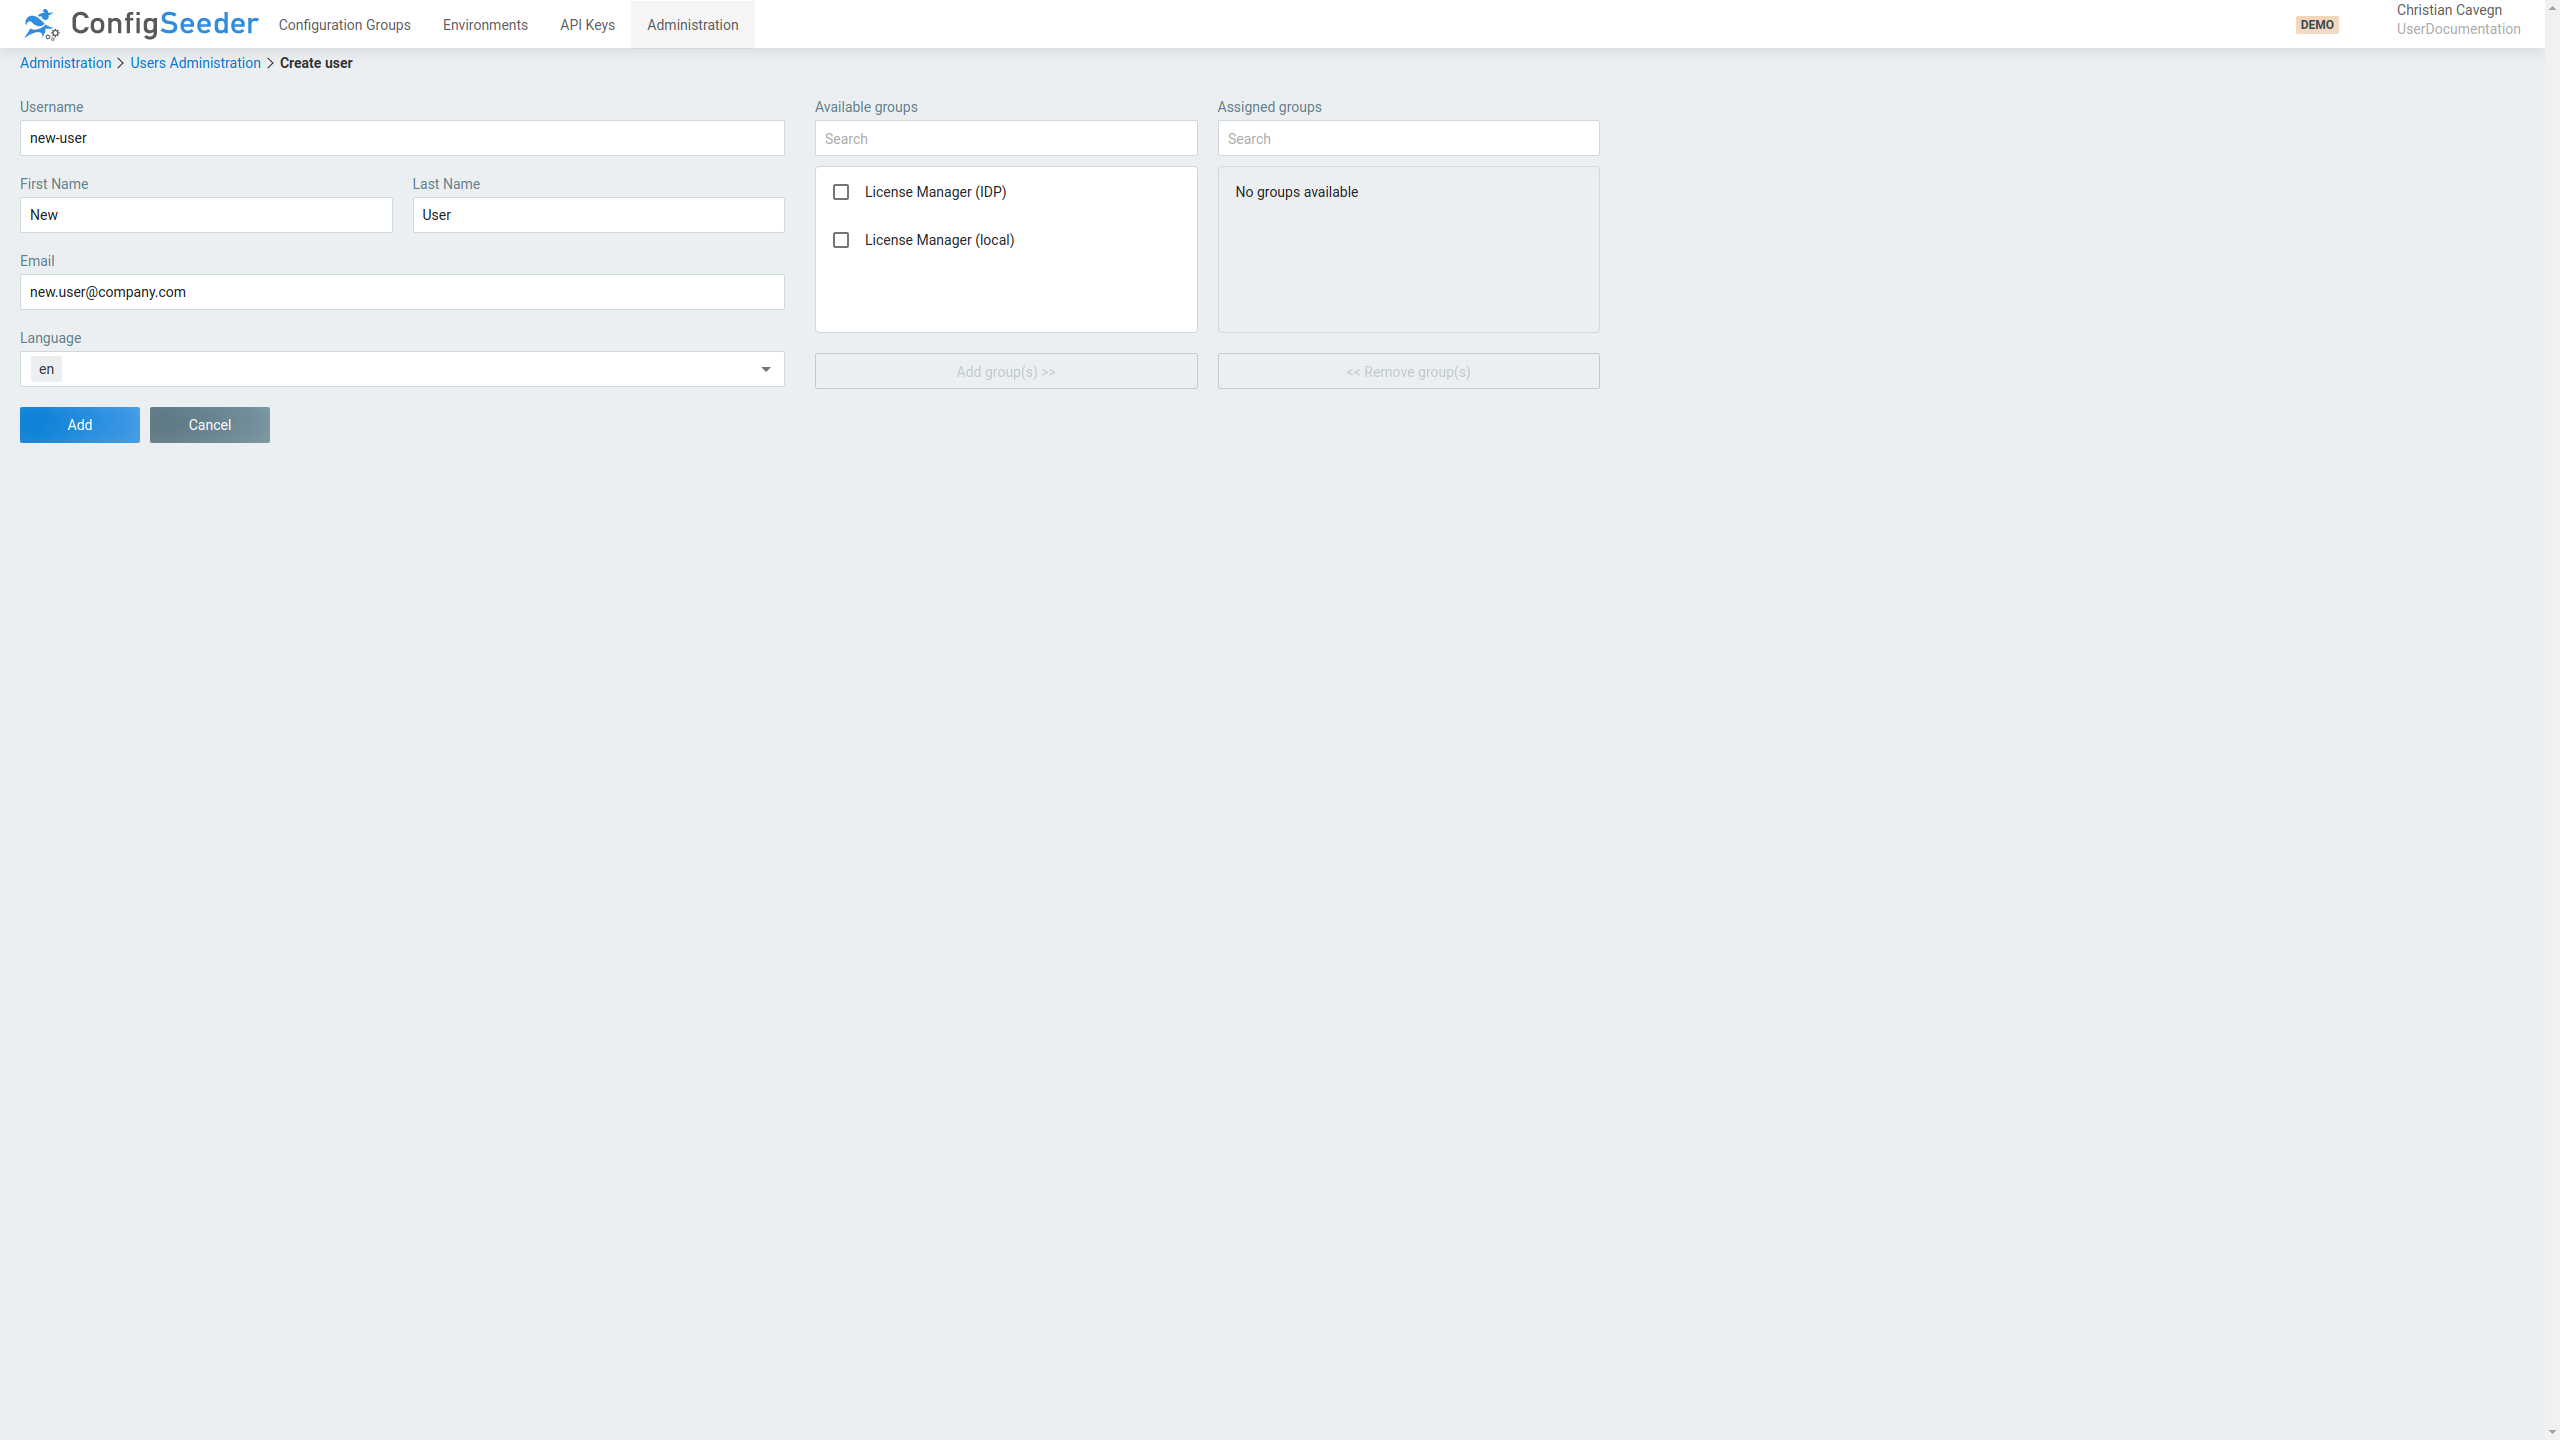
-
The entered username must be unique
-
Providing additional information is optional
-
Emails usually must be unique
-
If required assign groups to the new user
-
-
Create the new user by clicking on the
Addbutton.
|
If the Roles are provided through the security integration, you shouldn’t manually assign groups. |
3.5.5. Edit an existing user
-
Click on the navigation point
Administration -
Select Tab
Users -
Click on the pencil-icon of the user you want to edit
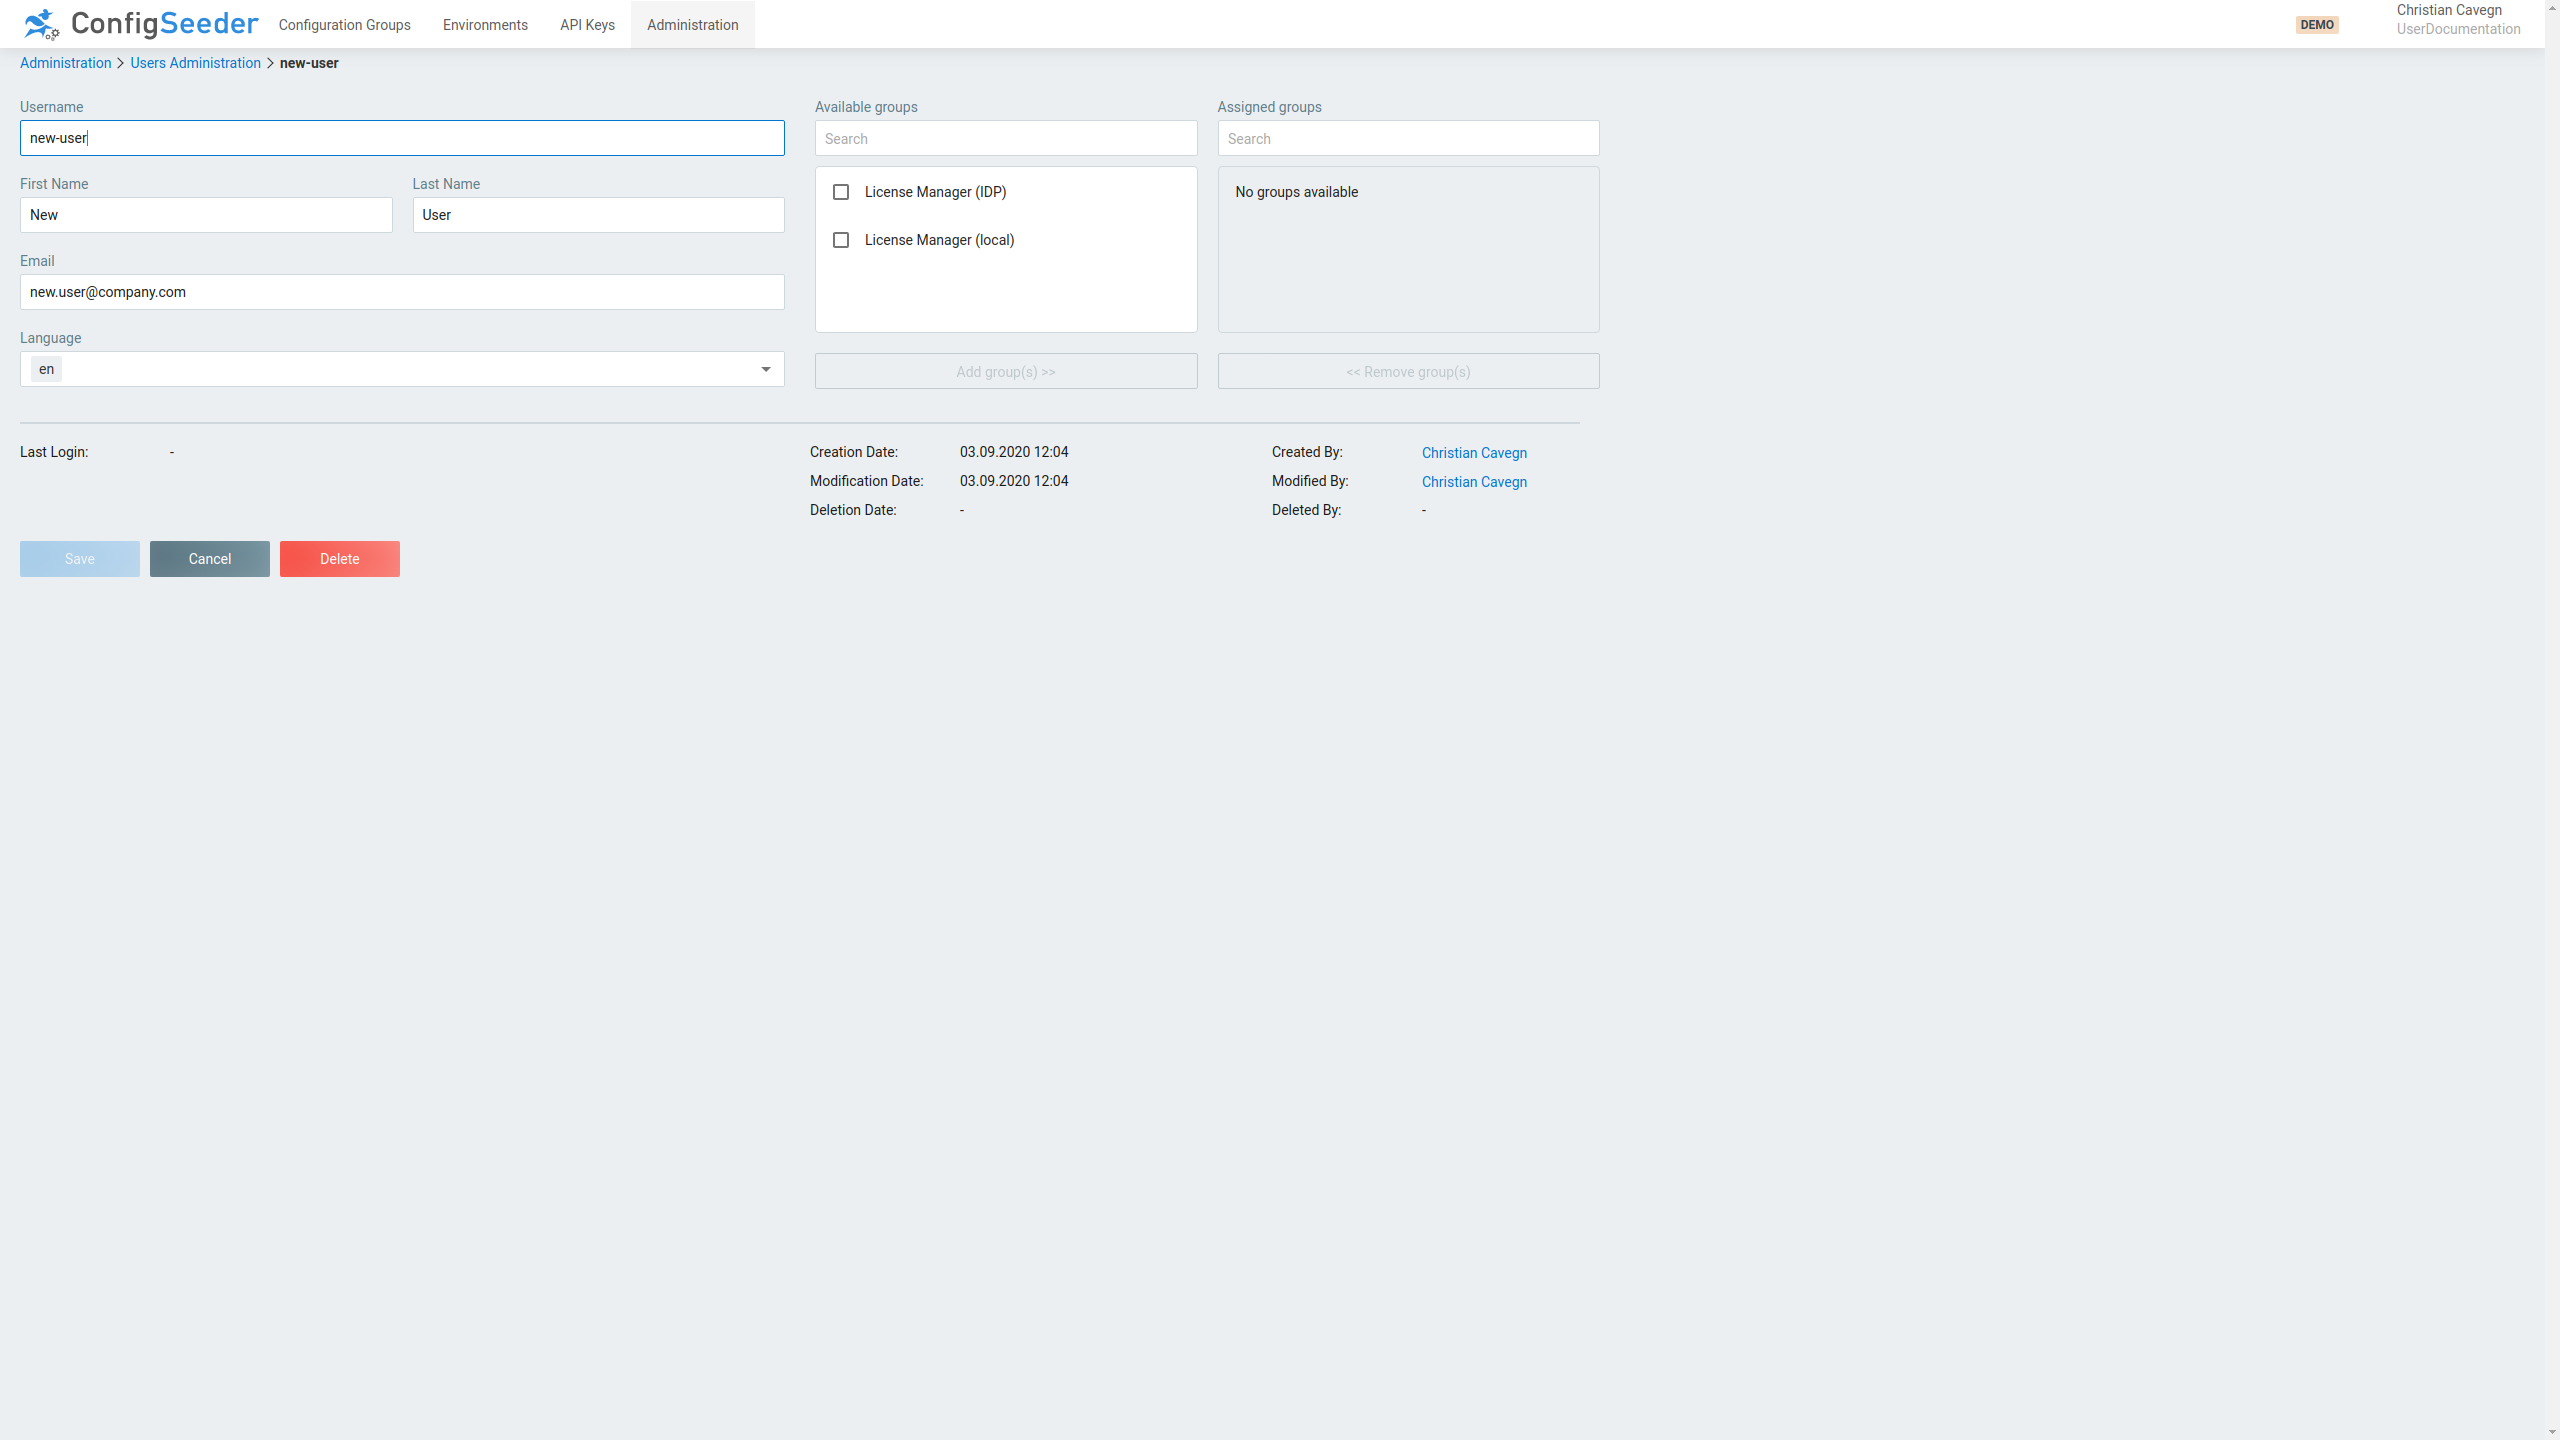
-
Change the user like desired
-
Store changes by clicking on the
Savebutton.
As is shown on the screenshot, the edit user site provides additional information to the user:
-
Last Login: Set to the date of the last login of the user
-
Creation Date: Who created the user at what time (Users created automatically are created by
SYSTEM) -
Modification Date: Who modified the user at what time (Users modified automatically are created by
SYSTEM) -
Deleted Date: Who deleted the user at which time
3.5.6. Delete an existing user
-
Click on the navigation point
Administration -
Select Tab
Users -
Click on the pencil-icon of the user you want to delete (or delete the user by clicking on the delete icon)
-
Delete the user by clicking on the
Deletebutton.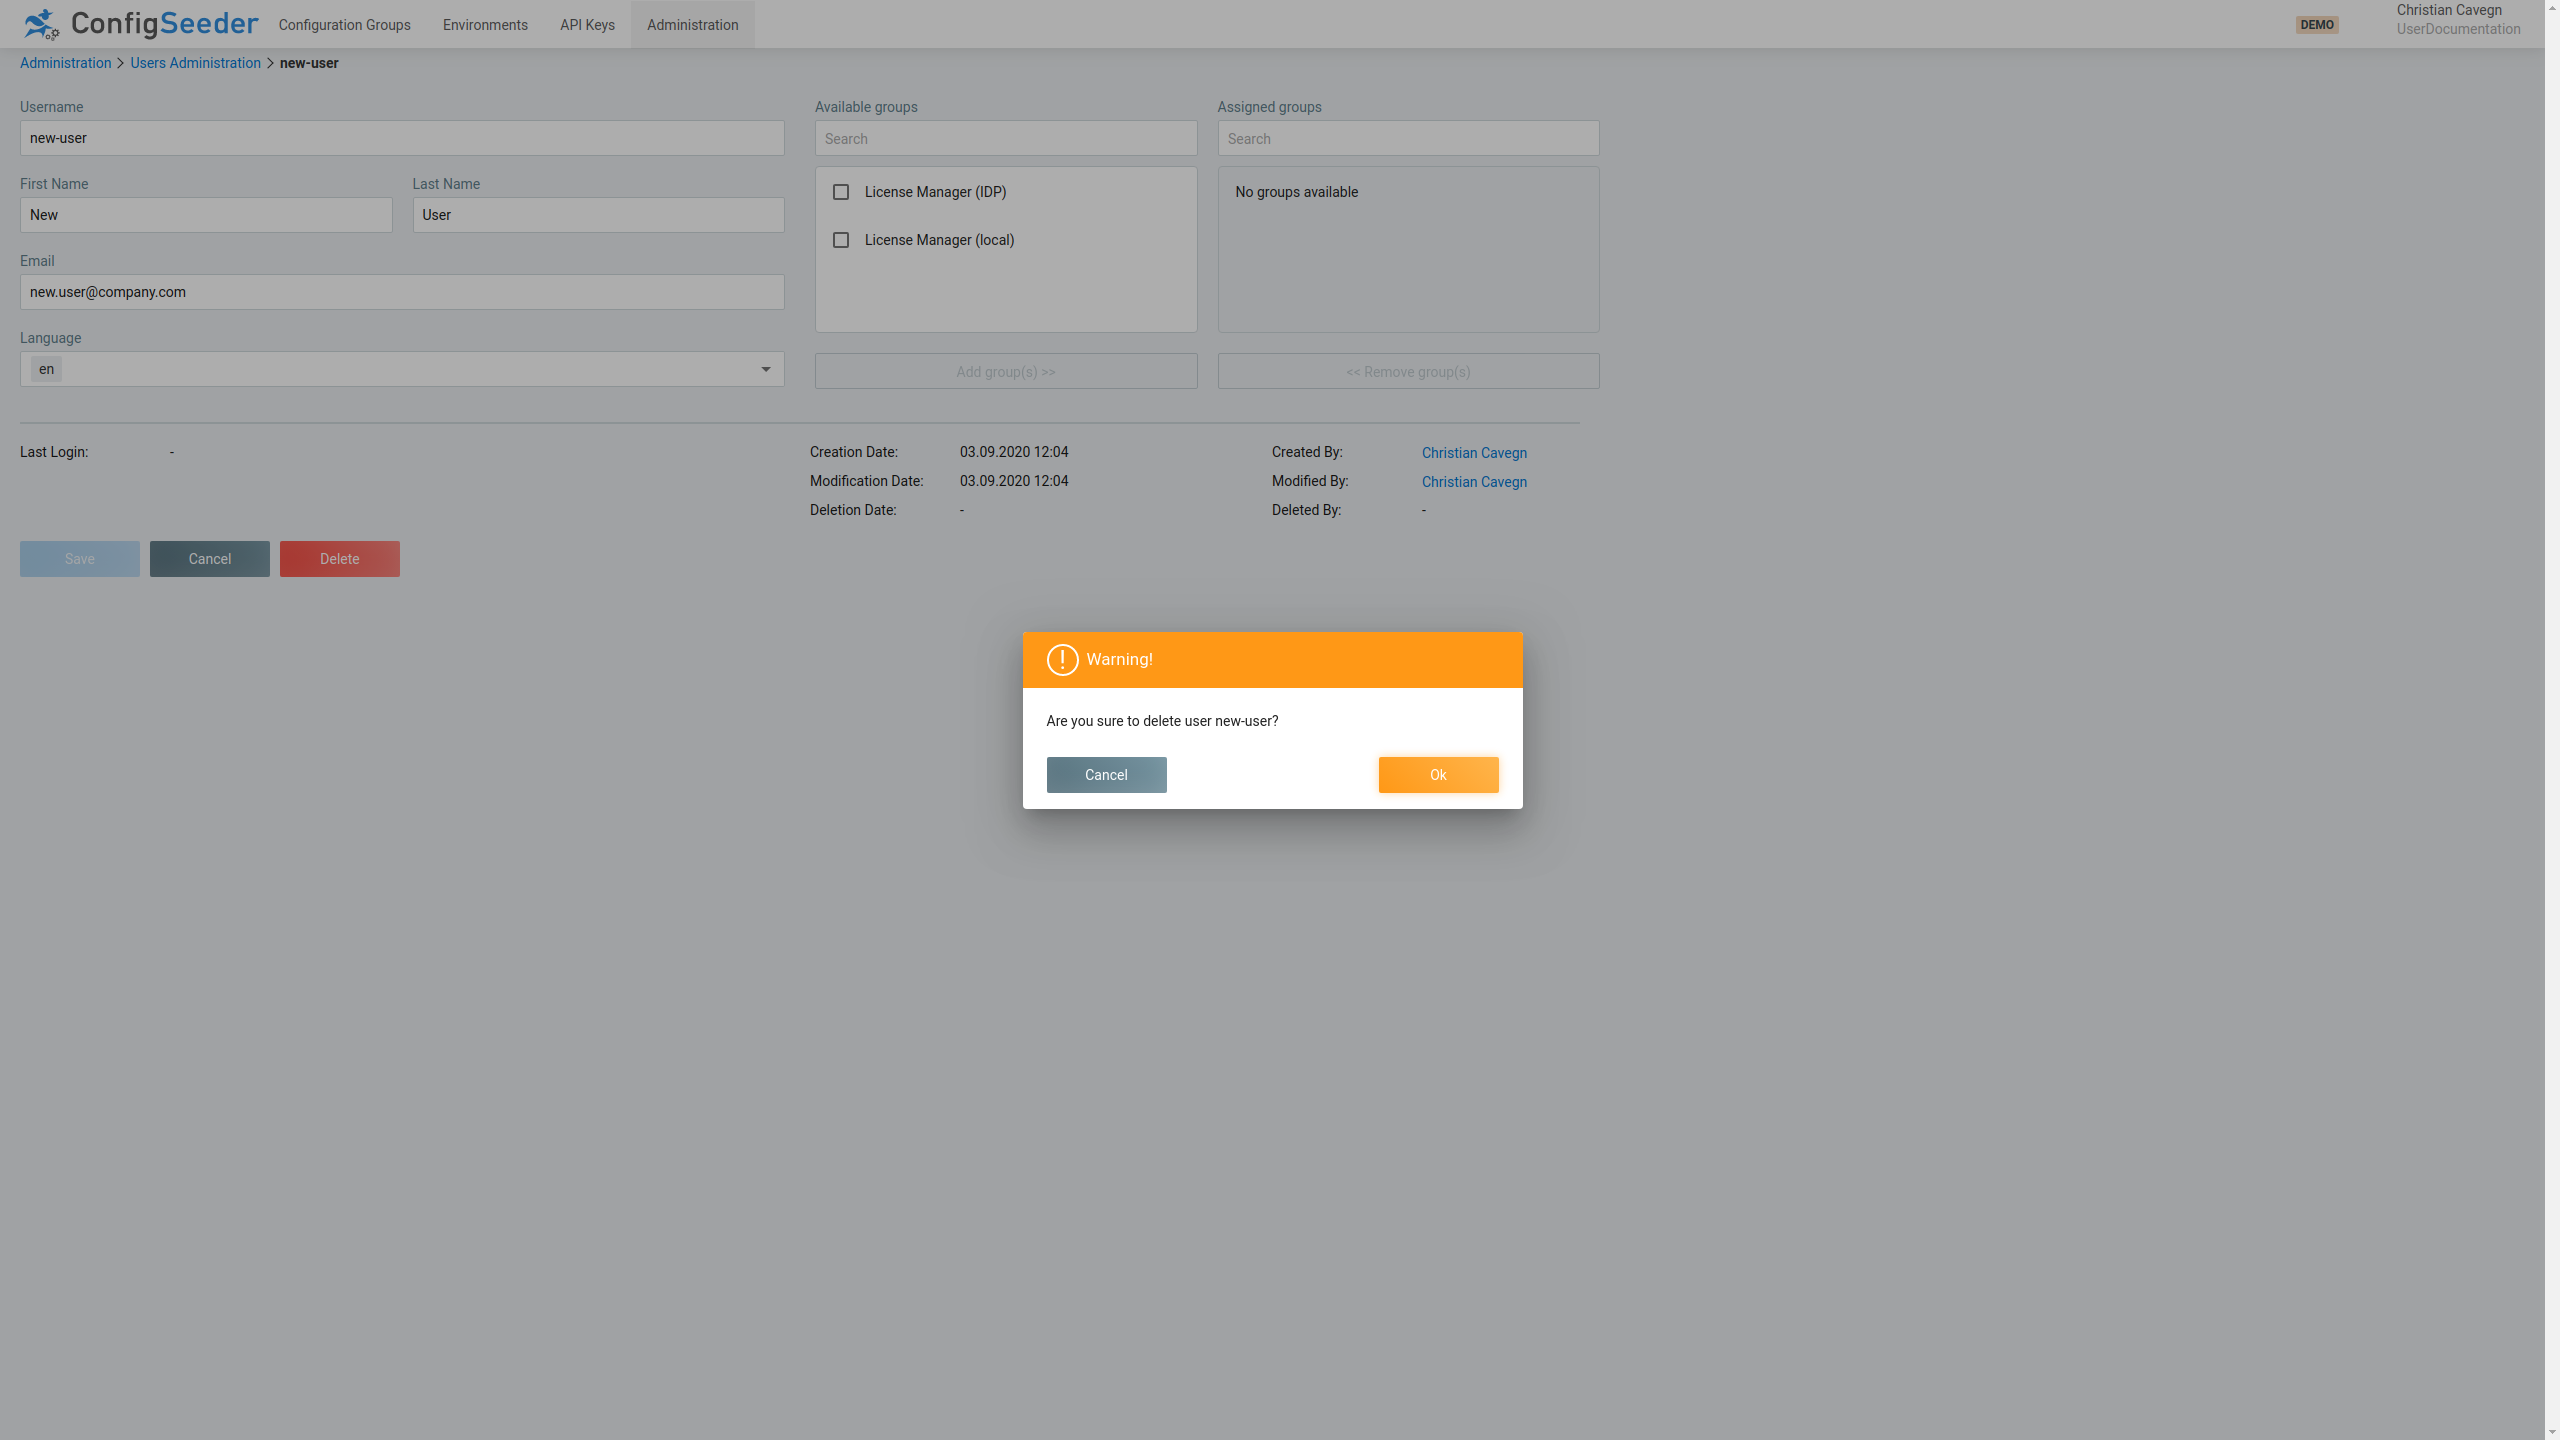
-
Accept deletion of the user by clicking on the
OKbutton.
|
A deleted user won’t receive any notification emails. |
|
Deleting a user doesn’t prevent the user from logging in. If a user shouldn’t be able to log in to ConfigSeeder®, his roles (or manually assigned groups) must be removed. |
3.5.7. Reactivate a deleted user
-
Click on the navigation point
Administration -
Select Tab
Users -
Choose filter option
All`or `Deleted -
Click on the reactivate-icon of the user you want to reactivate
3.6. Manage Groups
3.6.1. Description
The Groups administration gives an overview over all defined groups. Groups can be used to
-
manually assign permissions to a user
-
map IDP Roles to permissions
|
If the security-integrations provides the data and functional roles like defined in ConfigSeeder®, mapping the IDP Roles to permissions isn’t required. |
3.6.2. Show existing groups
-
Click on the navigation point
Administration -
Select Tab
Groups -
The groups page shows an overview of the existing groups
The group overview page shows the following information:
| Information | Description |
|---|---|
Group name |
Every group must have a group name, the group name must be unique and identifies the group. |
IDP Role |
If the group is used to map an IDP Role to function roles and/or data roles, this value references the IDP Role |
Description |
Description of the role |
Function Role |
Function Roles that are granted by the group |
Data Role |
Data Roles that are granted by the group |
3.6.2.1. Available Actions
| Icon | Description |
|---|---|
|
|
Edit the group |
|
|
Delete group |
3.6.3. Create a new Group
-
Click on the navigation point
Administration -
Select Tab
Groups -
Click on the
CreateButton -
Specify the details of the new group
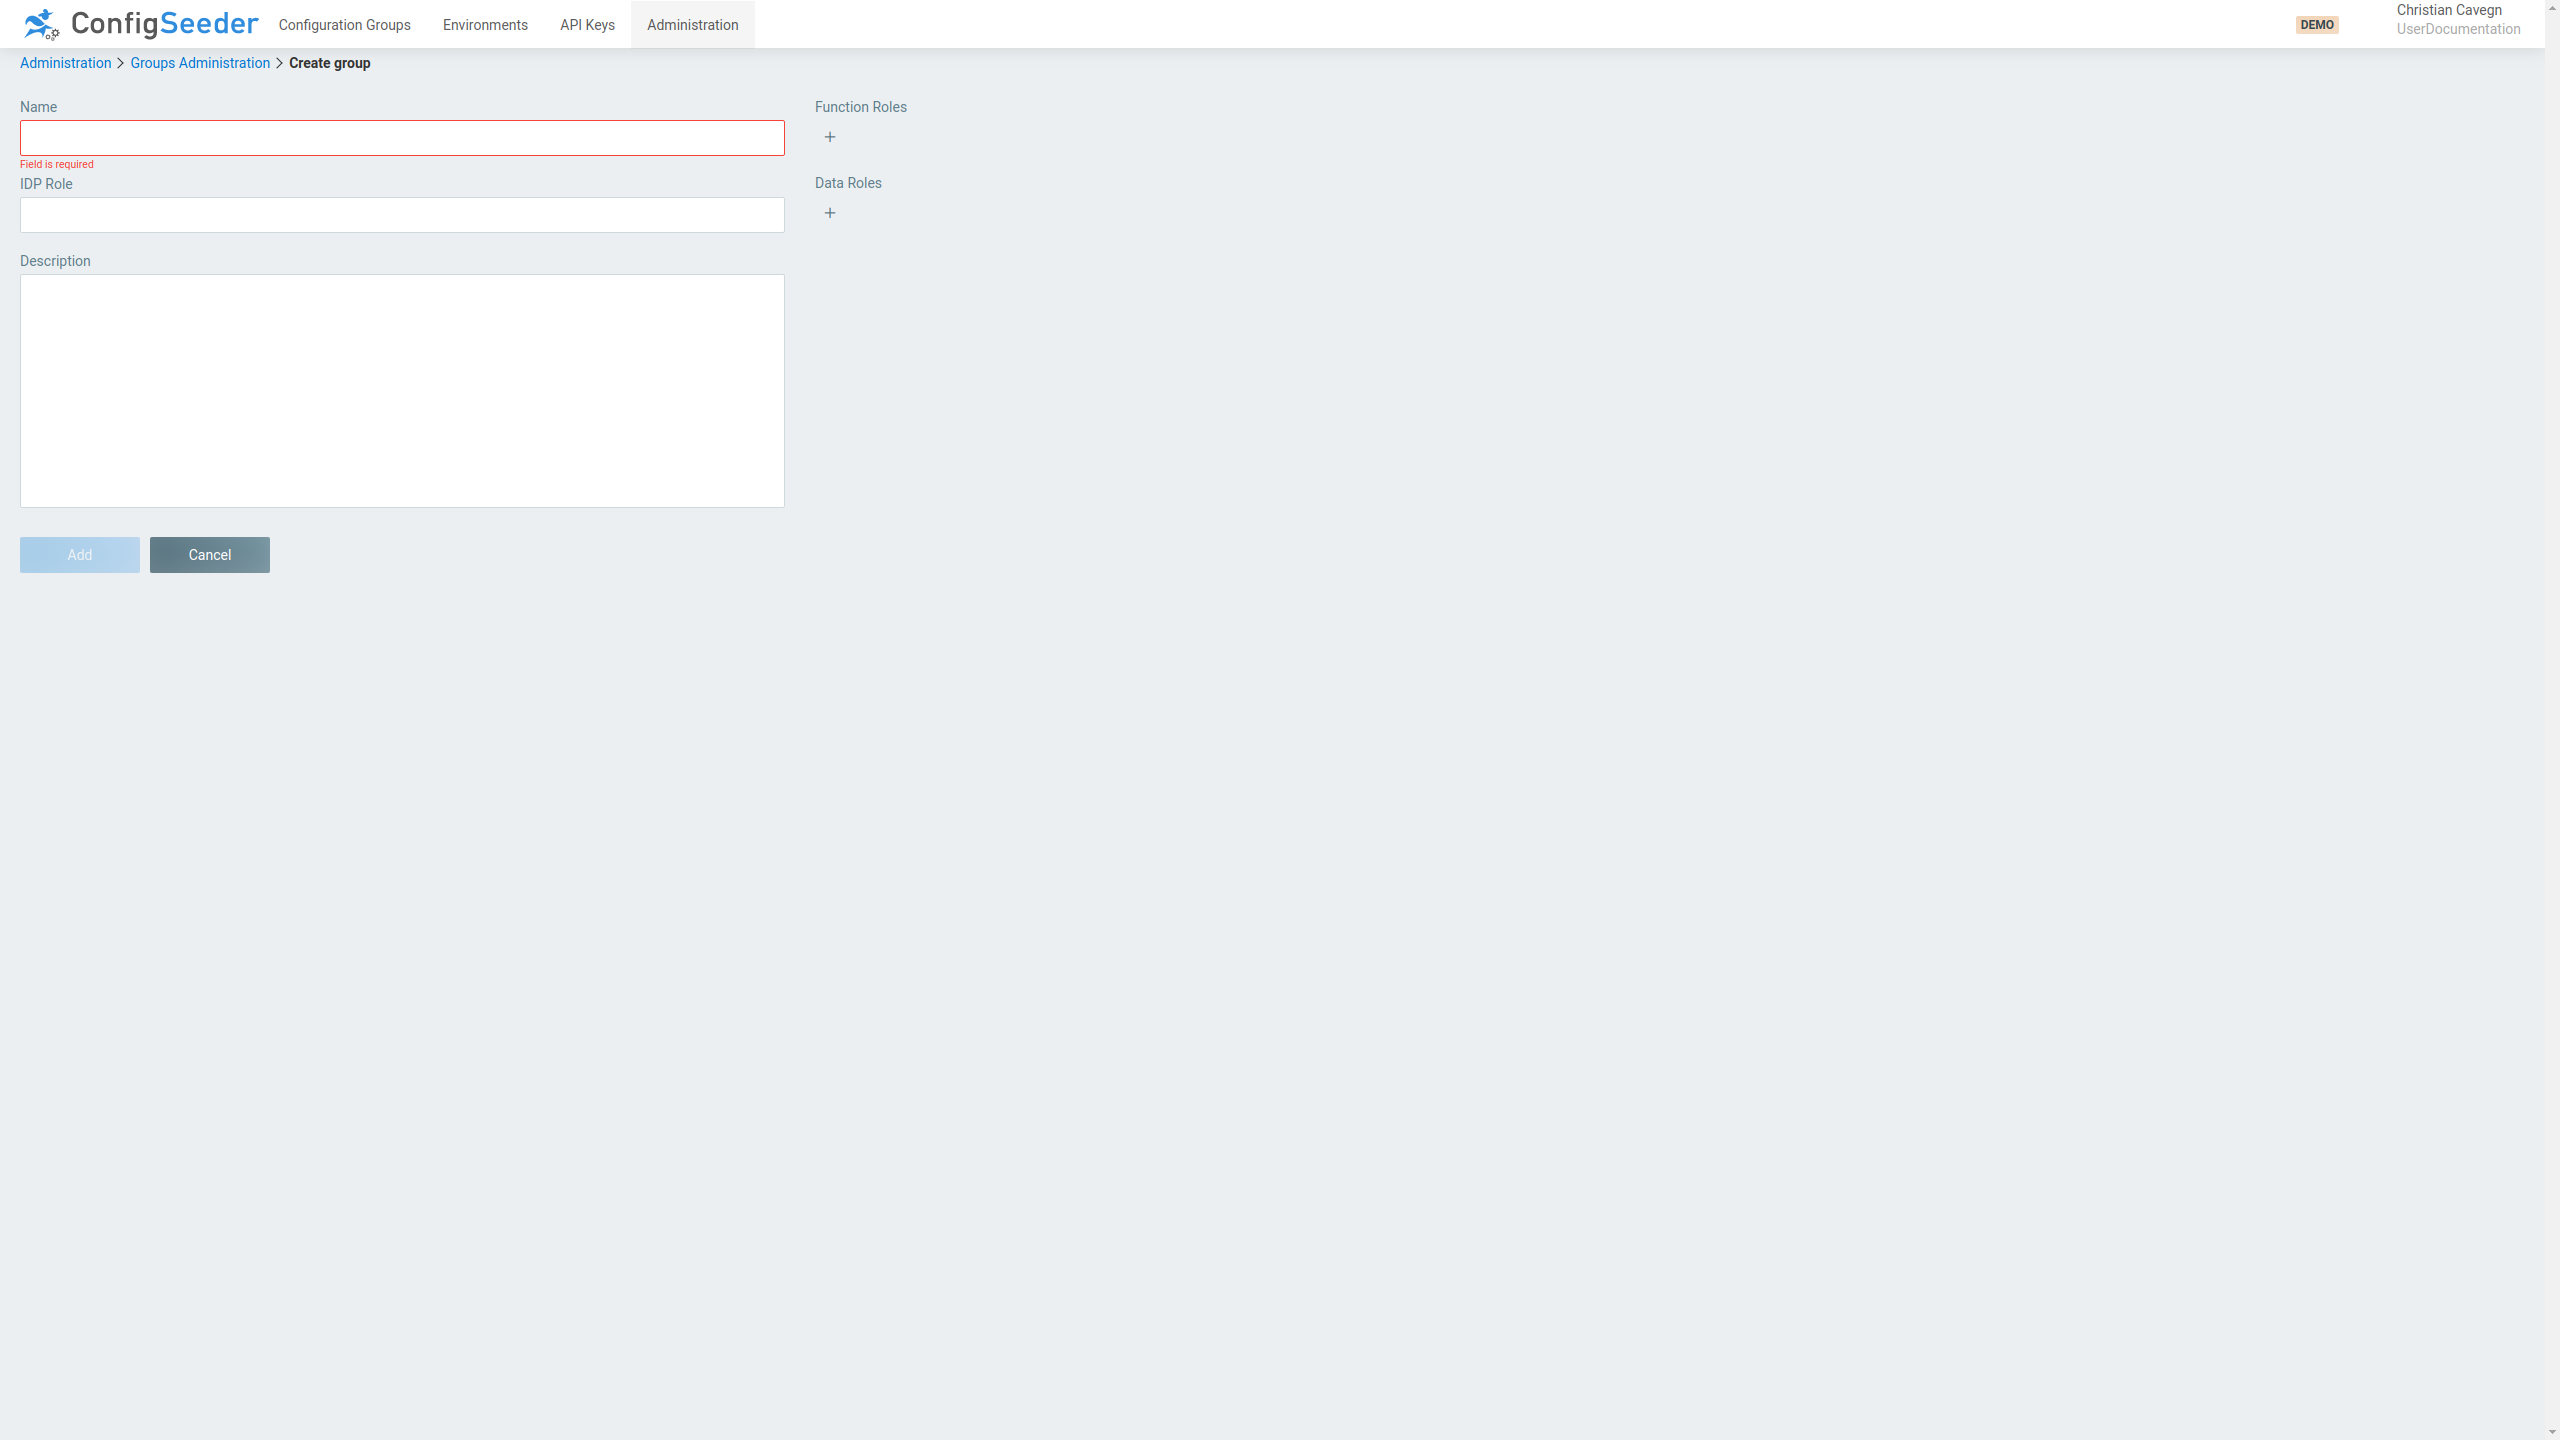
-
The entered group name must be unique
-
Providing additional information is optional
-
If the group is used to map an IDP Role to function roles or data roles, enter the IDP Role
-
If required, select the Function Roles the group grants
-
If required, select the Data Roles the group grants
-
-
Create the new group by clicking on the
Addbutton.
3.6.4. Edit an existing group
-
Click on the navigation point
Administration -
Select Tab
Groups -
Click on the pencil-icon of the group you want to edit
-
Change the group like desired
-
Store changes by clicking on the
Savebutton.
3.6.5. Delete a group
-
Click on the navigation point
Administration -
Select Tab
Groups -
Click on the pencil-icon of the group you want to delete (or delete the group by clicking on the delete icon)
-
Delete the user by clicking on the
Deletebutton.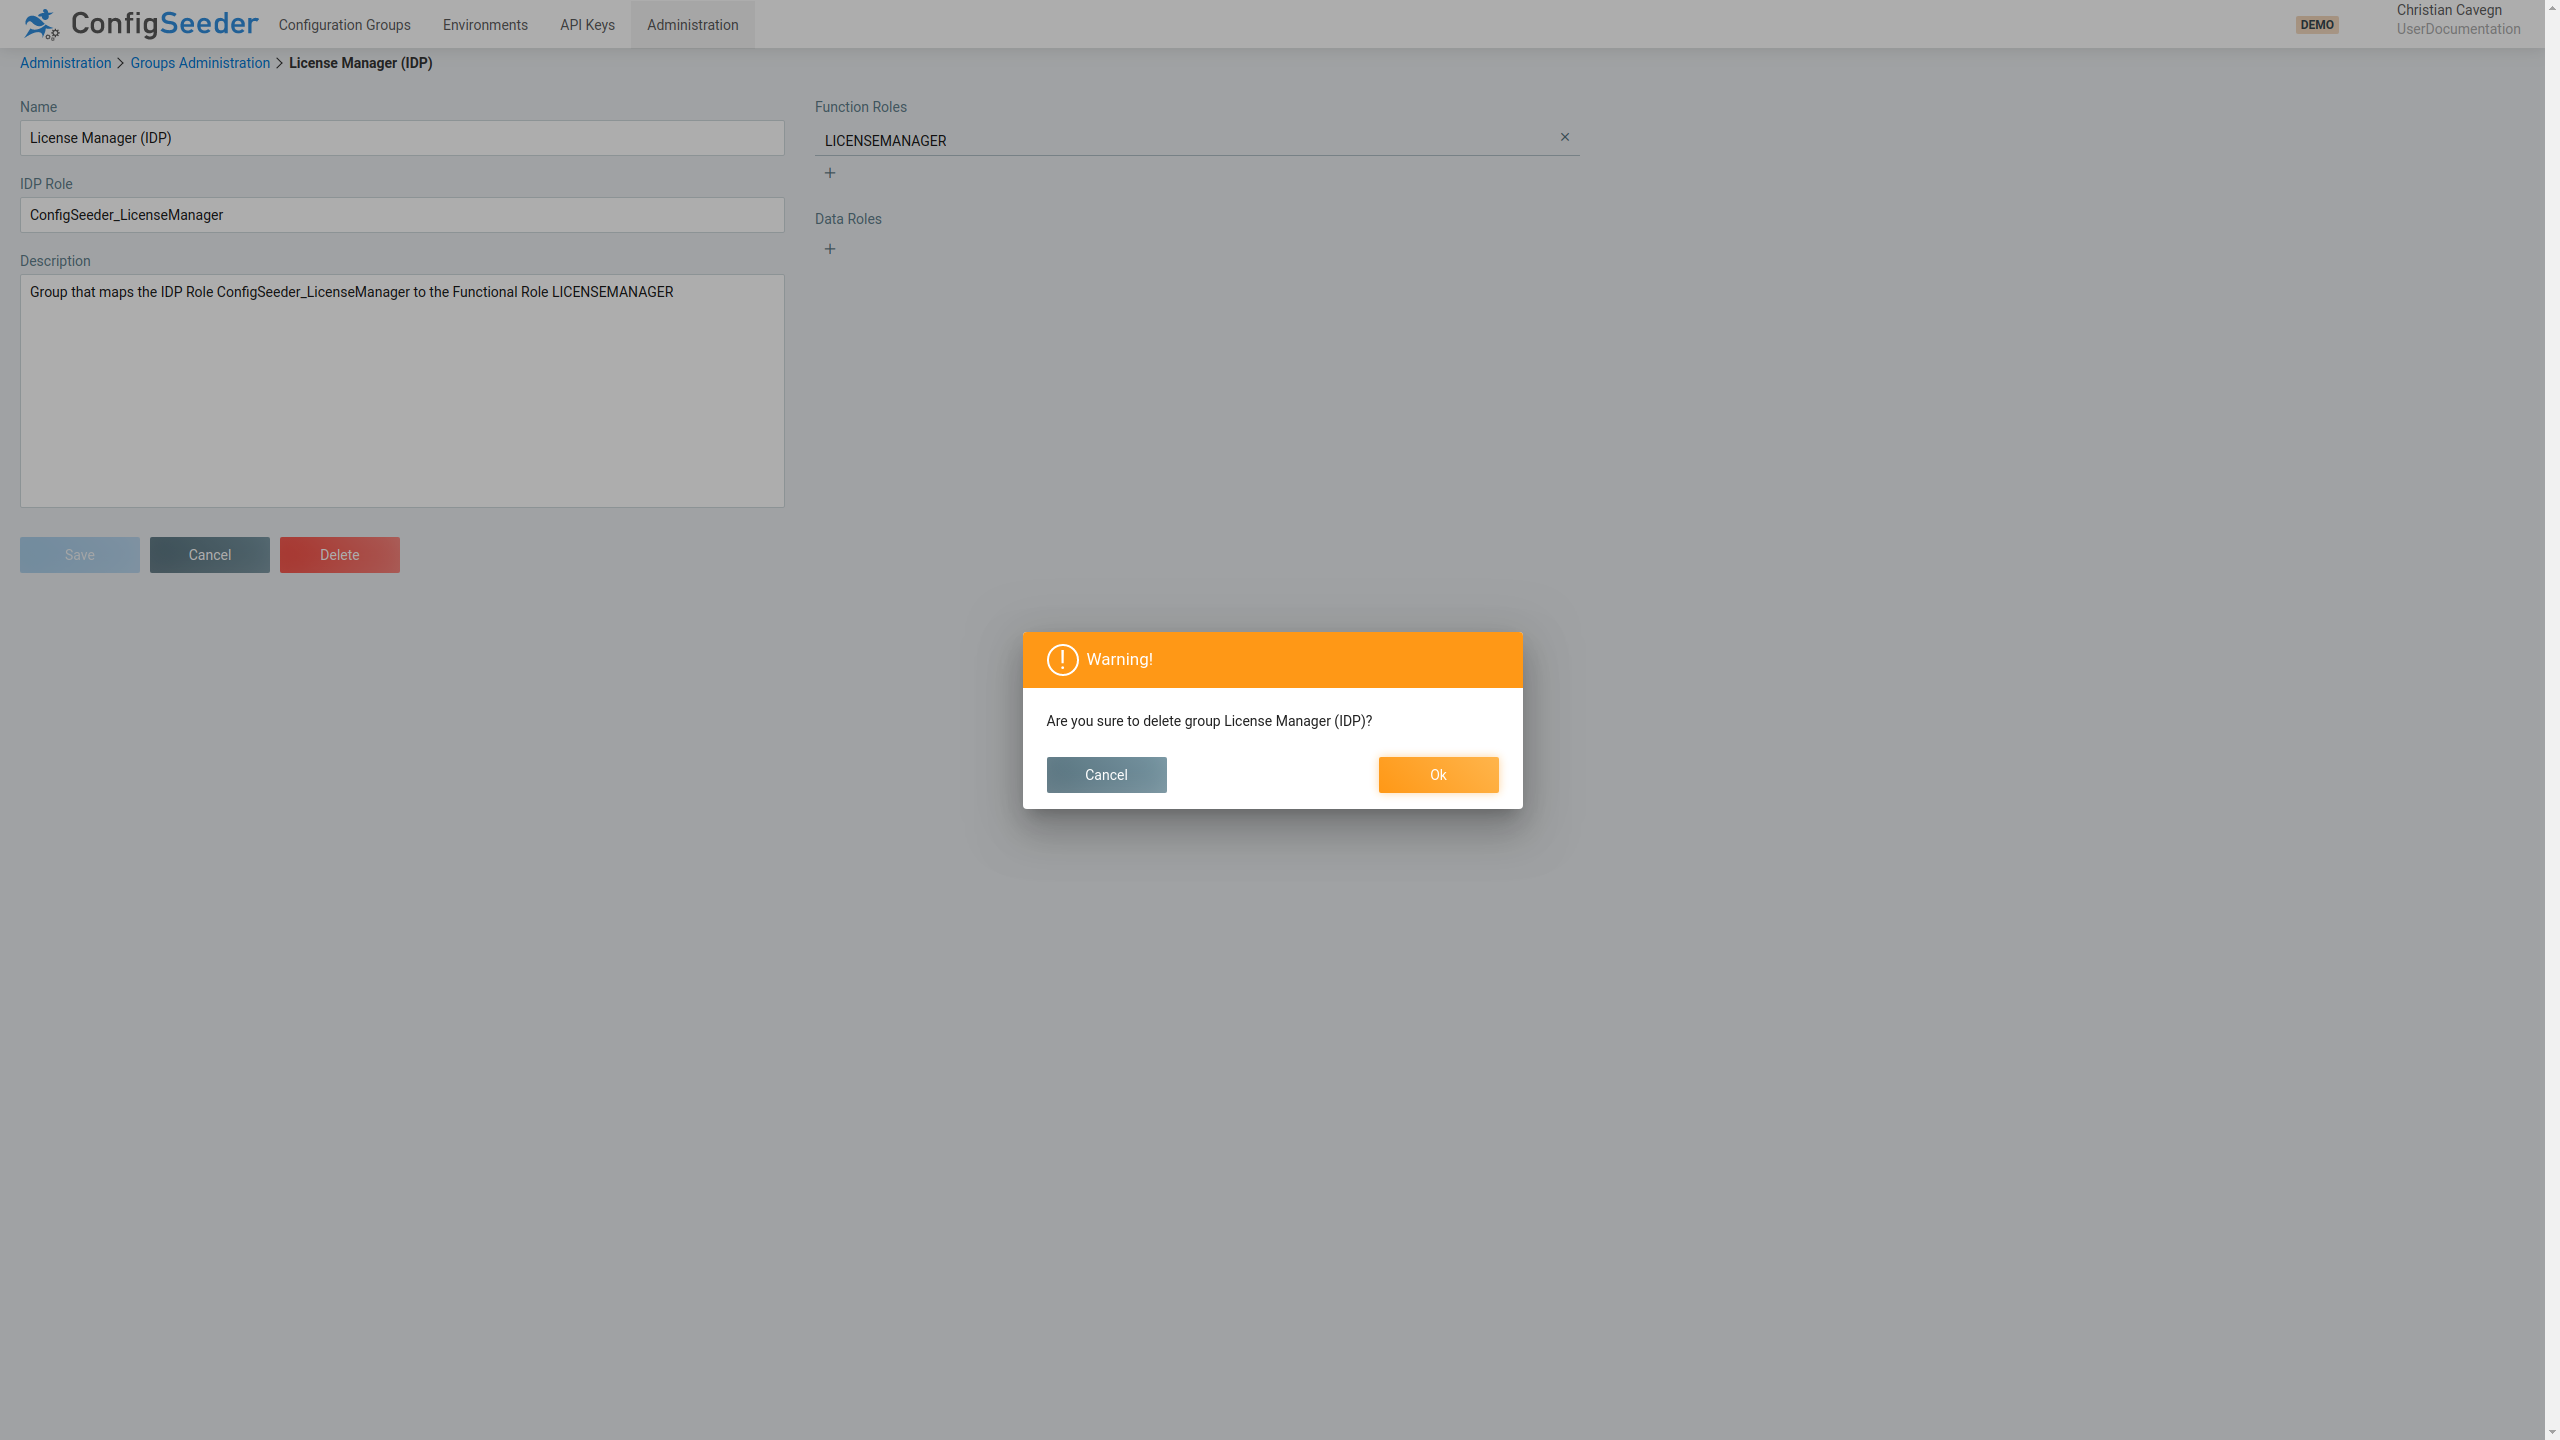
-
Accept deletion of the group by clicking on the
OKbutton.
3.7. Manage Function Roles
3.7.1. Description
The Functional Role administration gives an overview over all defined function roles. This functionality can be used to
-
see, what permissions are granted by the predefined function roles
-
create and edit individual function roles
|
Working with individual function roles can be tricky. Don’t hesitate to contact us. |
3.7.2. Show existing function roles
-
Click on the navigation point
Administration -
Select Tab
Function Roles -
The functional roles page shows an overview of the existing function roles
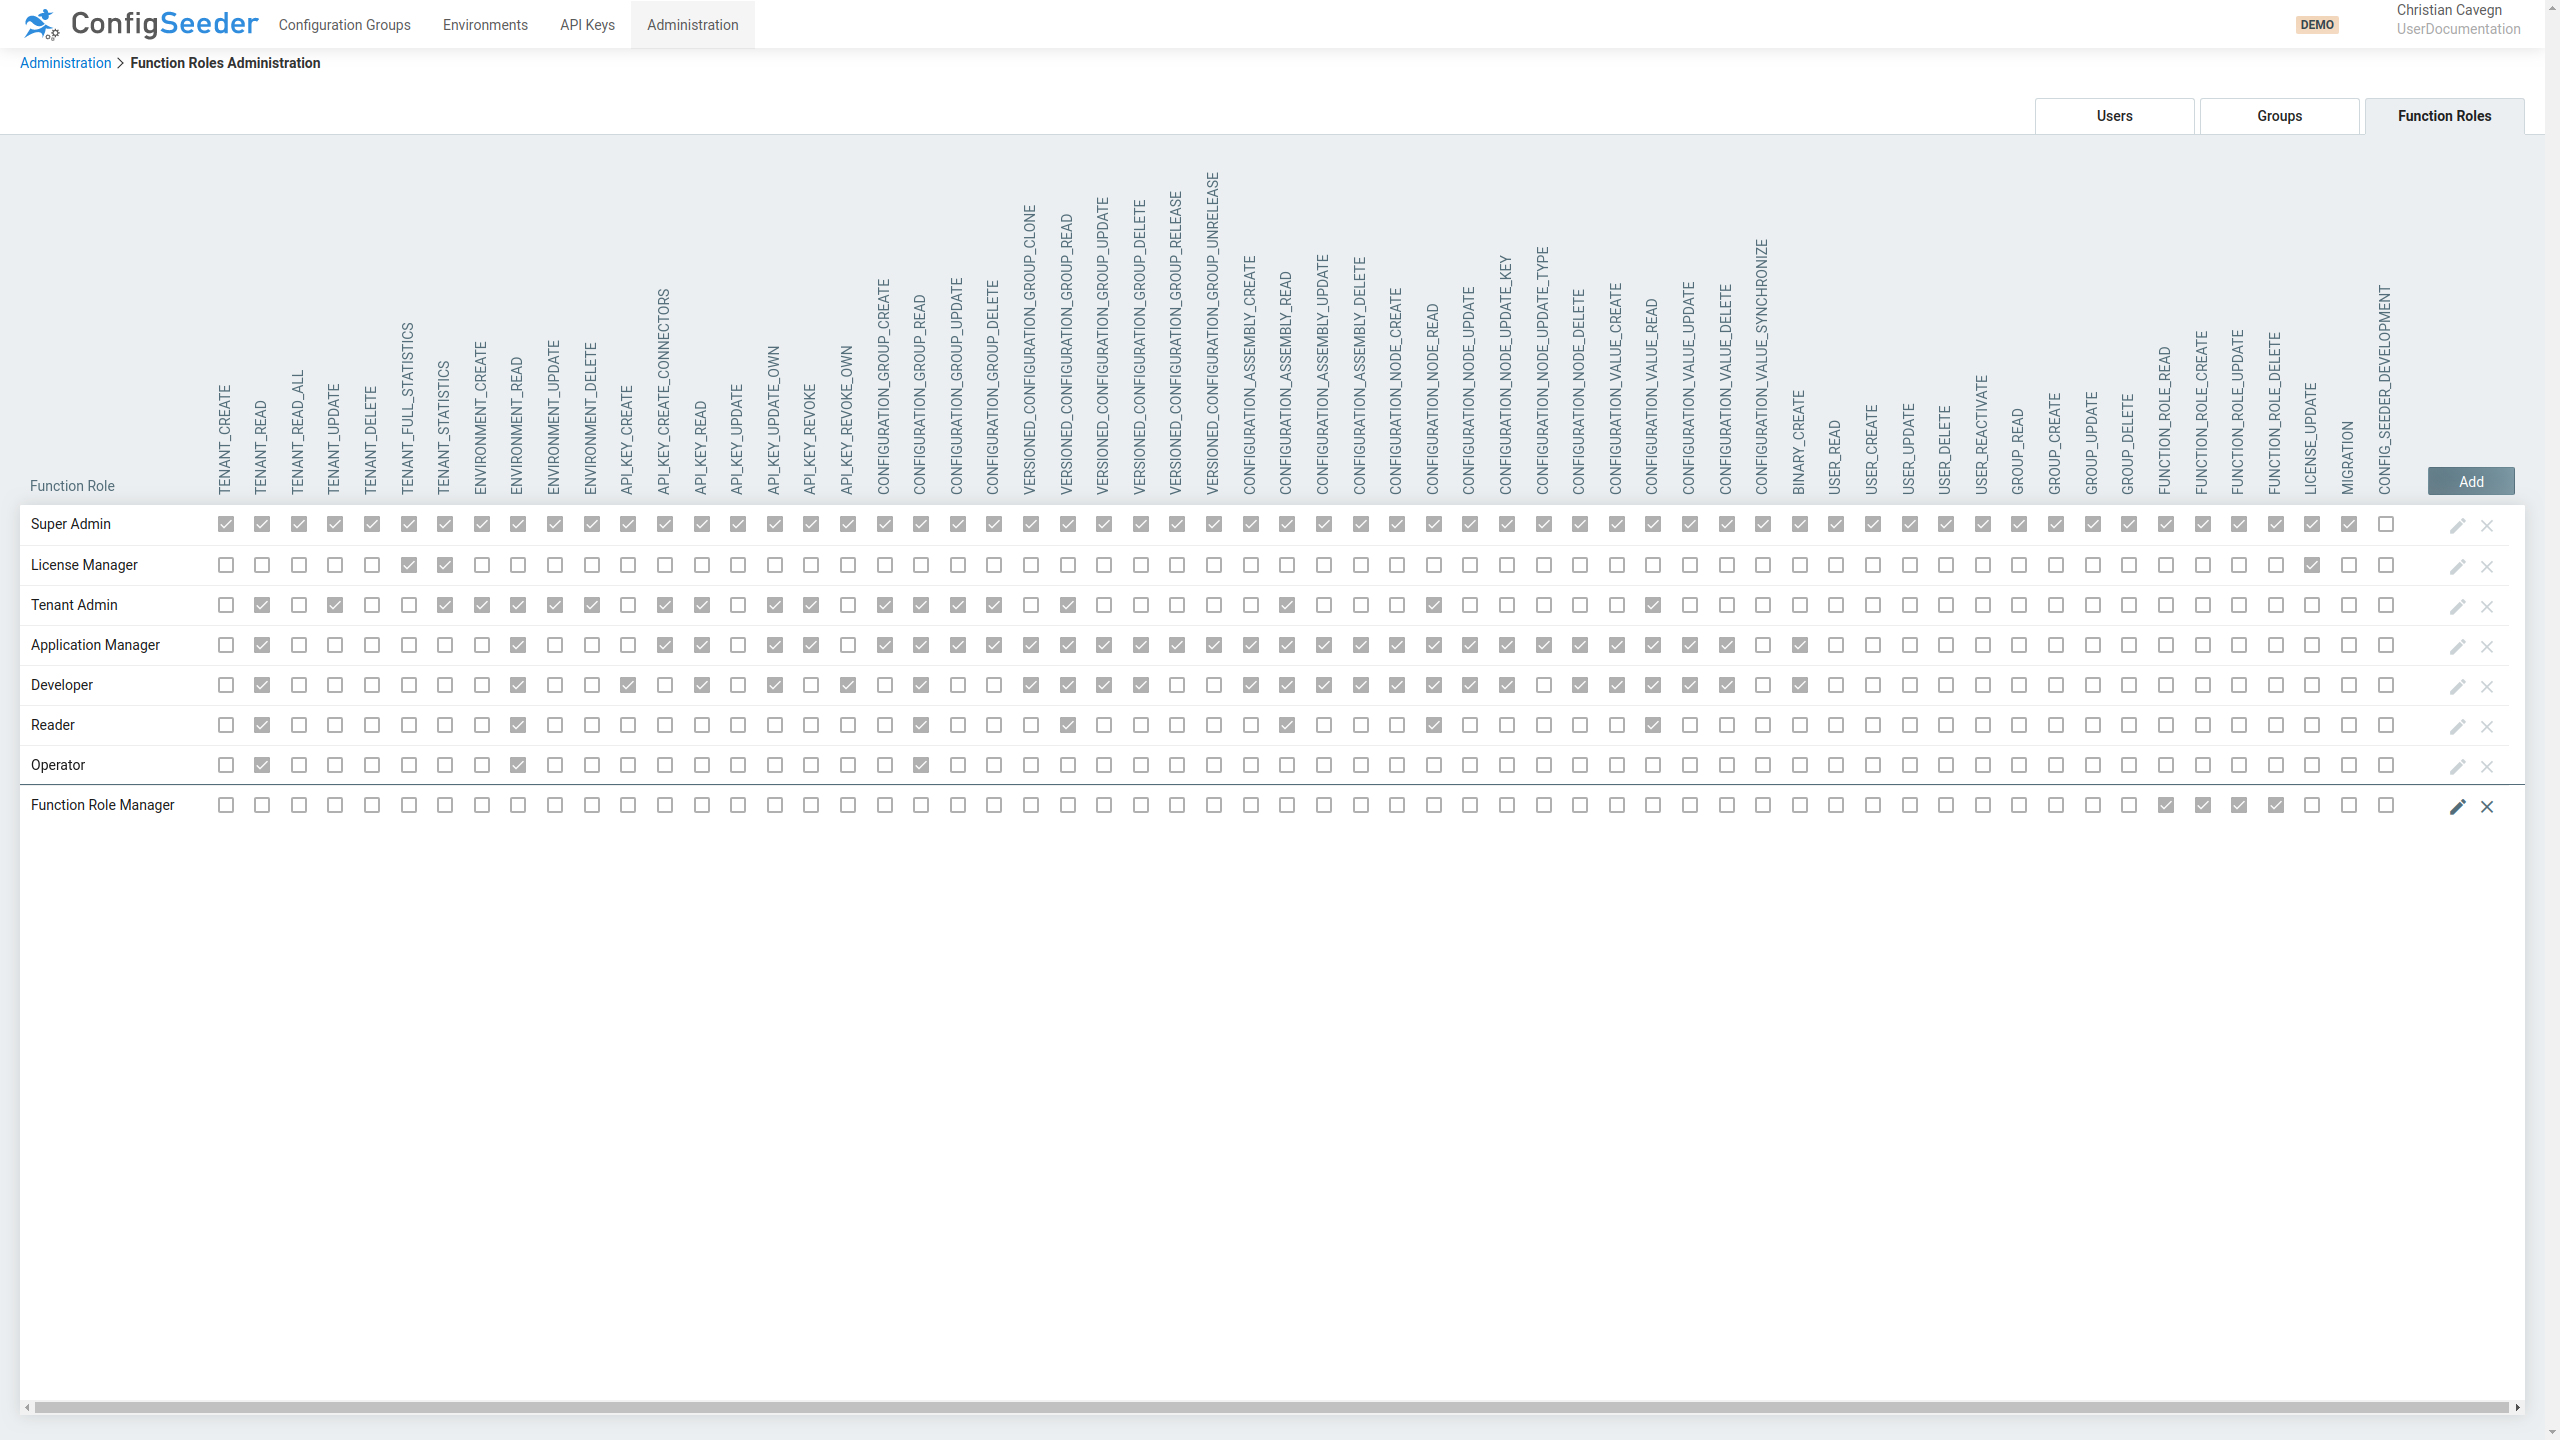
The function role overview page shows the following information:
| Information | Description | ||
|---|---|---|---|
Function Roles |
All predefined and individually created function roles
|
||
Permissions |
All available permissions that can be assigned to function roles. |
||
Per Function Role |
The assigned permissions |
3.7.2.1. Available Actions
| Icon | Description |
|---|---|
|
|
Edit the function role |
|
|
Delete the function role |
|
Predefined function roles can’t be deleted or changed. If you need to change such a role, a copy has to be created with the required changes. |
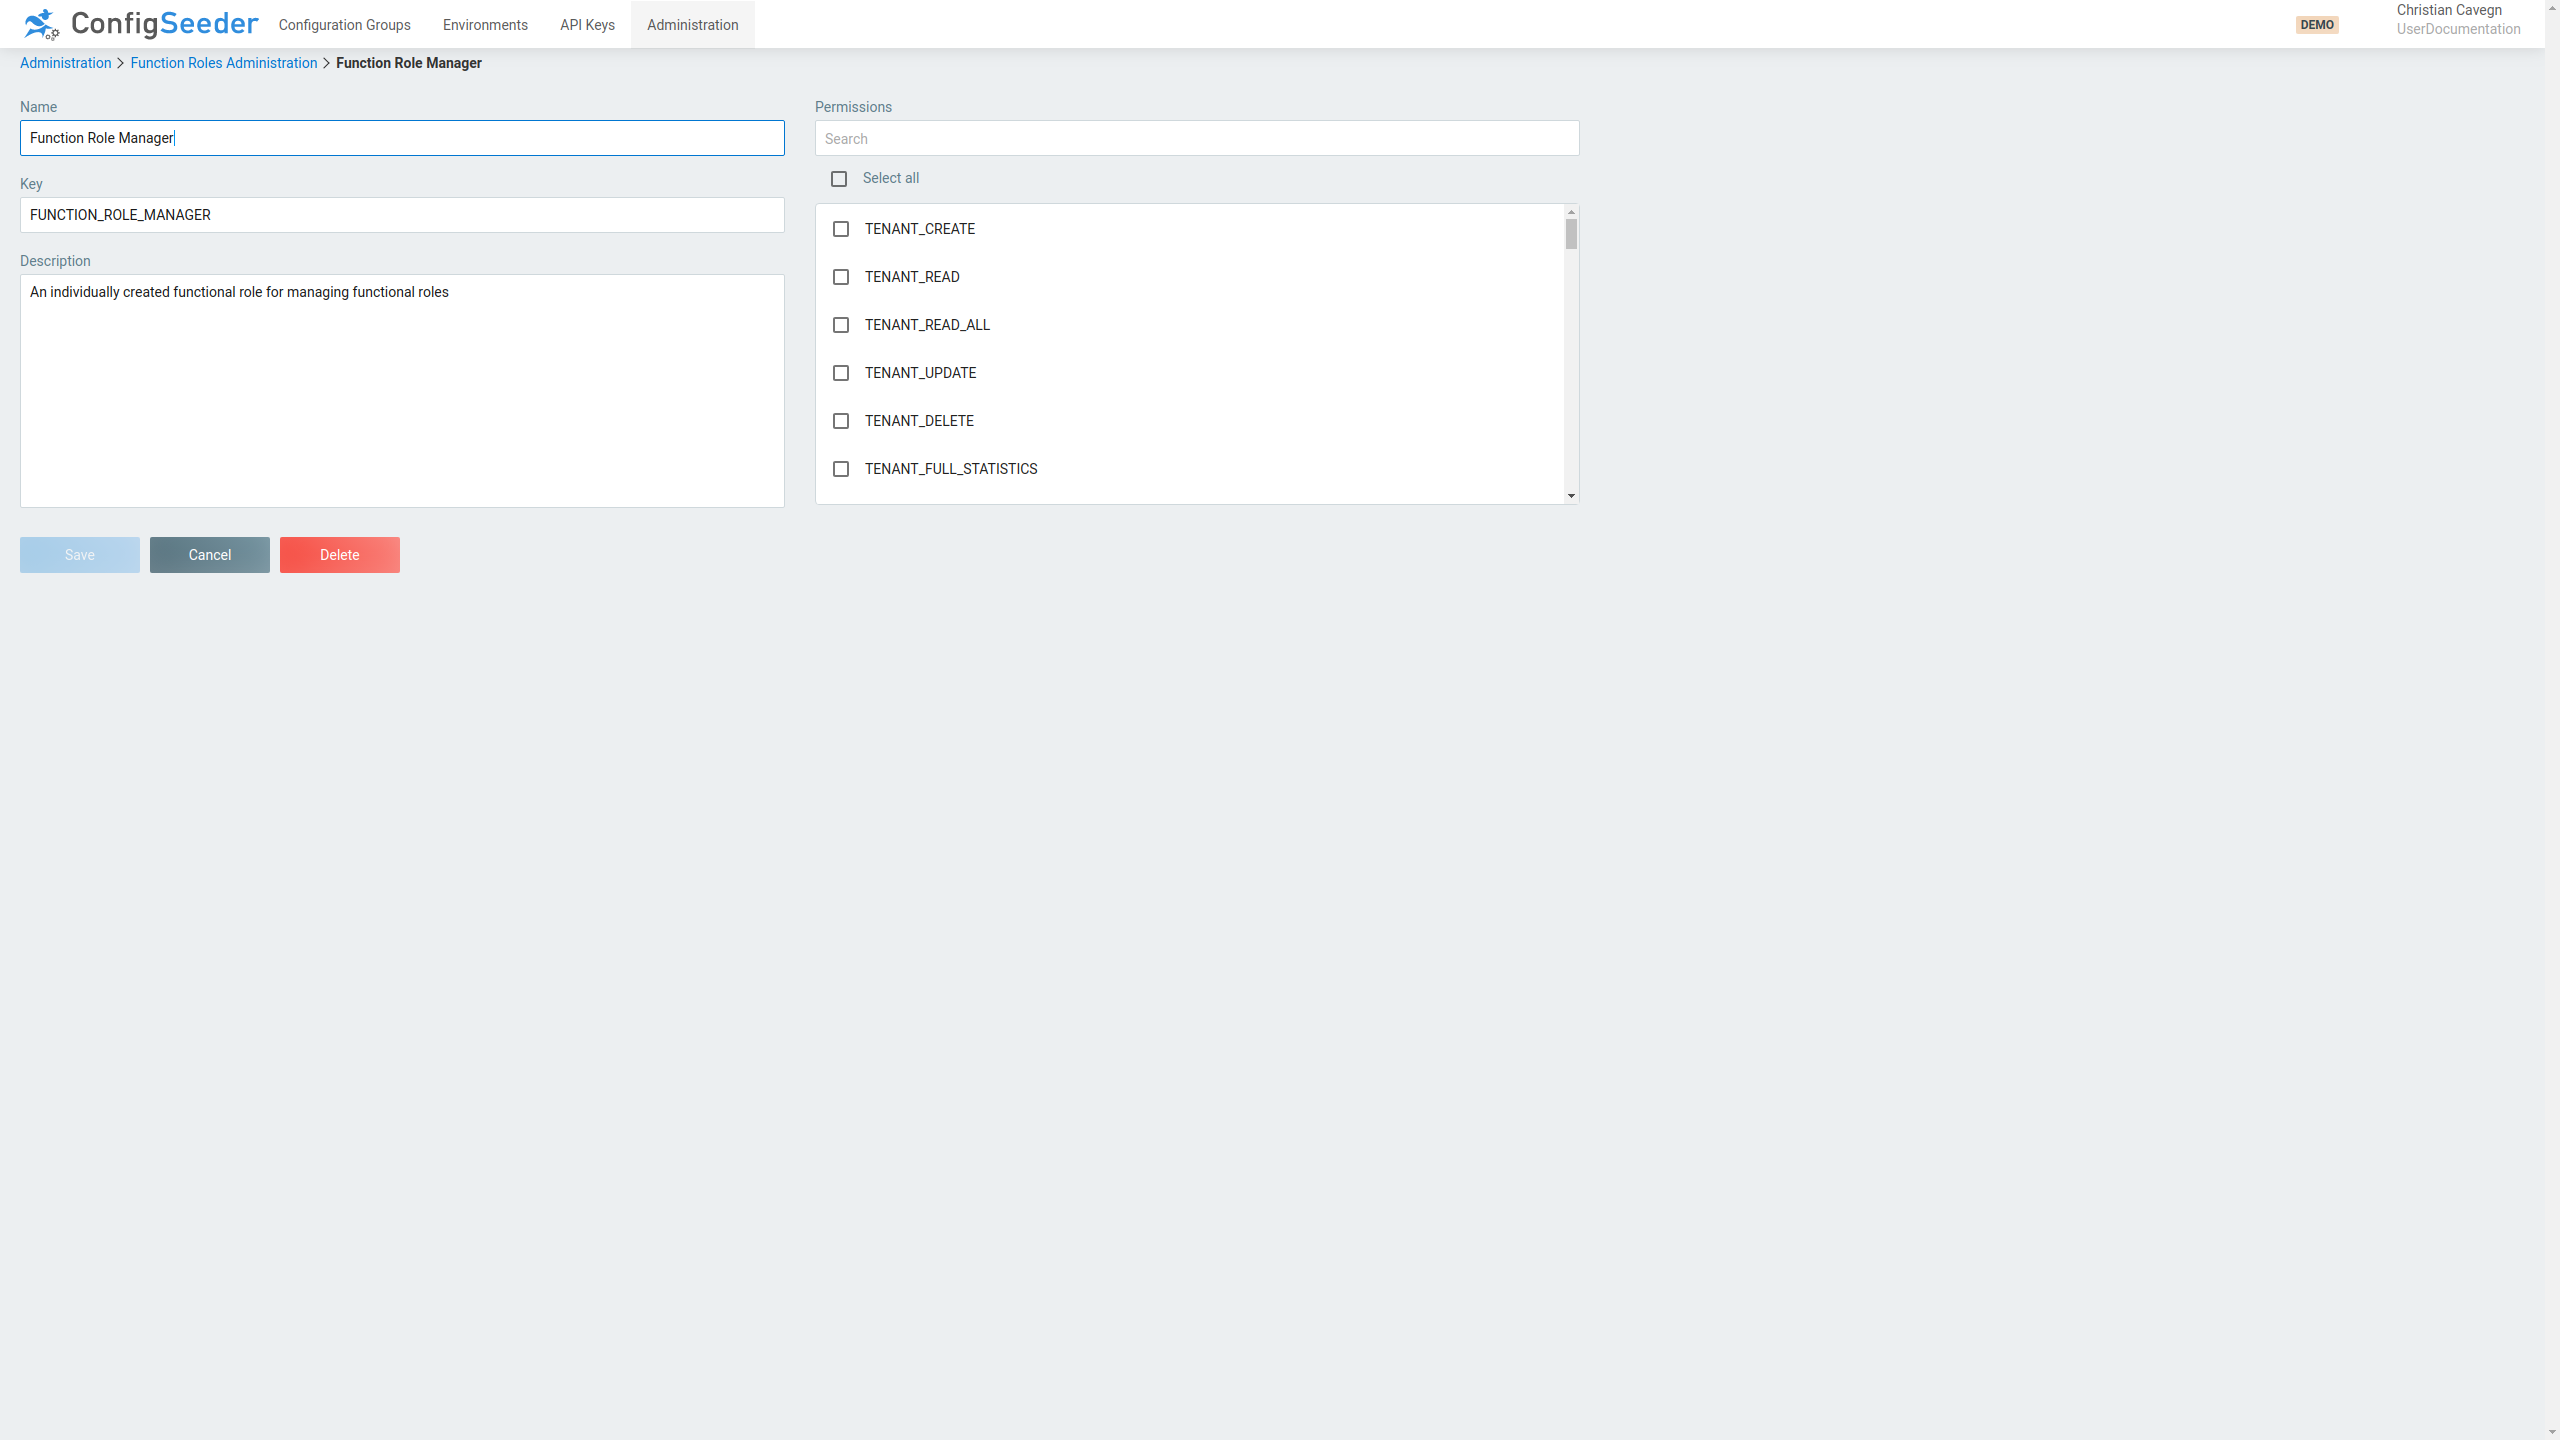
3.7.3. Create a new Function Role
-
Click on the navigation point
Administration -
Select Tab
Function Roles -
Click on the
AddButton -
Specify the details of the new function role

-
The entered function role name and key must be unique
-
Providing additional information is optional
-
A description should be entered
-
Select the permissions the function role will grant
-
-
Create the new function role by clicking on the
Addbutton.
3.7.4. Edit an individual fnction role
-
Click on the navigation point
Administration -
Select Tab
Function Roles -
Click on the pencil-icon of the function role you want to edit
-
Change the function role like desired
-
Store changes by clicking on the
Savebutton.
3.7.5. Delete an individual function role
-
Click on the navigation point
Administration -
Select Tab
Function Roles -
Click on the pencil-icon of the function role you want to delete (or delete the function role by clicking on the delete icon)
-
Delete the function role by clicking on the
Deletebutton.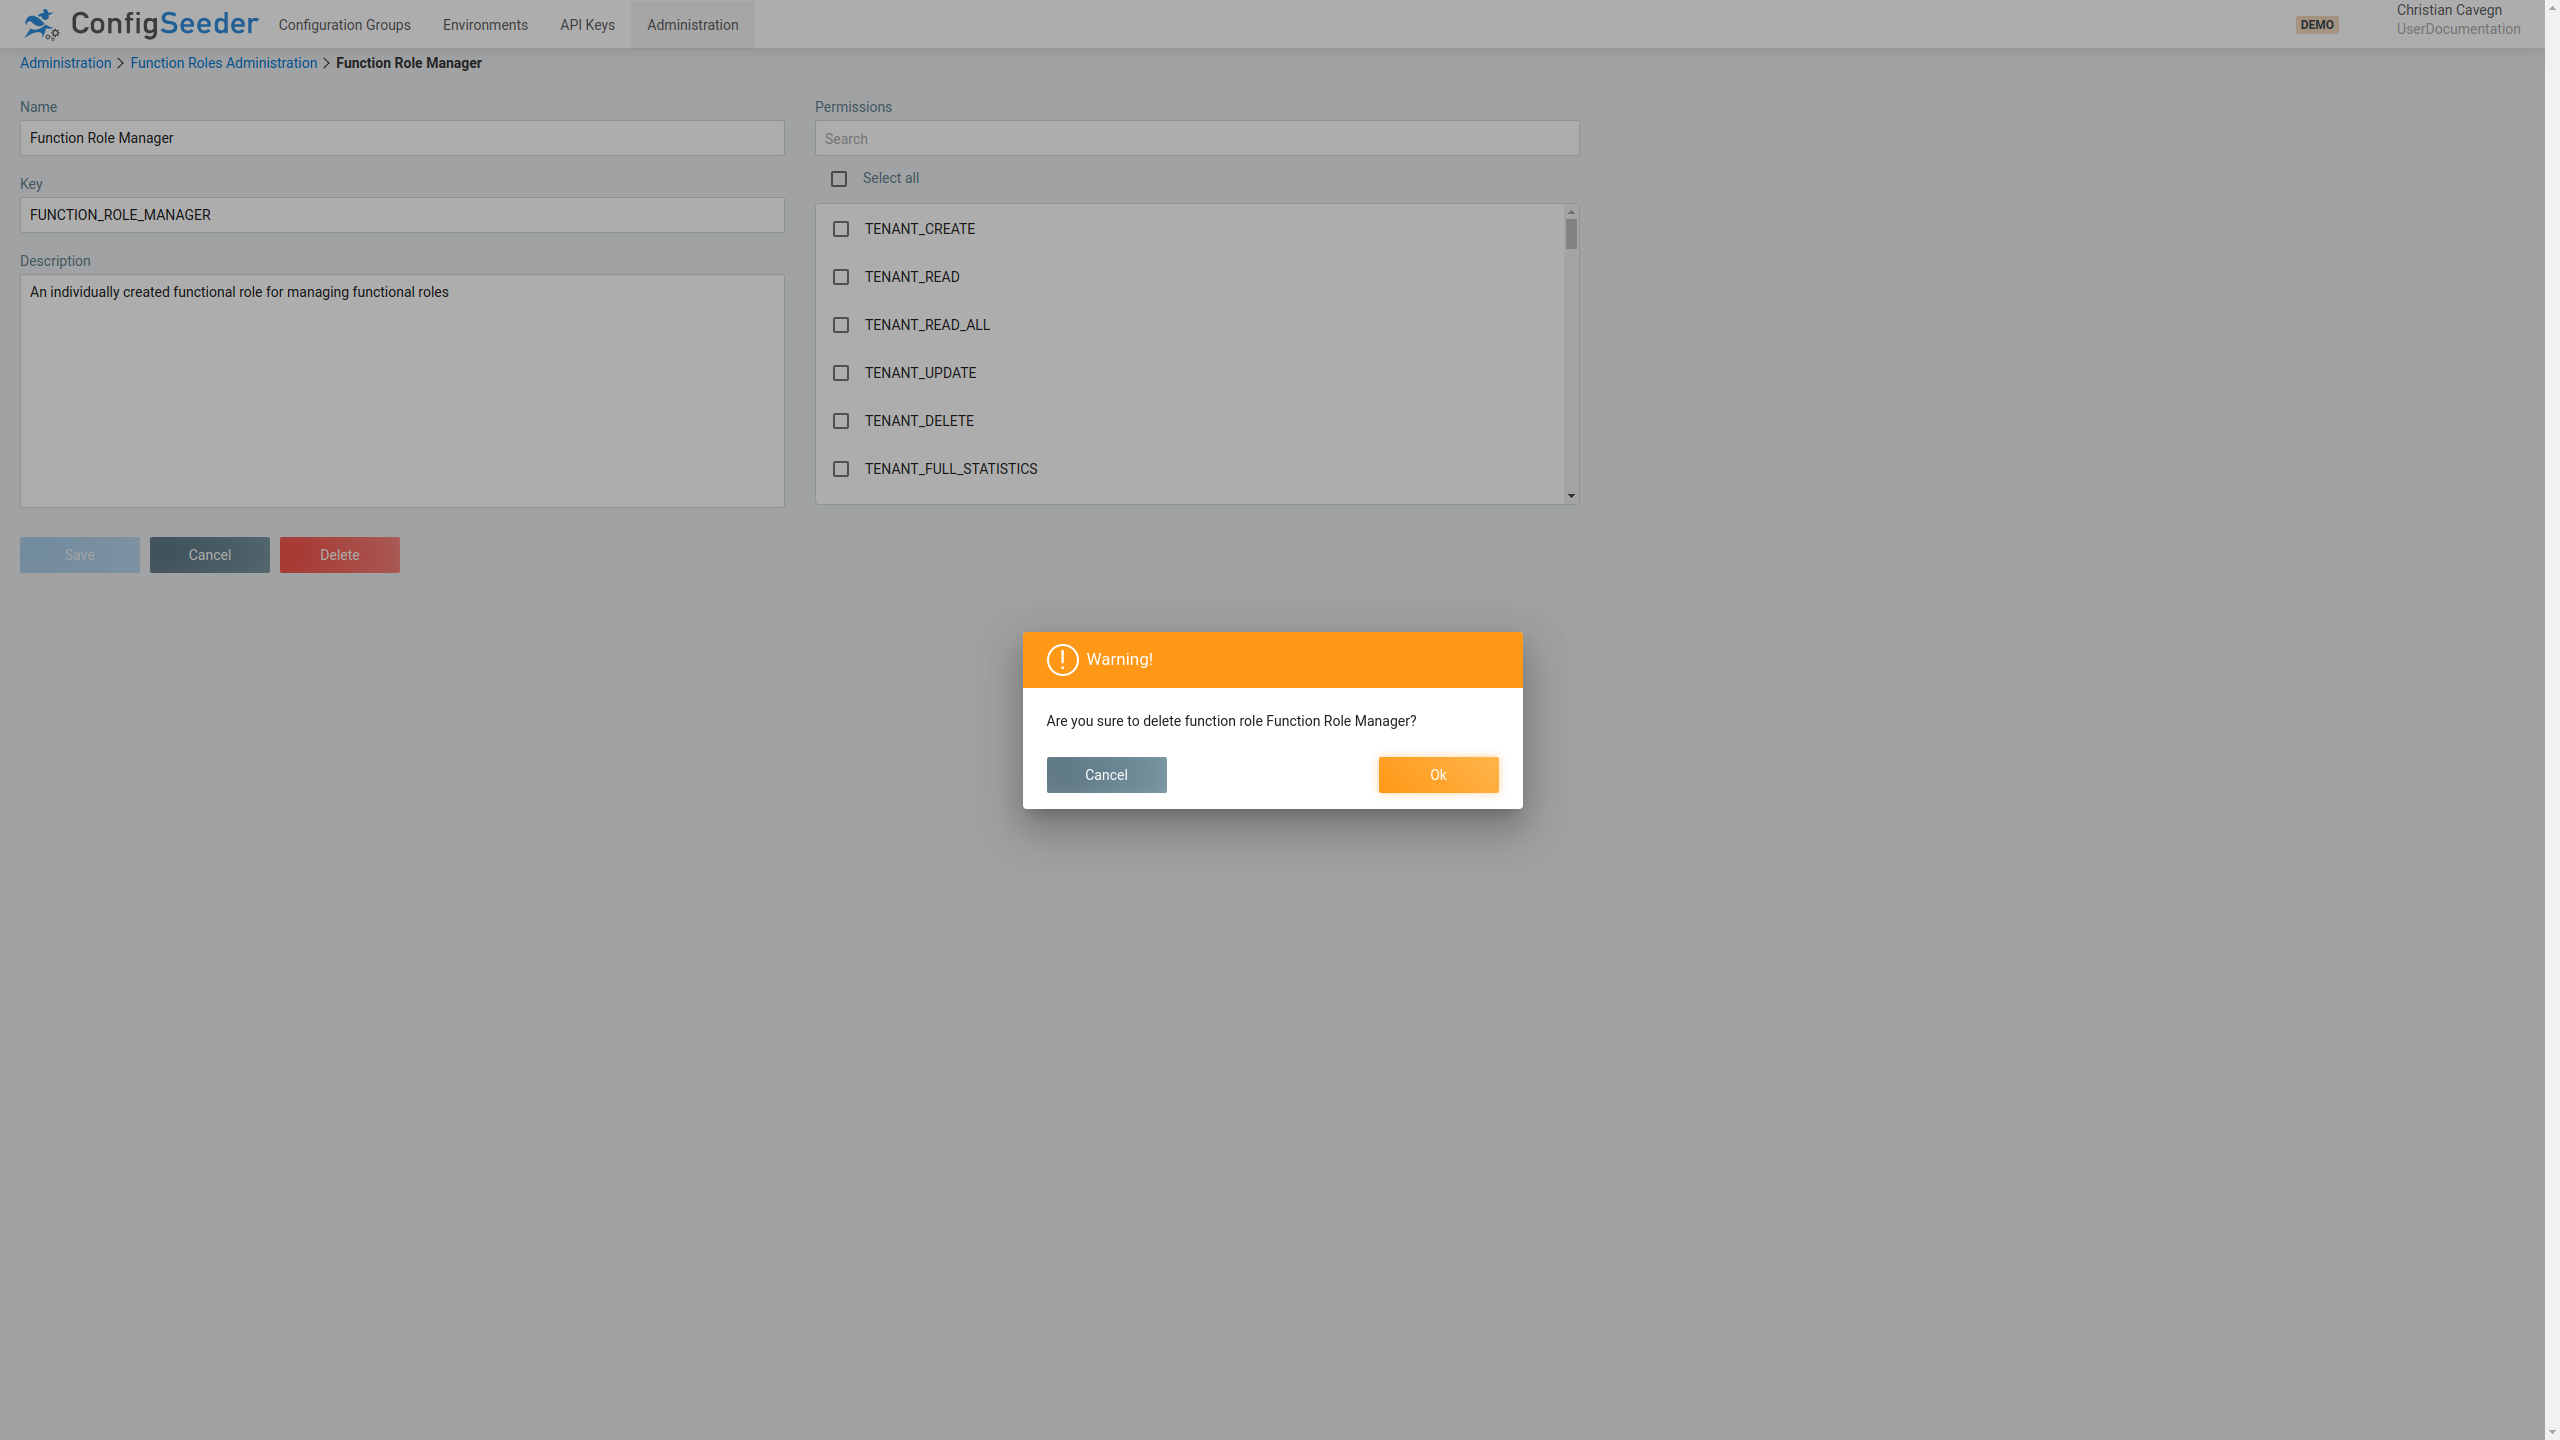
-
Accept deletion of the function role by clicking on the
OKbutton.
4. Work with configuration data
4.1. Work with configuration groups
4.1.1. Description
Configuration groups normally contain the configuration data of an application. Also see the concept description for configuration groups.
In this section is explained, how to work with configuration data stored in a configuration group. If you are interested in creating or updating configuration groups, please see manage configuration groups.
4.1.2. Tabs
When a configuration group is opened
(click on Configuration Groups, choose a configuration group and click on its name or key)
some tabs are available.

With the tabs, the following functionality can be accessed:
| Tab | Description |
|---|---|
Configurations |
The |
Value Assemblies |
With the tab |
Compare |
The tab |
History |
With the tab |
Preview |
With the |
Import |
With the |
4.2. Work with configuration nodes and values
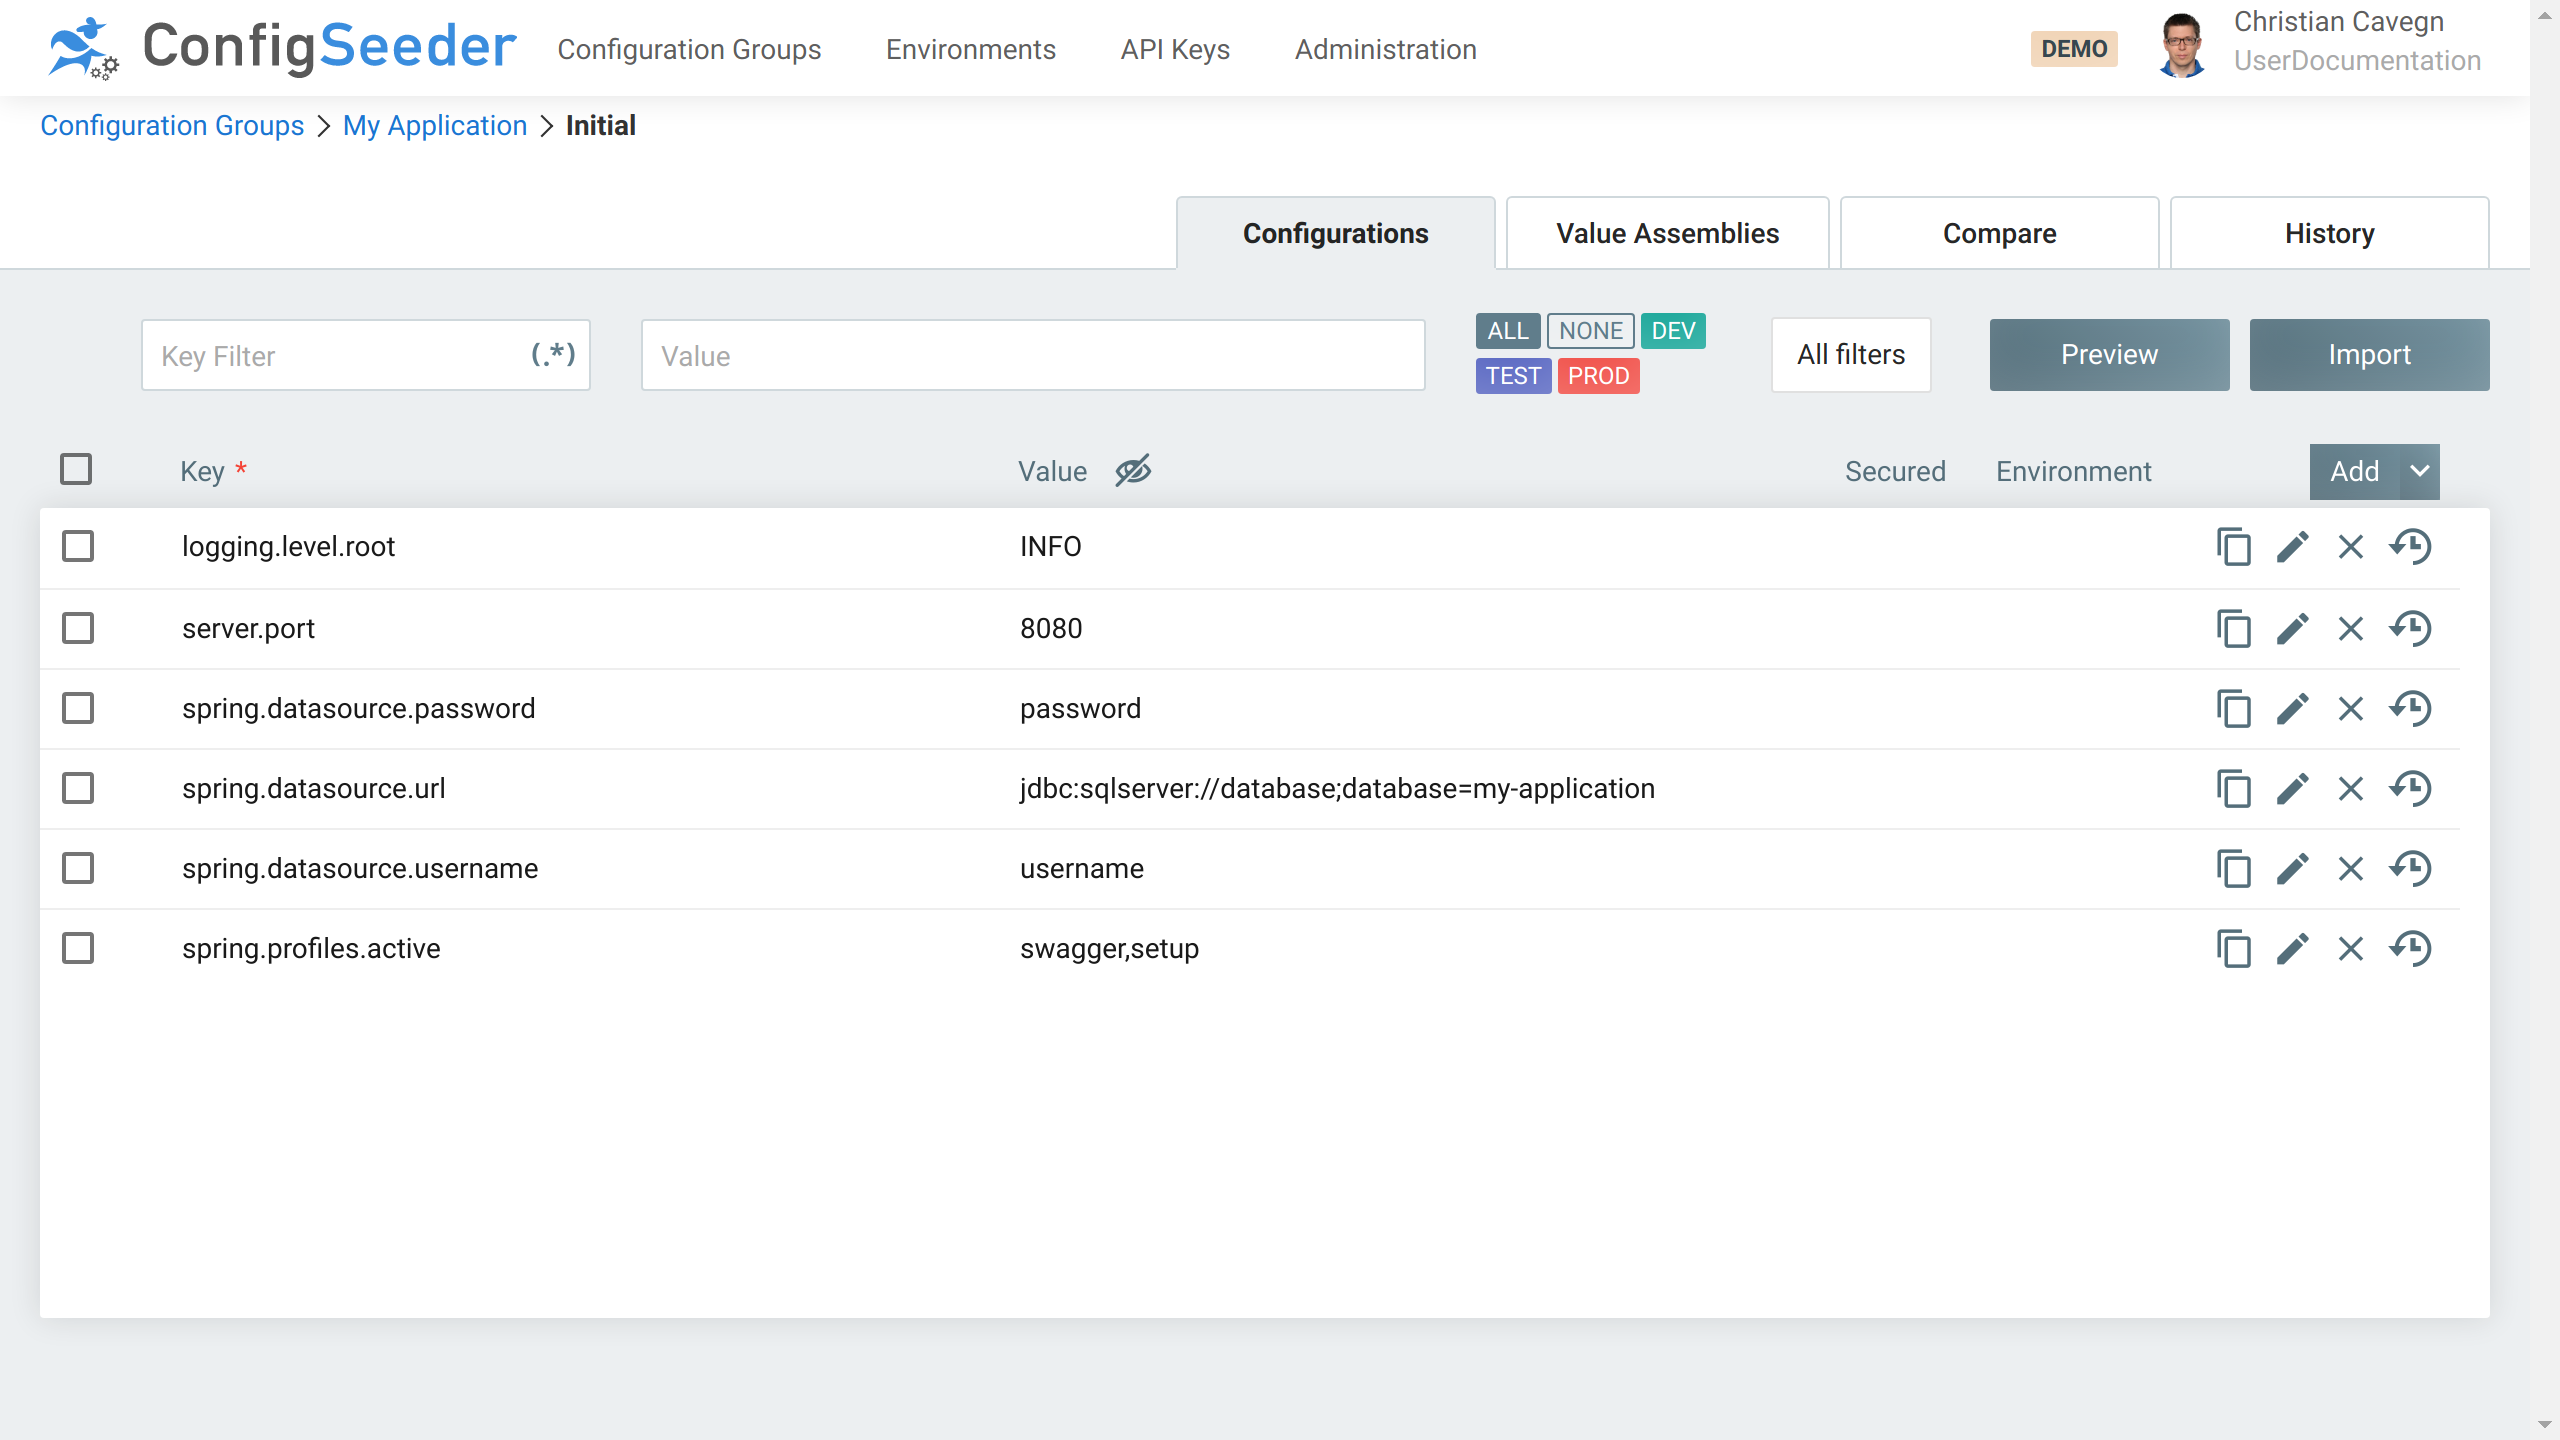
4.2.1. Show existing configuration data
-
Click on the navigation point
Configuration Groups
-
The configuration group page shows an overview of the existing configuration groups.
-
Click on the
Group NameorGroup Keyof the desired Configuration Group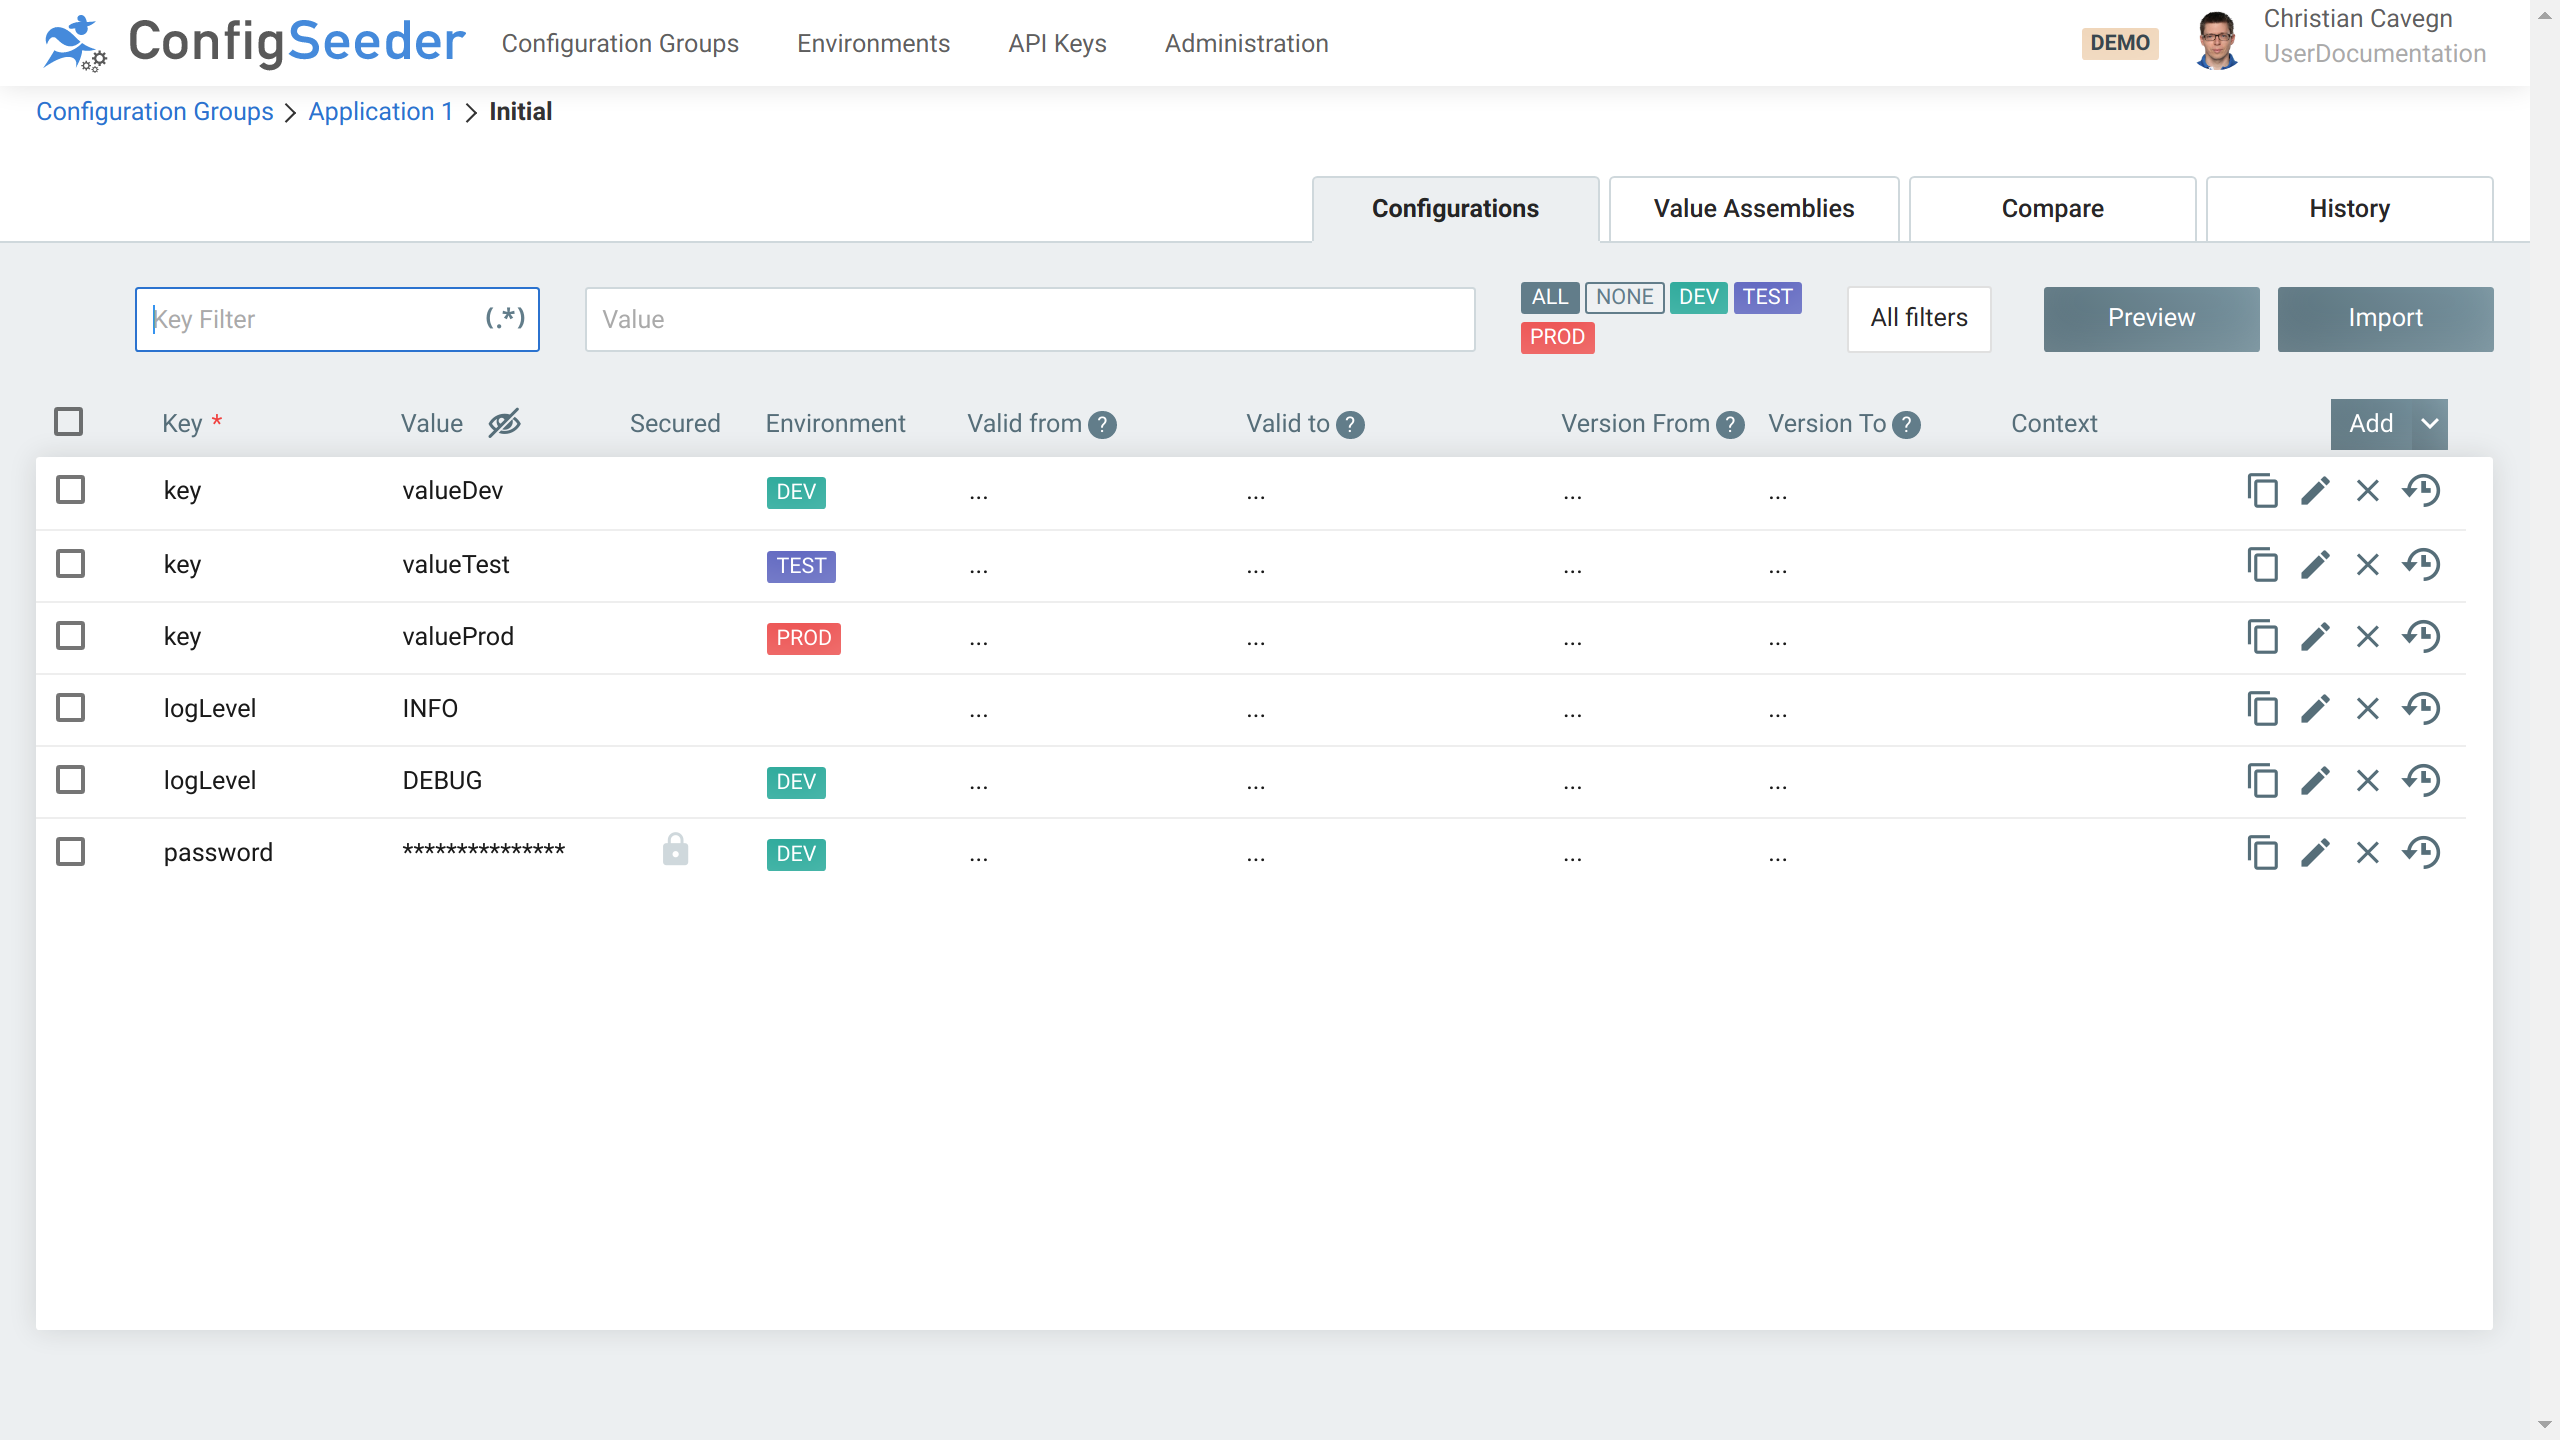
The configuration data overview page shows the following information:
-
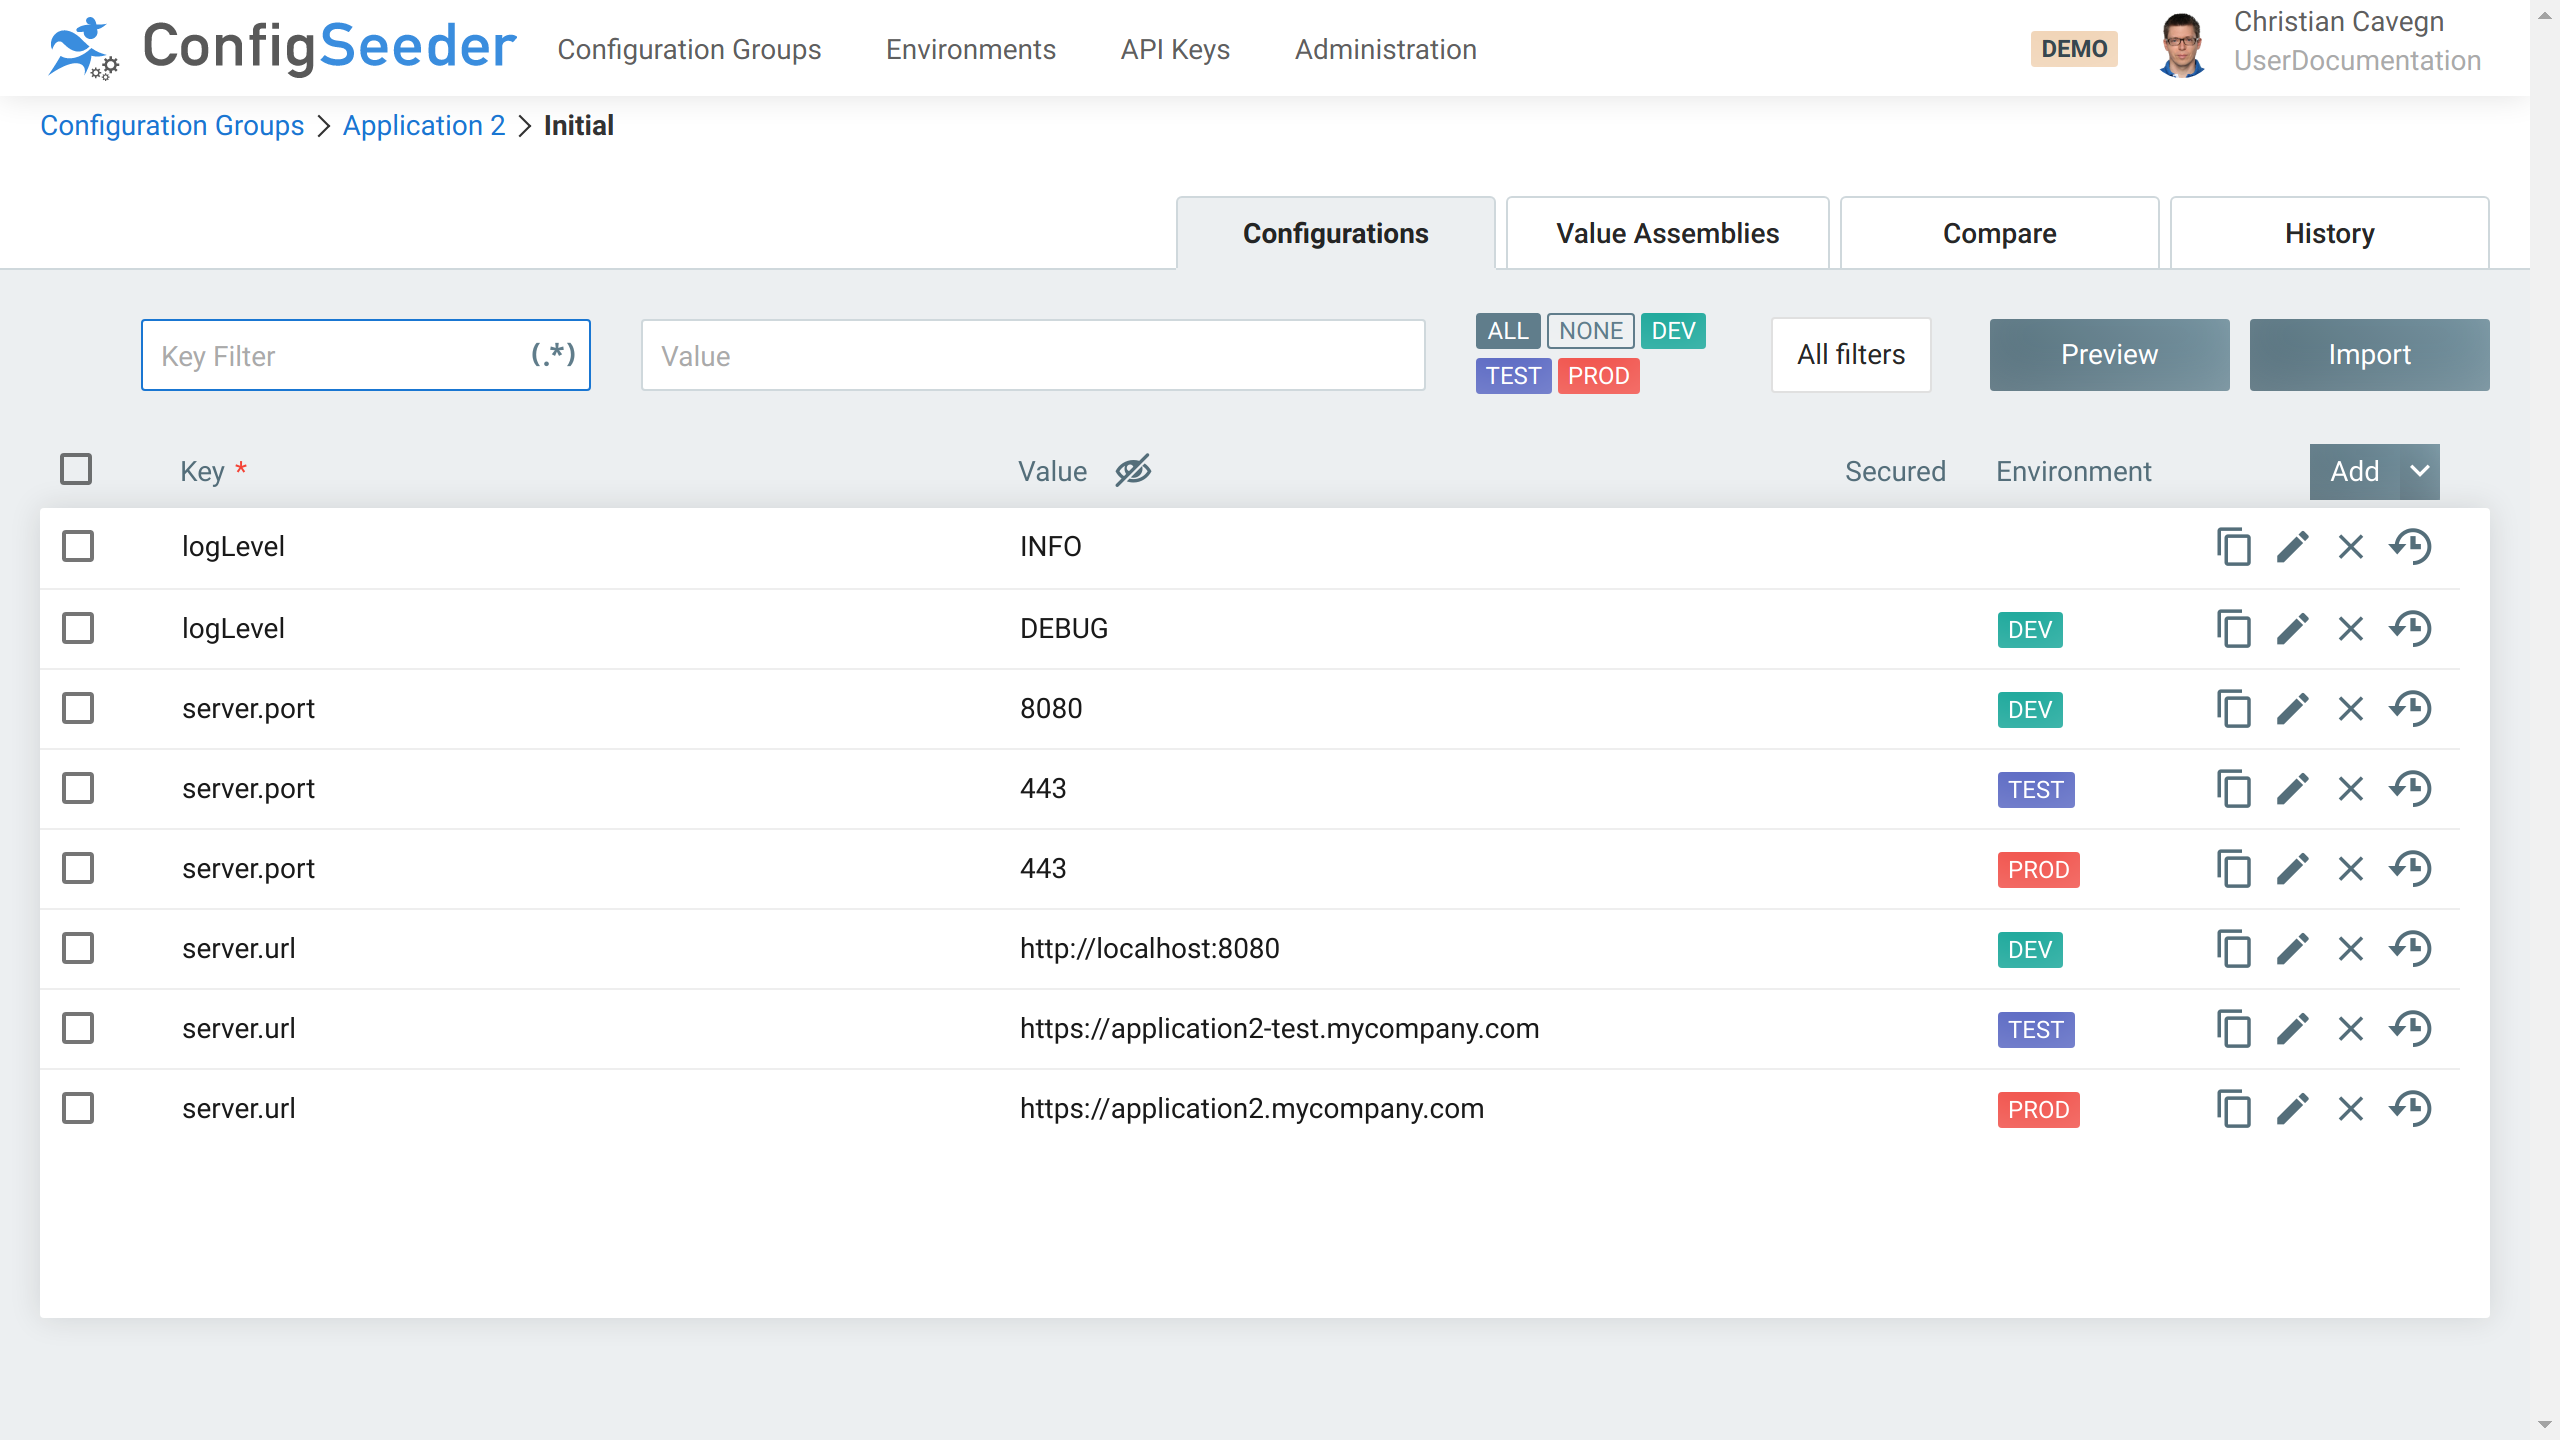
Shown configuration data
-
All configuration data (keys & values) is shown
-
If you don’t have access to configuration value because of missing access permissions, you will only see ******
-
Secured values (configuration data with key
passwordin screenshot) are only shown as ******. -
If you have the required permissions, the hidden values can be revealed by clicking on the eye-icon.
-
See access management for more details.
-
-
Filter conditions
-
Only the filter conditions activated for the configuration group are shown
-
Values without filter conditions are valid if no values exist with more specific configuration (default
logLevel) isINFObut onDEVit’s overwritten withDEBUG)
-
4.2.1.1. Available Actions
| Icon | Description |
|---|---|
|
|
Create another value for the same configuratio node |
|
|
Edit the configuration node |
|
|
Delete configuration value (and node if the last value of the node is deleted) |
|
|
Show history of the configuration value |

|
Reveal hidden values / hide revealed values |
4.2.1.2. Available Bulk operations
Bulk operations are operations that can modify multiple configuration values at the same time. Bulk operations become visible when at least one configuration data is selected.
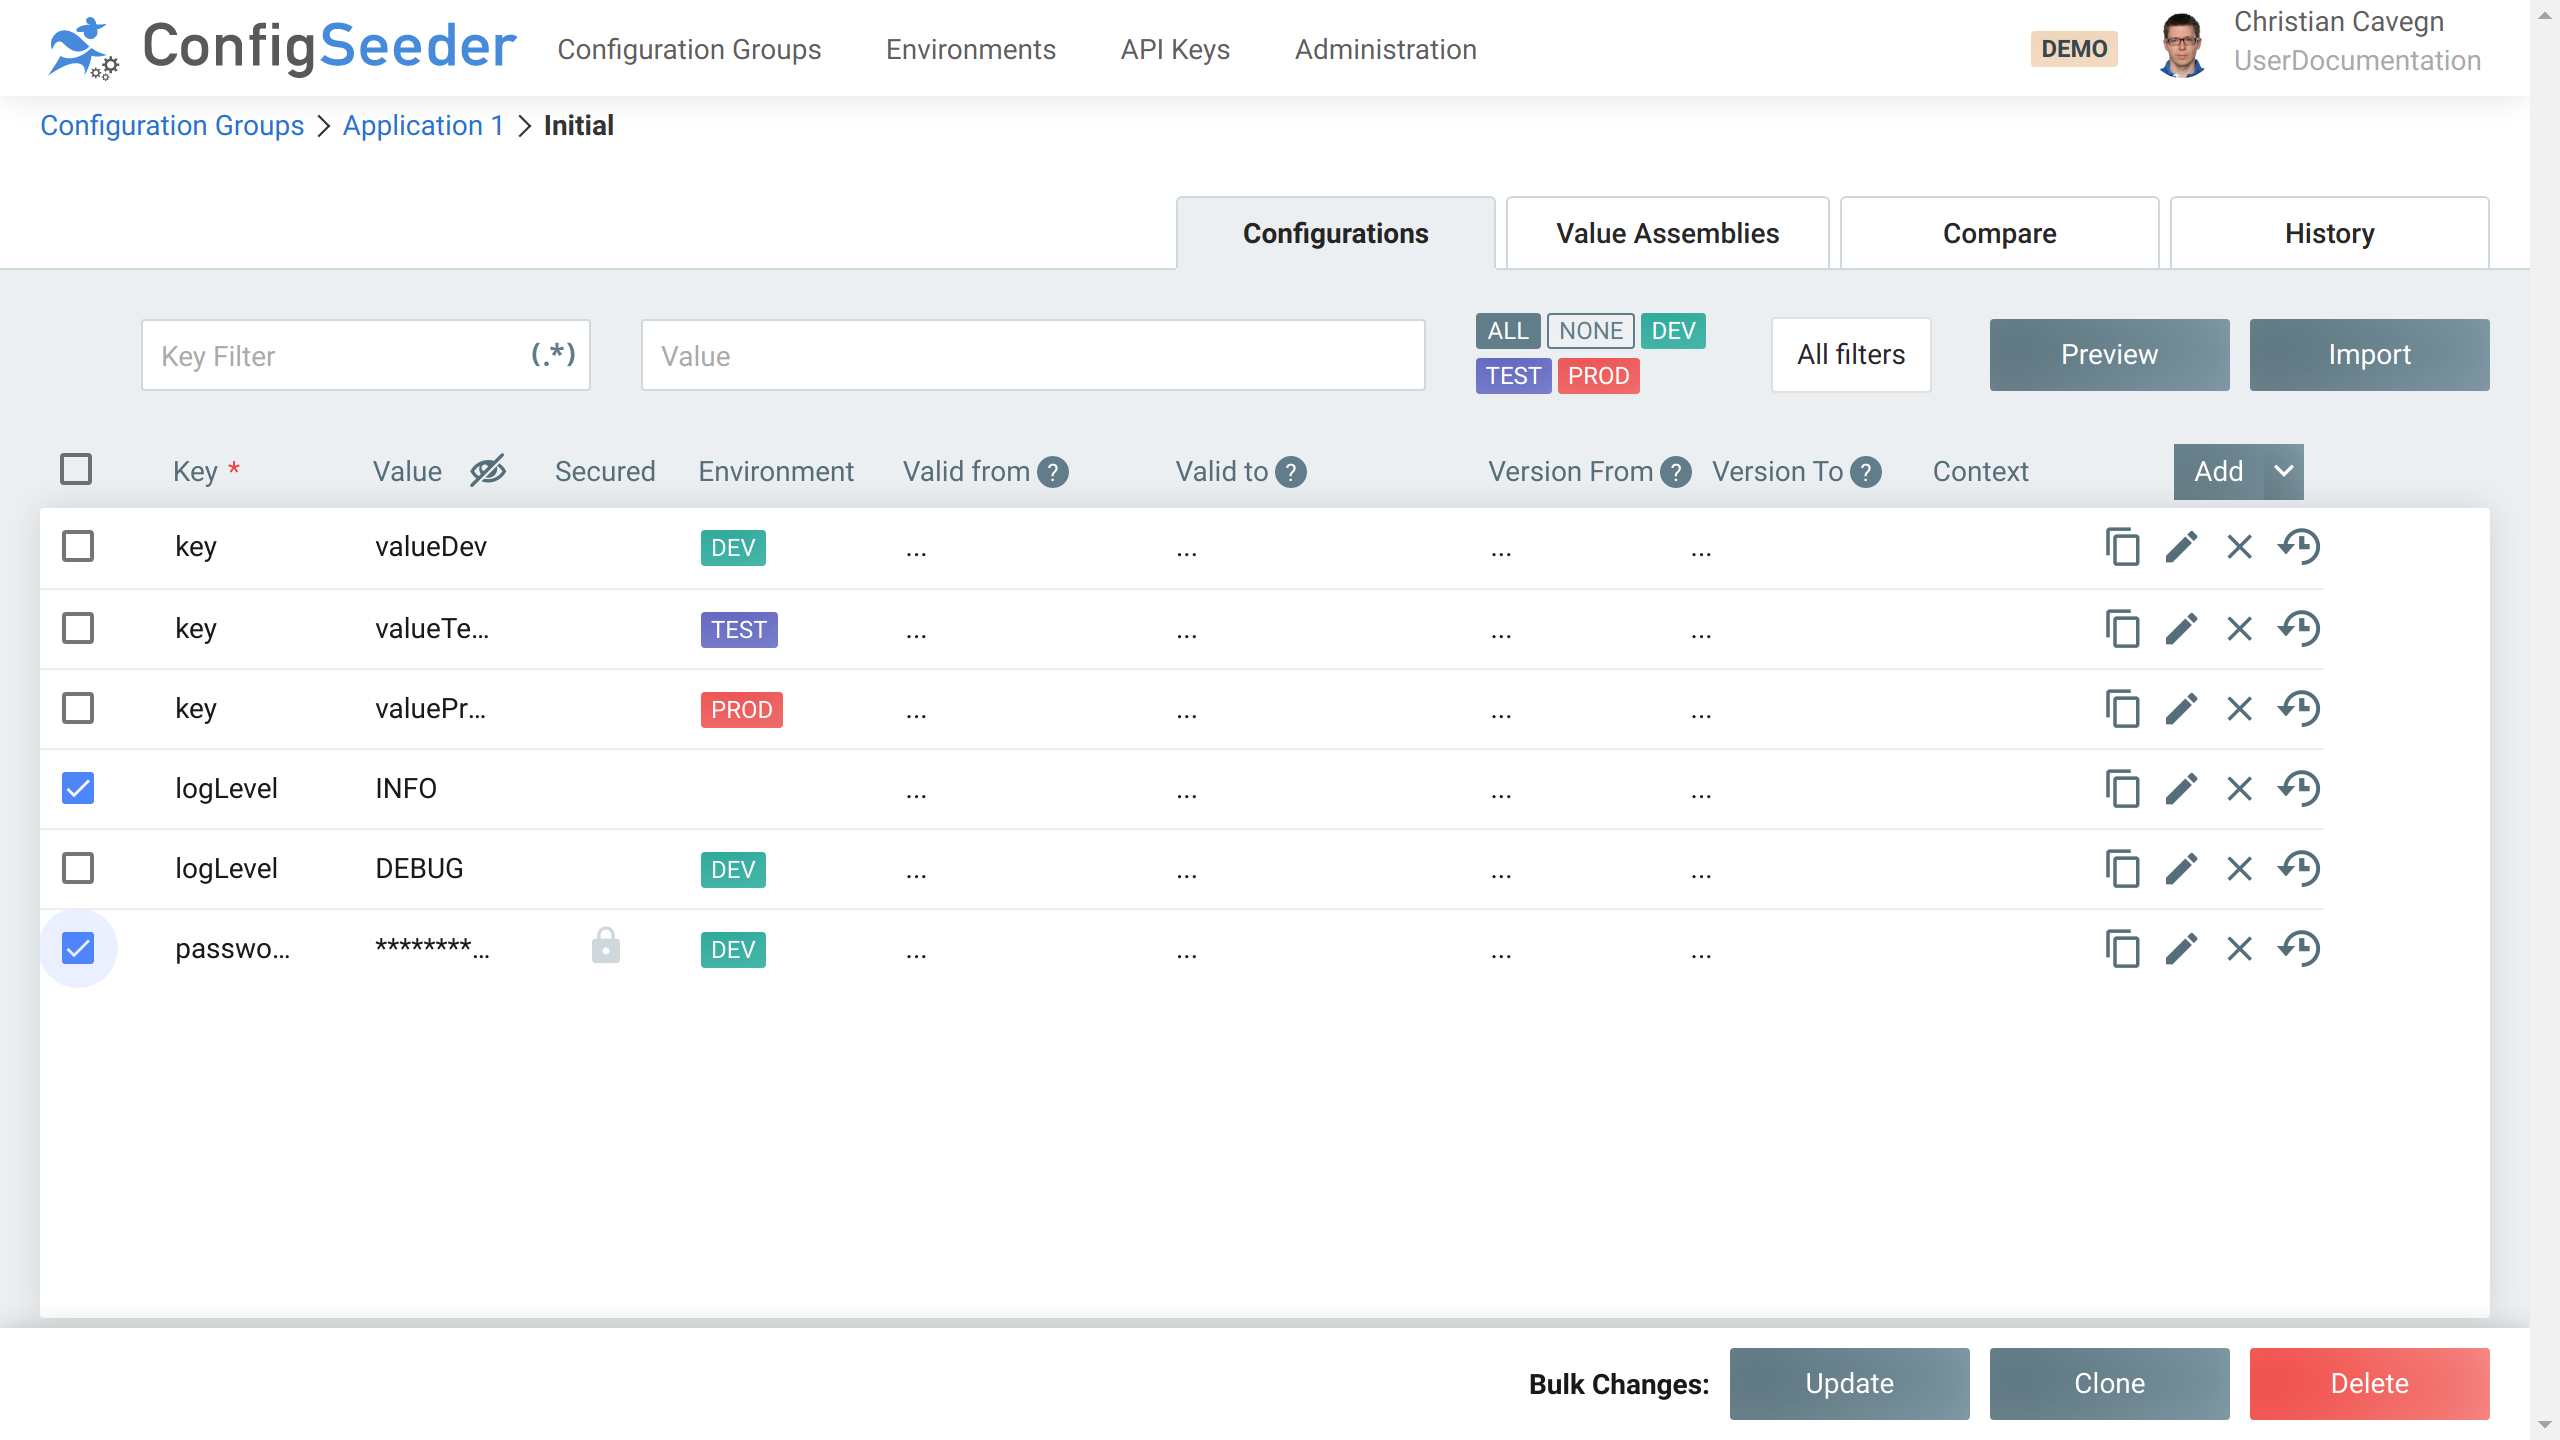
| Operation | Description |
|---|---|
Update |
Change the value, secured flag or one of the filter criteria for multiple configuration values at once. 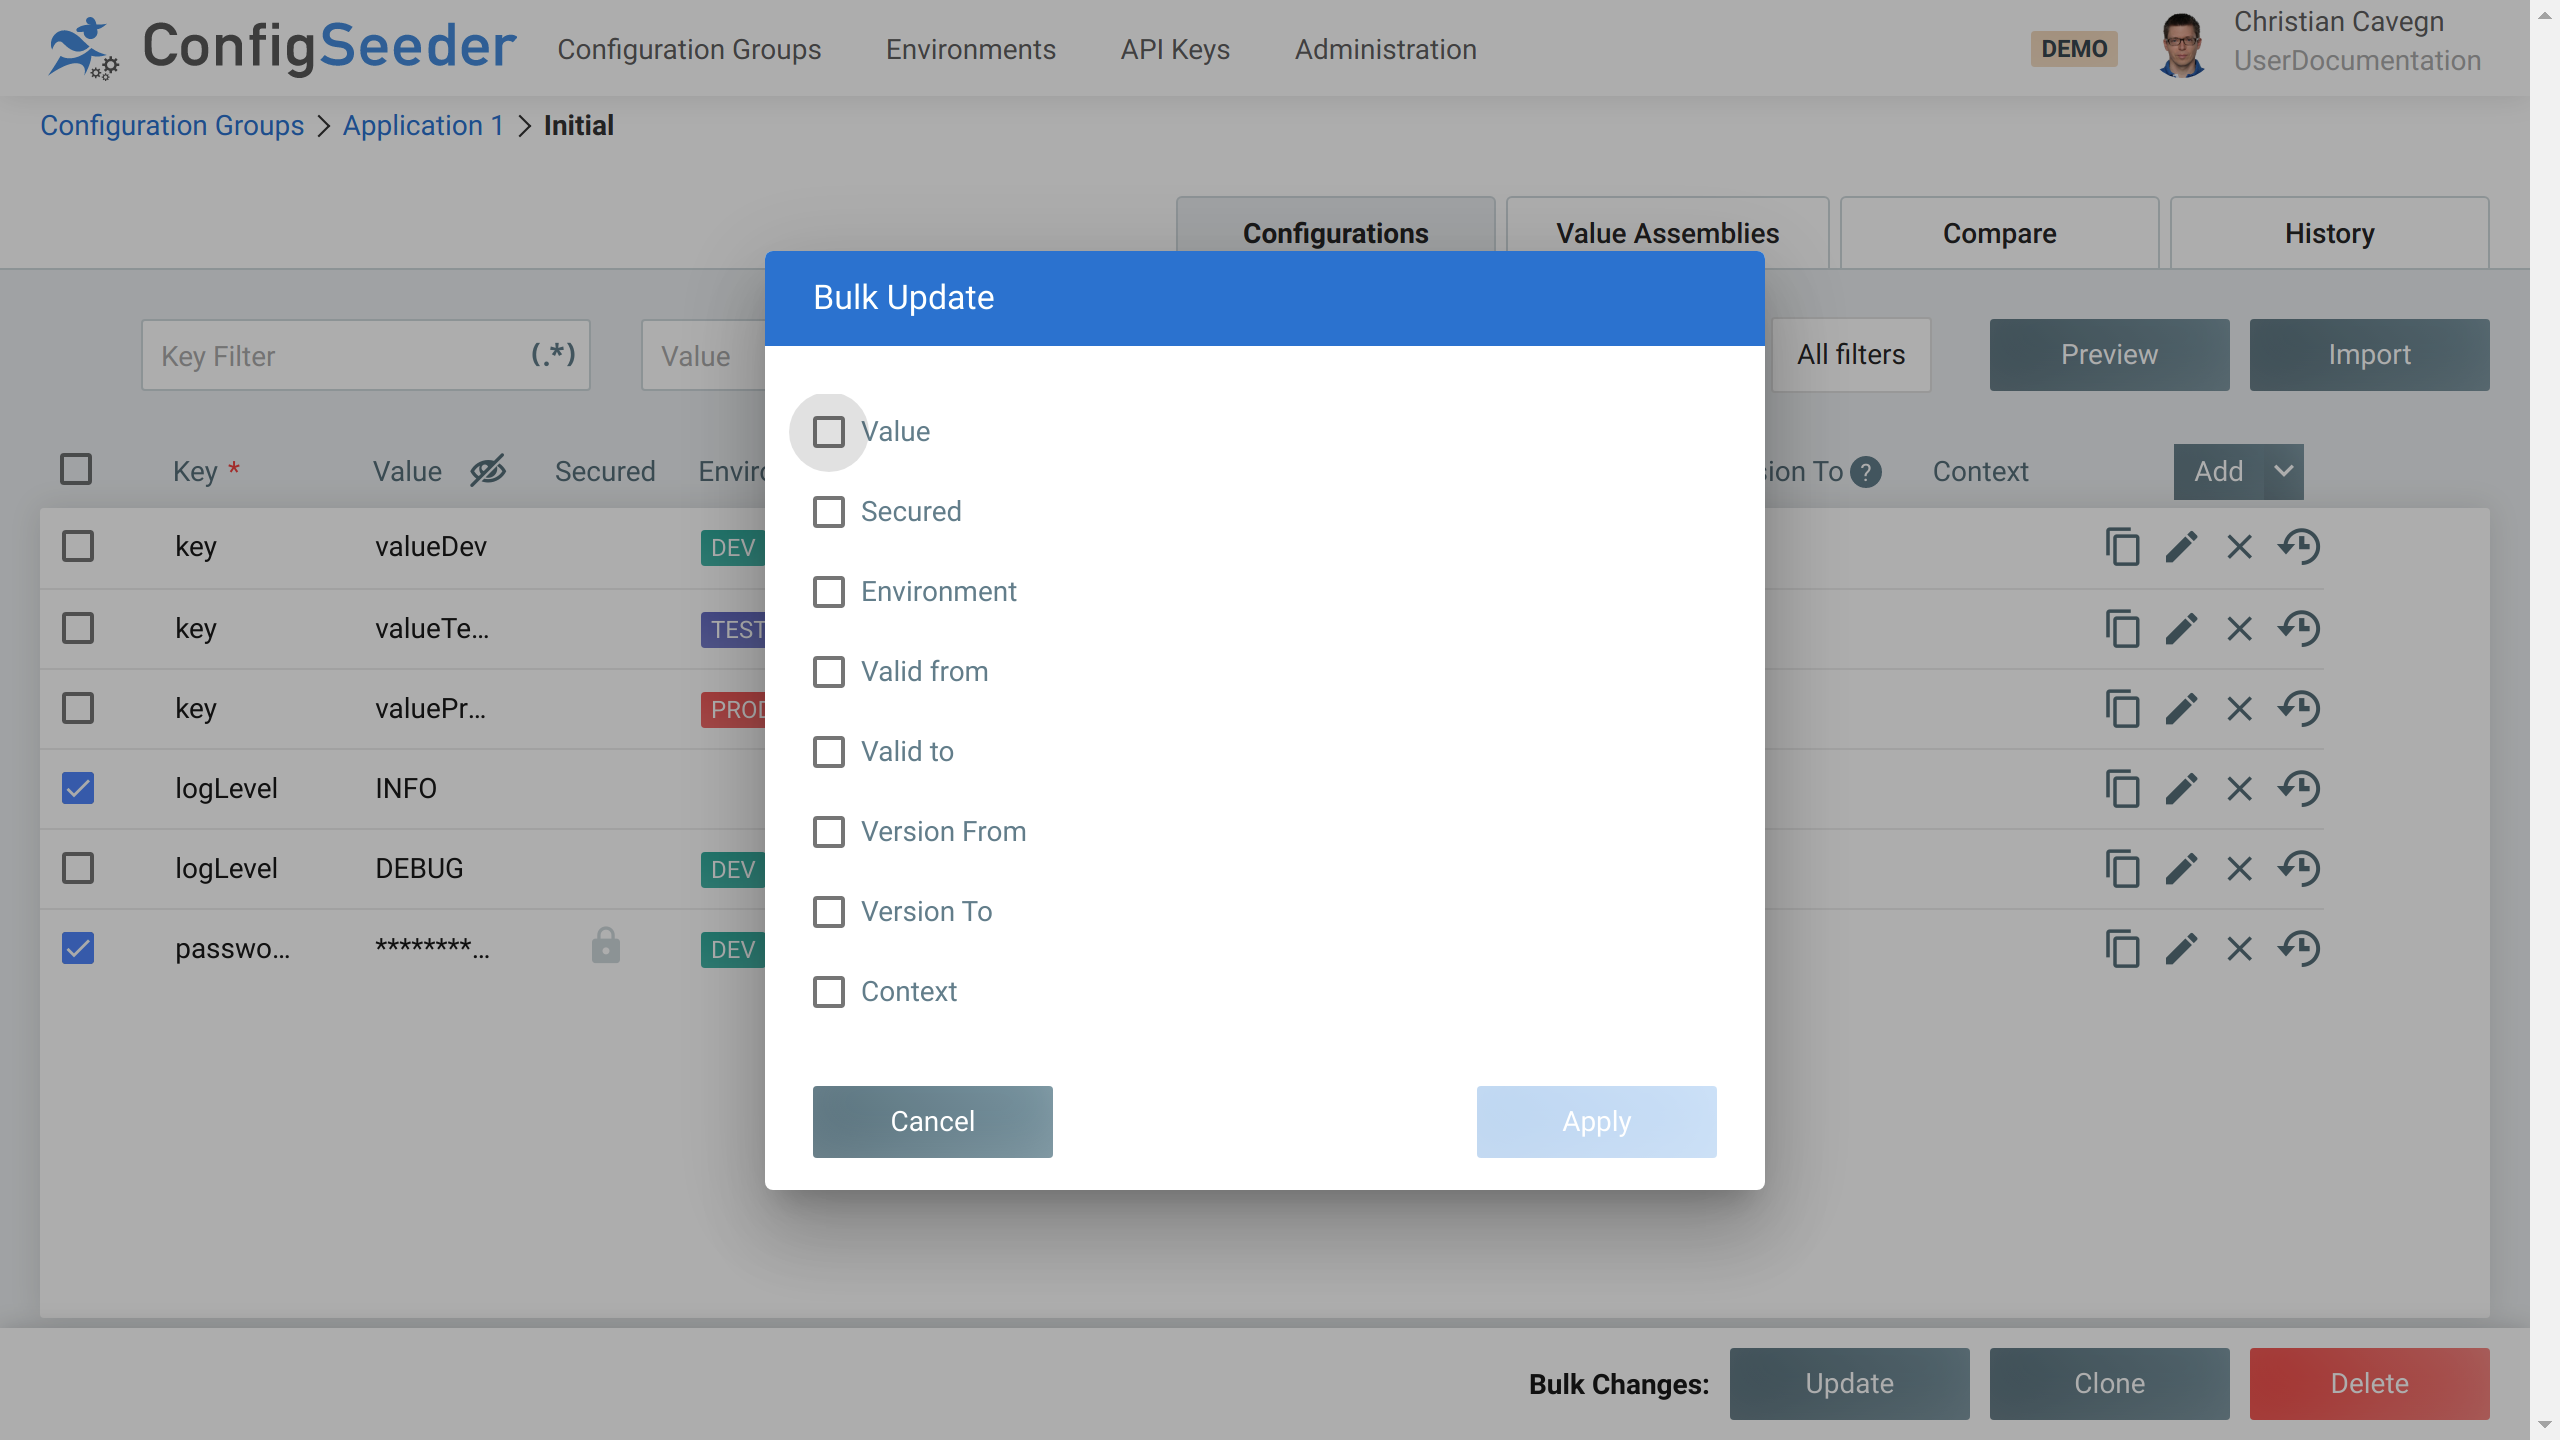
|
Clone |
Clone multiple configuration values at once. Cloning multiple configuration values is normally used in concert with the bulk operation Also see Clone an existing configuration value. |
Delete |
Delete multiple configuration values at once. The configuration nodes for which the last configuration value was deleted will also be deleted. |
4.2.2. Create new configuration data
4.2.2.1. Add vs Clone
In a configuration group, every configuration node (identified by it’s Key) has to be unique.
When adding new configuration data, you have to decide if
-
A new configuration node (key) should be created
-
Or if an existing configuration node should be extended with an additional value
If you add a configuration node with an already existing key, you will get a validation error and won’t be able to save the newly added data.
|
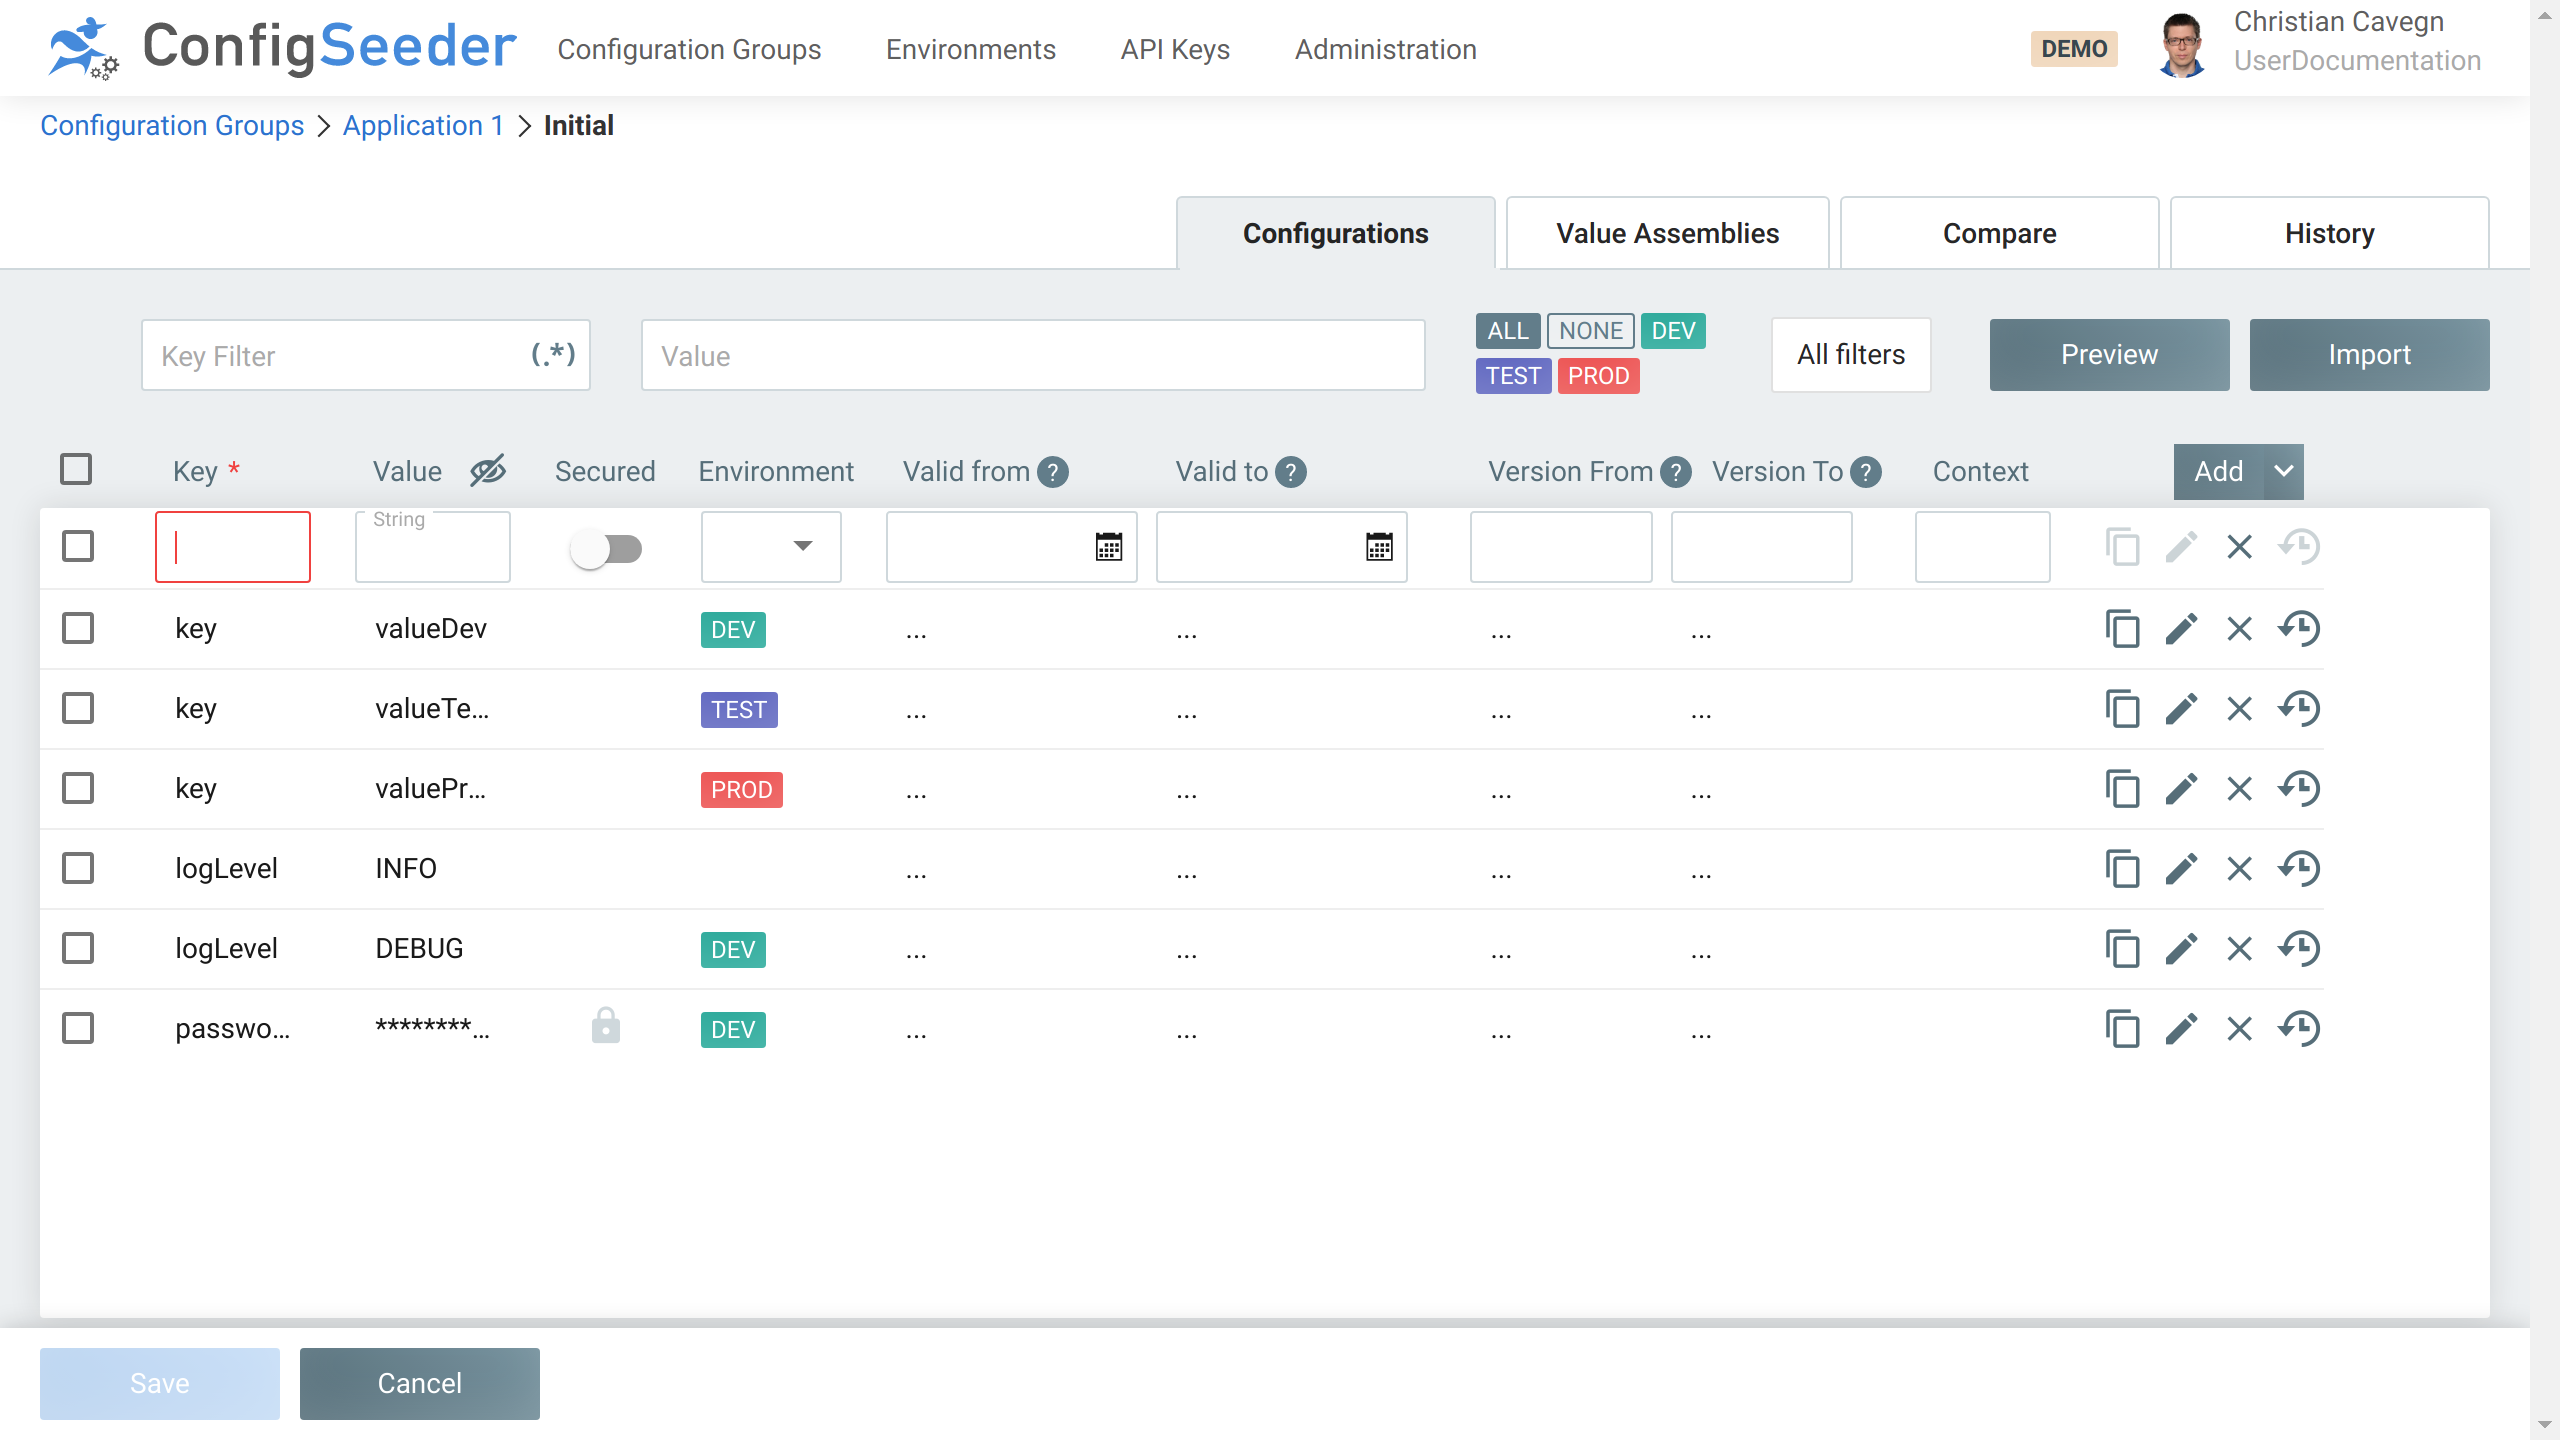
4.2.2.2. Add a new configuration node and -value
-
Open the configuration group in which you need to add a new configuration node.
-
Click on the
AddButton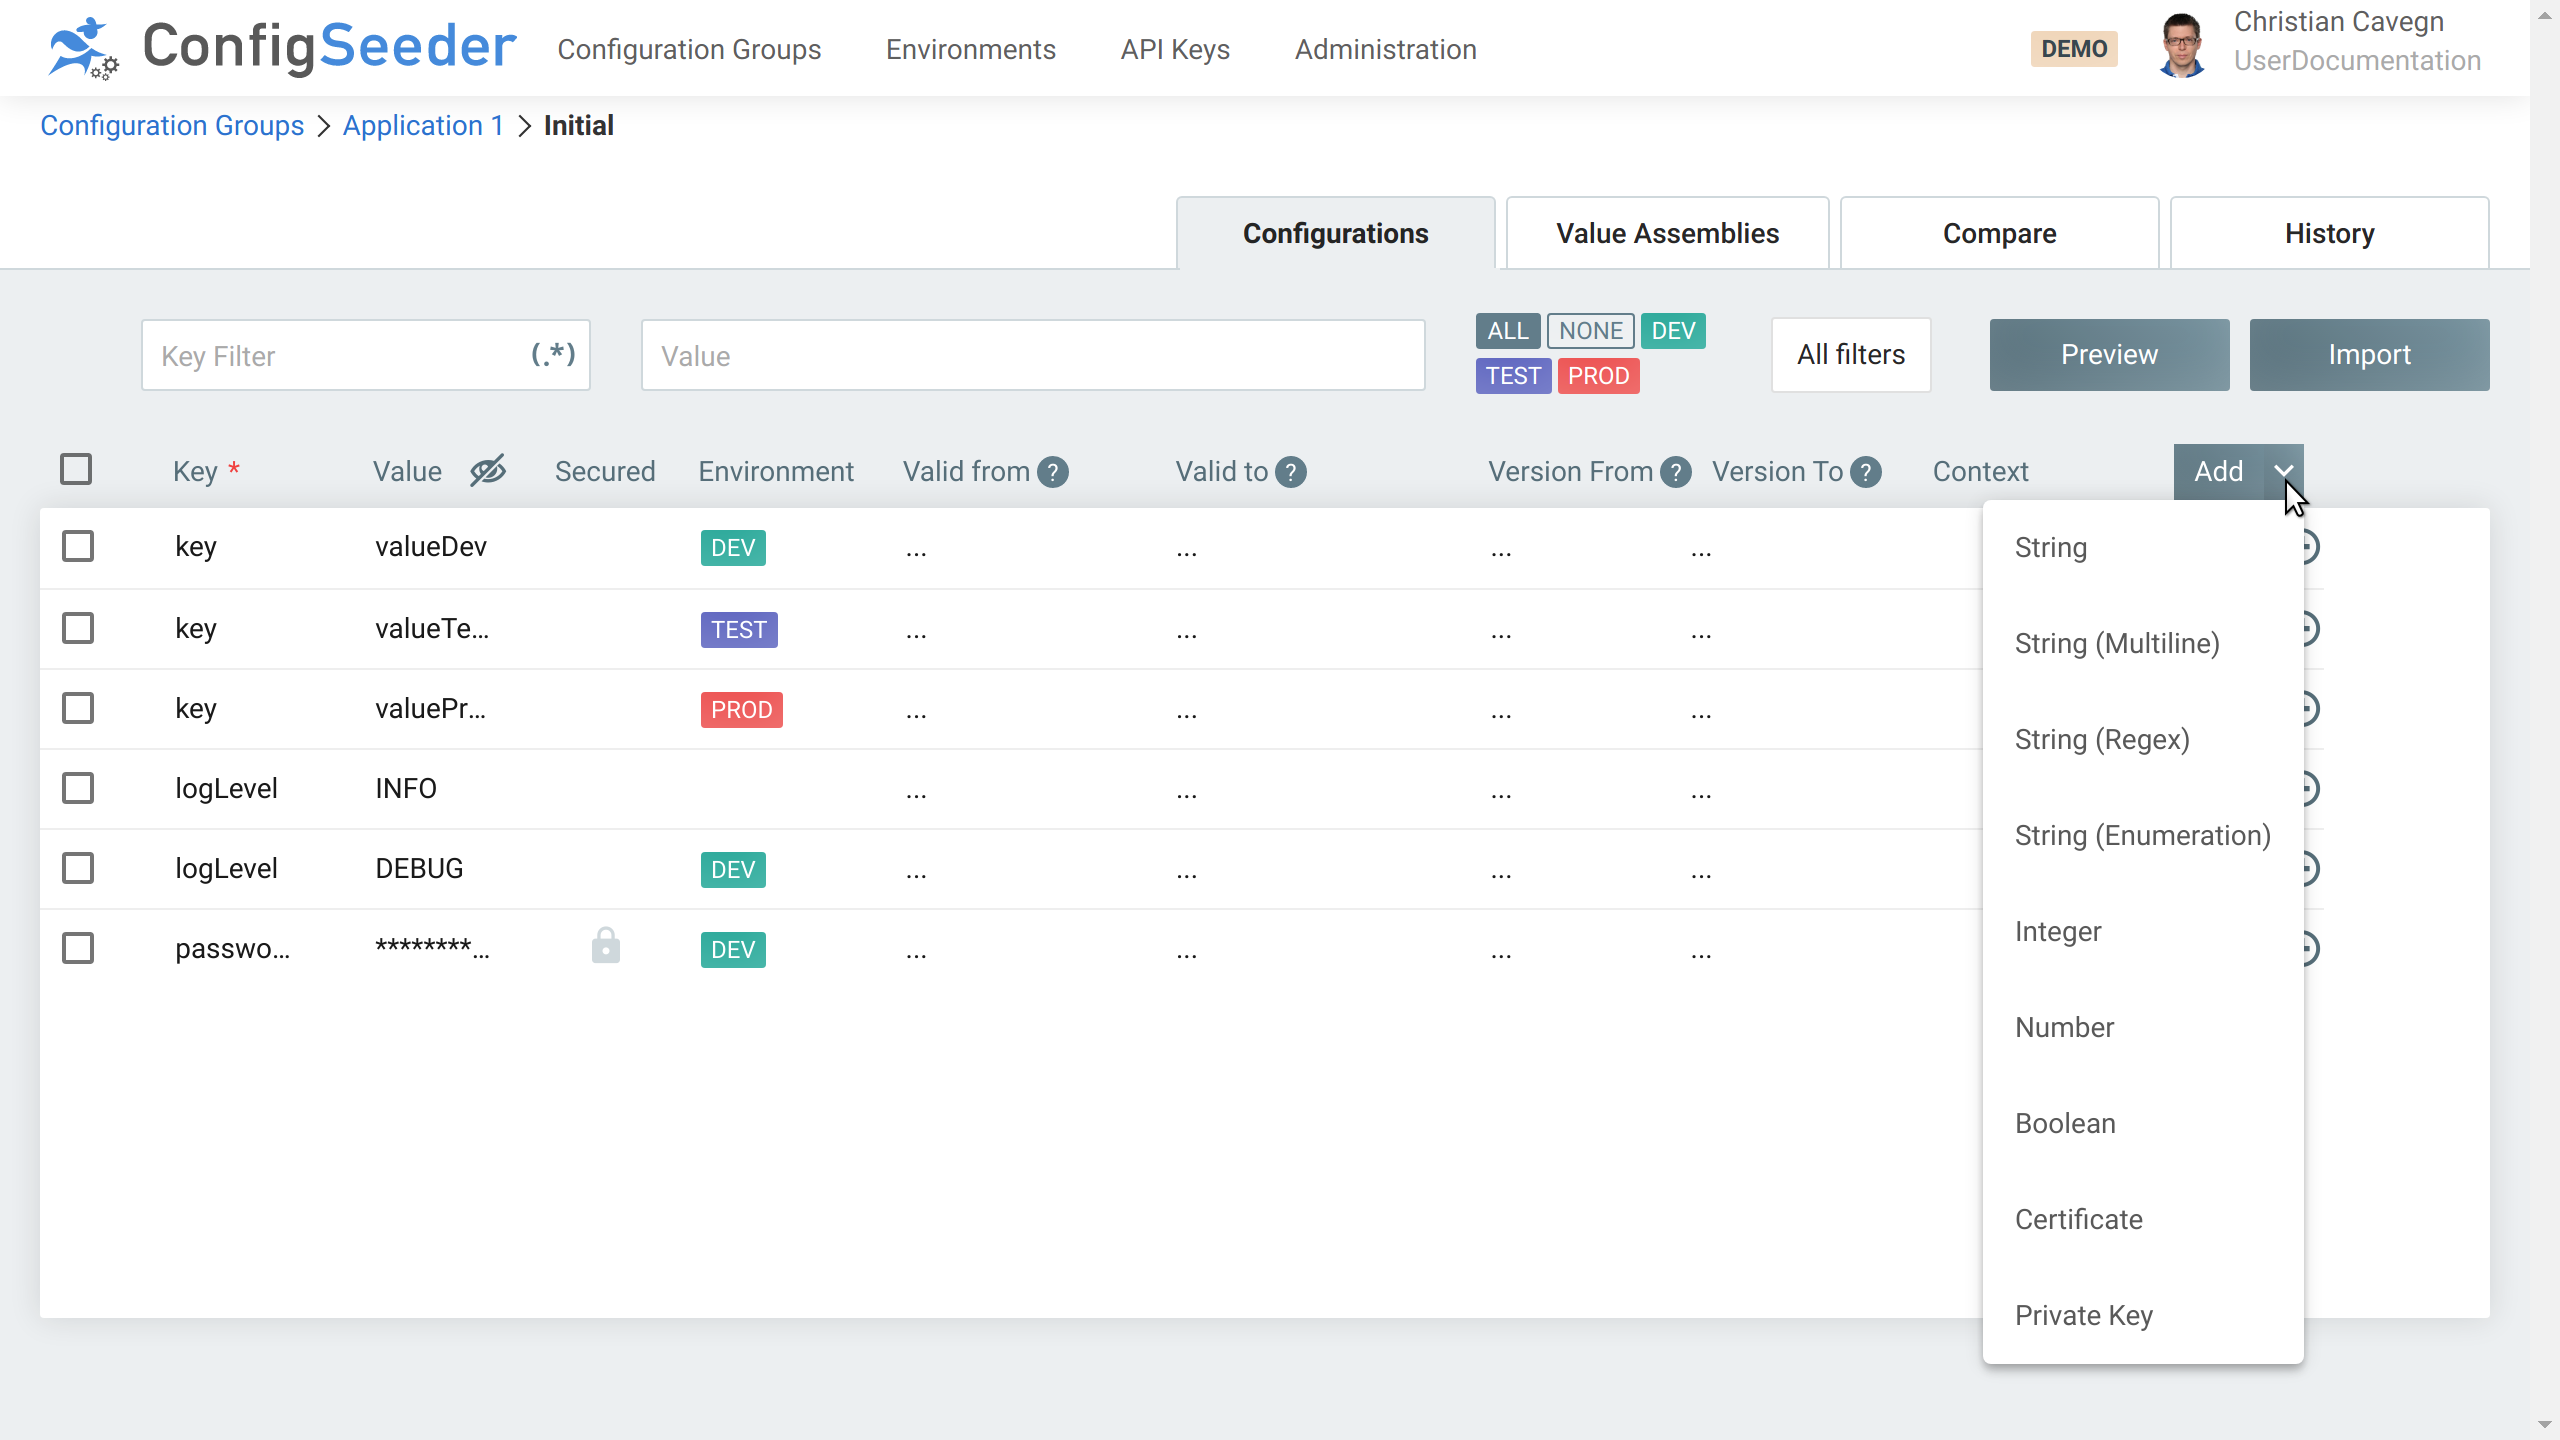
|
-
After clicking on the button / selecting the type of configuration node to add, the new node and a first configuration value is created, but not yet saved
-
Fix the validation issue (configuration nodes with an empty key are not valid) and save the new configuration data by pressing the
SaveButton.
4.2.2.3. Clone an existing configuration value
-
Open the configuration group in which you need to clone an existing configuration value.
-
Click on the
CloneIcon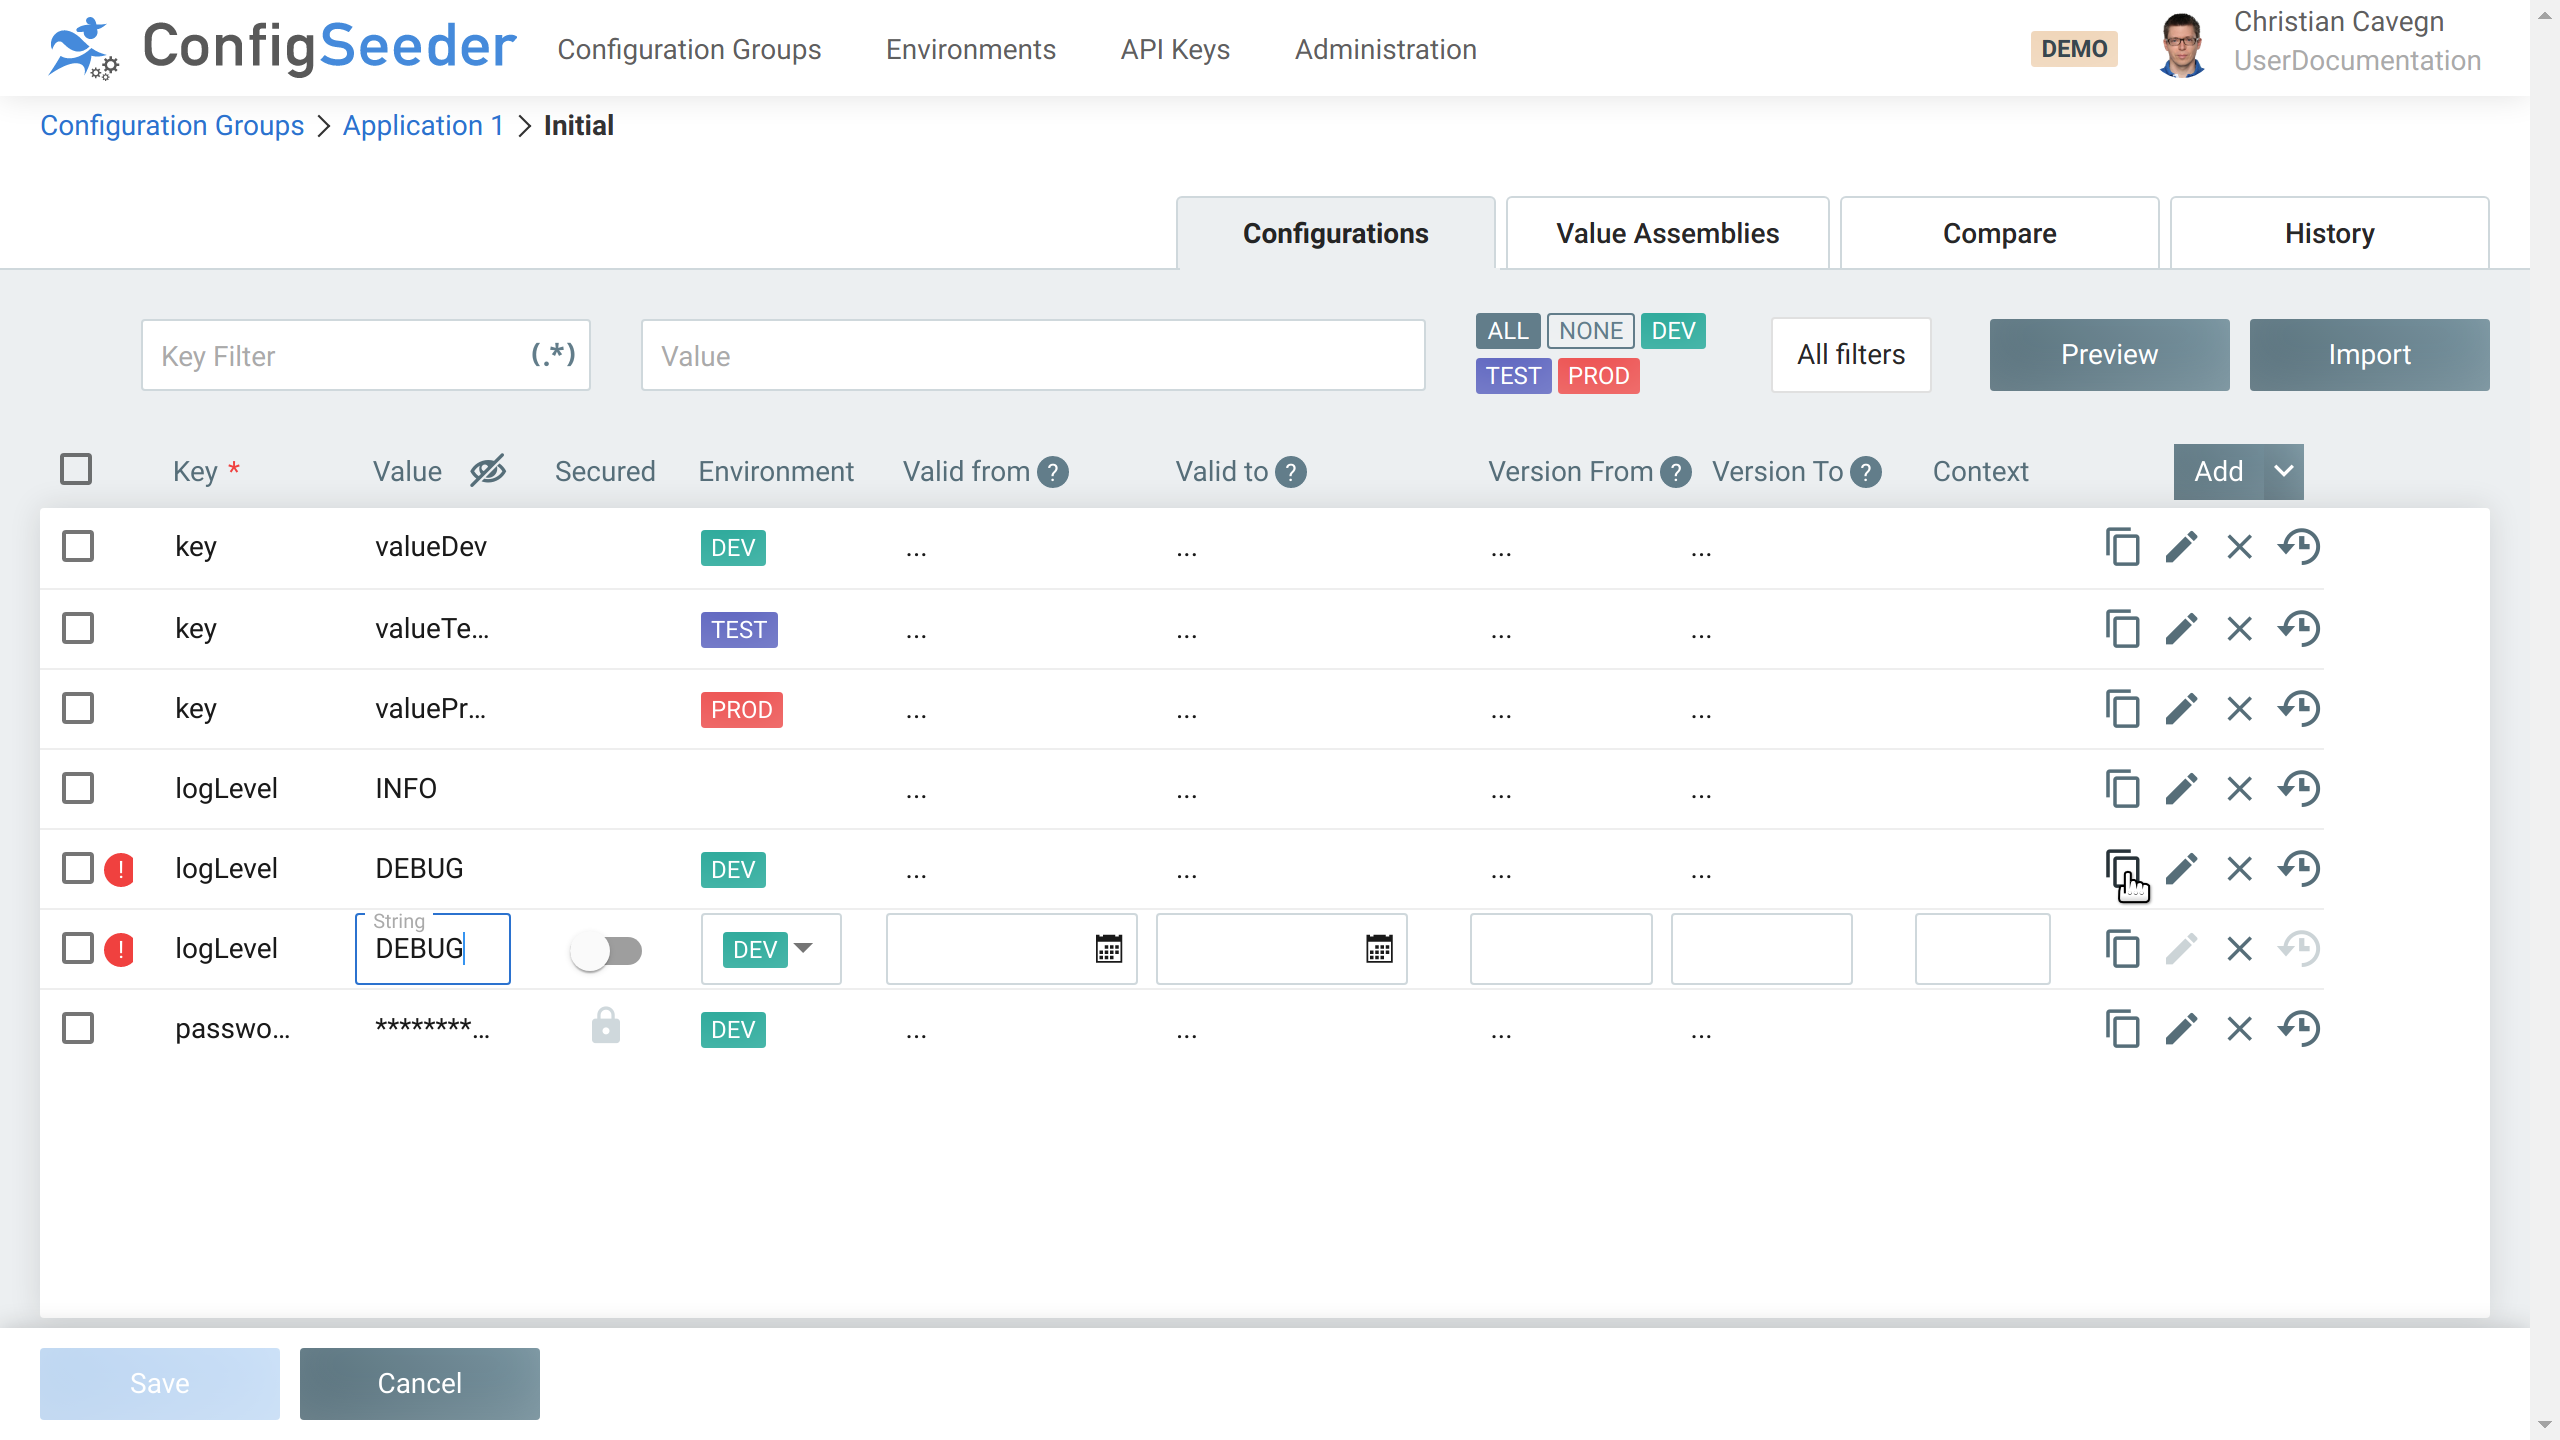
-
Fix the validation error and save the new configuration value by pressing the
SaveButton.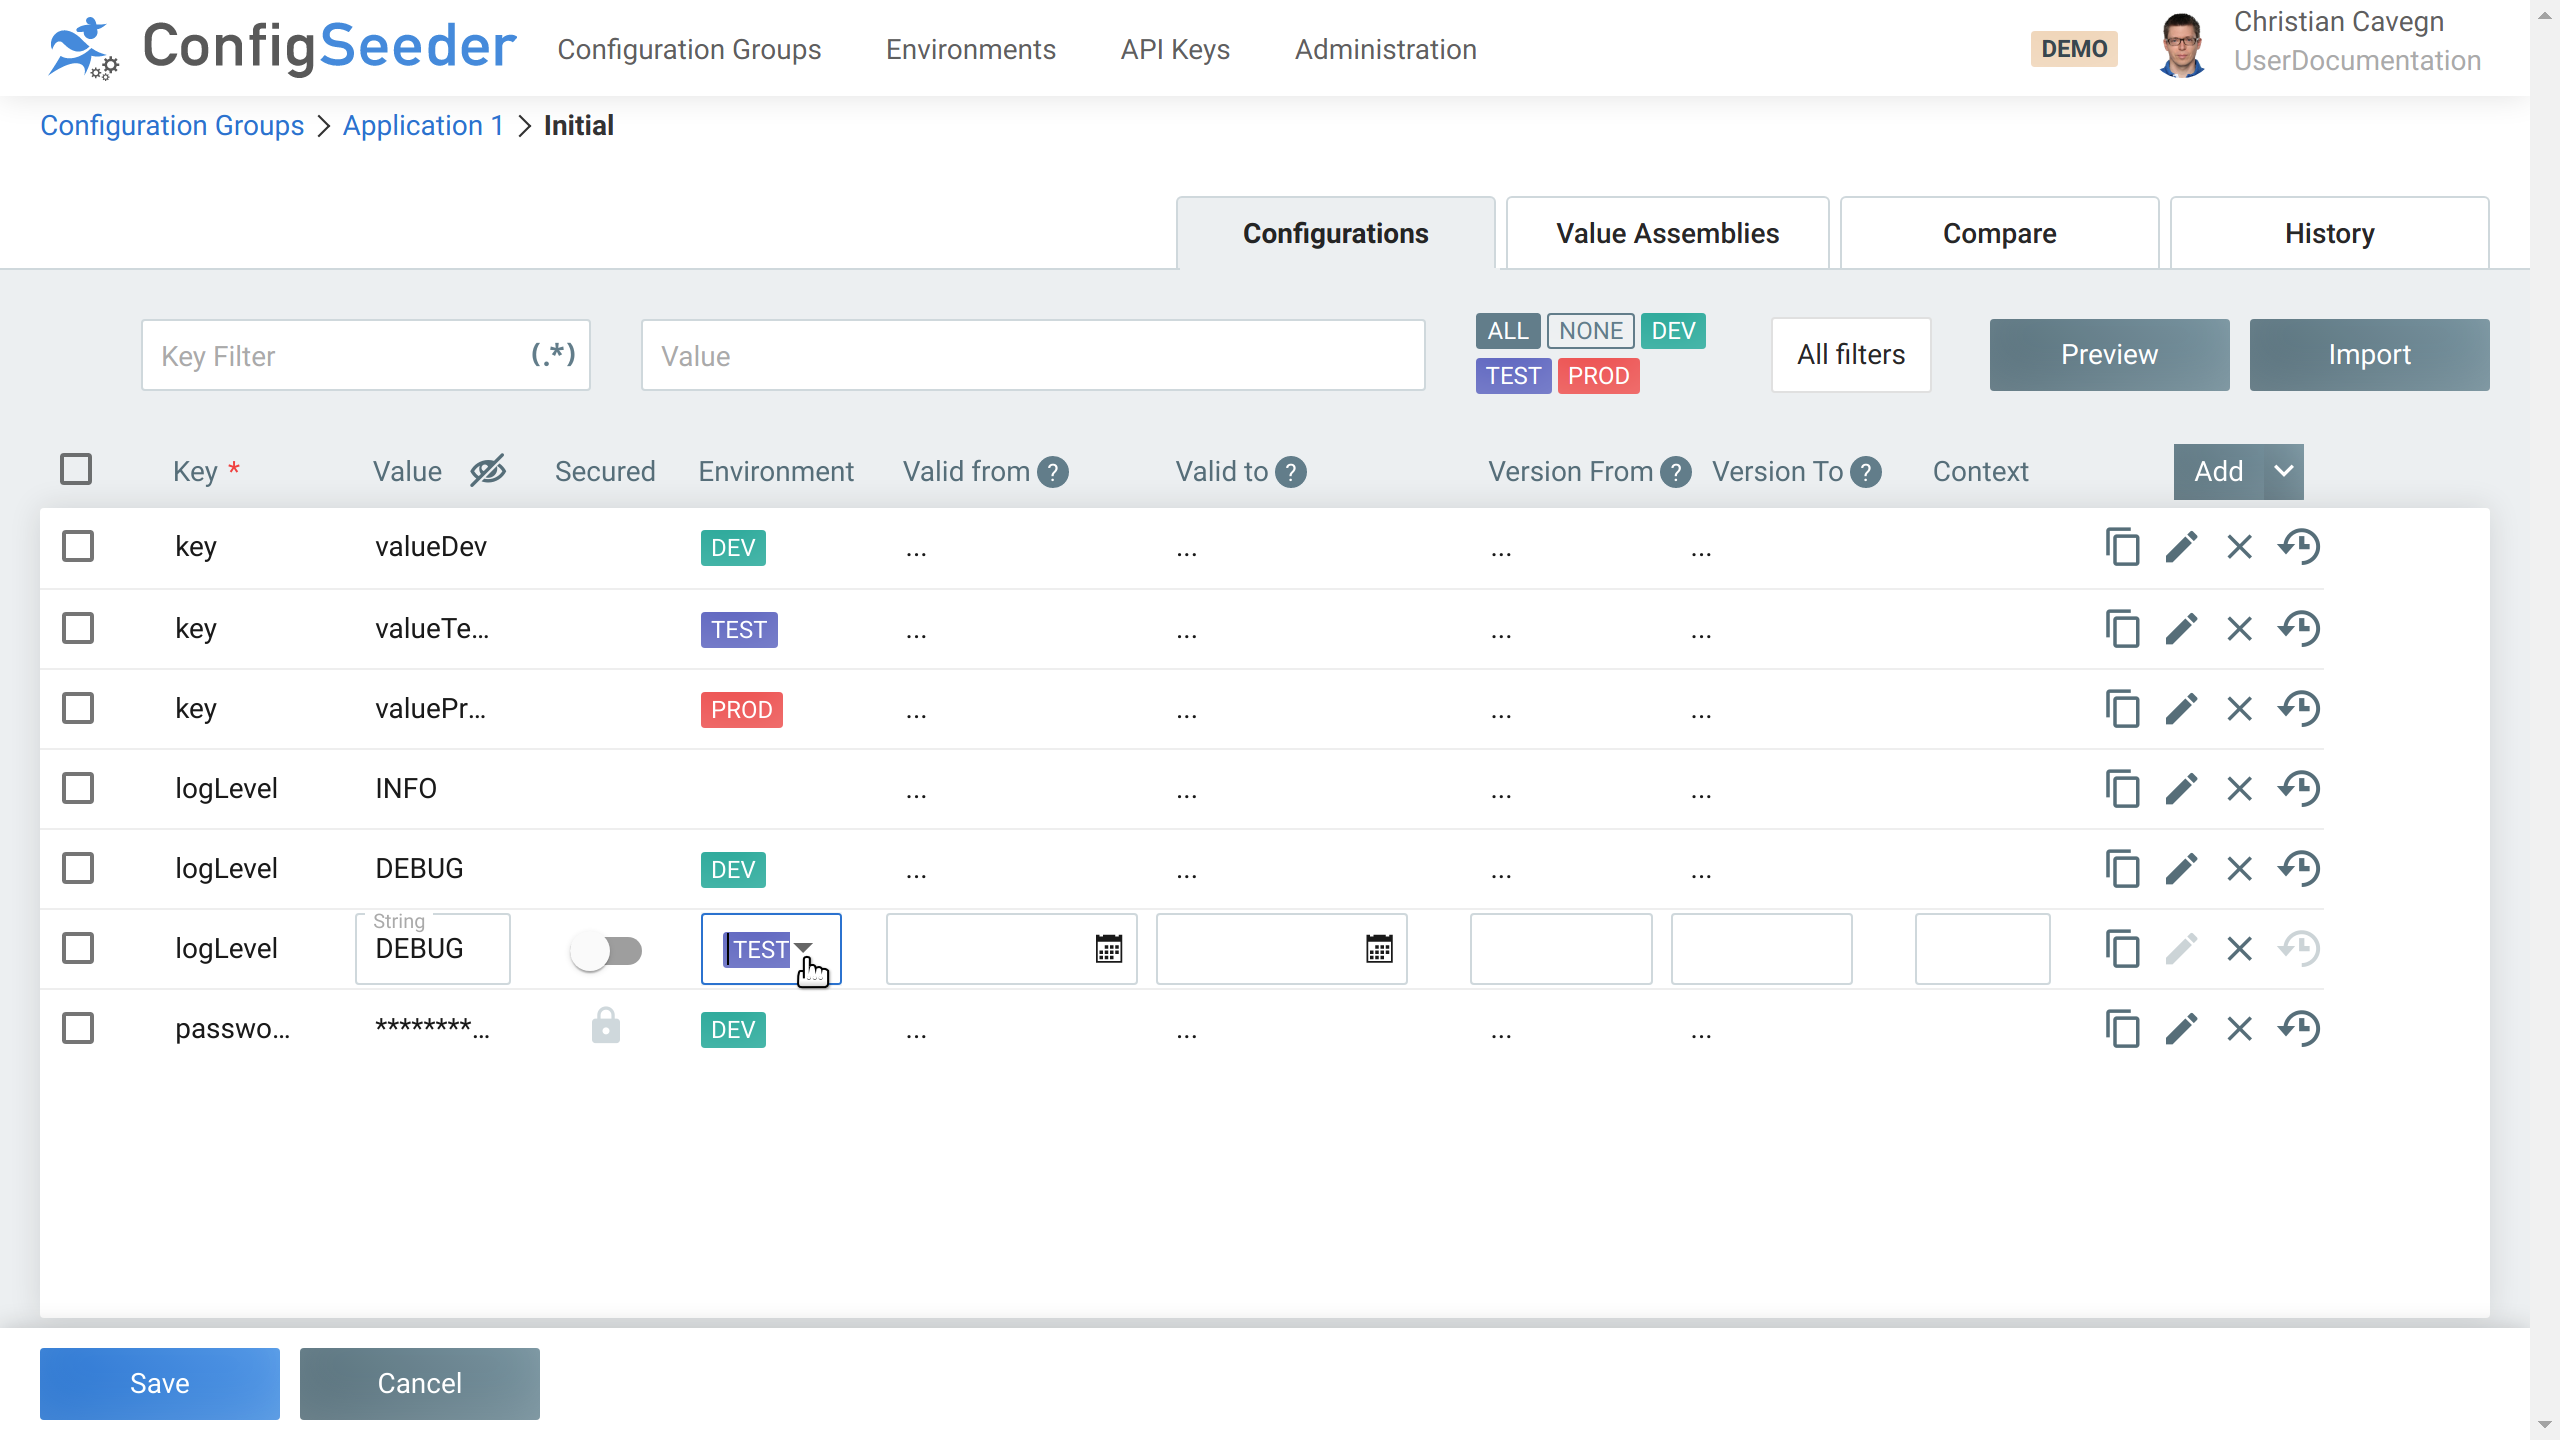
|
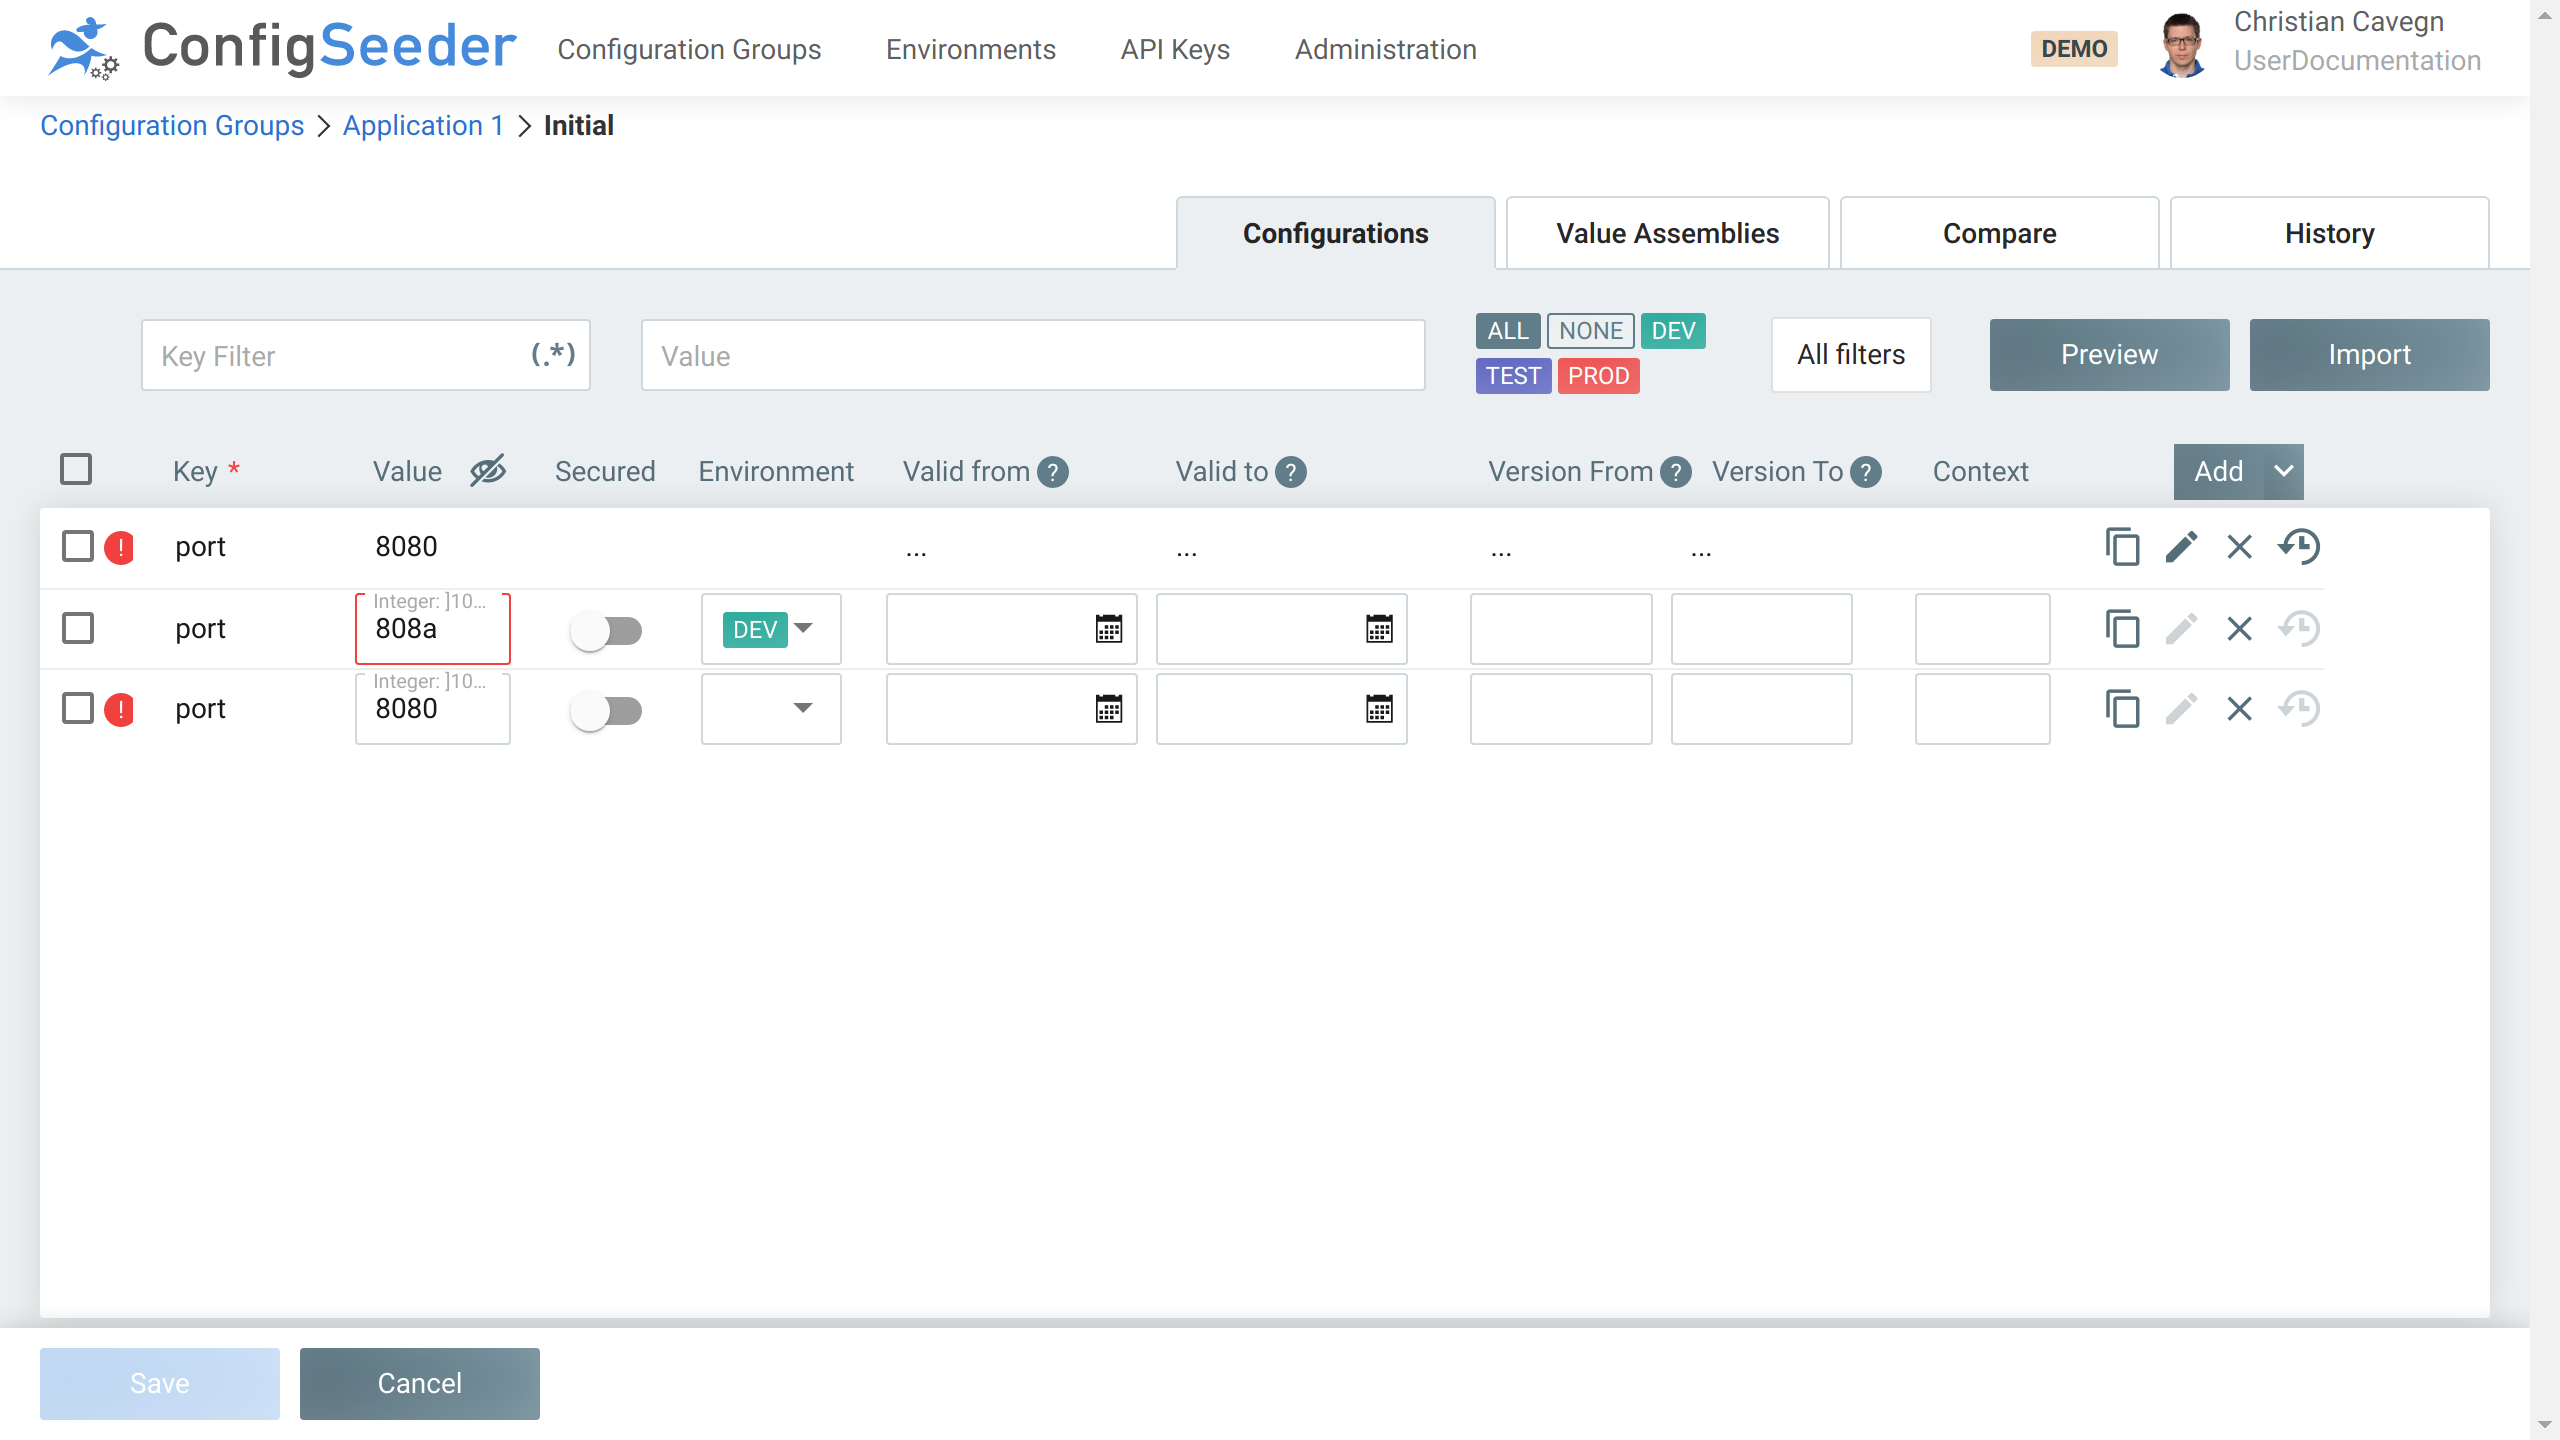
4.2.2.3.1. Validation errors
There are two kinds of validation errors. Both of them prevent that changes can be saved.
-
Cloning without changing the filter criteria leads to a new non-unique configuration value
-
See row
#1and#3in the screenshot -
This can be fixed by changing the filter criteria
-
-
Enter an invalid value
-
See row `#2`in the screenshot
-
Change the value so it complies with the validation rules of the configuration node
-
Change the validation rules of the configuration node so the new value is valid
-
4.2.3. Edit configuration data
4.2.3.1. Edit a configuration node vs edit a configuration value
Edit a configuration node means:
-
Change the key of configuration data
-
Change the type (String, Enum, …) of configuration data
-
Make configuration data nullable or mark it as deprecated
Edit a configuration node explicitly doesn’t mean to change the value or filter criteria of configuration data.
In return, edit a configuration value means changing the value, secured flag or the filter criteria of configuration data.
4.2.3.2. Edit a configuration node
-
Navigate to the configuration group containing the configuration node to edit
-
Click on the pencil icon
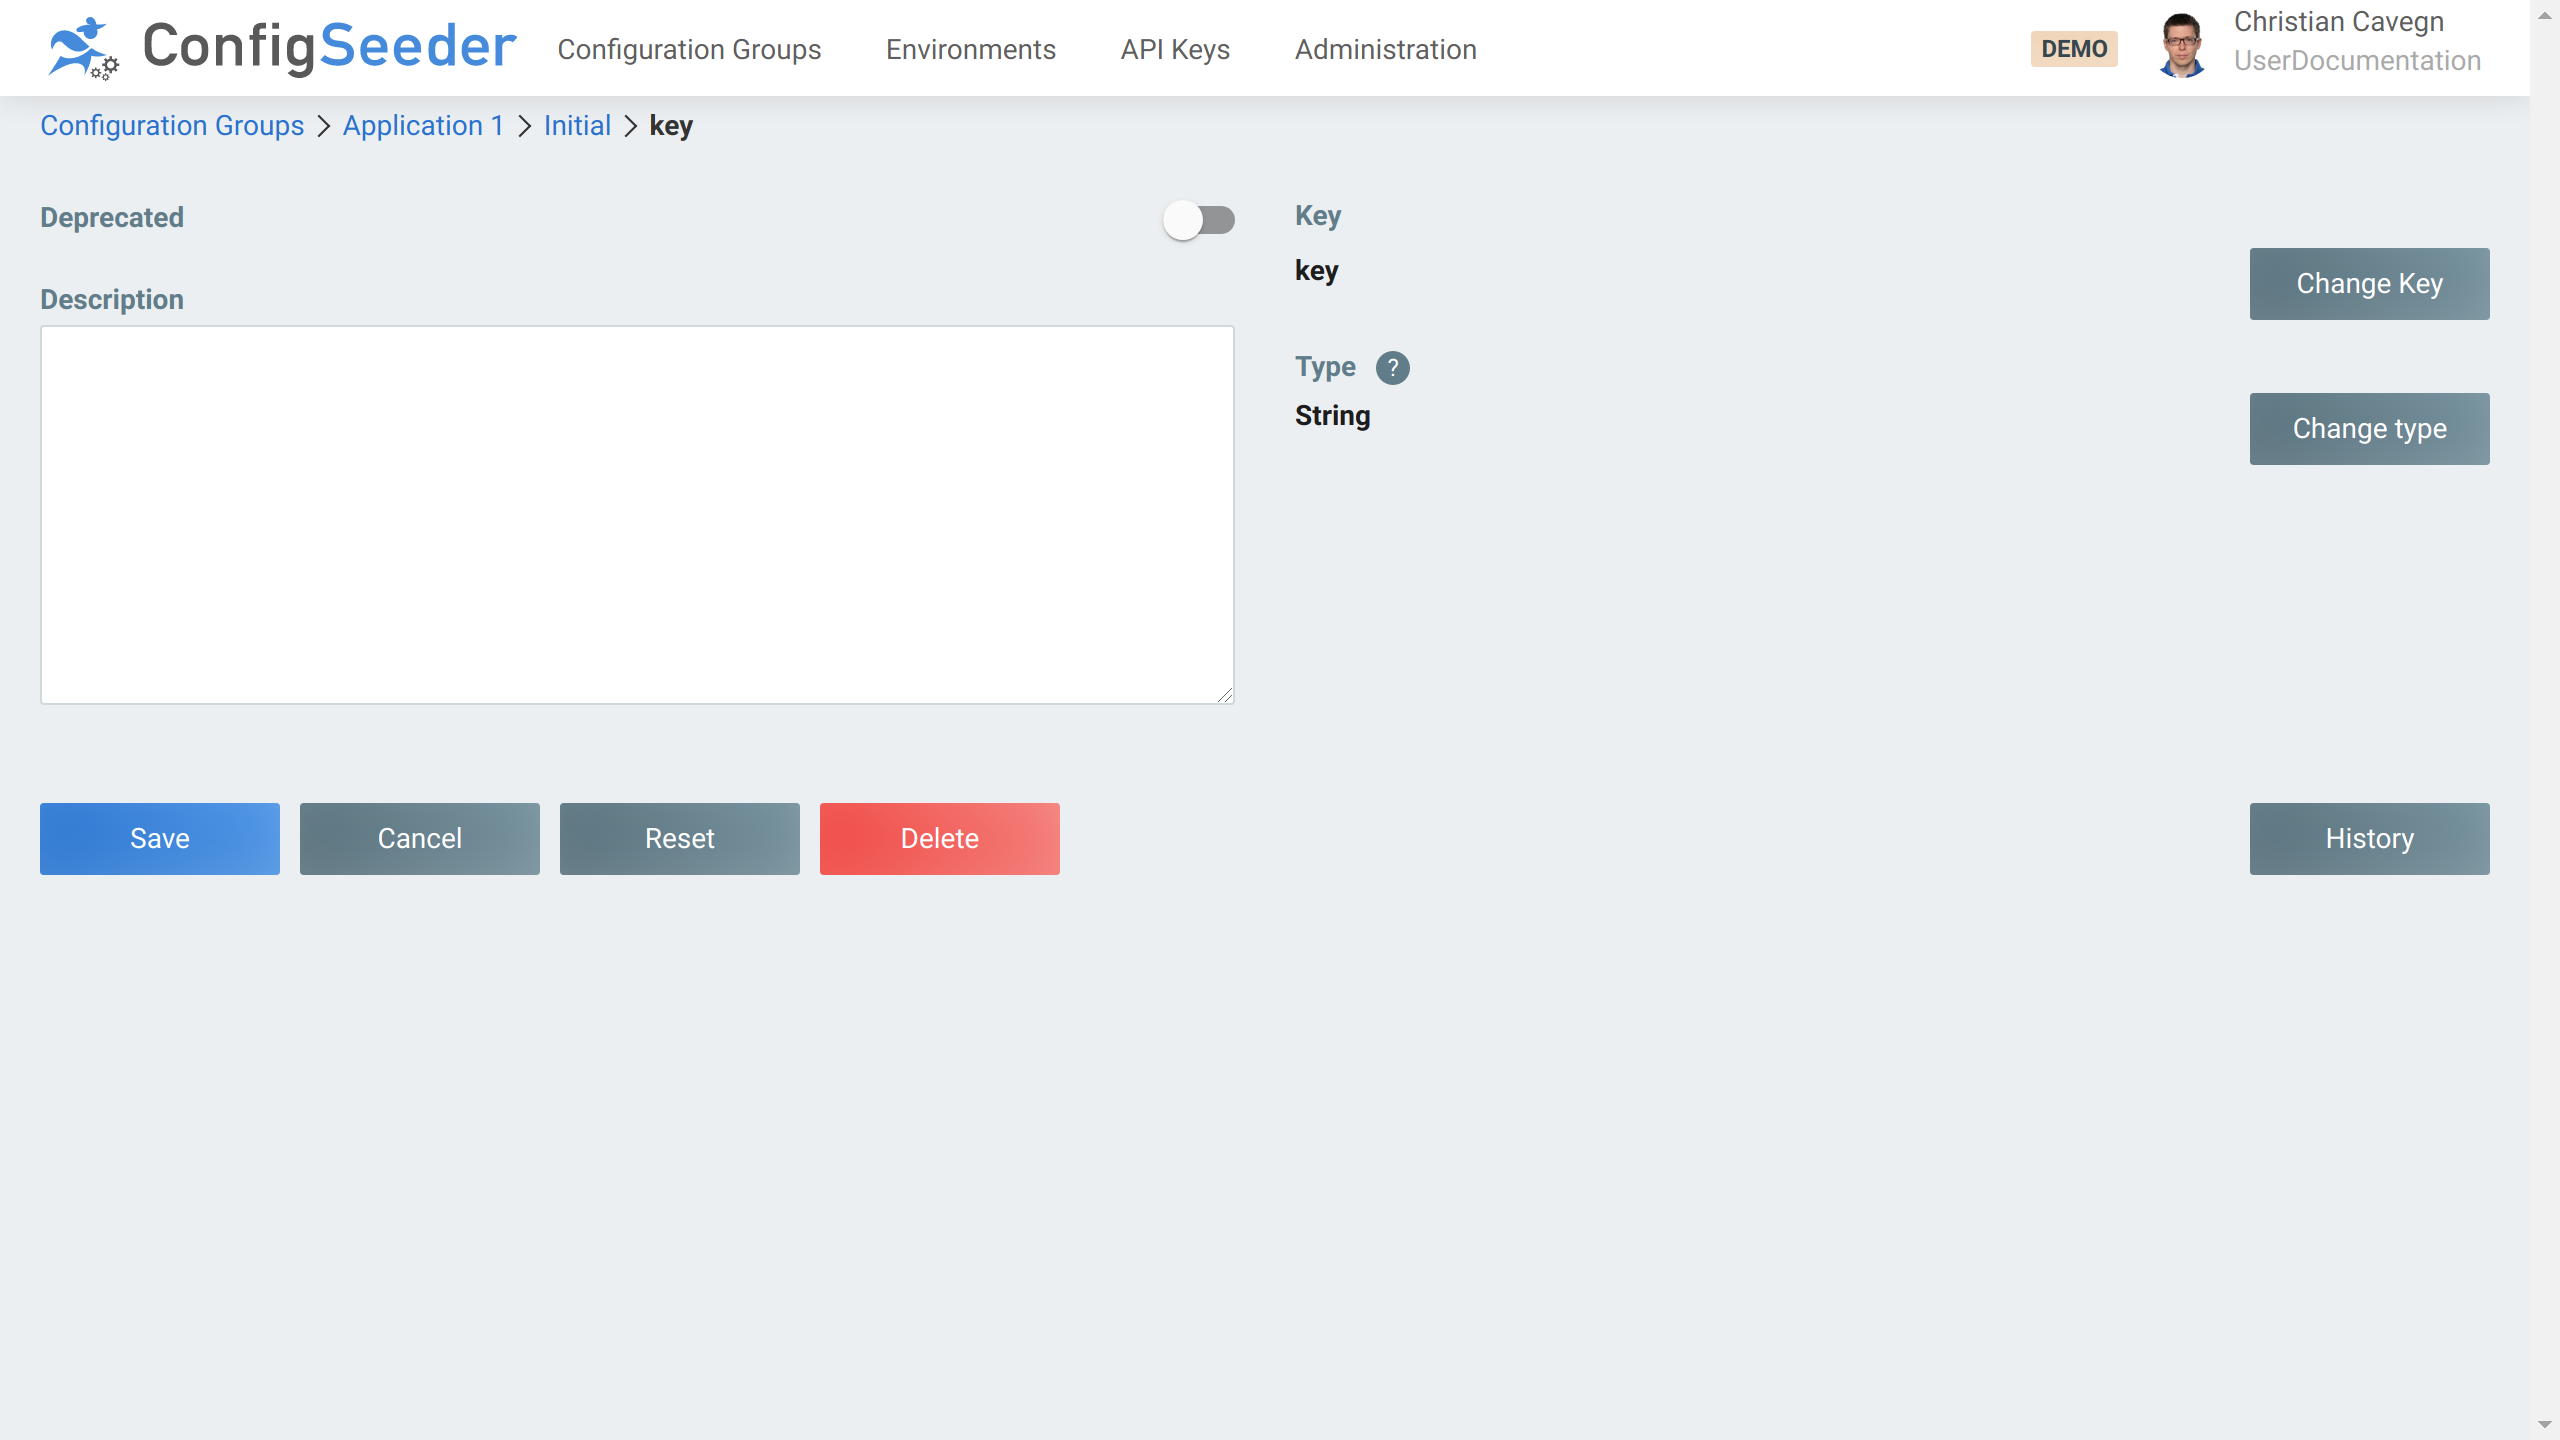
-
Change the node like desired
-
Be aware that the buttons
Save,CancelandResetare only valid vor the left side of the page (Deprecatedflag, andDescription) -
The actions behind
Delete,Change KeyandChange typewill be applied immediately after the action is confirmed.
-
4.2.3.2.1. Details shown depending on the configuration node type
Depending on the type of a configuration node, detailed information is shown:
| Type | Details |
|---|---|
Boolean |

|
Certificate |
No additional information available |
Enum |

|
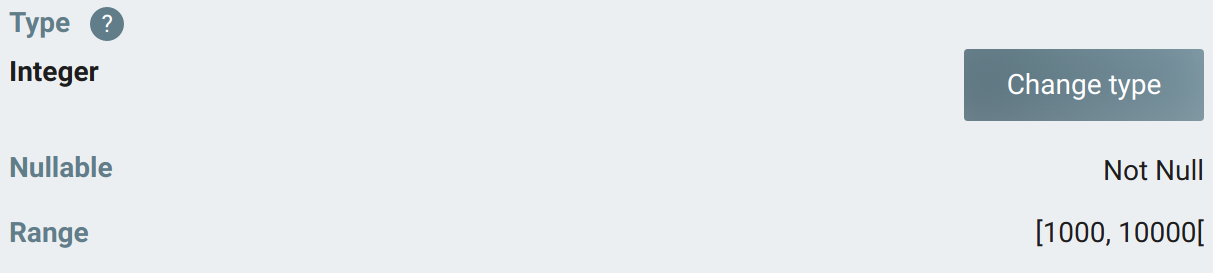
Integer |
|
Number |
|
Private Key |
No additional information available |
String (Regex) |

|
String |
No additional information available |
String (Multiline) |
No additional information available |
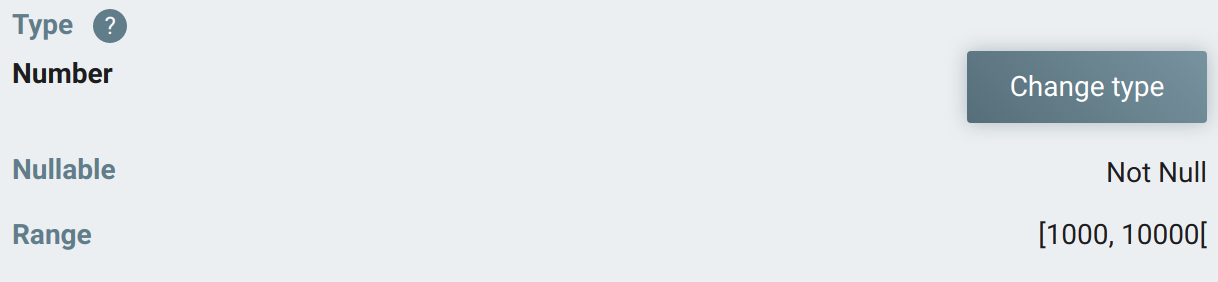
4.2.3.2.2. Range notation for Integer and Number
| Symbol | Description |
|---|---|
|
No lower boundary set |
|
Boundary is exclusive |
|
Boundary is inclusive |
| Symbol | Description |
|---|---|
|
No upper boundary set |
|
Boundary is exclusive |
|
Boundary is inclusive |
| Symbol | Description |
|---|---|
|
No lower and upper boundary set, all values are valid This is the default for all configuration nodes of types Integer and Number |
|
All values |
|
All values |
|
All values between 0 (inclusive) and 1 (inclusive) are valid |
4.2.3.3. Change the key of a configuration node
-
Click on
Change Key -
Enter new key
-
Click on
Save -
A popup dialog will inform about the success of the key change
|
4.2.3.3.1. Change the type of a configuration node
-
Click on
Change Type -
Depending on which type a configuration node has, a popup showing details for the current type is shown
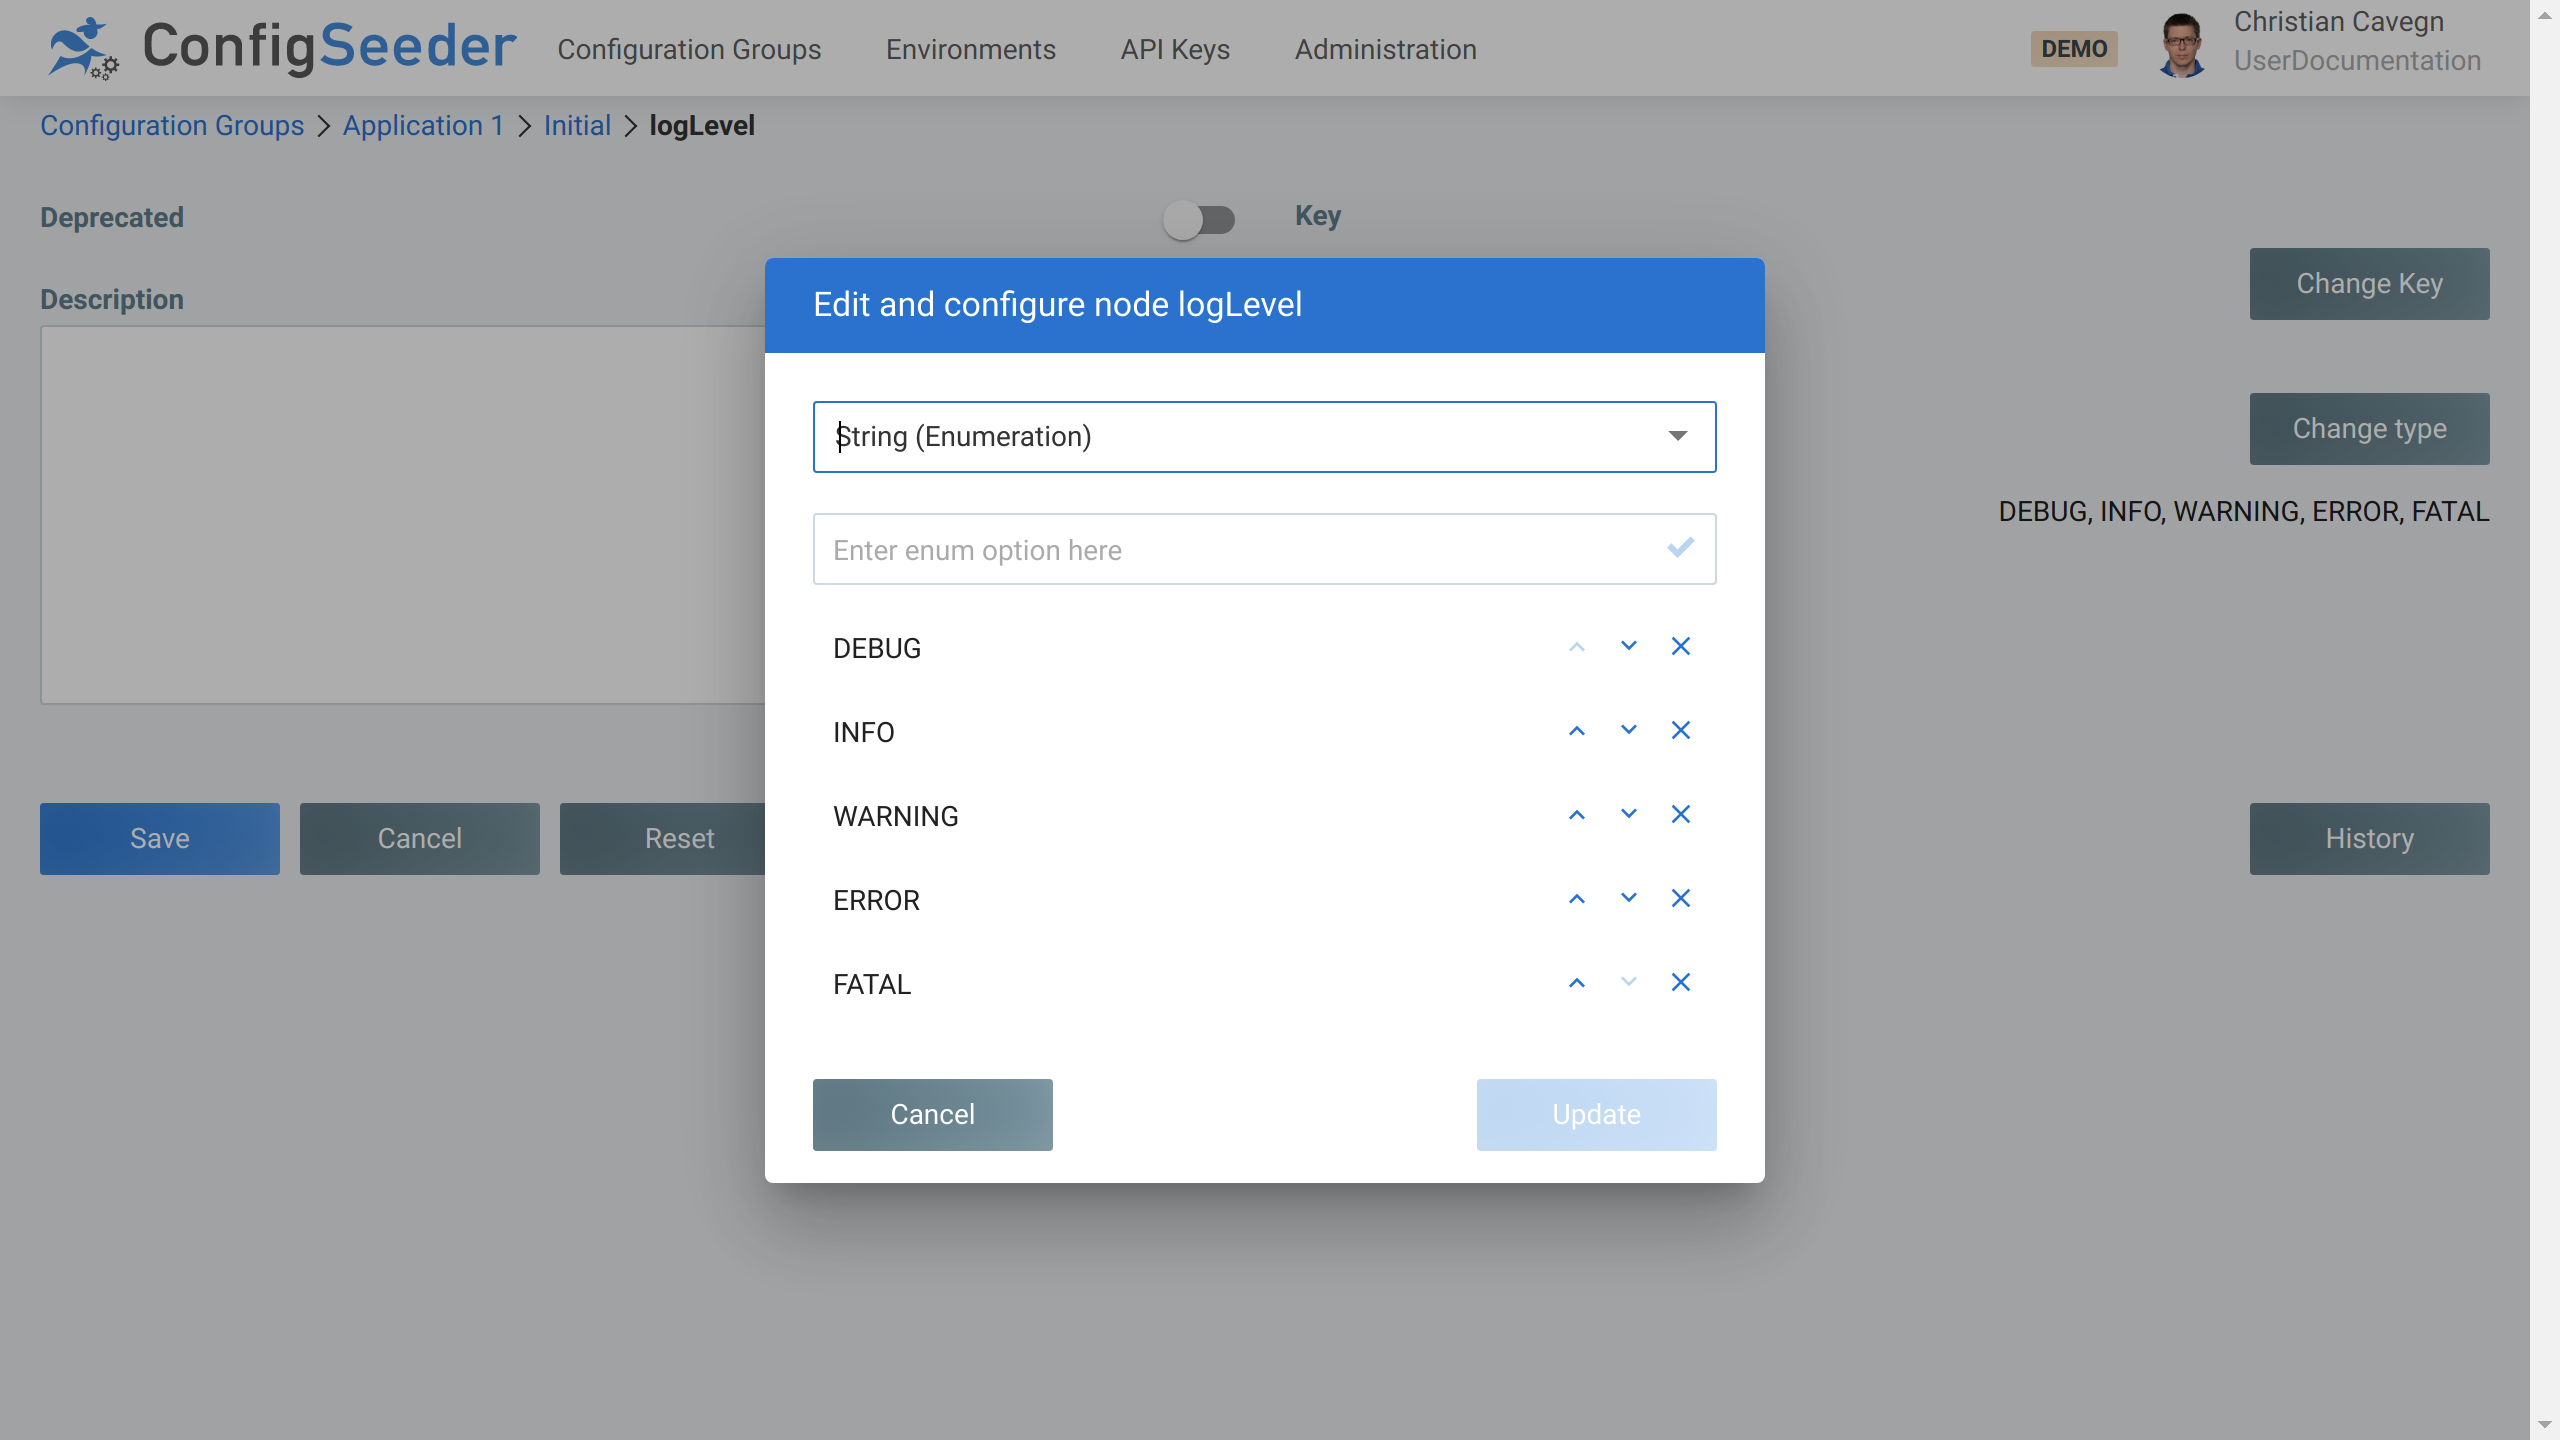
-
Enter the new type or modify the existing type
-
Click on
Update -
A popup dialog will inform about the success of the type change
|
Be aware that the all configuration values of the changed node have to be valid for the new type. However, there are some conversion rules in place. |
| From | To | Conversion rule / Example |
|---|---|---|
Boolean |
Integer, Number |
|
Boolean |
String |
|
Integer, Number |
Boolean |
|
Integer, Number |
String |
|
Integer |
Number |
|
Number |
Integer |
|
String |
Boolean |
|
String |
Integer |
|
String |
Number |
|
String |
String (Enum) |
|
String |
String (Multiline) |
|
String |
String (Regex) |
|
String (Multiline) |
String |
|
4.2.3.4. Edit a configuration value
-
Navigate to the configuration group containing the configuration value to edit
-
Just click the cell containing the value you like to edit

-
All cells surrounded by the blue box can be edited directly in the table
-
In this example, the Value of the configuration data
portwas changed
-
-
If the save button is disabled, see validation errors about how to fix invalid data.
-
Save the changes by clicking on the
Savebutton
4.2.4. Secured values
4.2.4.1. Secure and insecure values
Configuration values can be marked as secure. Secure values
-
are marked with a lock icon
-
are shown as
by default even if the accessing user has permission to see (and edit) the value
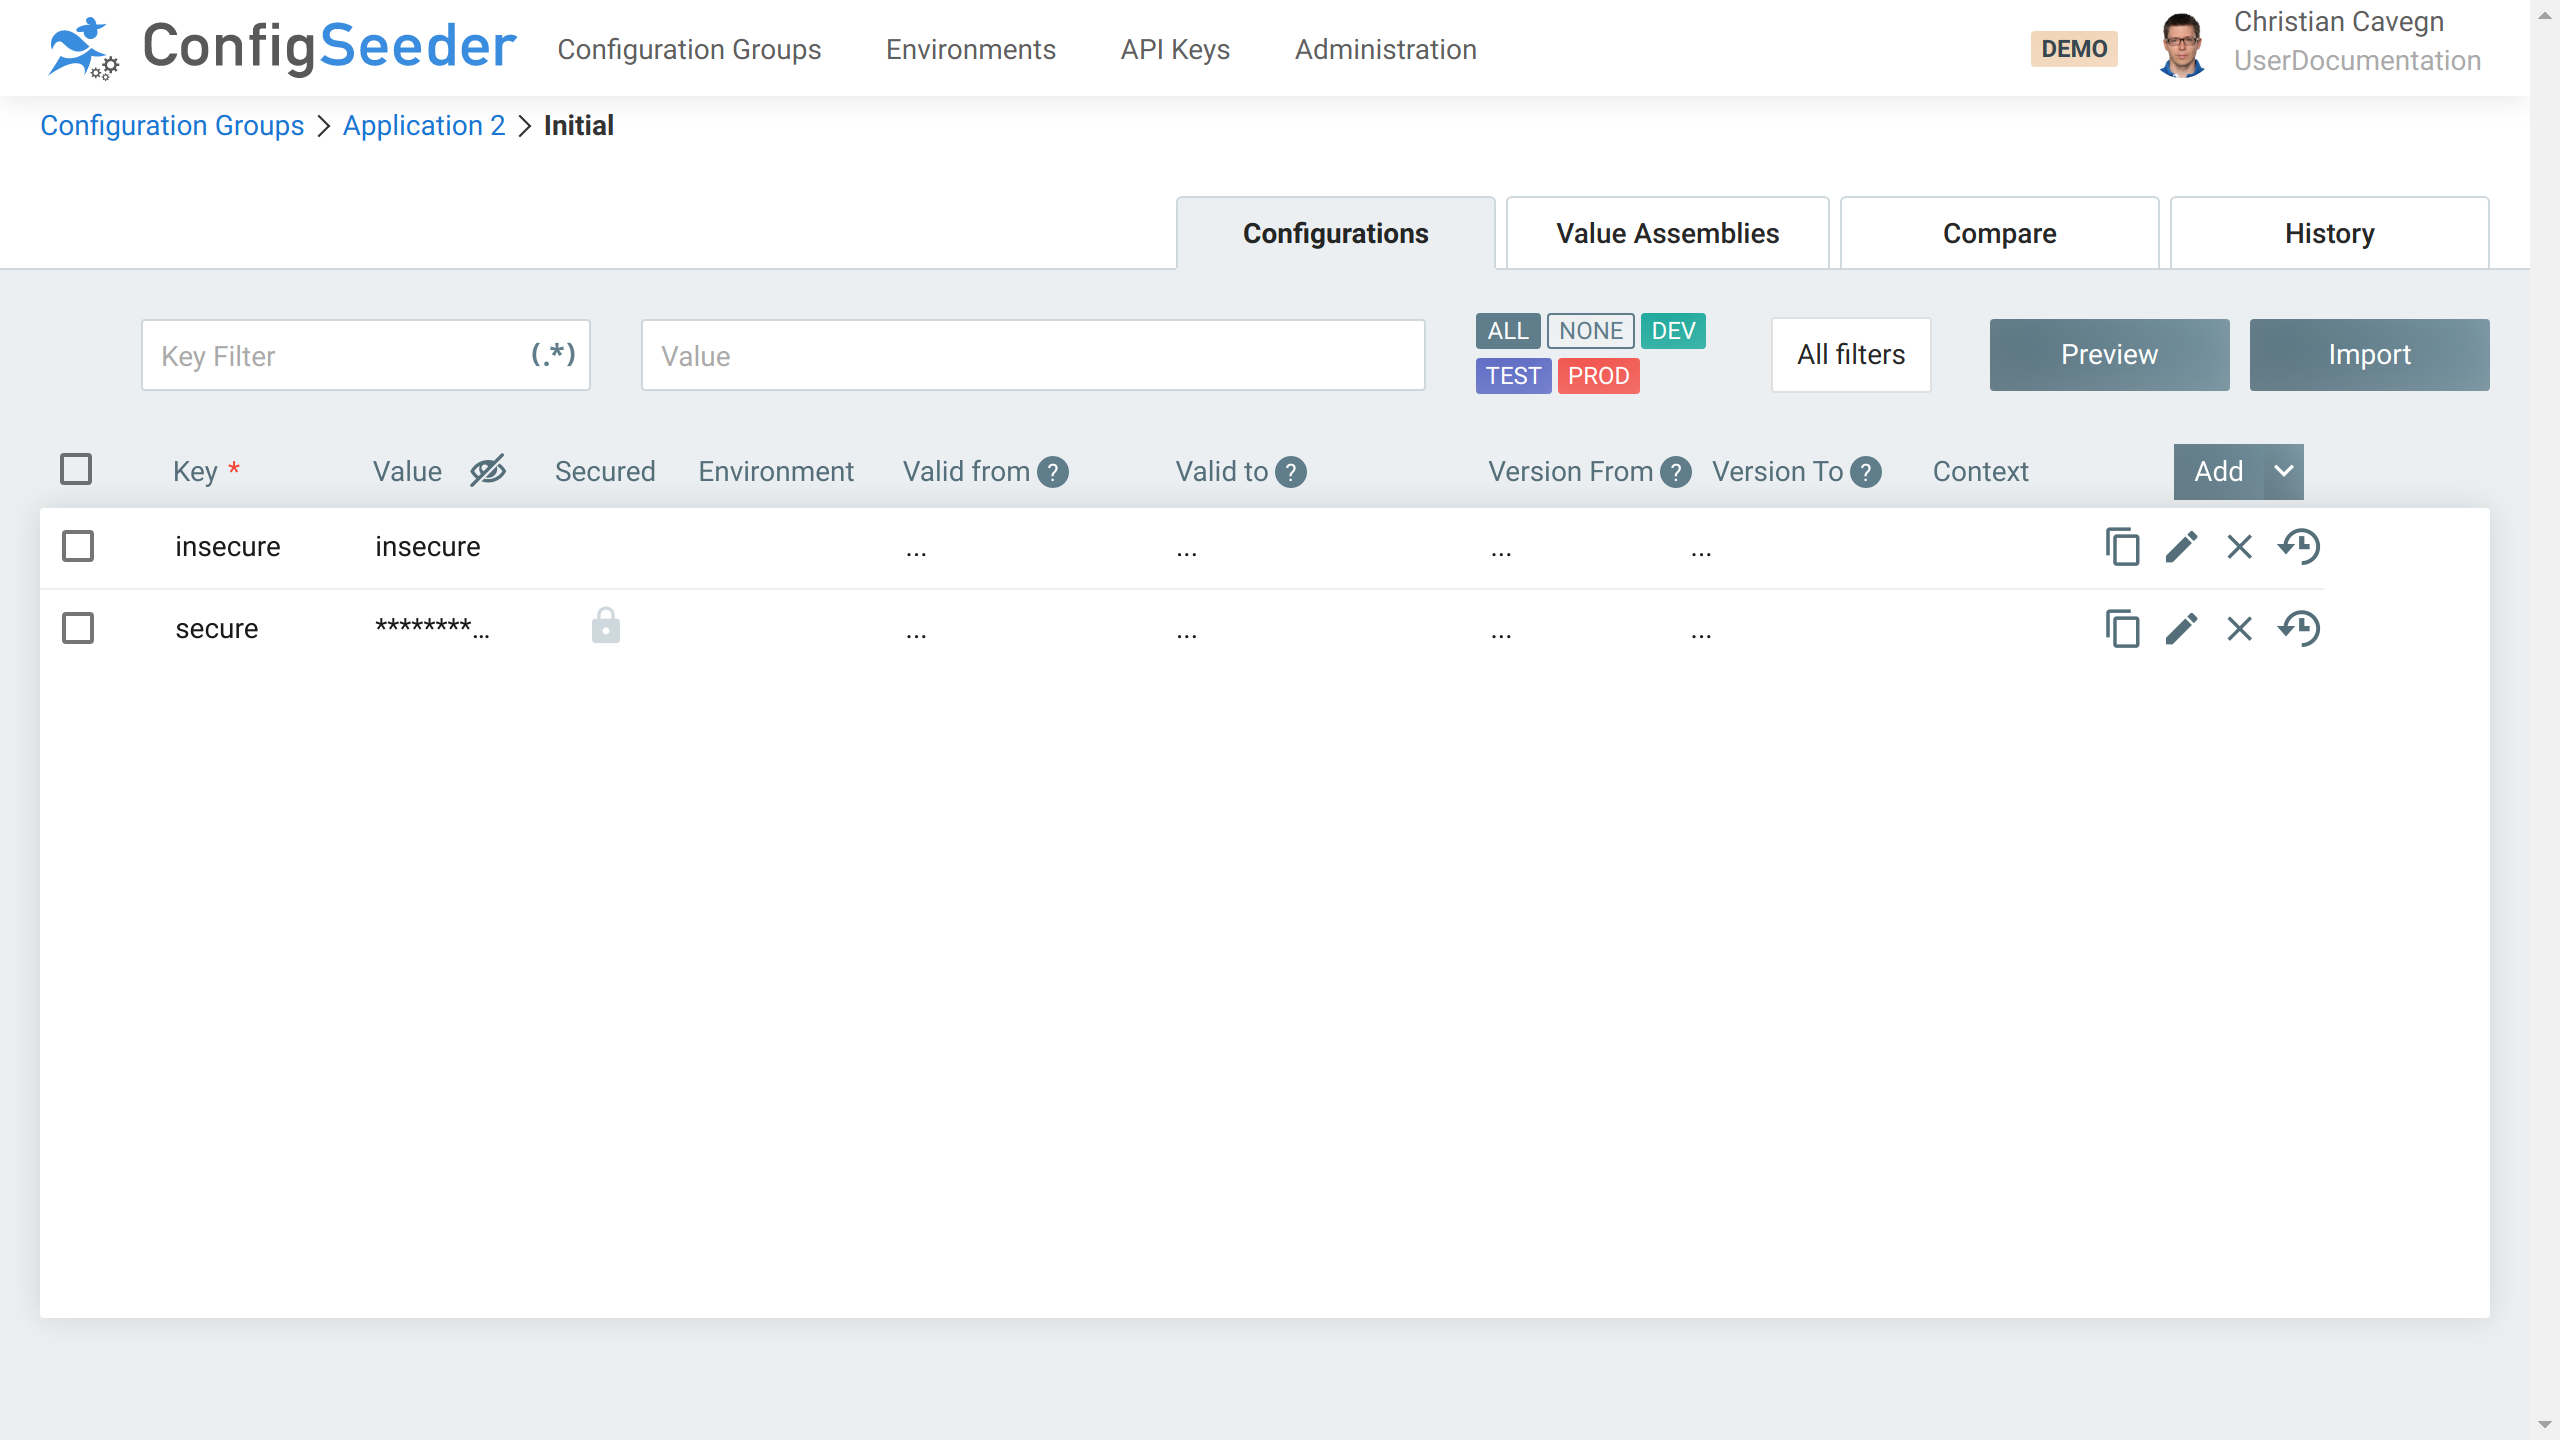
It is a conscious decision to hide values marked as secured. The user should be able to decide for himself if and when he wants to reveal a secured value. He may choose to not do so if a colleague is standing behind him.
4.2.4.2. Reveal hidden values
Secured values can be revealed by clicking on the eye symbol. Revealed values can be hidden again by clicking on the eye symbol again.
4.2.4.3. Impact on access management
Read and/or write access to secured values can be protected by a dedicated permission. See access management.
4.2.5. Delete configuration data
4.2.5.1. Delete a configuration value
-
Navigate to the configuration group containing the configuration node to delete
-
Click on the delete icon
-
Click on the
Savebutton to delete the value (and save all other changes)
|
A configuration nodes for which the last configuration value was deleted will also be deleted. |
4.2.5.2. Delete a configuration node
-
Navigate to the configuration group containing the configuration node to delete
-
Click on the pencil icon
-
Click on the delete button

-
Click on
Okto delete the configuration node and all it’s values
4.3. Work with Value Assemblies
4.3.1. Description
Assemblies are only used in concert with the OS and Kubernetes Connector. They describe elements like
-
different types of files (OS Connector)
-
different types of Kubernetes Secrets and ConfigMaps (Kubernetes Connectors).
In the following chapters some generic information about the assemblies are provided. Please see the documentation of the Connectors for specific details about the different assemblies.
Managing configuration data contained in assemblies works very similar to managing normal configuration data.
For this reason only the differences are described in this chapter.
Please see Work with configuration nodes and values for general information.
4.3.2. Overview
-
Open the required configuration group
-
Click on the
Value Assembliestab -
An overview of all existing assemblies is shown (left side of the screen)
Like said in the introduction, the information specific for the different assembly types can be found in the connector documentation. The following is true for all assembly types:
-
The
Activeflag must be set to true, otherwise the assembly is not recognized by the connectorWith this flag, an assembly can be deactivated for all environments. An assembly should be activated when it’s configuration is completed.
-
The
assembly.activeproperty must be set to true for the relevant environment(s)With this property can be defined for which environments and other filter criteria an assembly should be active
-
The
NameandApplicationof an assembly should be unique and are only used for logging purposes.
|
The properties used for creating an object in the target runtime environment
( |
4.3.2.1. Mandatory and optional configuration nodes
Every assembly has a set of mandatory and optional configuration nodes. Examples:
-
file.nameis a mandatory attribute for a file-based assembly. -
file.modeis an optional attribute for file-based assemblies.
Mandatory and optional configuration nodes have the following consequences:
-
Mandatory configuration nodes can’t be deleted
-
Only configuration nodes for optional attributes can be added
-
The type of optional and mandatory configuration nodes is predefined and can’t be changed
4.3.3. Preview for configuration assemblies
The previously explained preview shows which configuration values would be returned by ConfigSeeder® using the specified filter criteria.
Goal of the preview for configuration assemblies is to show how the data contained or referenced by a given configuration assembly will look like when it has been processed by the responsible connector.
The Preview is available for the following Assembly Types:
-
File: Generated -
File: Keystore -
File: Template -
ConfigMap: Key/Value -
ConfigMap: Template -
Secret: Key/Value -
Secret: Keystore
4.3.3.1. Preview for File: Generated
The preview for Assembly Type File: Generated shows how the data contained in the configuration group(s) specified in
file.configuration-groups.source will look like in the format defined in file.format.
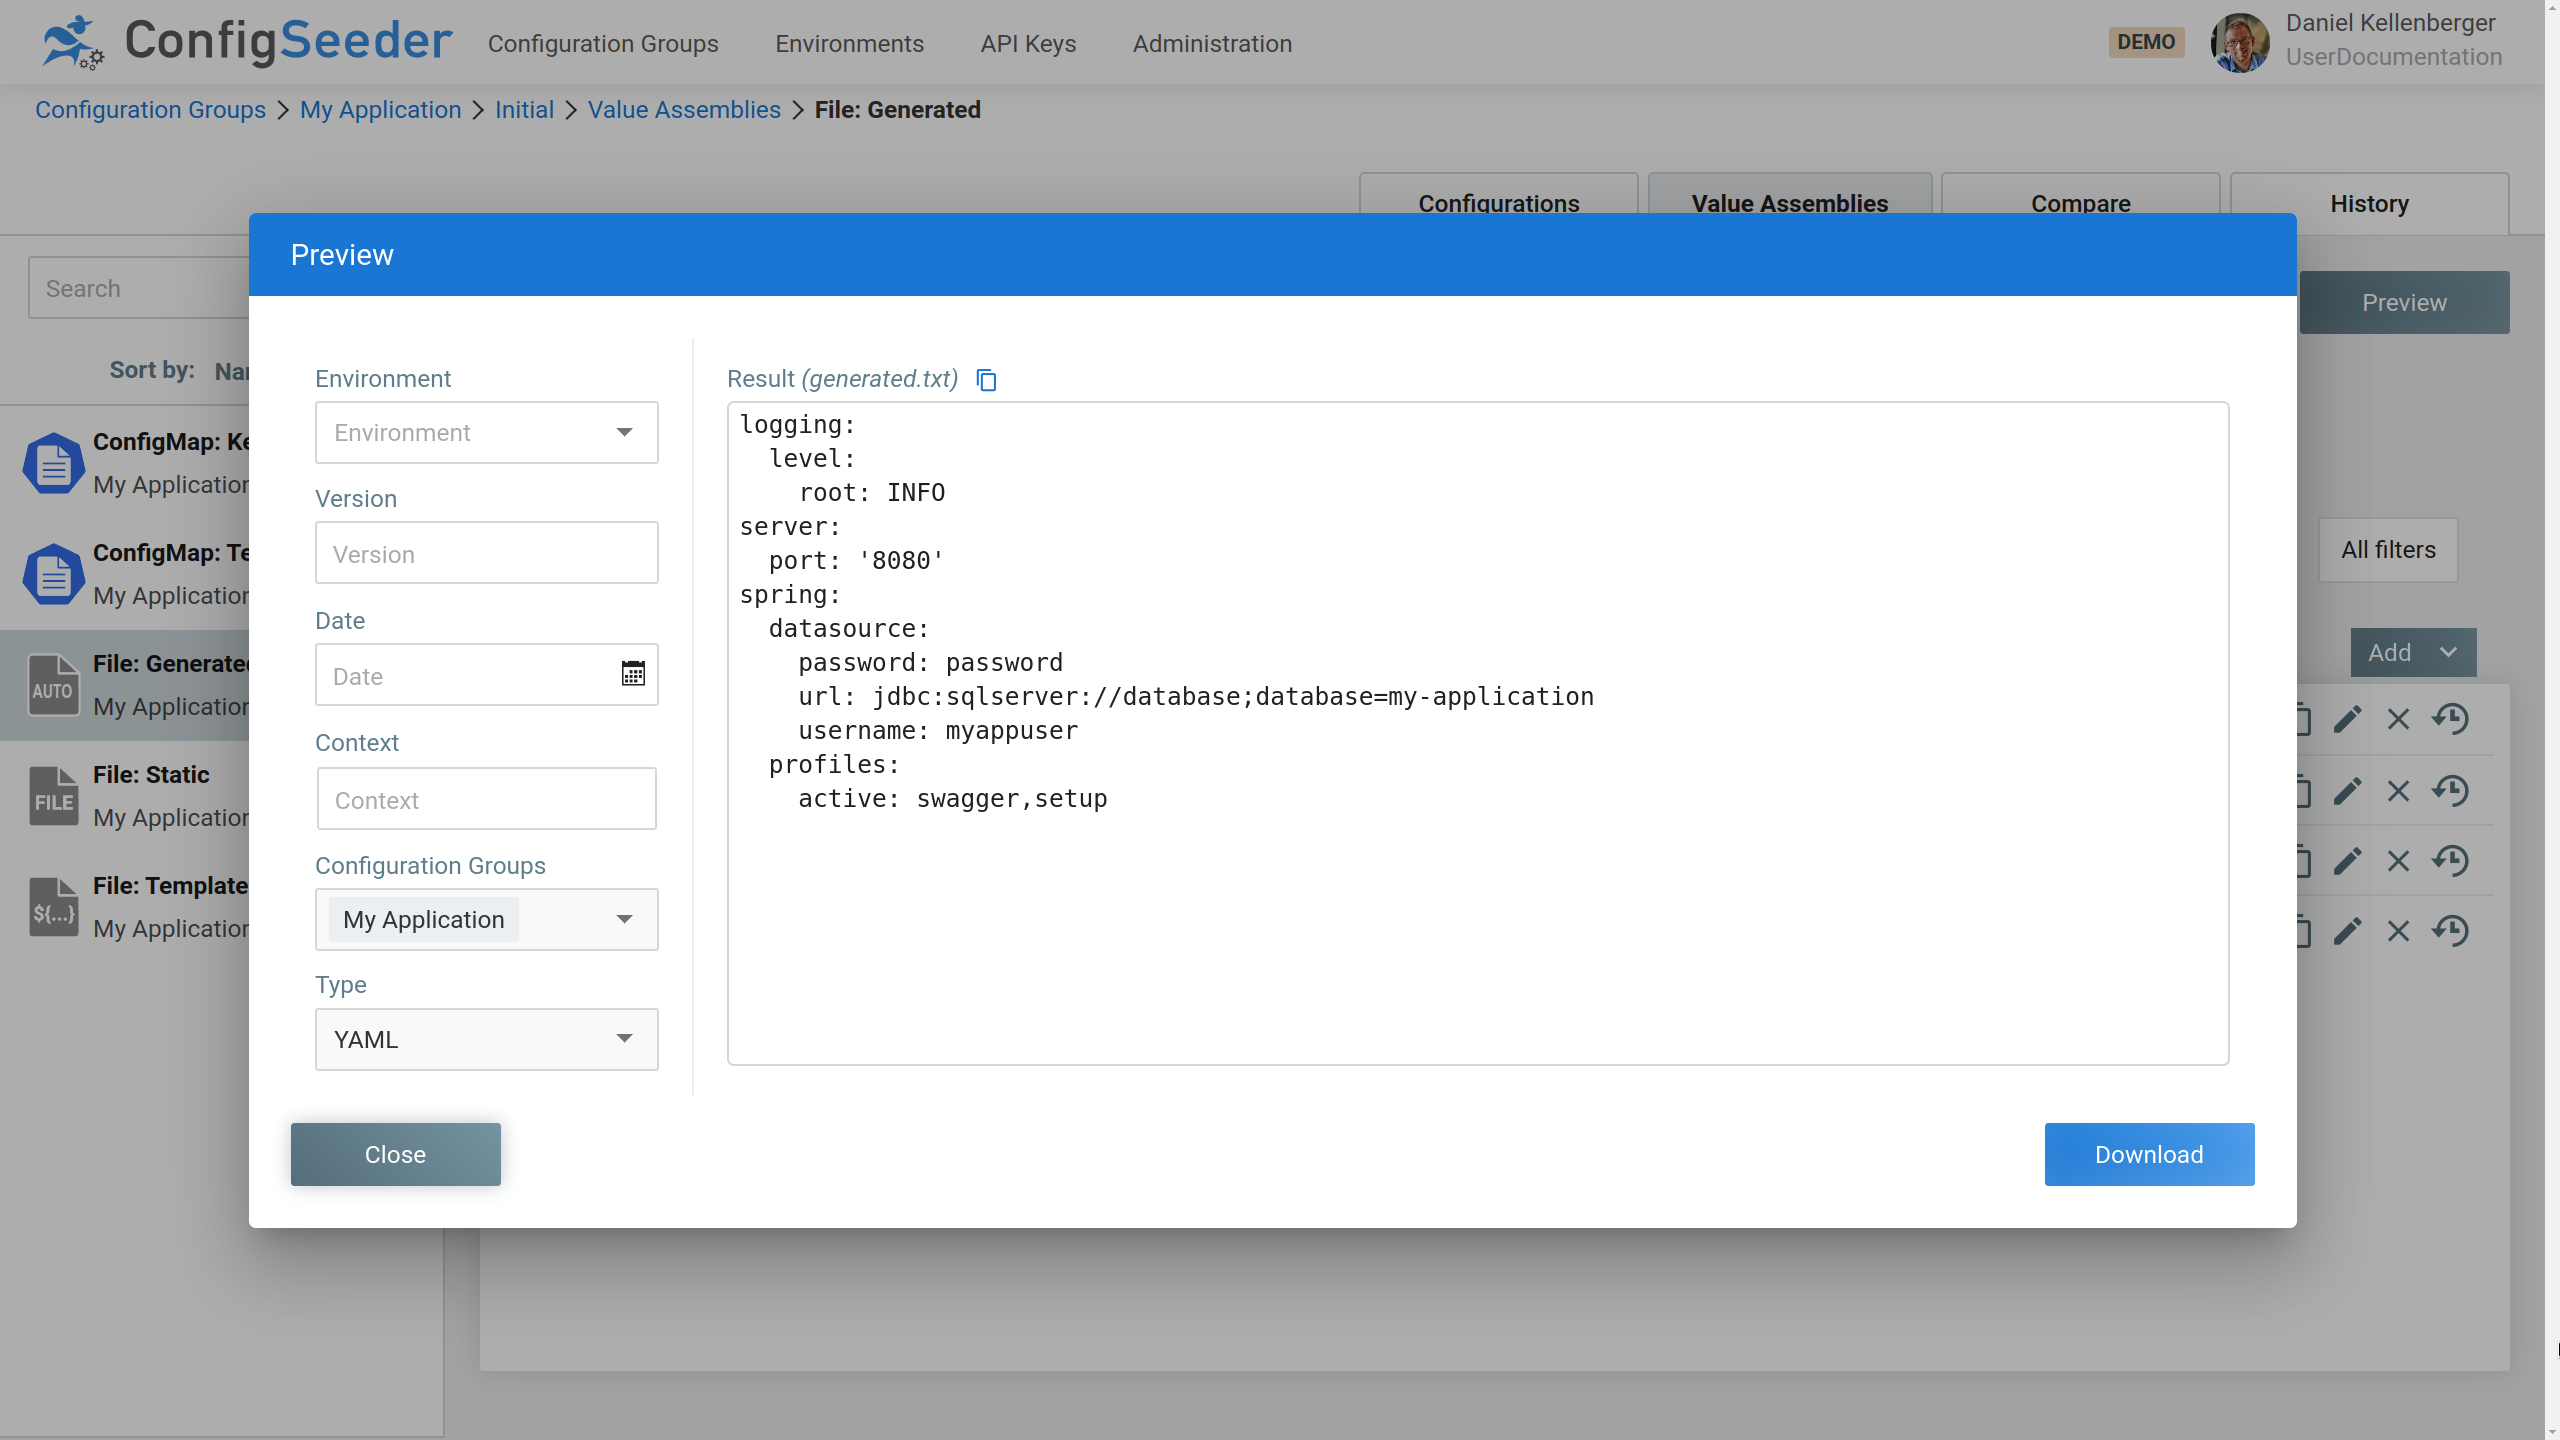
The preview can be opened by clicking on the Preview Button.
4.3.3.2. Preview for File: Generated & ConfigMap: Template
Assemblies of the types File: Template and ConfigMap: Template can hold one or many templates.
These templates will be processed when one of the connectors accesses ConfigSeeder® to provision data to the target runtime environment.
The preview shows the result of the templating done for a given set of filter criteria.
The template is stored in template.file or configmap.file.*.
The preview will be opened by a click on the value holding the template.
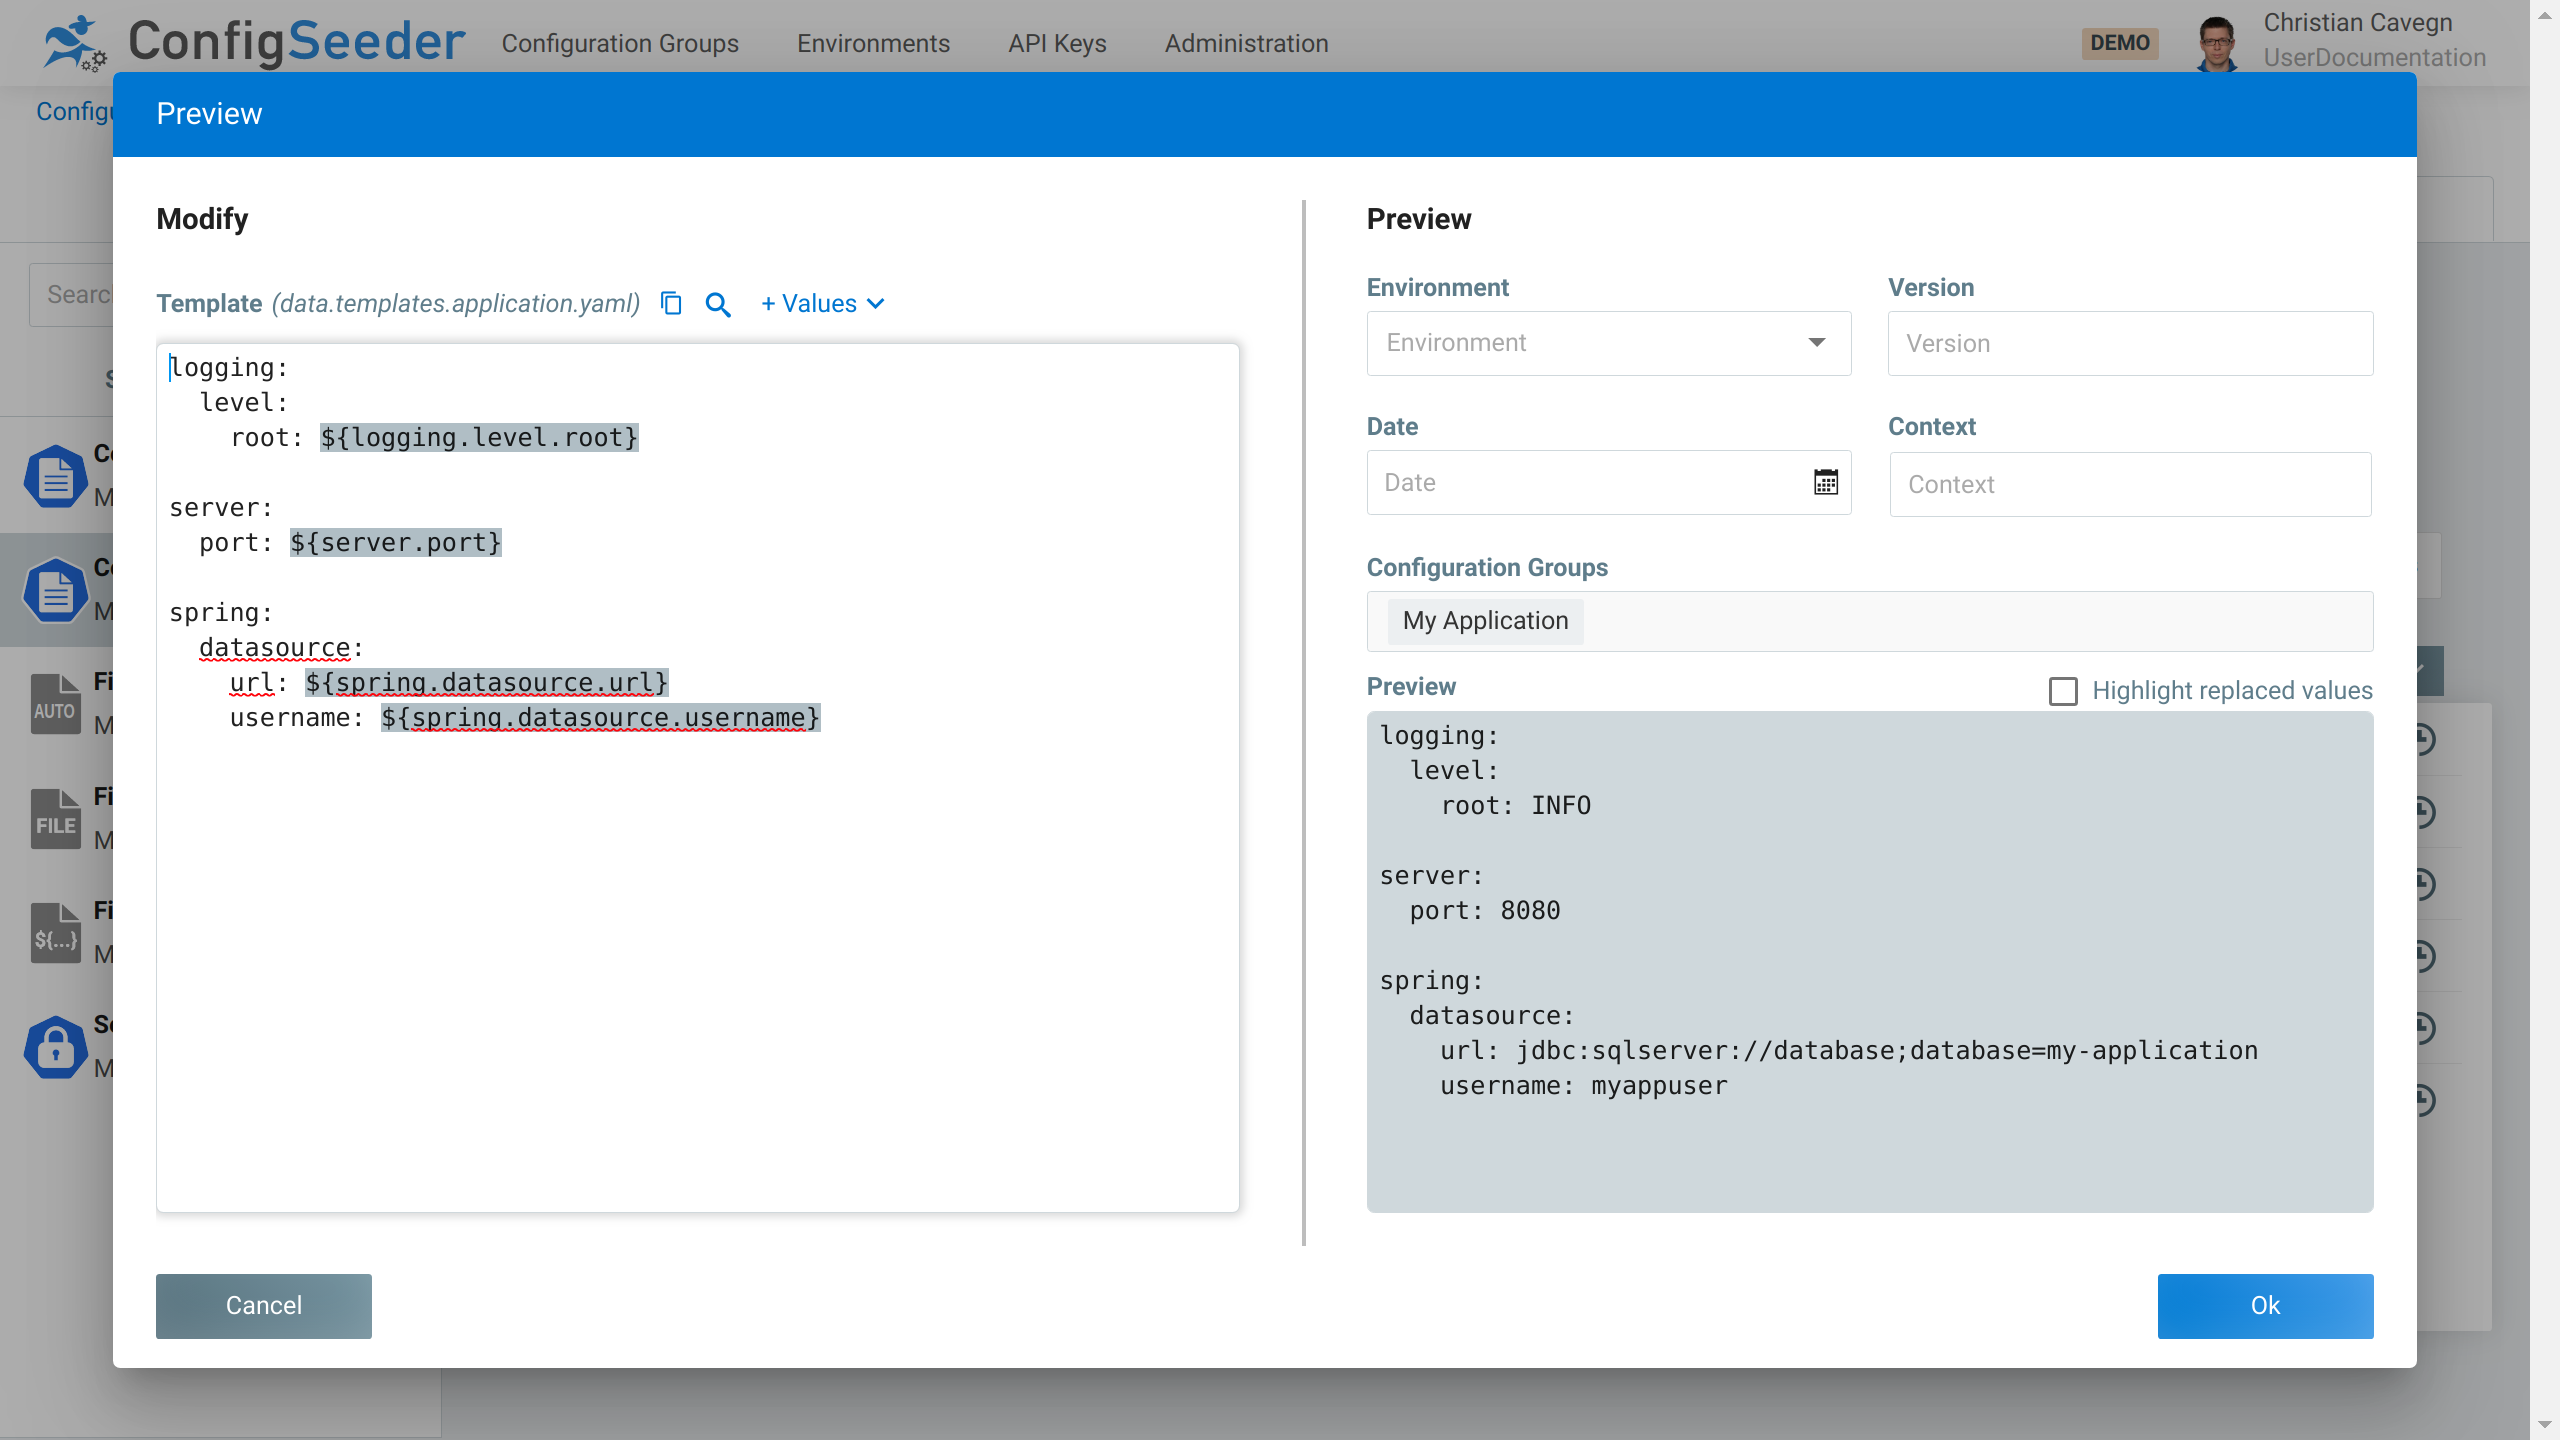
ConfigSeeder® supports two template variants: SIMPLE and HANDLEBARS.
The template variant can be changed by editing the node.
-
SIMPLE: Placeholders are defined with the prefix${and the suffix}. -
HANDLEBARS: placeholders are defined with the prefix{{and the suffix}}. Please notice that handlebars supports also methods and even switch of variable prefix and suffix. For more details please check the Handlebars-Section.
|
On the right side the filter criteria and the result of the templating is shown.
|
Change the filter criteria to see how the result adapts. |
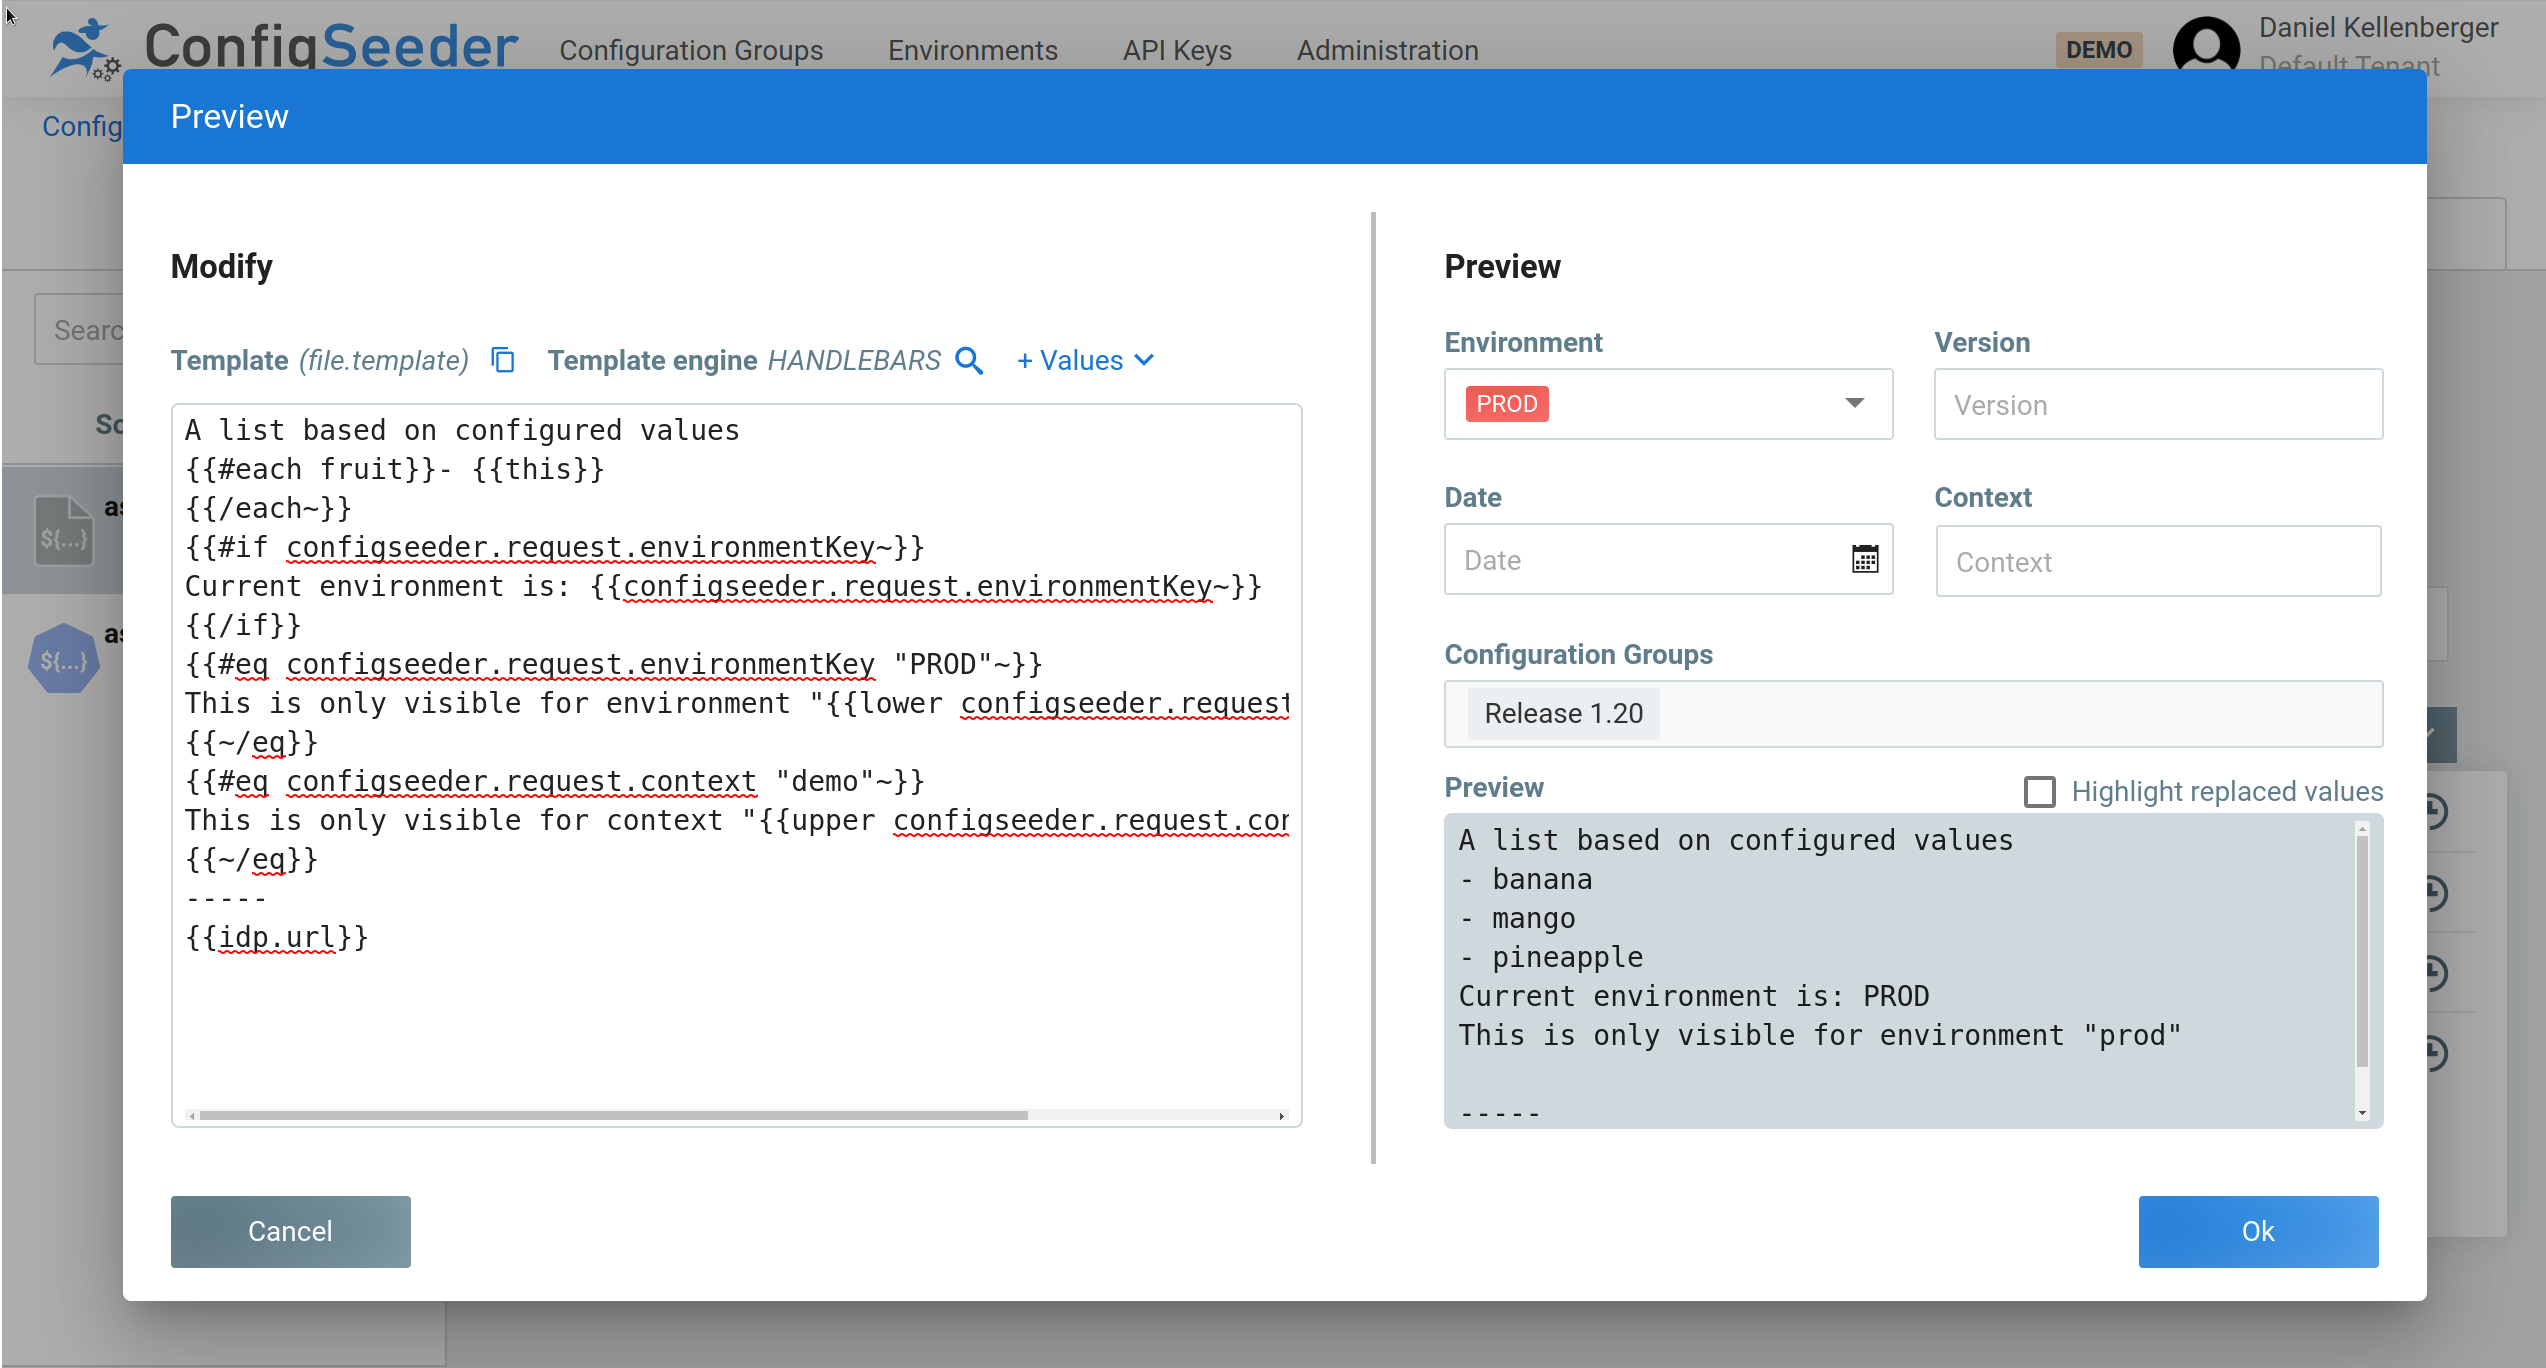
4.3.3.2.1. Handlebars
Handlebars supports not only variable substitution, but also controls and functions. With these it is possible to generate different file structure e.g. depending on the environment.
| Name | Template |
|---|---|
|
|
|
|
|
|
|
|
|
|
|
|
|
|
|
|
|
|
|
|
|
|
|
|
|
|
|
|
|
|
|
|
|
|
|
|
|
|
|
|
|
|
|
|
|
|
It is also possible to switch variable prefixes.
This can be done with {{= and =}}.
Following example shows how to switch to ${ and } delimiters:
{{=${ }=}}An example of a complex template:
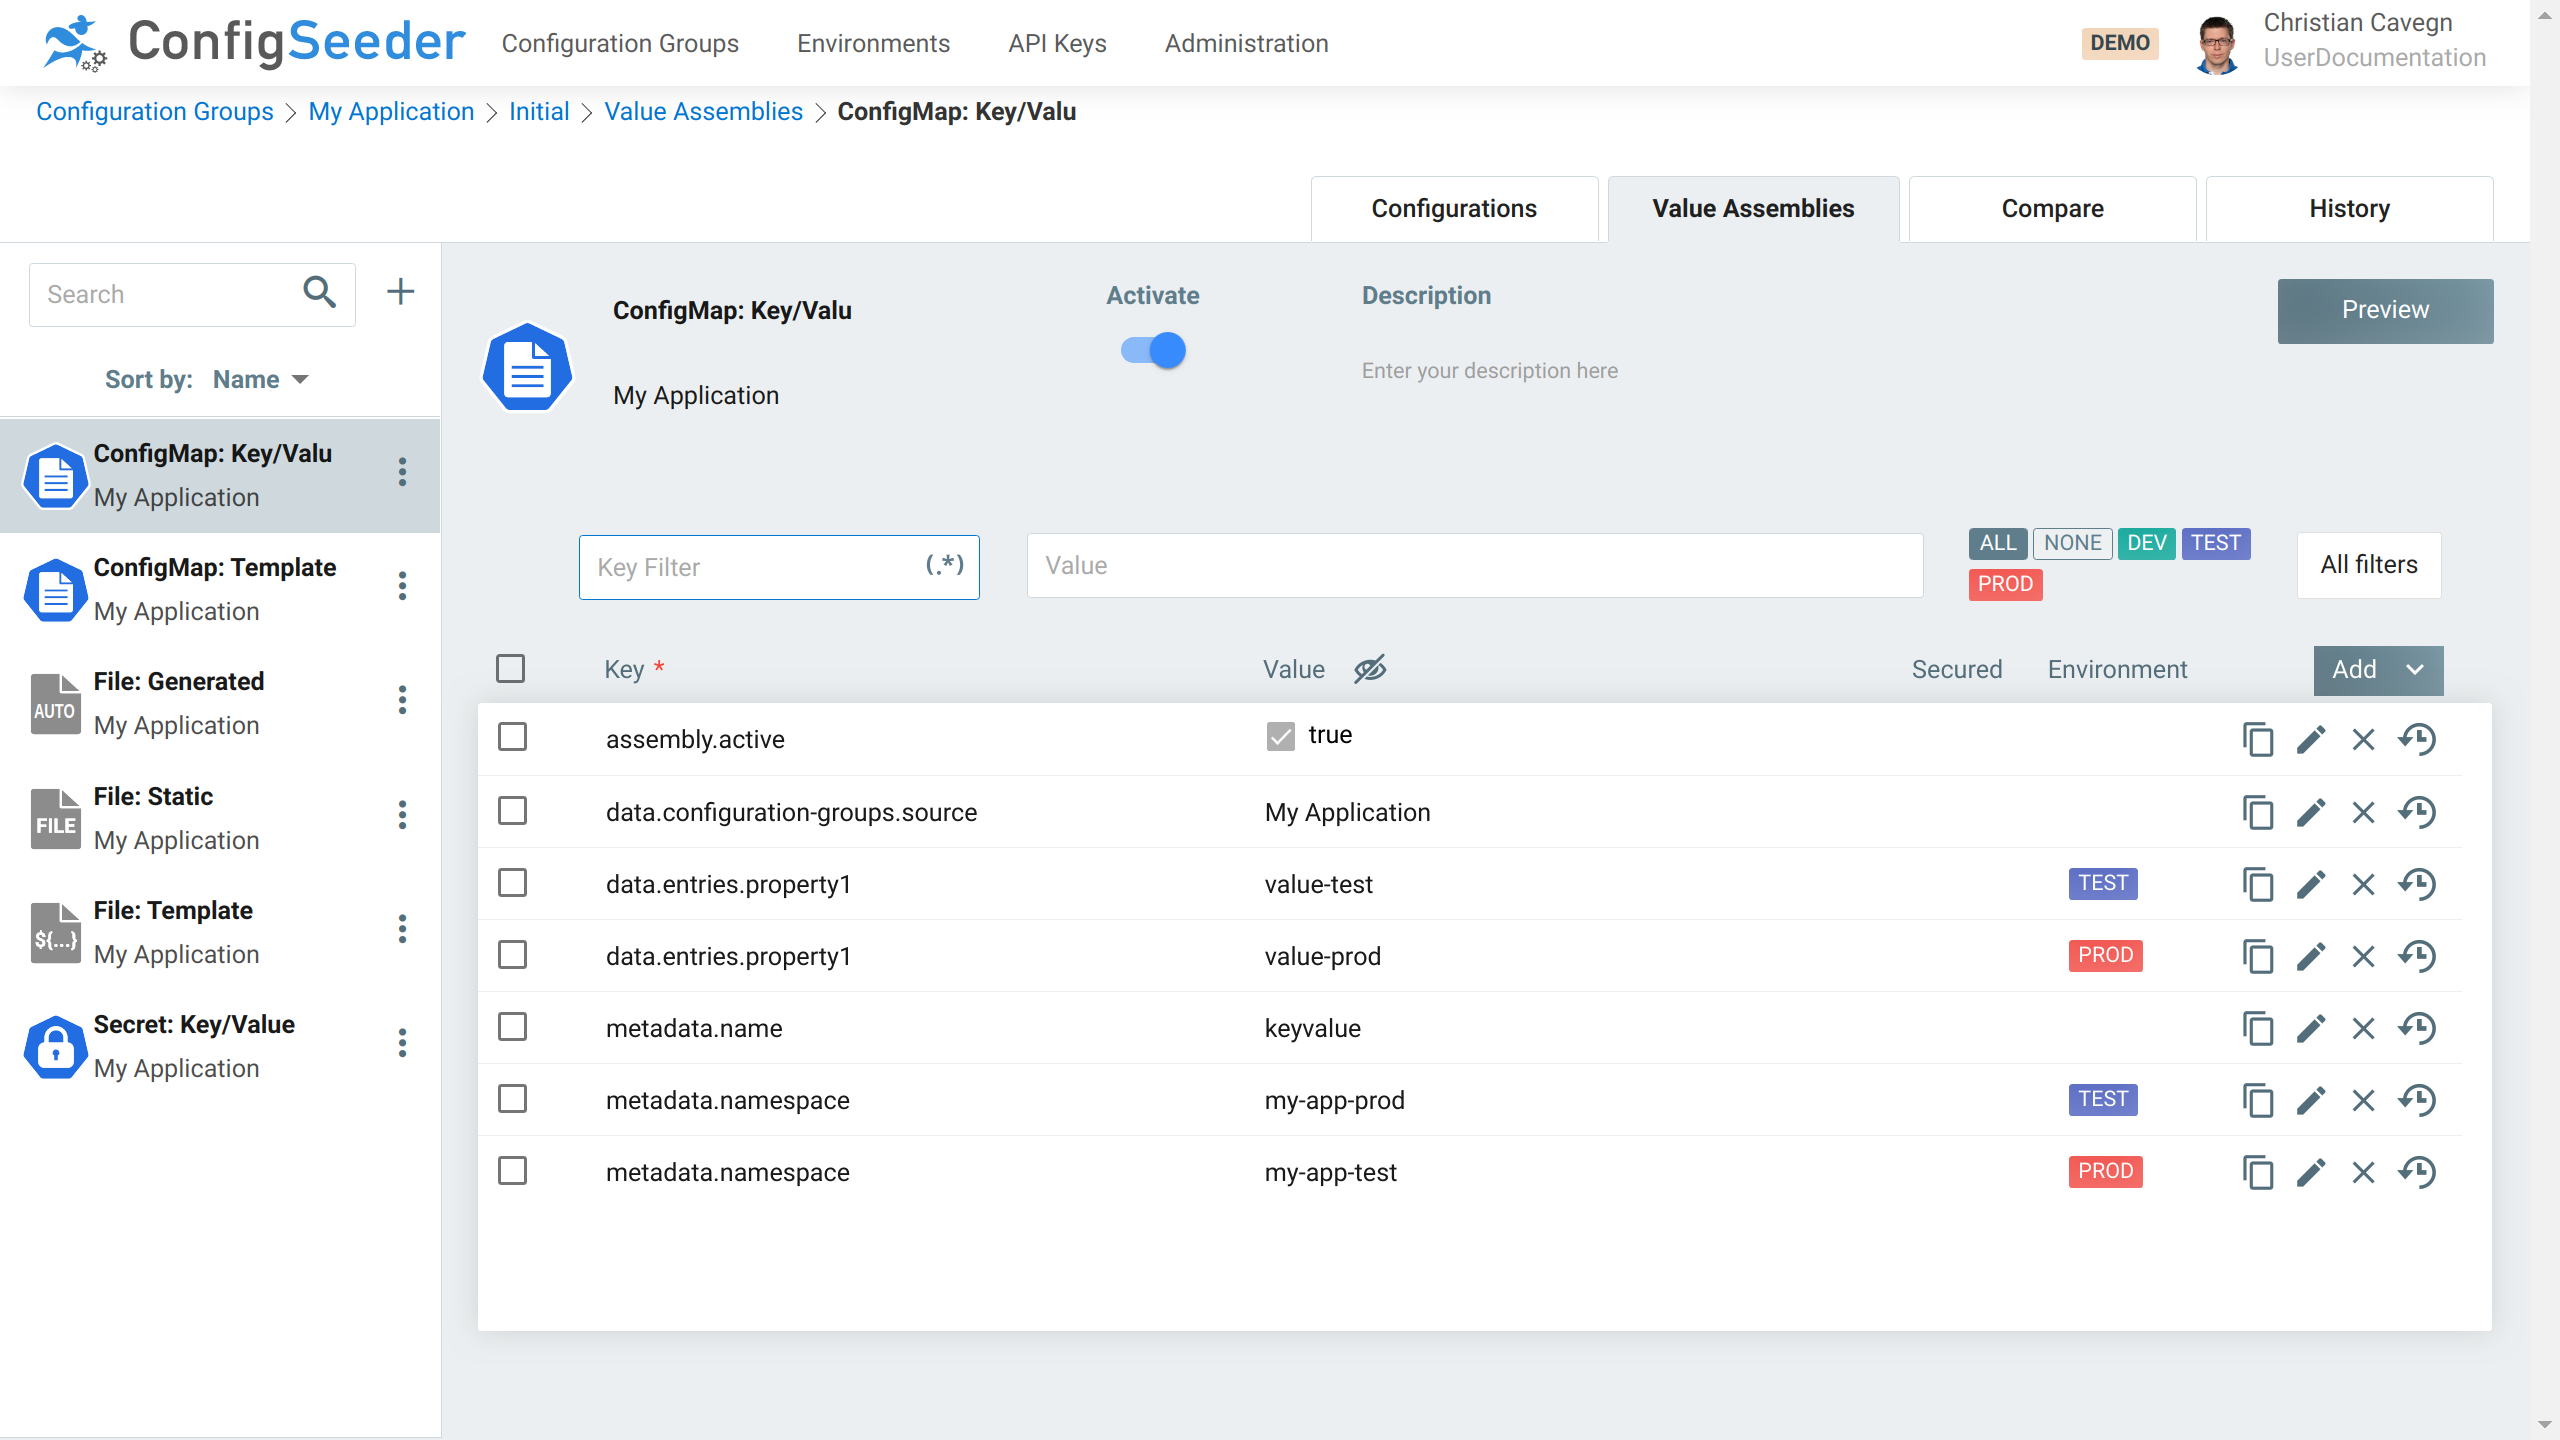
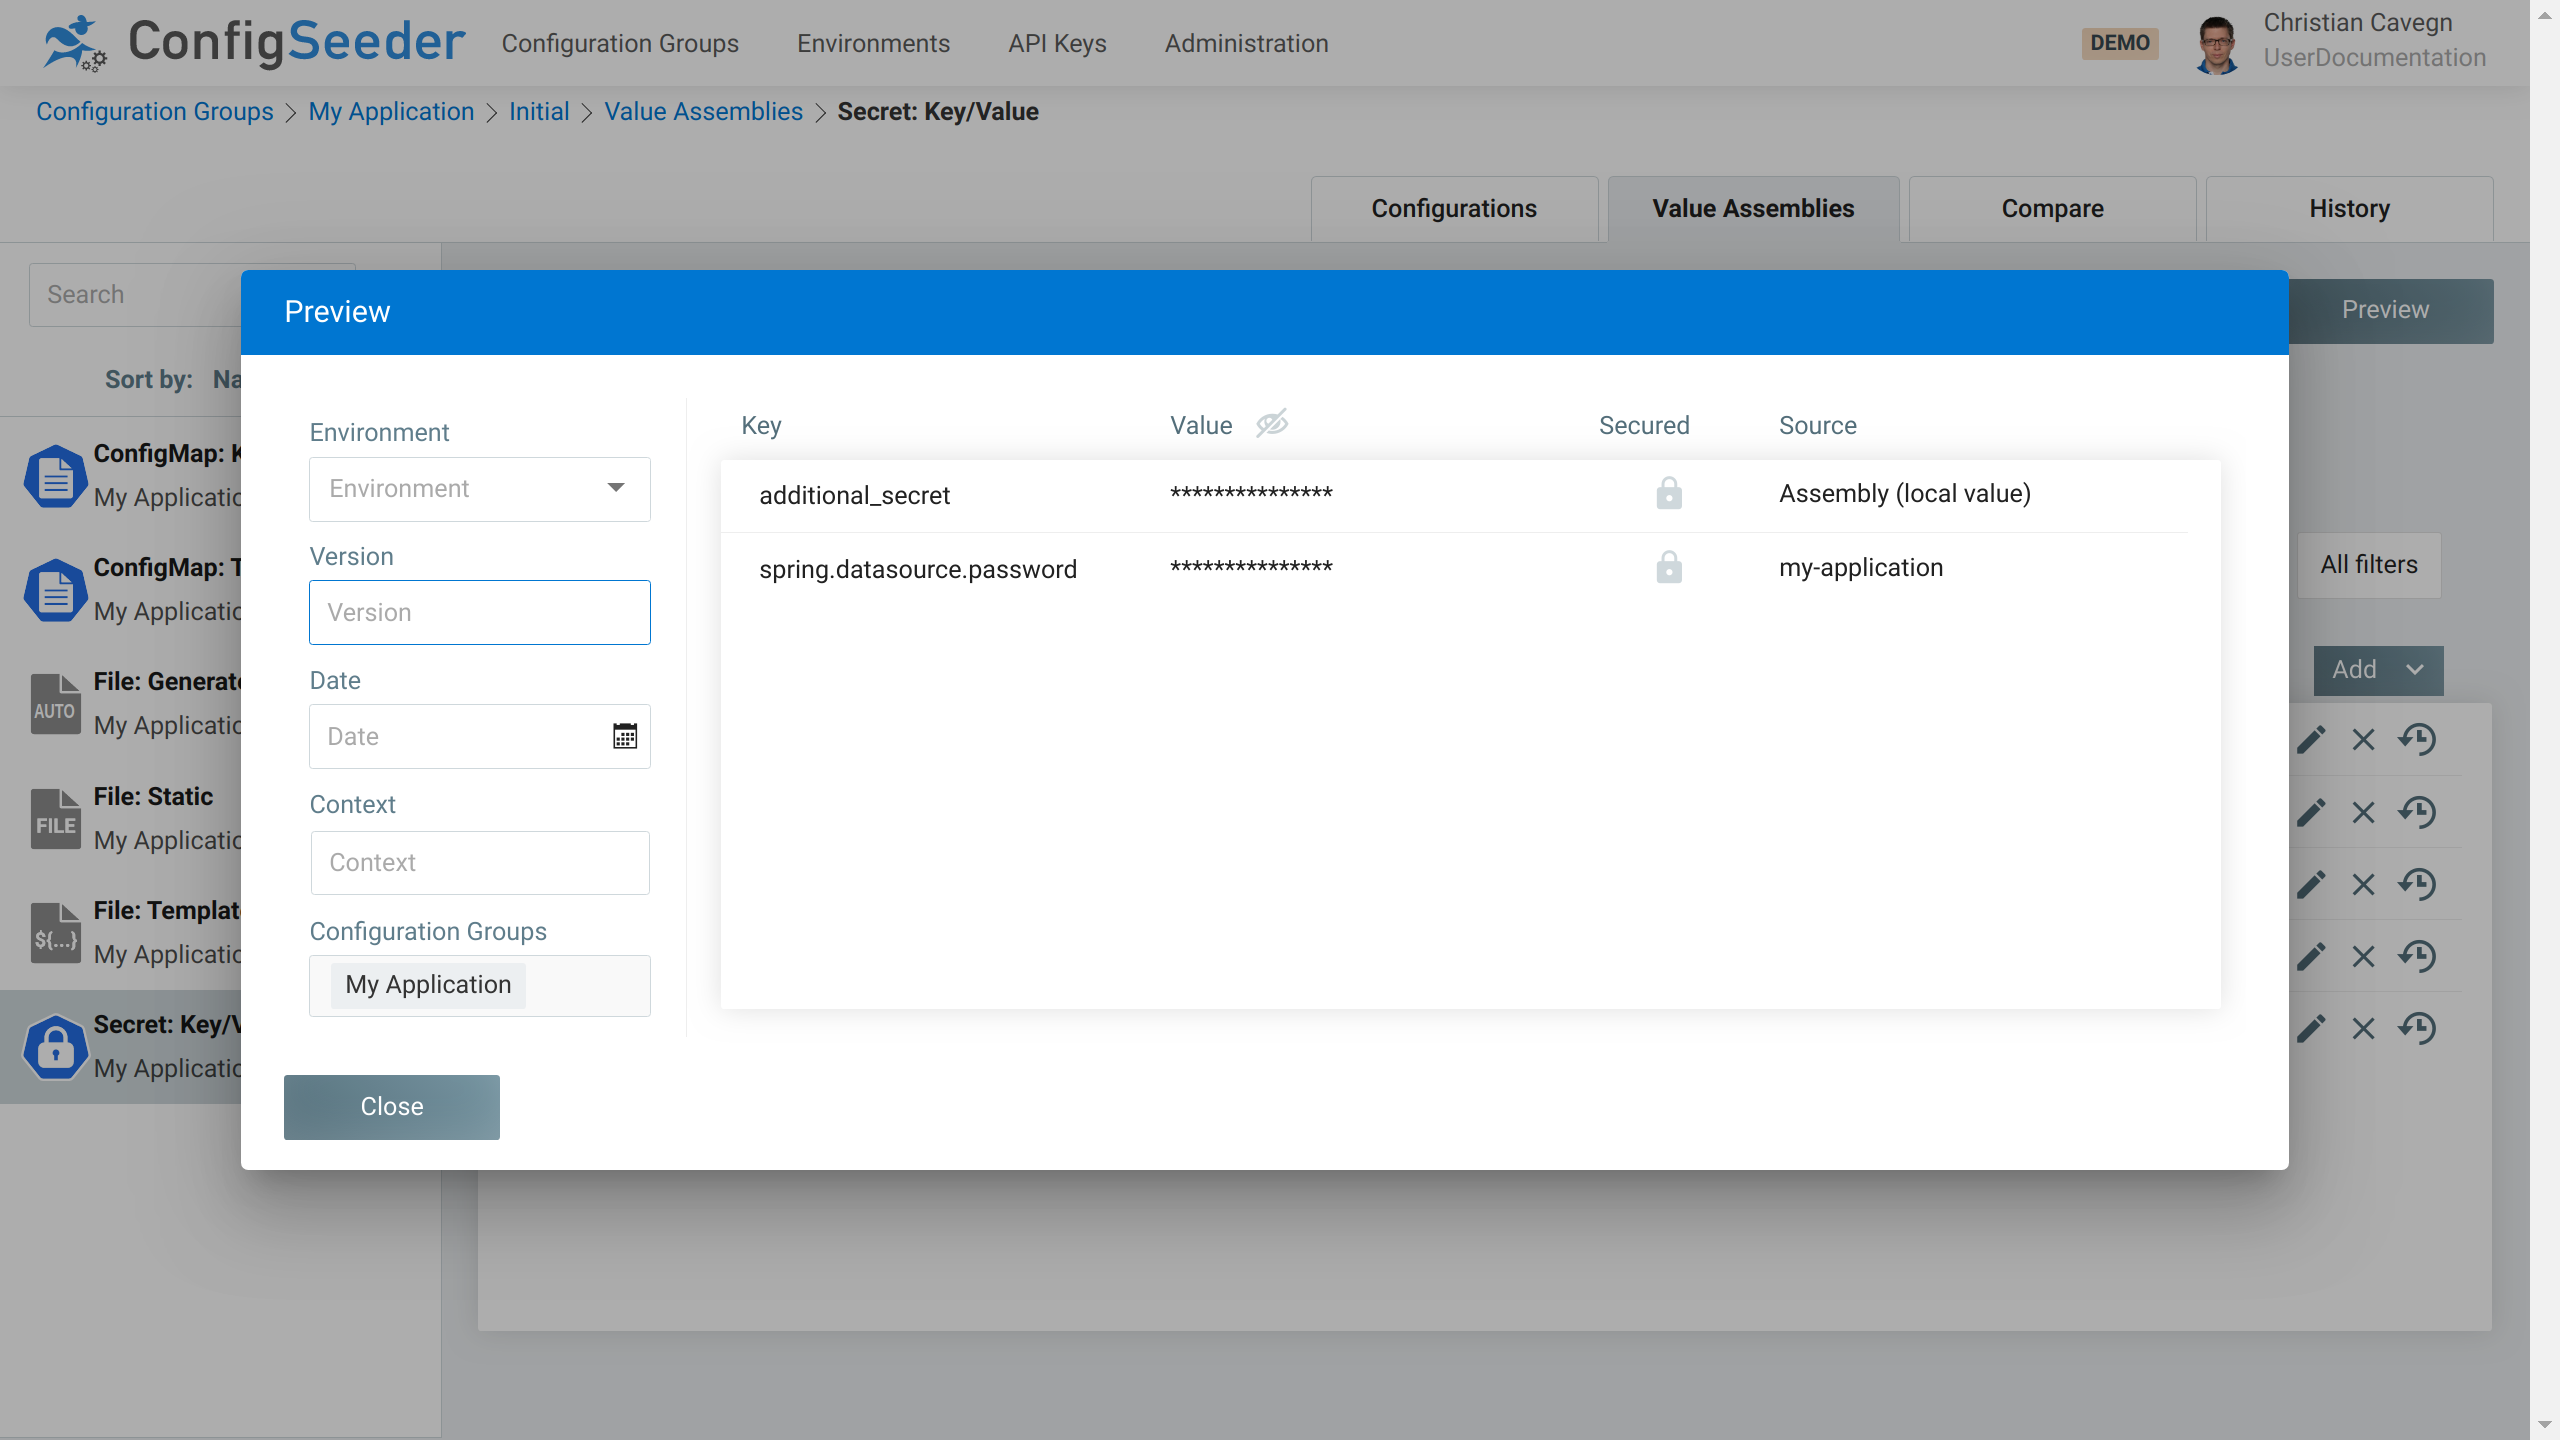
4.3.3.3. Preview for ConfigMap Key/Value & Secret: Key/Value
The preview for Assembly Type ConfigMap: Key/Value and Secret: Key/Value shows how the data
contained in the configuration group(s) specified in data.configuration-groups.source and the assembly as key and values.
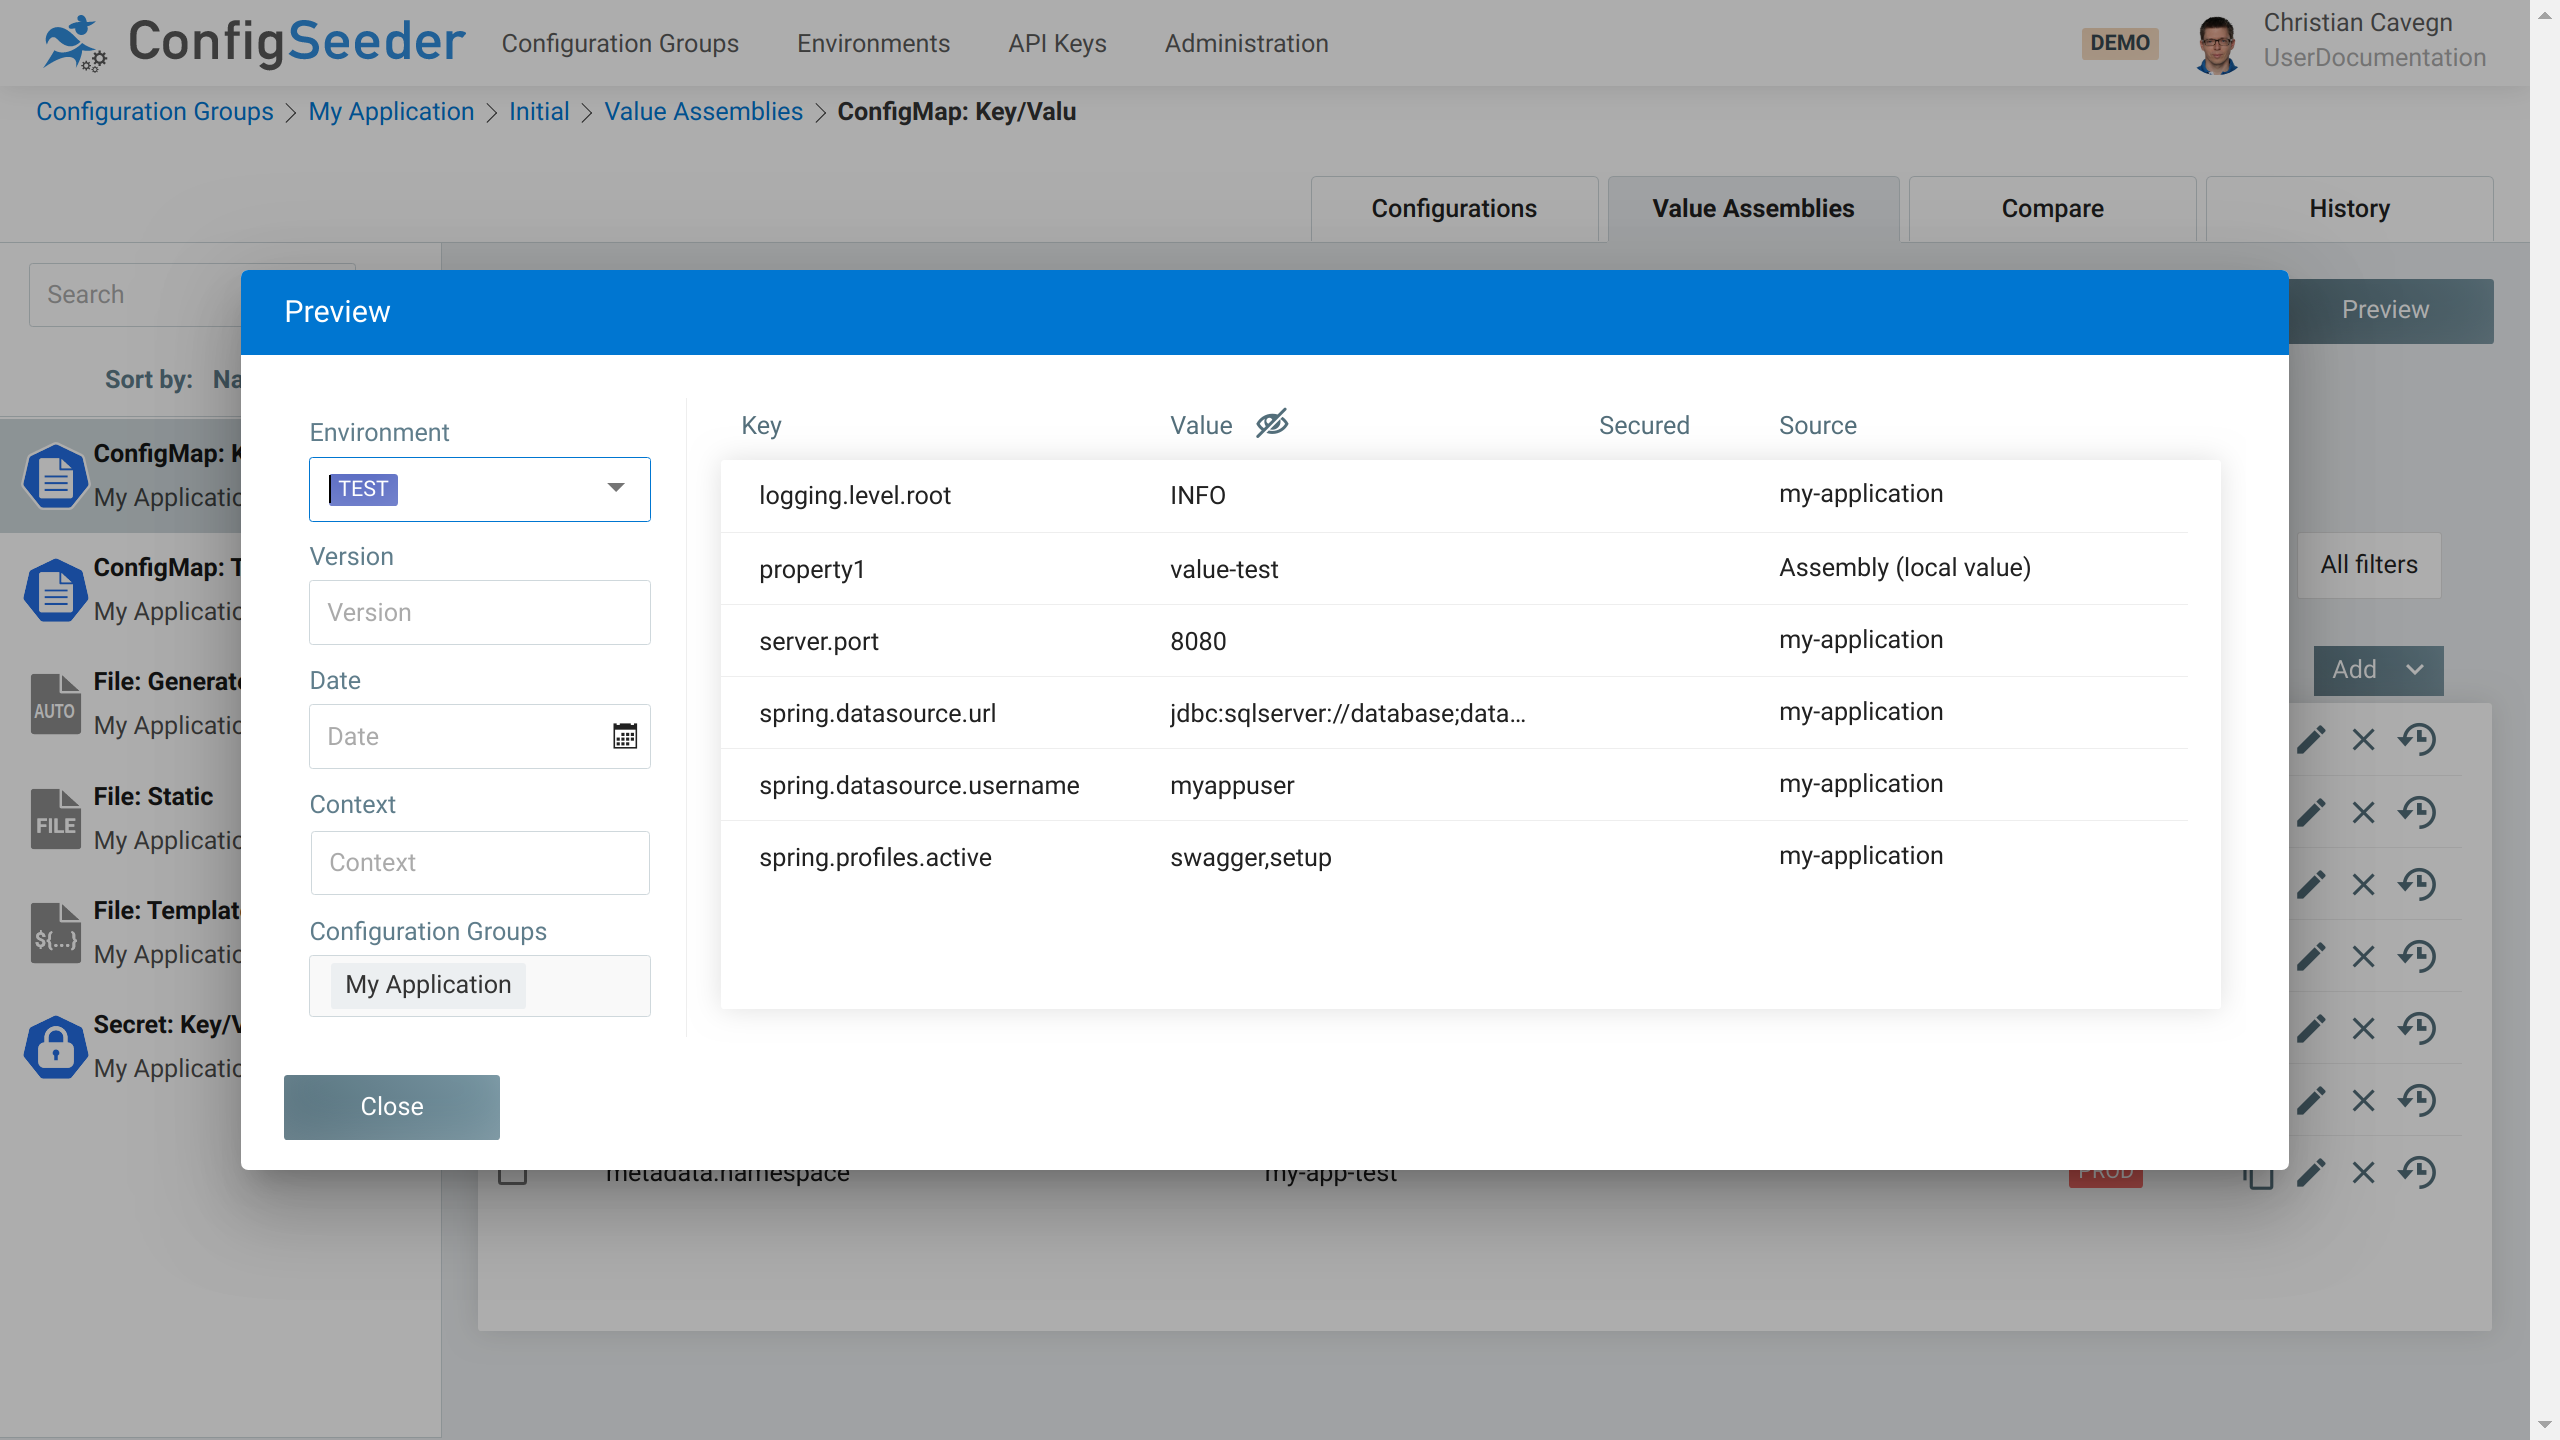
When opening the preview of a Secret, the secured values are starred out per default.
4.3.3.4. Preview for Secret: Keystore / File: Keystore
With ConfigSeeder® we also support Keystores, with one key and multiple certificates. The preview will show all included keys and certificates. This is especially helpfull if certificates are added from other configuration groups.
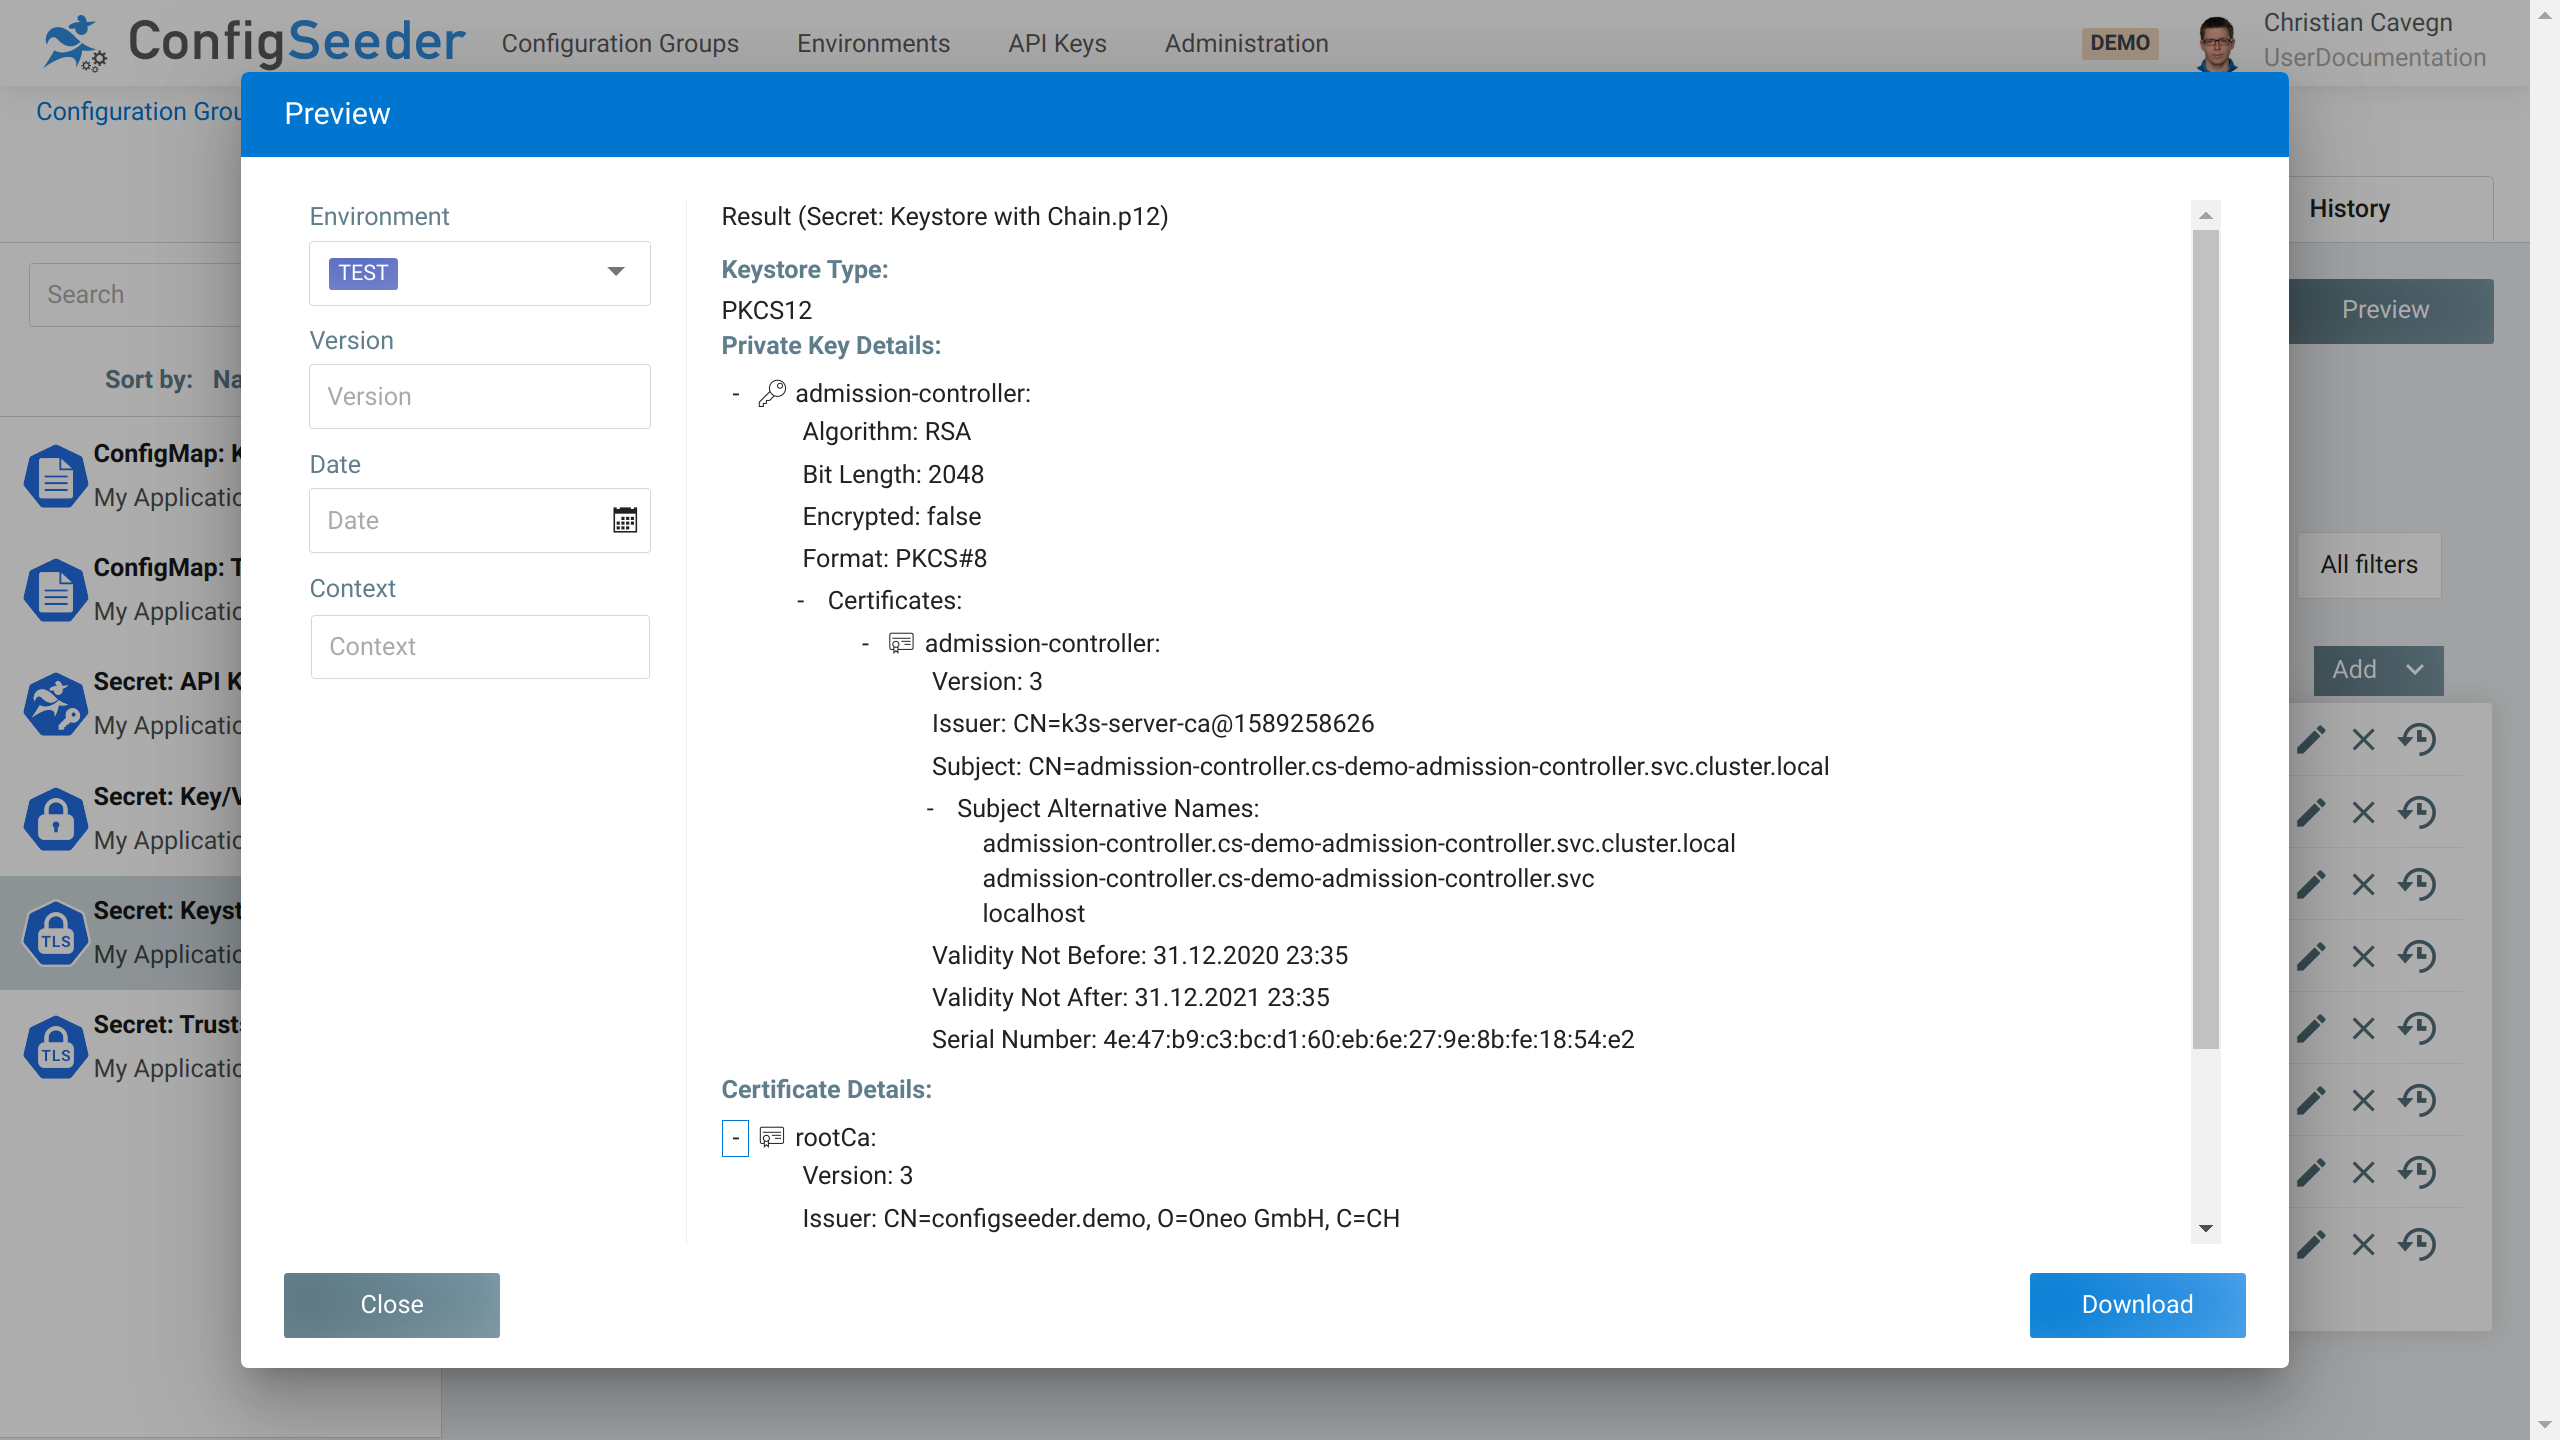
In this preview we can see one private key and it’s certificate as well as one other certificate.
ConfigSeeder® supports JKS and PKCS12 keystores.
4.4. Work with the Preview
4.4.1. Description
The preview helps you to see, which configuration data is retrieved from ConfigSeeder® using a defined set of filter criteria.
The next view screenshots use the following configuration group as a basis:
-
Navigate to
Configuration Groups -
Open Preview
-
Variant 1: Click directly on the preview button
-
Variant 2: Open a configuration group and then click on the preview button
In this case, the previously opened configuration group is already preselected.
-
Enter filter criteria
-
Select the configuration groups that should be used in the preview
-
|
More than one configuration group can be selected. This is useful if
The order of the configuration groups define the priority, latest configuration group has the highest priority. |
-
Select the environment for that the configuration should be retrieved (this is not enforced but necessary in most scenarios)
-
If required enter additional filter criteria (
Date,Version,Context) -
Select the
Typeof configuration you like to retrieve (Properties,Yaml, …) -
Whenever an input field is changed, the three output areas (
configseeder.yaml,curlandResult) are updated
4.4.2. Generated Result
-
Only data valid for the entered filter criteria is returned. Without a selected environment the result (
Properties-format) looks like:#Export #Sun Aug 23 07:04:39 GMT 2020 logLevel=INFO -
Result for the
TESTenvironment:-
Properties:#Export #Sun Aug 23 17:11:08 GMT 2020 logLevel=INFO server.port=443 server.url=https://application2-test.mycompany.com -
Yaml:logLevel: INFO server: port: '443' url: https://application2-test.mycompany.com -
There are different output formats available, just select the one required.
-
4.4.3. Output area configseeder.yaml
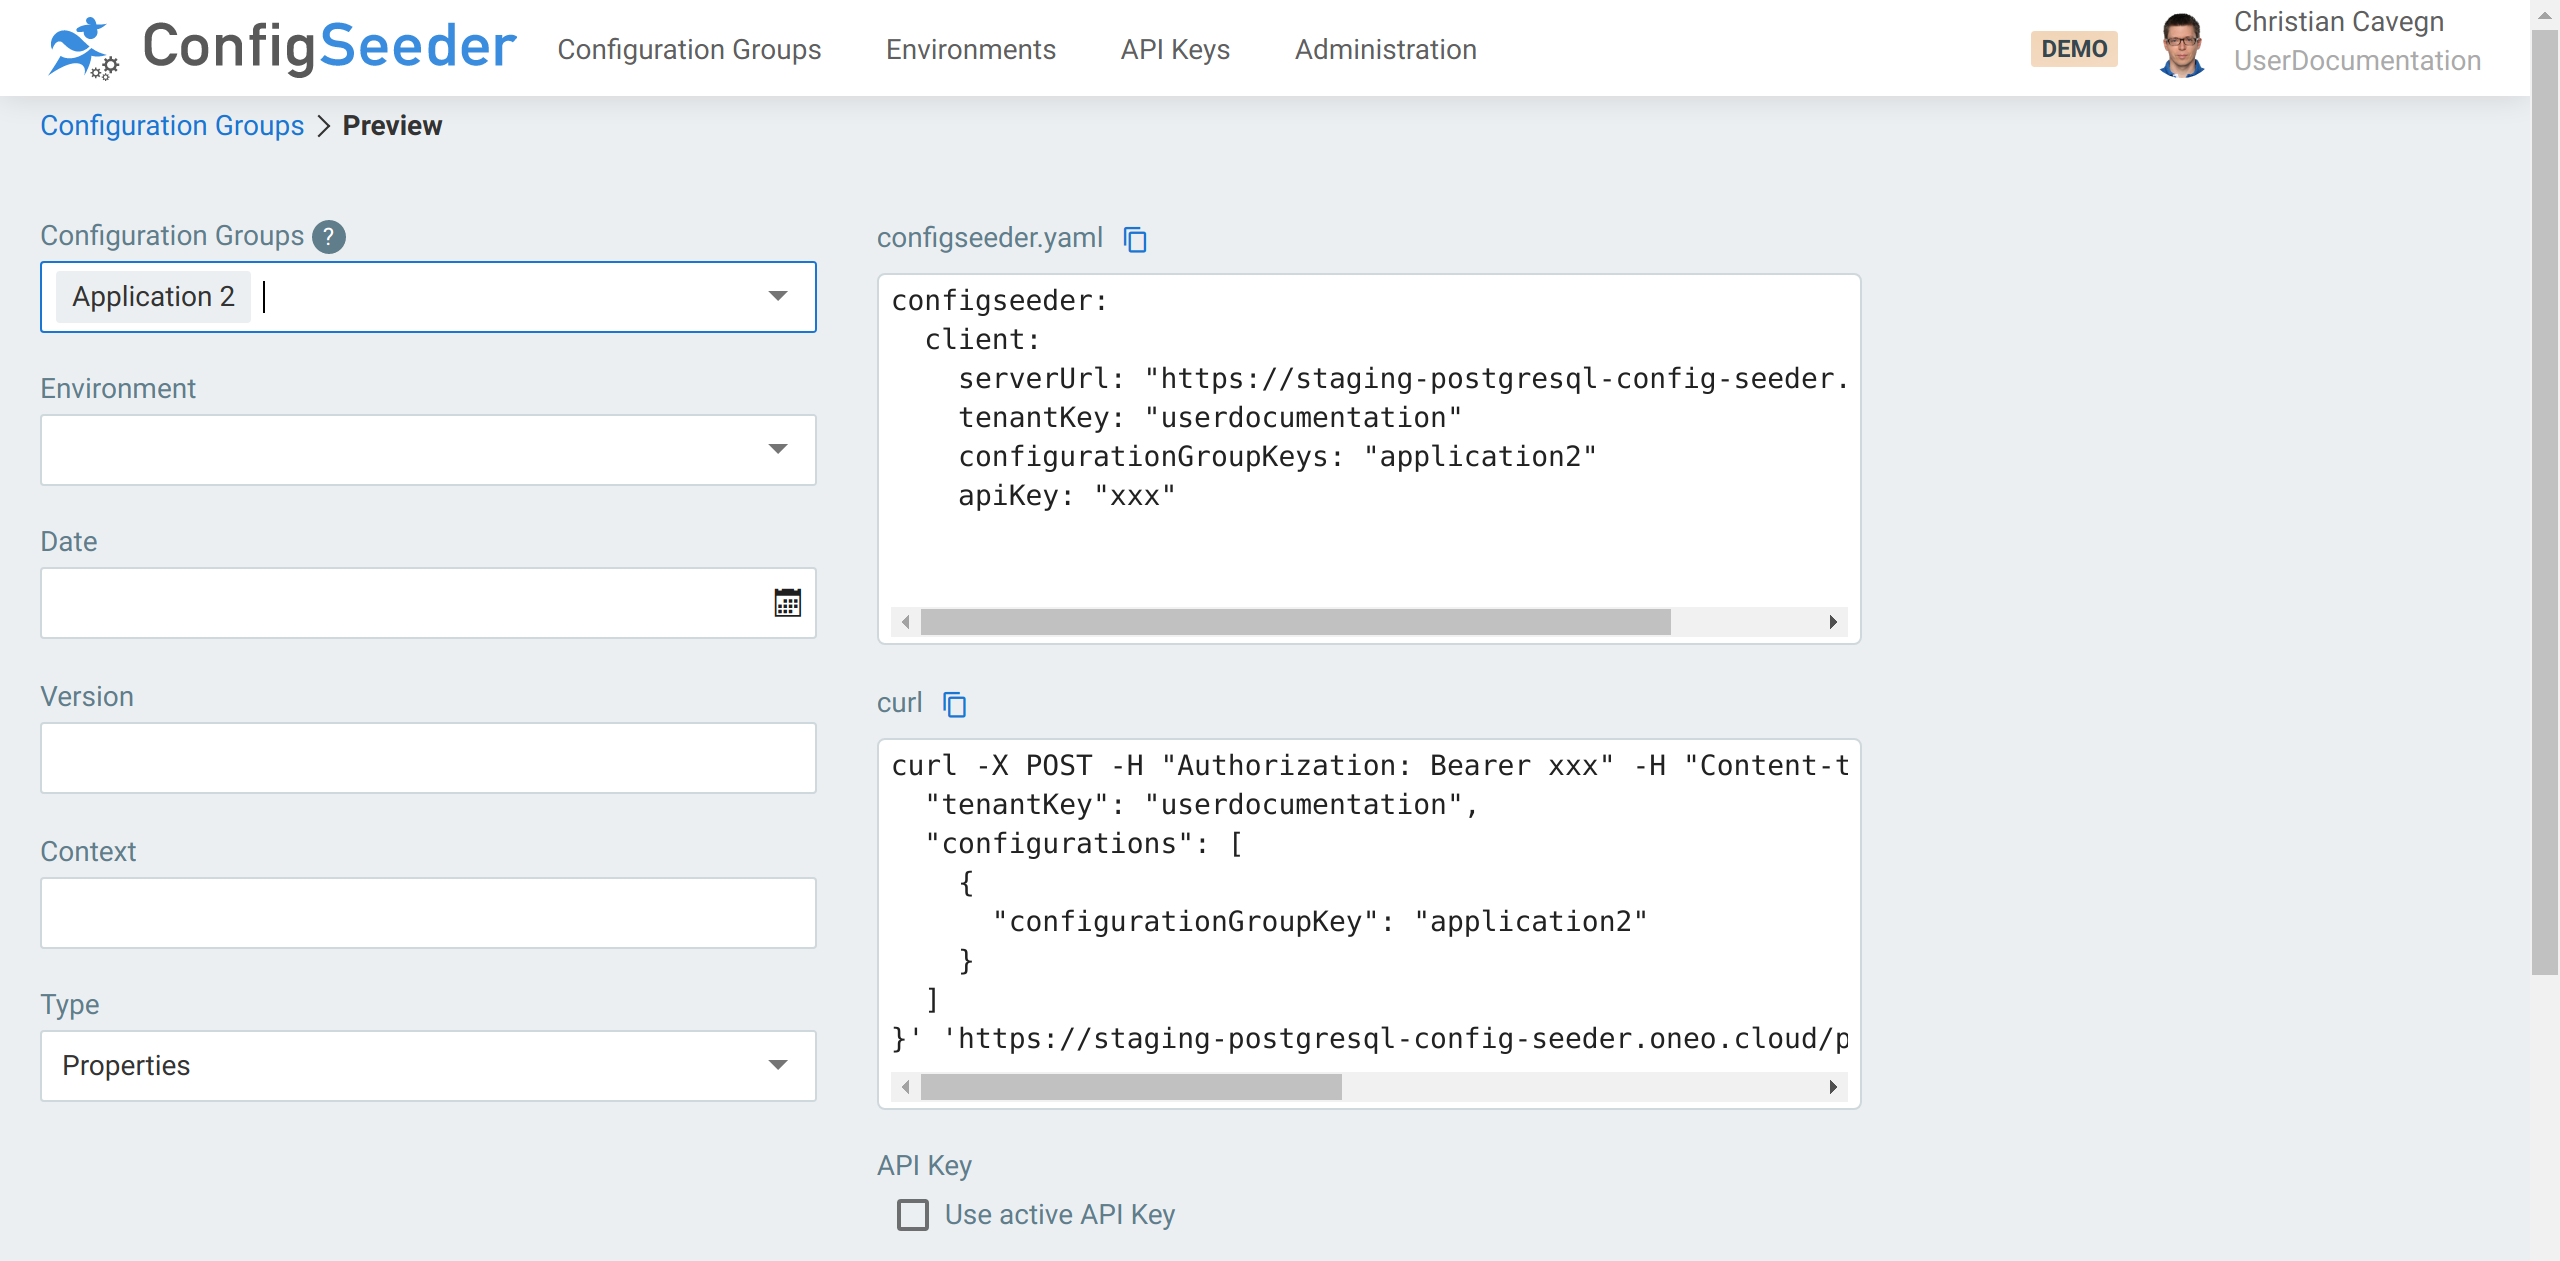
This output can directly be used to configure the ConfigSeeder® Clients.
Just replace the API Key (or even better remove the apiKey configuration and set it via the environment variable CONFIGSEEDER_CLIENT_APIKEY).
configseeder:
  client:
    serverUrl: "https://staging-postgresql-config-seeder.oneo.cloud"
    tenantKey: "userdocumentation"
    configurationGroupKeys: "application2"
    environmentKey: "TEST"
    apiKey: "xxx"
Also see section ConfigSeeder Clients in our system documentation
(available at Documentation).
|
Click on the checkbox But be aware that the API Key used by a User / Browser has a short lifetime. You should do this only for testing. |
4.4.4. Output area curl
This output can be used if you need to retrieve configuration data via curl.
curl -X POST -H "Authorization: Bearer xxx" -H "Content-type: application/json" -H "Accept: text/yaml" -d '{
  "tenantKey": "userdocumentation",
  "environmentKey": "TEST",
  "configurations": [
    {
      "configurationGroupKey": "application2"
    }
  ]
}' 'https://staging-postgresql-config-seeder.oneo.cloud/public/api/v1/configurations?download=false'|
Click on the checkbox But be aware that the API Key used by a User / Browser has a short lifetime. You should do this only for testing. |
4.5. Compare configuration data
4.5.1. Description
The compare view has various uses:
-
Compare the configuration data of your production environments with the test environments before you install a new release. With the compare view you will find newly introduced (and missing on production) configuration properties before the release is installed
-
Compare versions, dates or contexts to find out how the configuration differs for the selected filter criteria
-
Select one dataset as reference and let ConfigSeeder® show you, where other datasets deviates from the chosen reference.
4.5.2. Compare View
Select the environments (or versions, data, context) that should be compared:
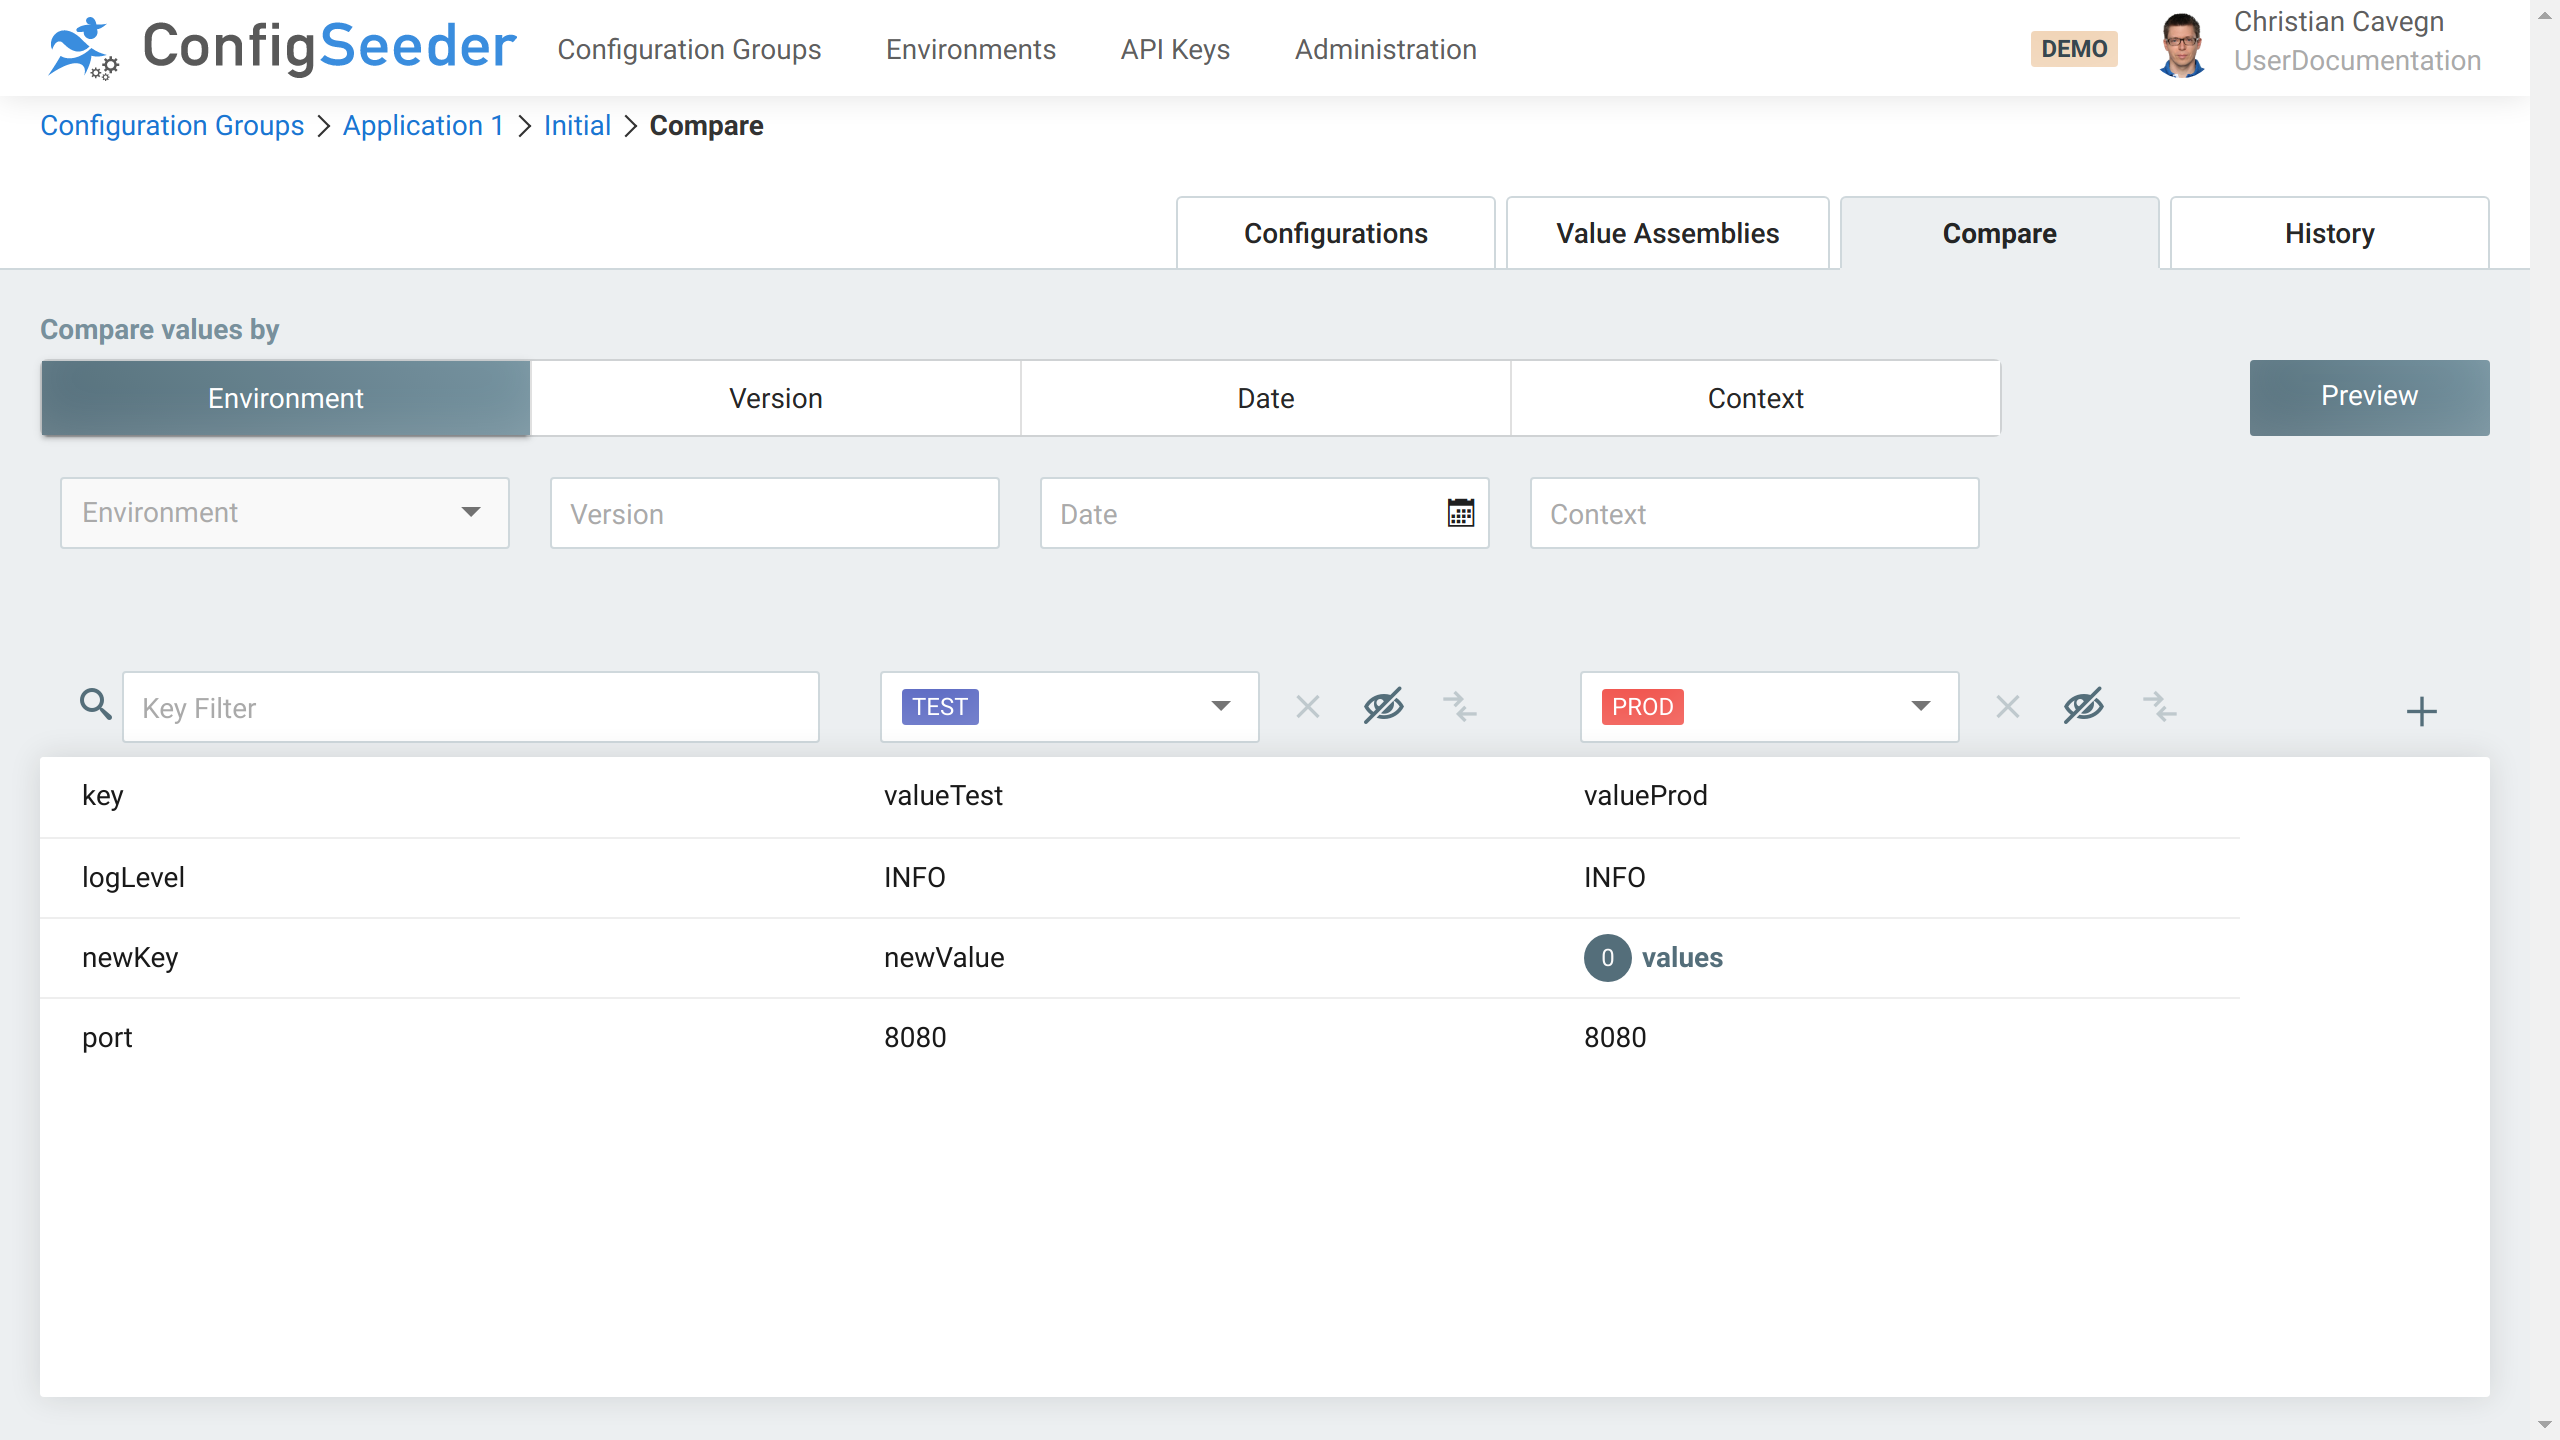
In this example, a configuration value newKey was introduced but not yet configured for production.
You can easily find this problem before the installation on production.
Even if you don’t have any knowledge about the managed application.
4.5.2.1. Available Actions
| Icon | Description |
|---|---|

|
Add dataset to comparison |
|
|
Remove dataset from comparison |
|
|
Reveal hidden values / hide revealed values |
|
|
Sets the dataset as reverence, compare other datasets with this dataset |
4.5.2.2. Compare with reference
Click on the compare icon to mark a dataset as reference and let ConfigSeeder® compare all values against it.
Deviations to the reference dataset are shown with a red corner.
4.6. Work with the History
4.6.1. Description
The History is used to find out information like:
-
At what time did a configuration node (or value) change?
-
Who did the change?
-
What was the value before it changed?
An involuntary or incorrect change can easily be reverted with the history view.
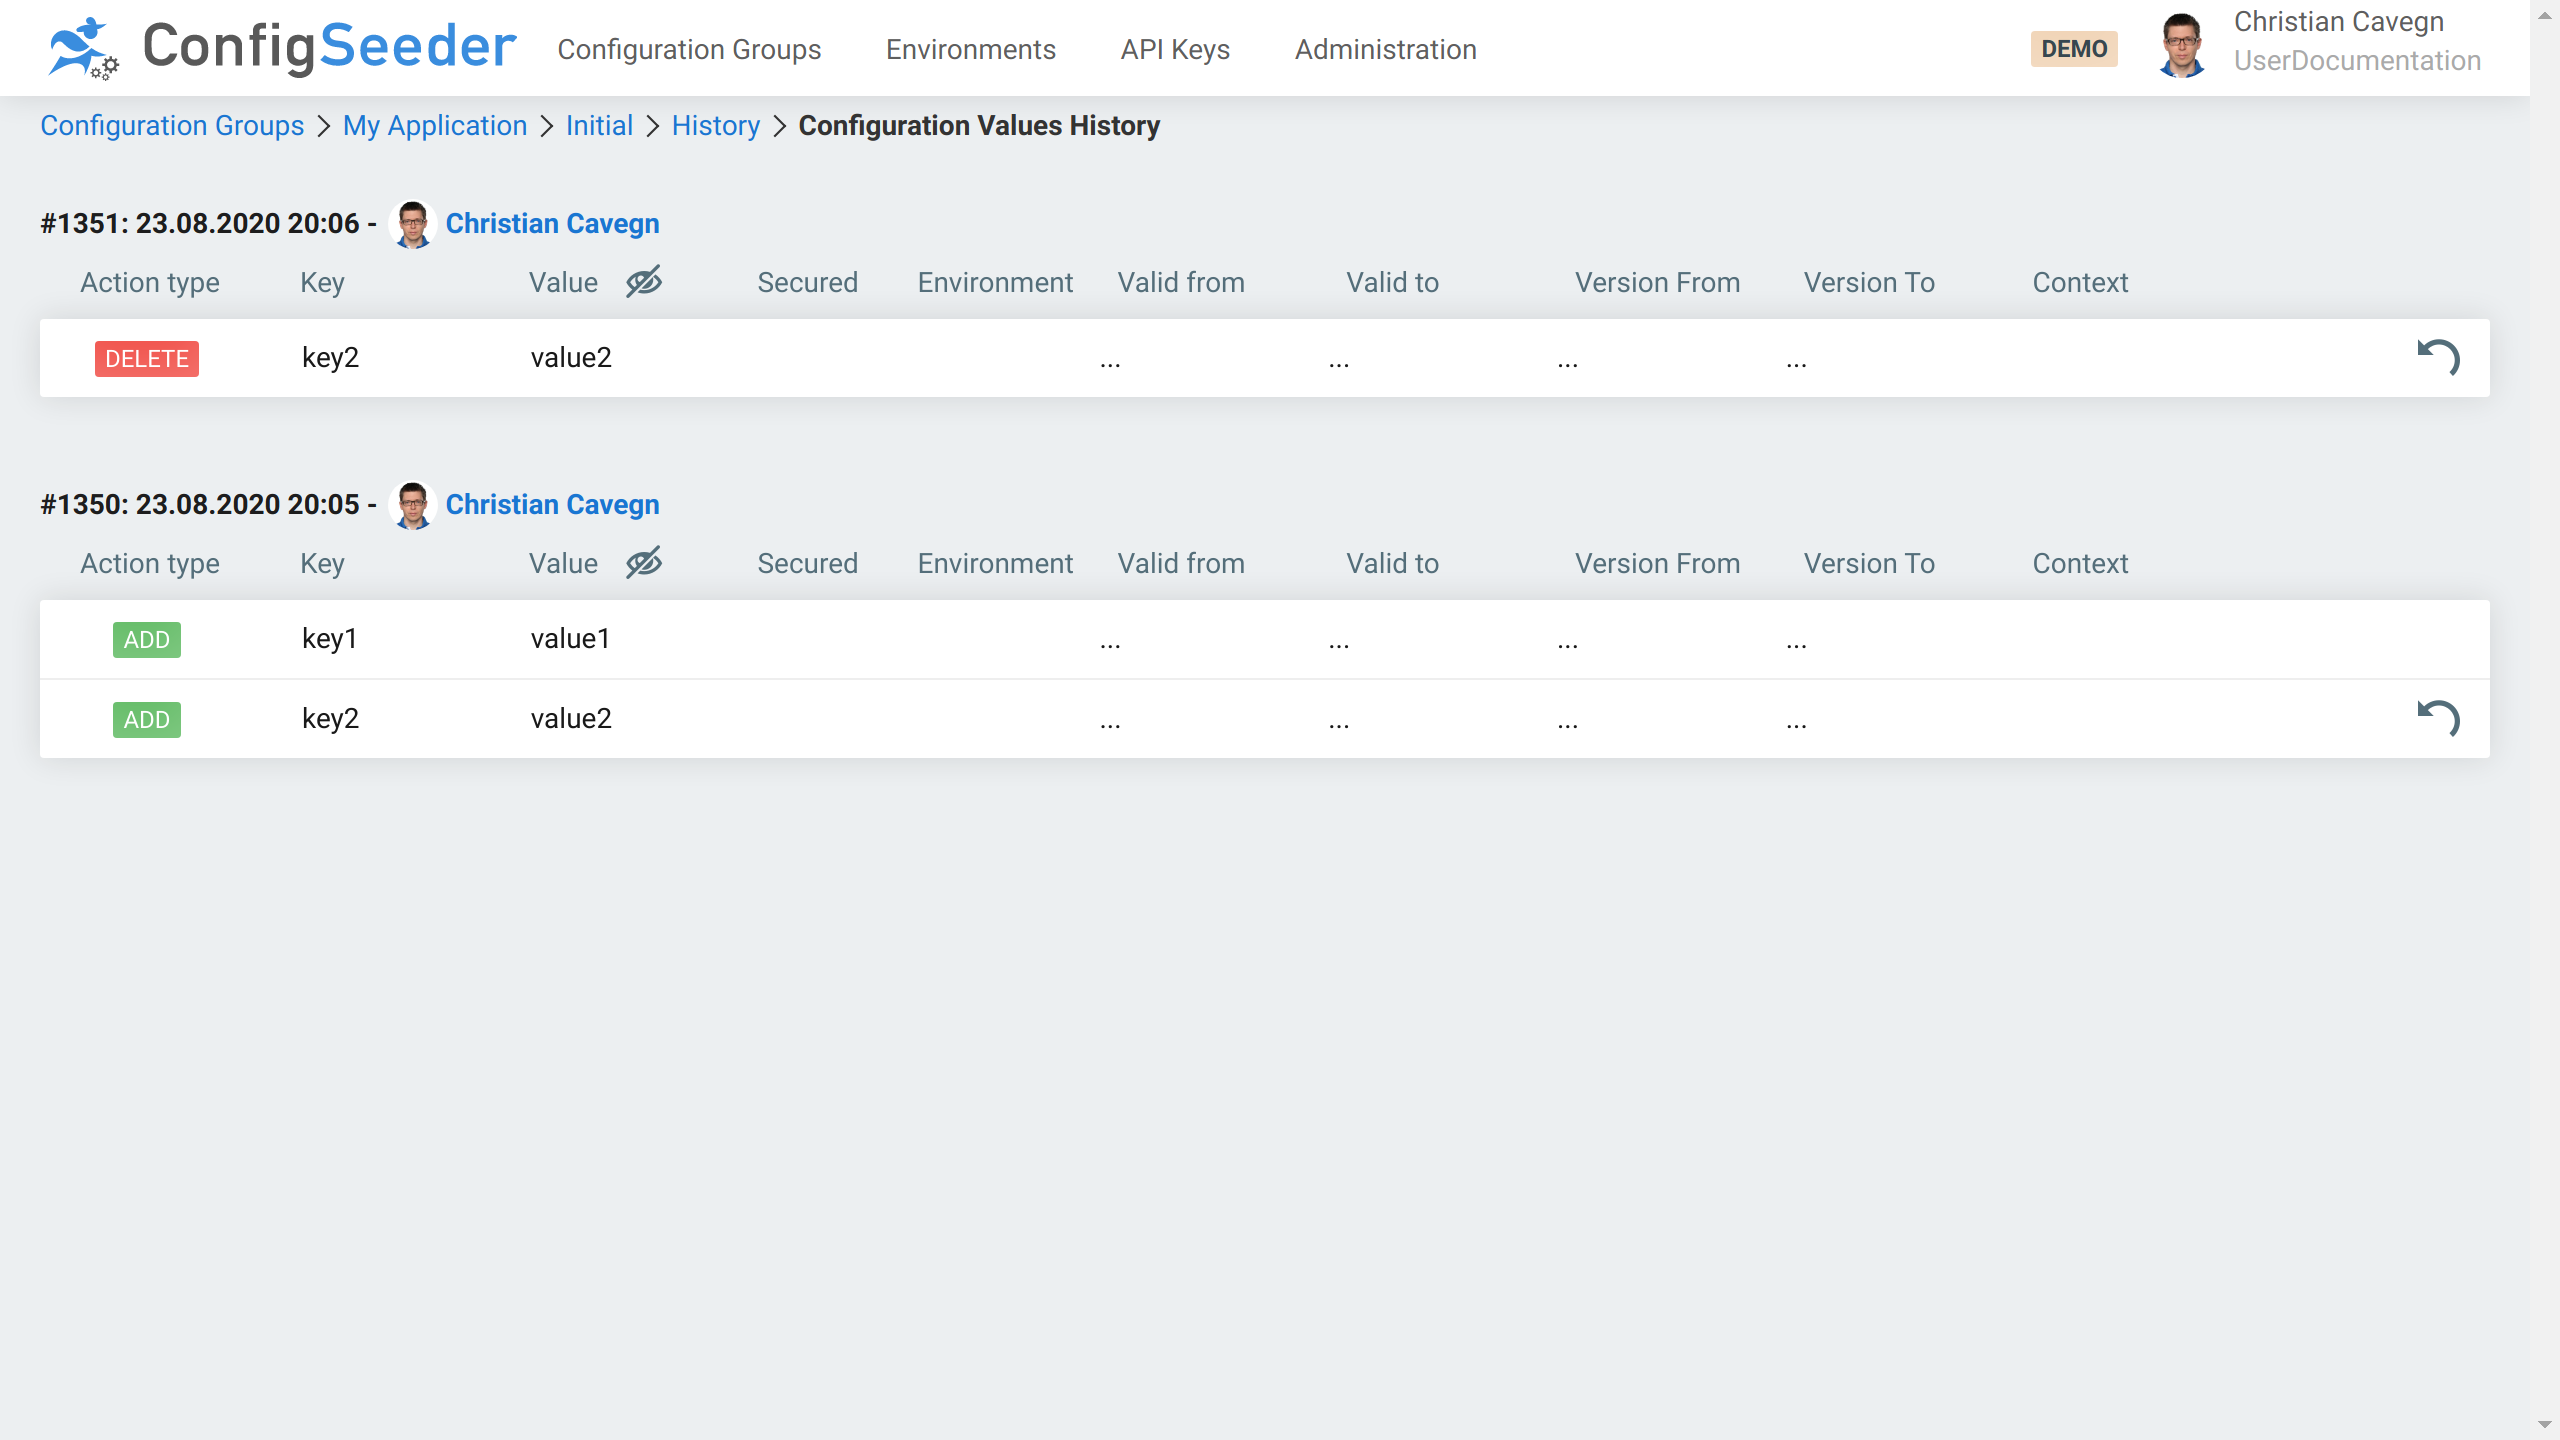
4.6.2. History of a configuration node
Use-case:
-
A configuration value was changed, you need to know (or even restore) a previous value.
Navigate to the history of a configuration node:
-
Open the configuration group
-
Click on the history icon of the configuration value
The history of a configuration node looks like this:
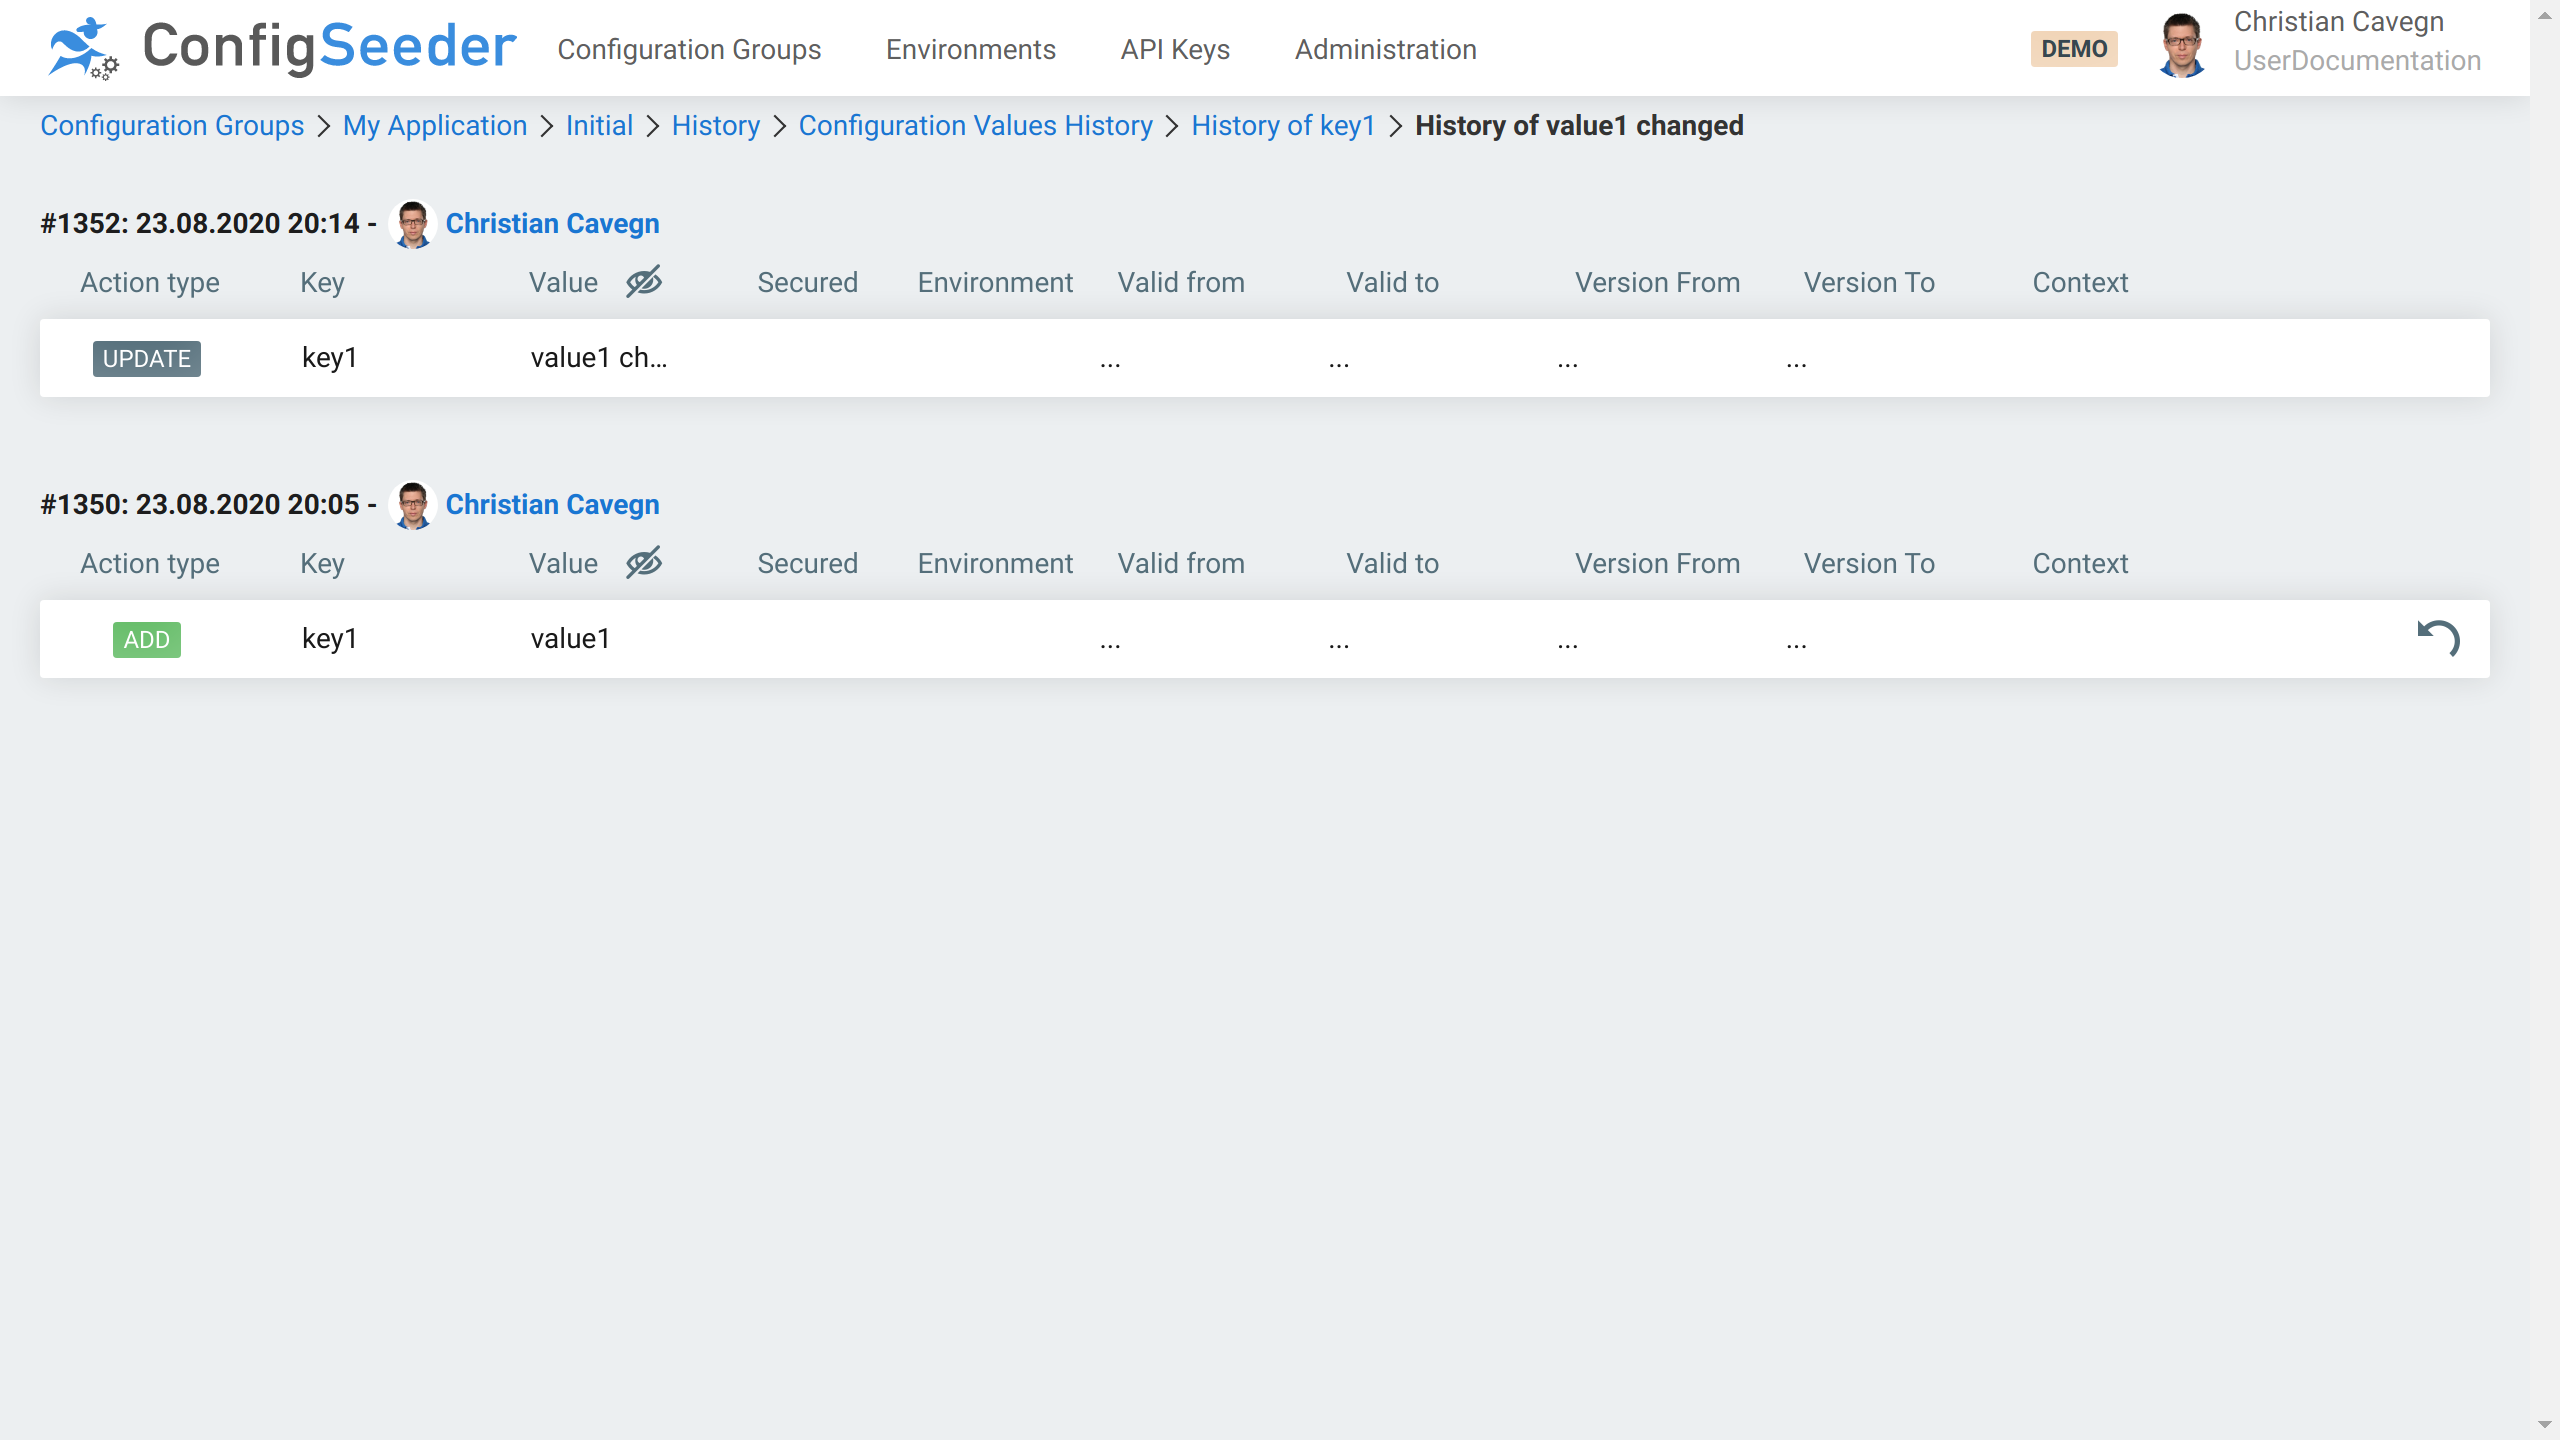
The history of a configuration node shows:
-
Who made a change and when
-
What kind of change was it (
ADD,UPDATE,DELETE) -
What was the value of the configuration value
Of course, secured values are hidden by default and can be revealed with a click on the eye icon.
With the revert icon, a previous value (or a deleted value) can be restored. See reverting a change.
Via breadcrumb you can navigate to the history of the assembly and configuration group.
4.6.3. History of a configuration group & assembly
Use-case:
-
The configuration group was changed at a known date, but the exact changes are unknown.
Navigate to the history of a configuration group:
-
Open the configuration group
-
Click on the
Historytab
The history of a configuration group looks like this:
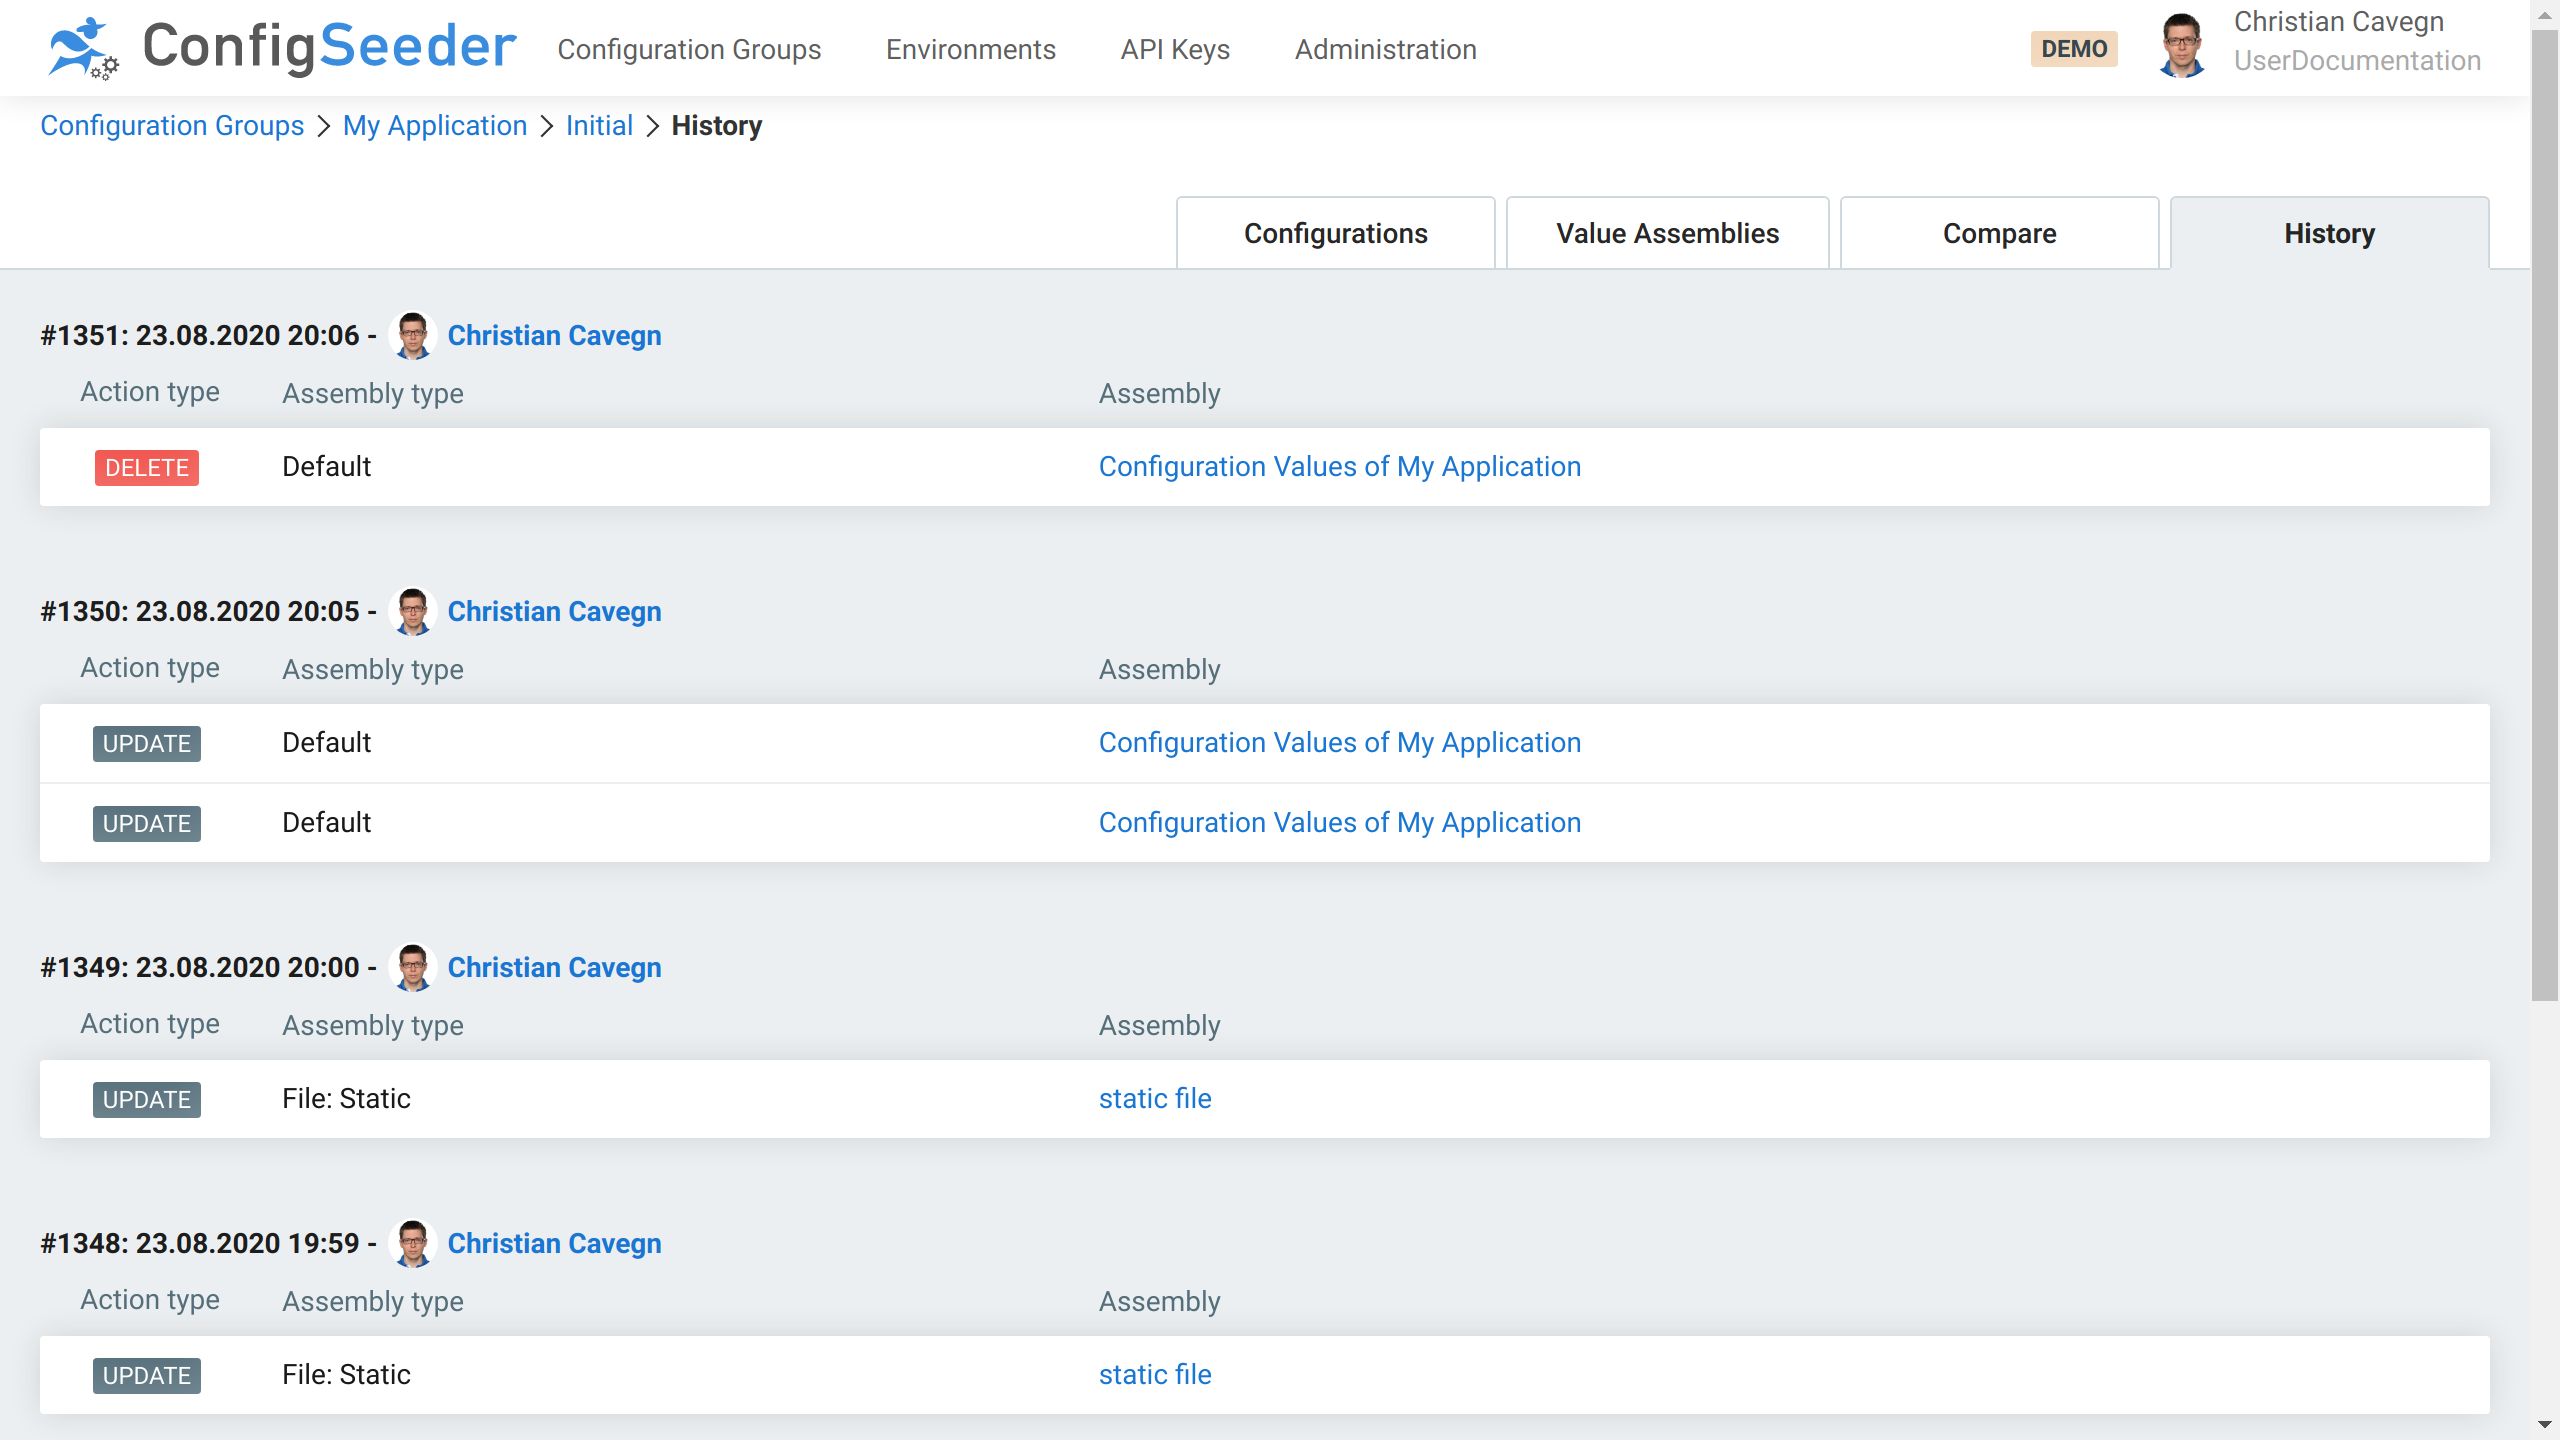
The history of a configuration group shows:
-
Who made a change and when
-
What kind of change was it (
ADD,UPDATE,DELETE) -
What changed (name and type of the assembly containing the configuration data)
|
For configuration data not stored in any special assembly, the assembly type is |
Clicking on the assembly leads to the history of the assembly:
On this page, the value of the configuration values is also visible. Of course, secured values are hidden by default and can be revealed with a click on the eye icon.
With the revert icon, a previous value (or a deleted value) can be restored. See reverting a change.
4.6.4. Reverting a change
The revert functionality can be used on the following two pages:
-
History of an assembly
-
History of a configuration node
It is started with a click on the revert icon:
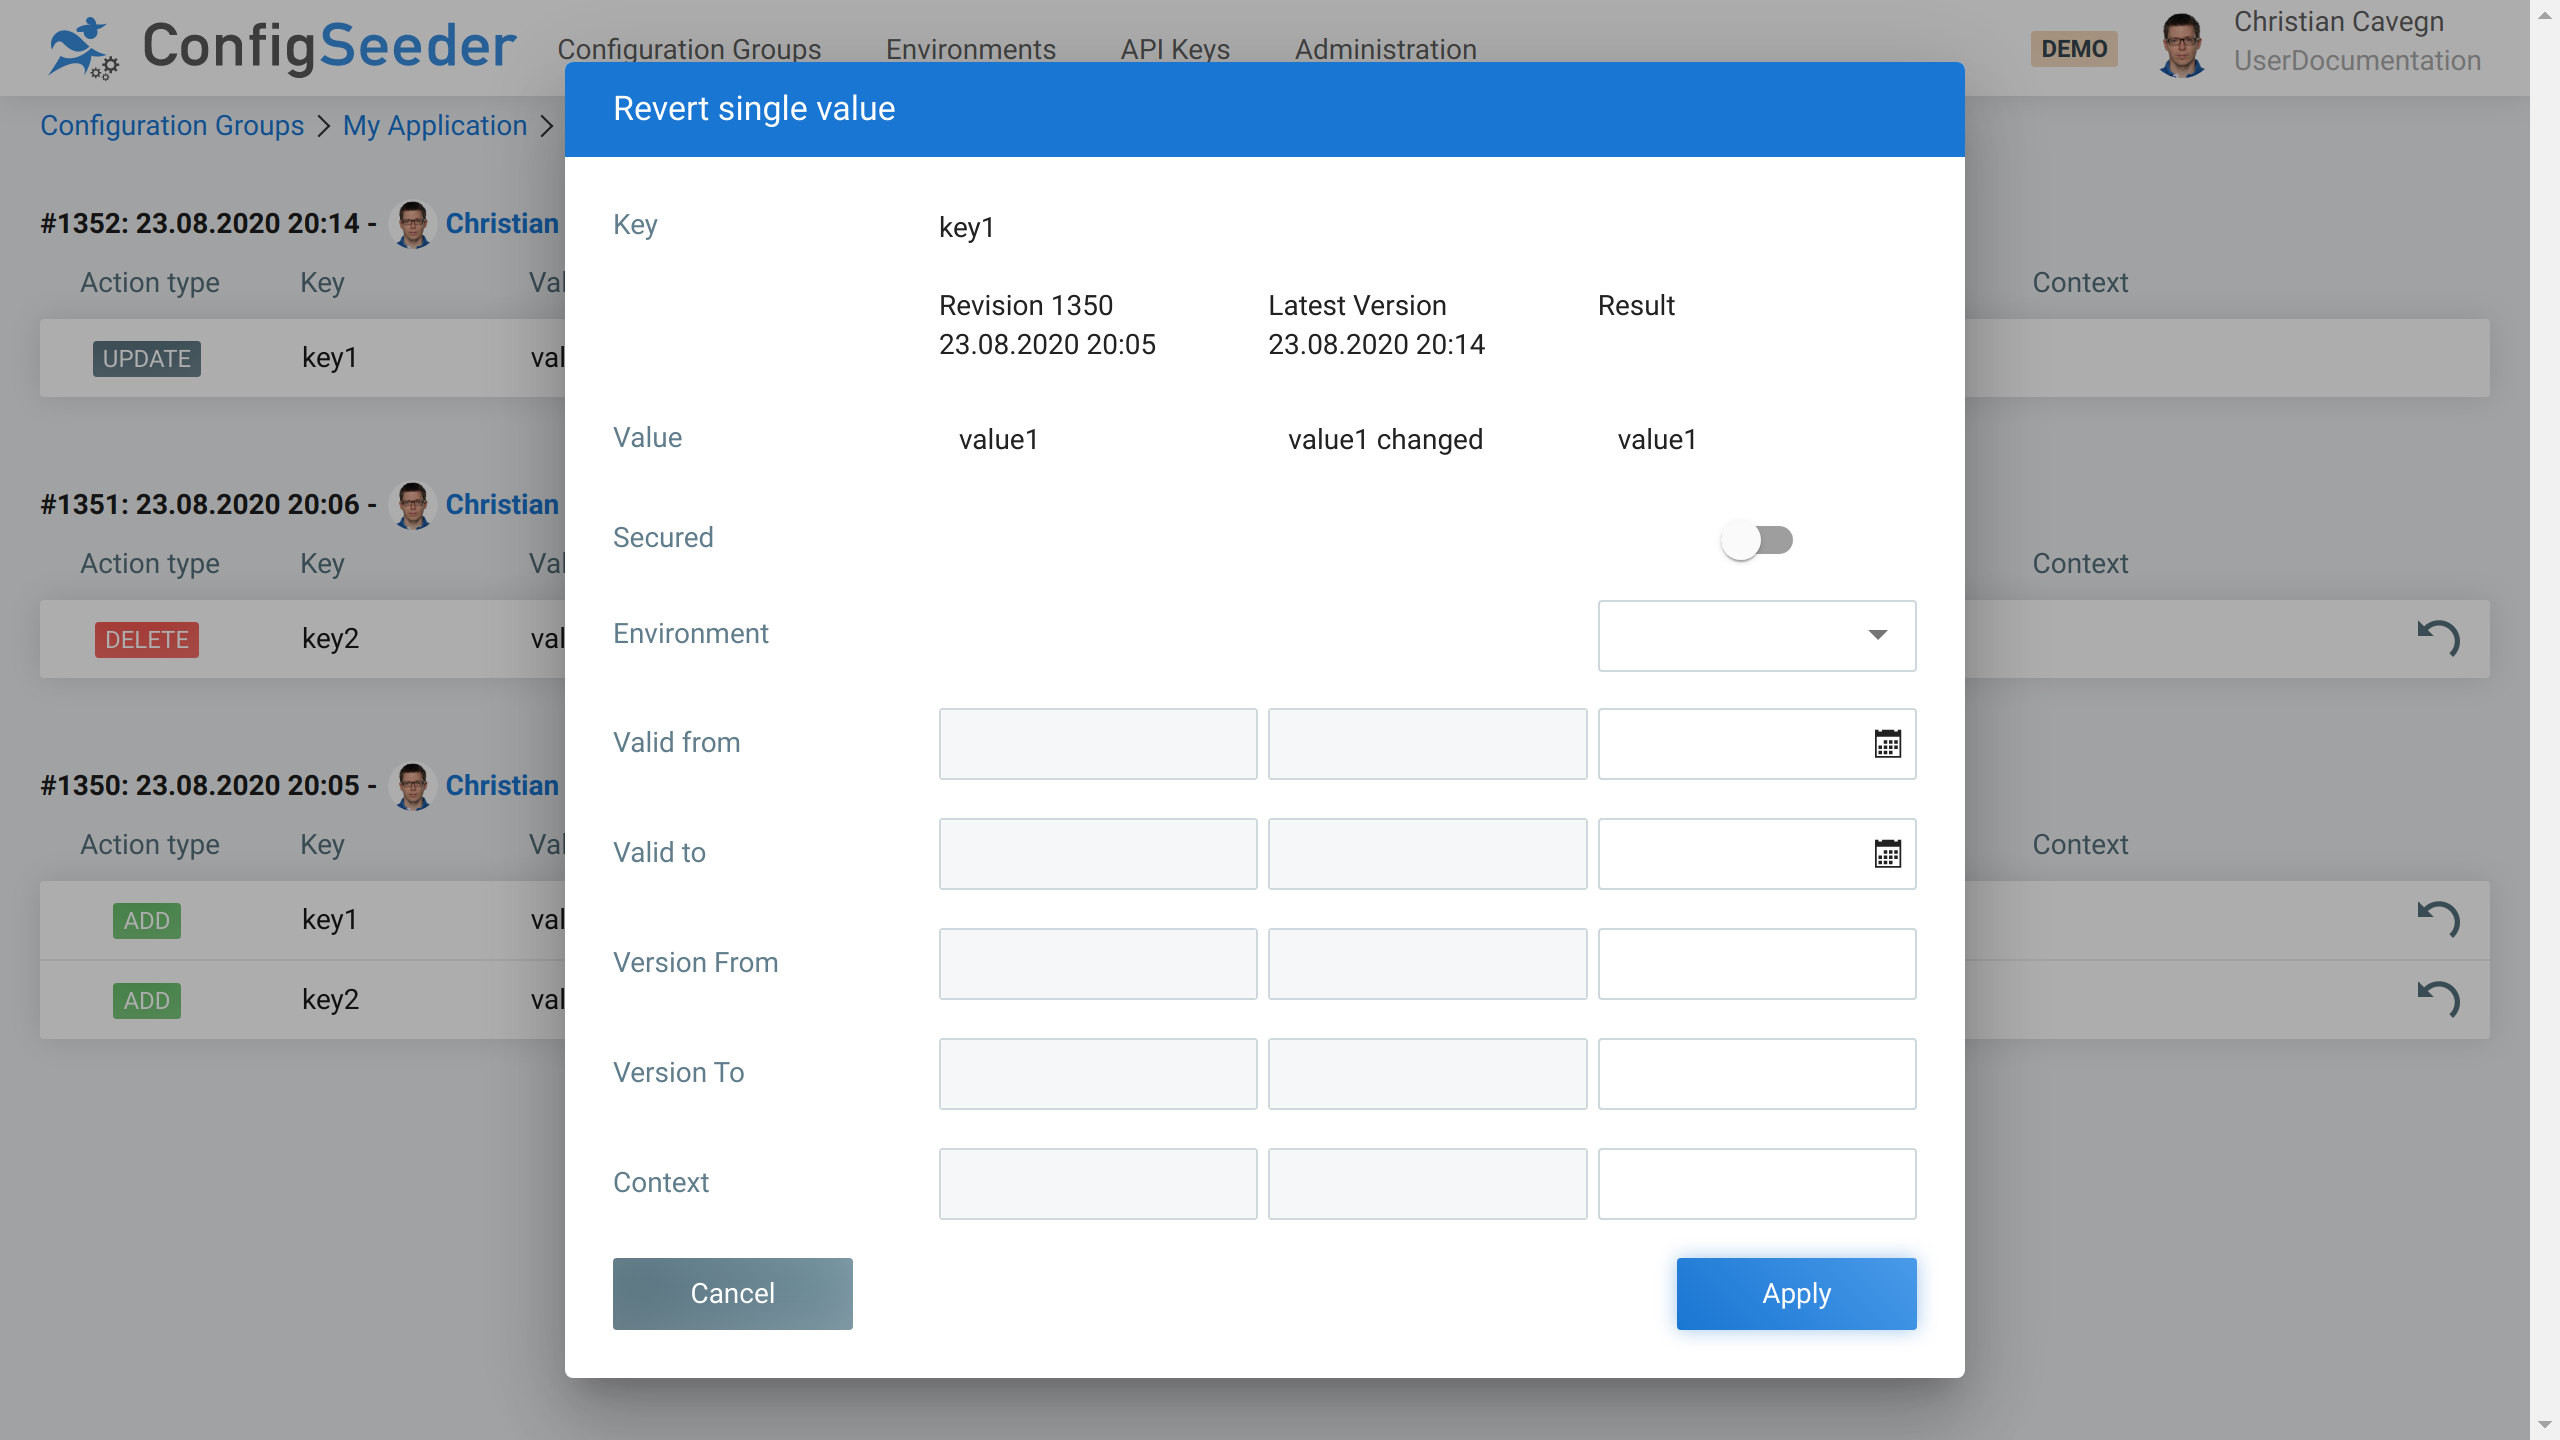
The popup shows
-
on the left side the value and filter criteria of the selected value
-
in the middle it’s current value and filter criteria
-
on the right side the value and fitler criteria if the value is restored
Of course when accepting a restore via click on Apply, a new entry will be visible in the history.
4.7. Work with the Import
4.7.1. Description
With the import feature existing configuration files in the Properties, Yaml and Json format can be imported into ConfigSeeder®.
This feature can be very useful if you are migrating your existing configuration data into ConfigSeeder®.
4.7.2. Importing existing configuration files
-
Navigate to the configuration group
-
Click on the
Importbutton -
Select the file to import
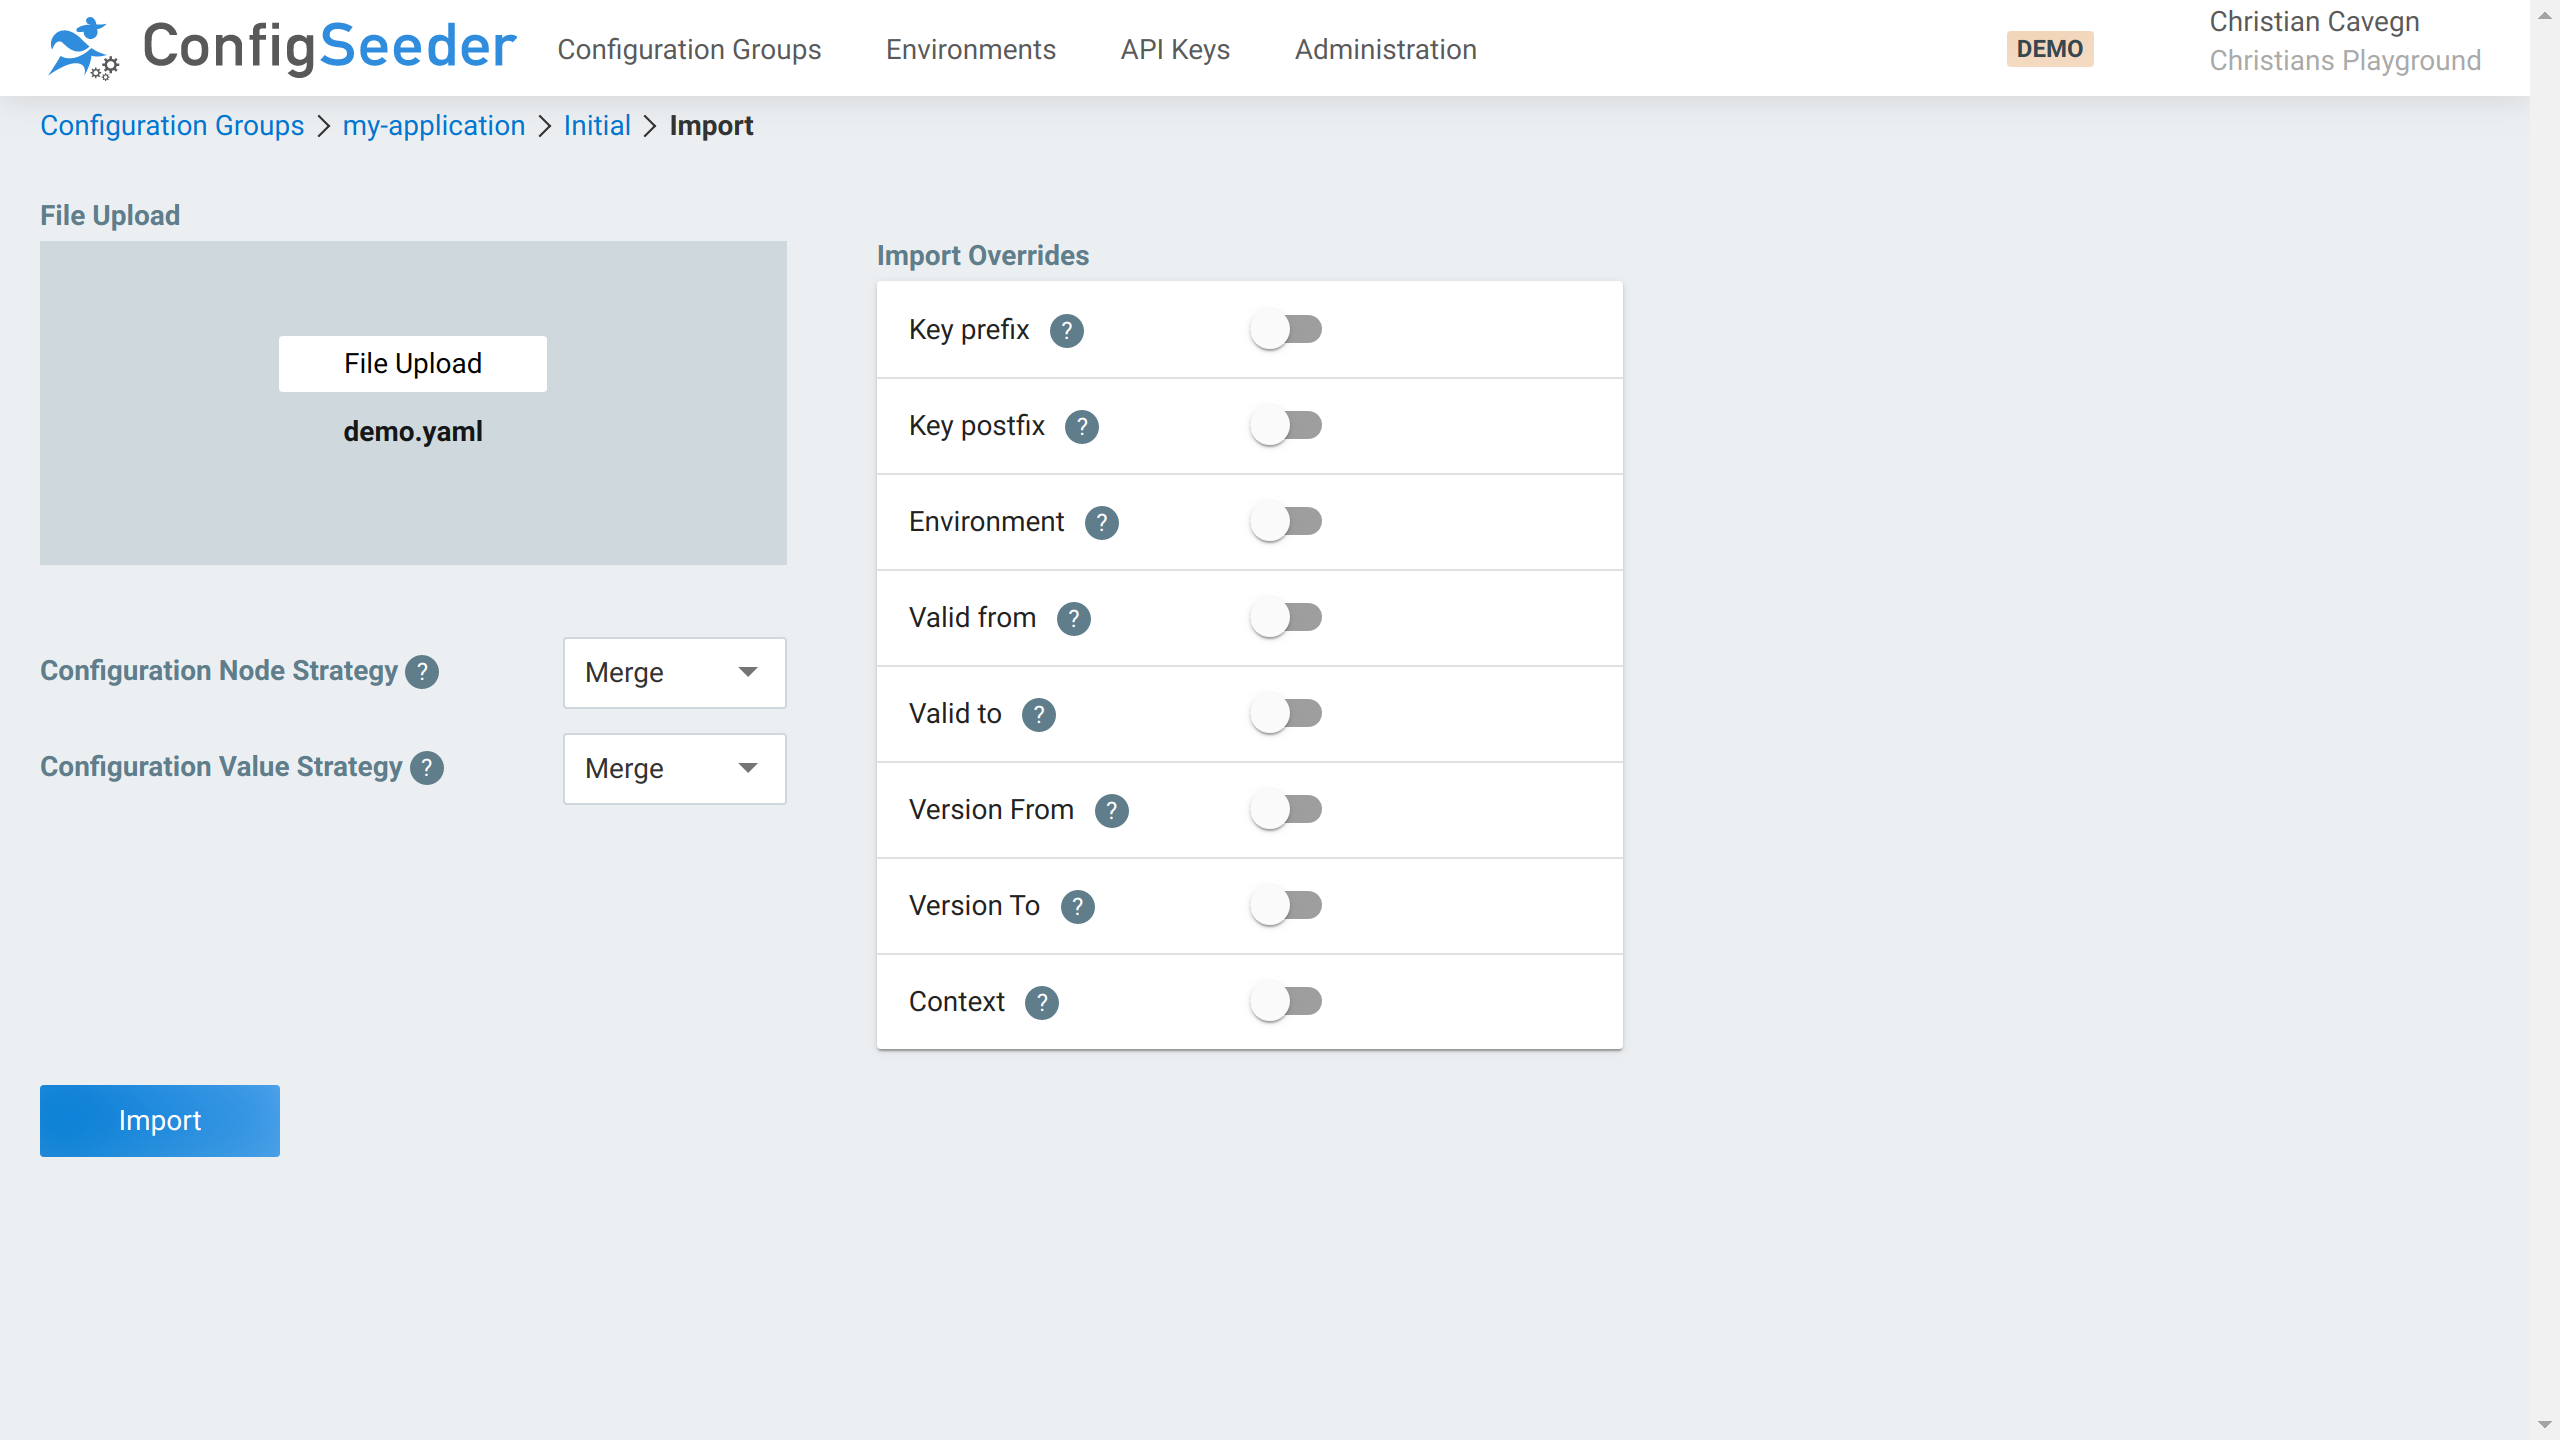
-
Decide how the details if the import
-
Choose the desired strategy for handling new/existing configuration nodes and values
-
Override filter criteria or set a pre- and/or postfix for all keys
-
-
Start the import by clicking on the
Importbutton -
Check the result of the import
4.7.3. Post-process imported data
The result of the import will be good, but not perfect. You will have to look through the created configuration nodes and values and adapt the imported configuration.
Candidates are:
-
Configuration values that are valid for more than just one environment
-
Update the type of configuration nodes that wasn’t recognized correctly
-
Move configuration data to a centralized configuration group if you work with that concept
4.7.4. Limitations of the import
At the moment, the Import feature has the following limitations:
-
For
Yaml:-
Files containing more than one (spring) profile are not supported
-
Depending on how the keys are structured, the imported keys are not optimal. But you can easily change the created keys, see change the key of a configuration node.
-
5. General Information & Statistics
5.1. About
Open the about page by opening the menu and select About.
The about page shows general information about ConfigSeeder® and the current installation.
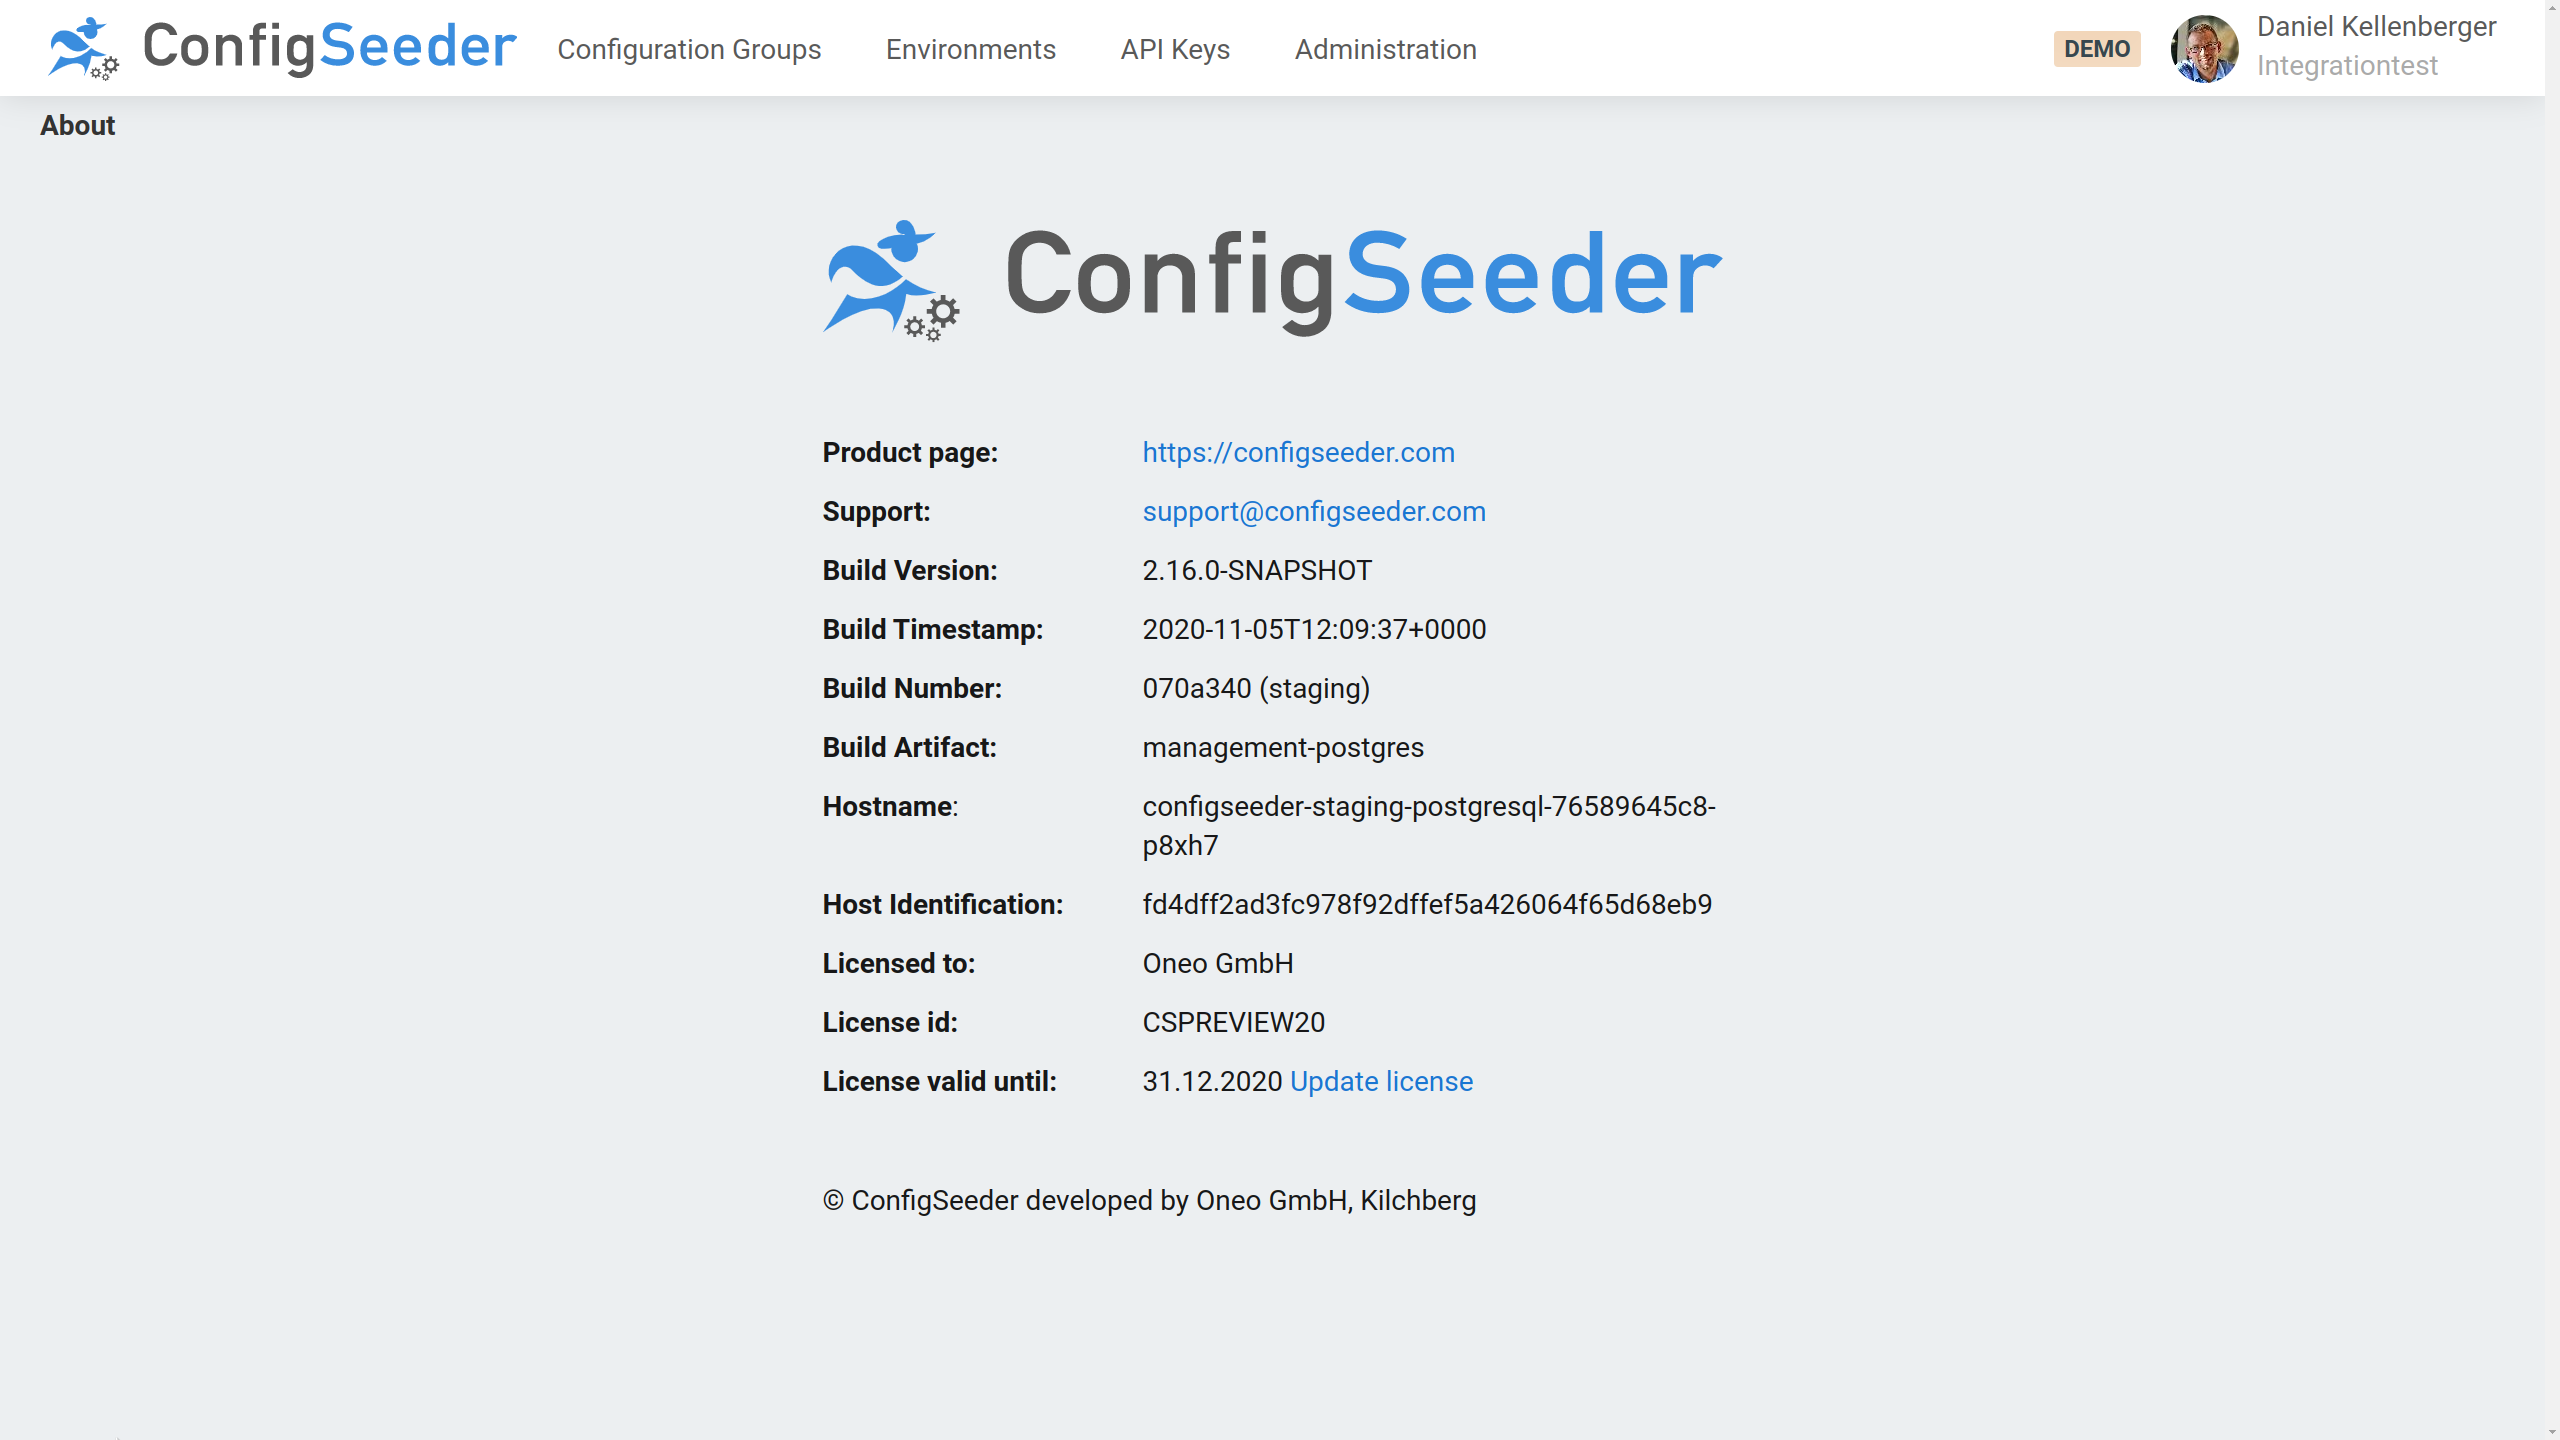
Most important information on the screen:
| Information | Example | Description |
|---|---|---|
Build Version |
|
The Version of ConfigSeeder® Management. |
Build Artifact |
|
The second part of the |
License id |
|
ID of your License, required for creating support tickets. |
License valid until |
|
See how long the current license is valid. |
See get license details for more information about the active license.
5.2. Profile
Open the profile page by opening the menu and select Profile.
The profile page shows information about the active user.
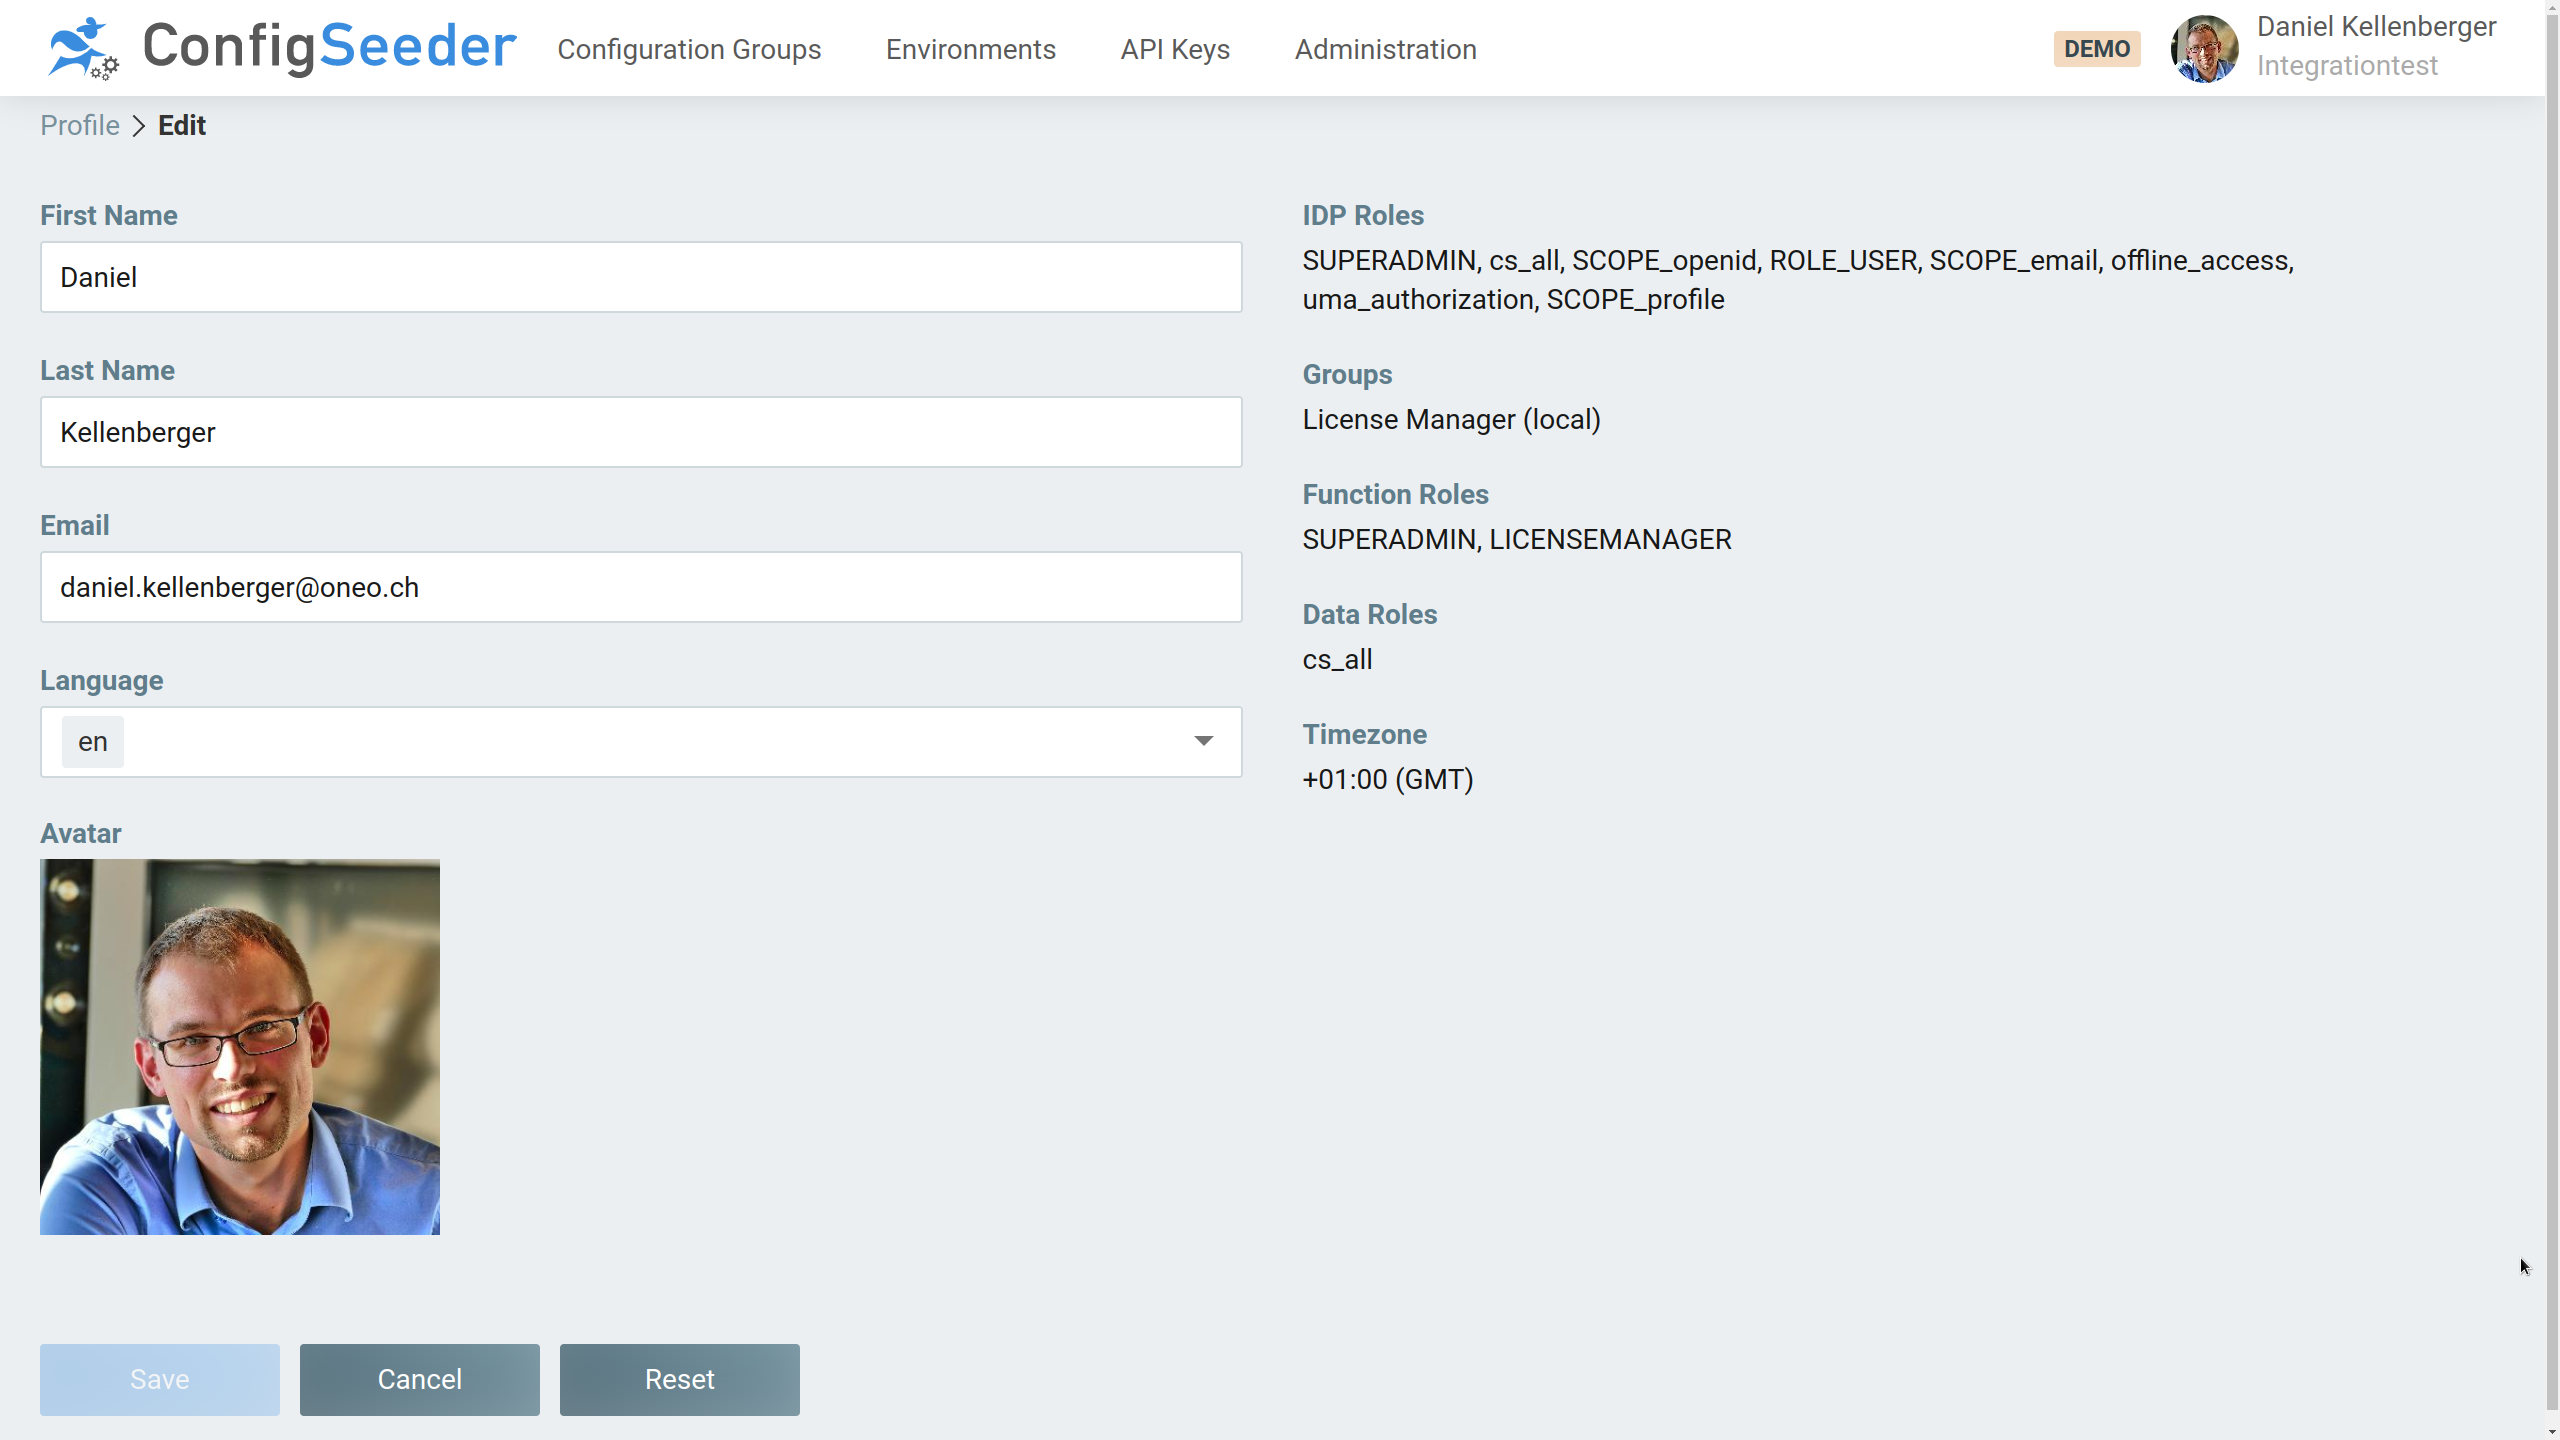
Most important information on the screen:
| Information | Example | Description |
|---|---|---|
IDP Roles |
|
The Roles transported in the SAML or OIDC token |
Groups |
|
Groups locally assigned to the user, see user mangement |
Function Roles |
|
Function Roles granted to the User by the locally assigned groups and roles received through the IDP Roles. |
Data Roles |
|
Data Roles granted to the User by the locally assigned groups and roles received through the IDP Roles. |
See user mangement and function role management for more information about managing the permissions of users as well as details to Function Roles and Data Roles.
5.2.1. Available Actions
-
Change details for the logged in user
-
Change language for the logged in user
-
Upload an avatar
|
ConfigSeeder® receives some user attributes through the security integration. The attributes received through security integration have precedence and will overwrite changes done by the user. |
5.3. Statistics
Open the statistics page by opening the menu and select Statistics.
5.3.1. License Usage Statistics
The license usage statistics shows detailed information about the license utilization of the ConfigSeeder® installation. These statistics should help to assess whether the license is big enough or whether it will soon reach its limits.
-
Information with a single tenant in use
-
Information with multiple tenants in use
Information shown on the screen:
| Information | Description |
|---|---|
Tenants |
Shows the number of licensed and currently used tenants |
Configuration Groups |
Shows the number of licensed and currently used configuration groups |
Environments |
Shows the number of licensed and currently used environments |
API Keys |
Shows the number of licensed and currently used API Keys |
Client |
Shows at what time the last access was done by a client |
OS Connector |
Shows at what time the last access was done by a OS Connector. This is only relevant the license includes the use of the OS Connector |
Kubernetes Connector |
Shows at what time the last access was done by a Kubernetes Connector. This is only relevant the license includes the use of the Kubernetes Connector |
Value Provider |
Shows at what time the last access was done by a Value Provider. This is only relevant the license includes the use of the Value Provider |
5.3.2. Distribution Statistics
The distribution statistics provide information about the type and number of configuration data stored in ConfigSeeder®.
-
Information with a single tenant in use
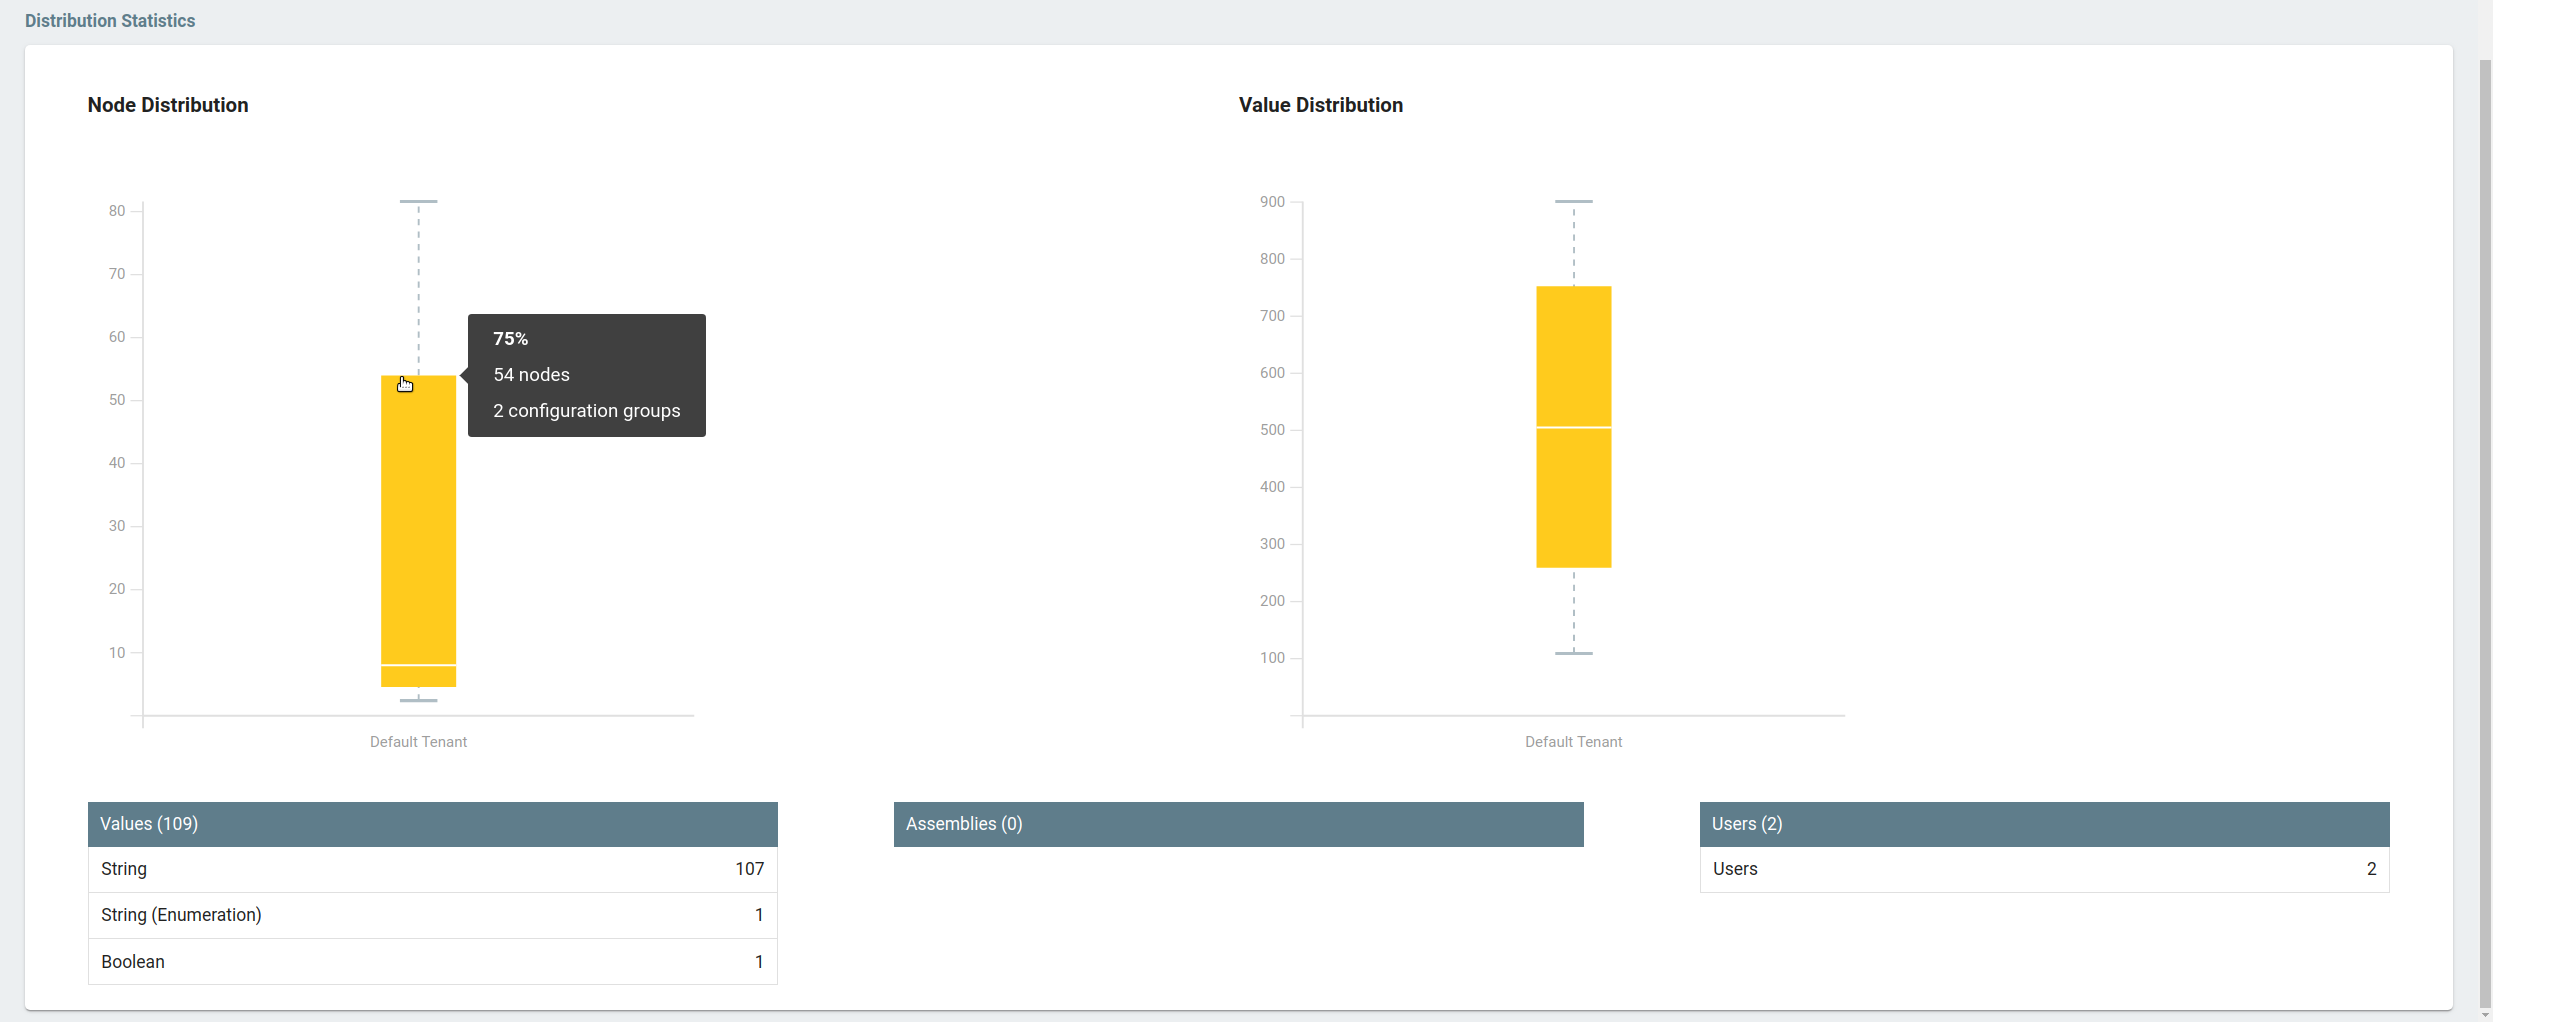
The Node / Value Distribution diagrams will show more detailed information if you hover with the mousepointer over the limits.
-
Information with multiple tenants in use
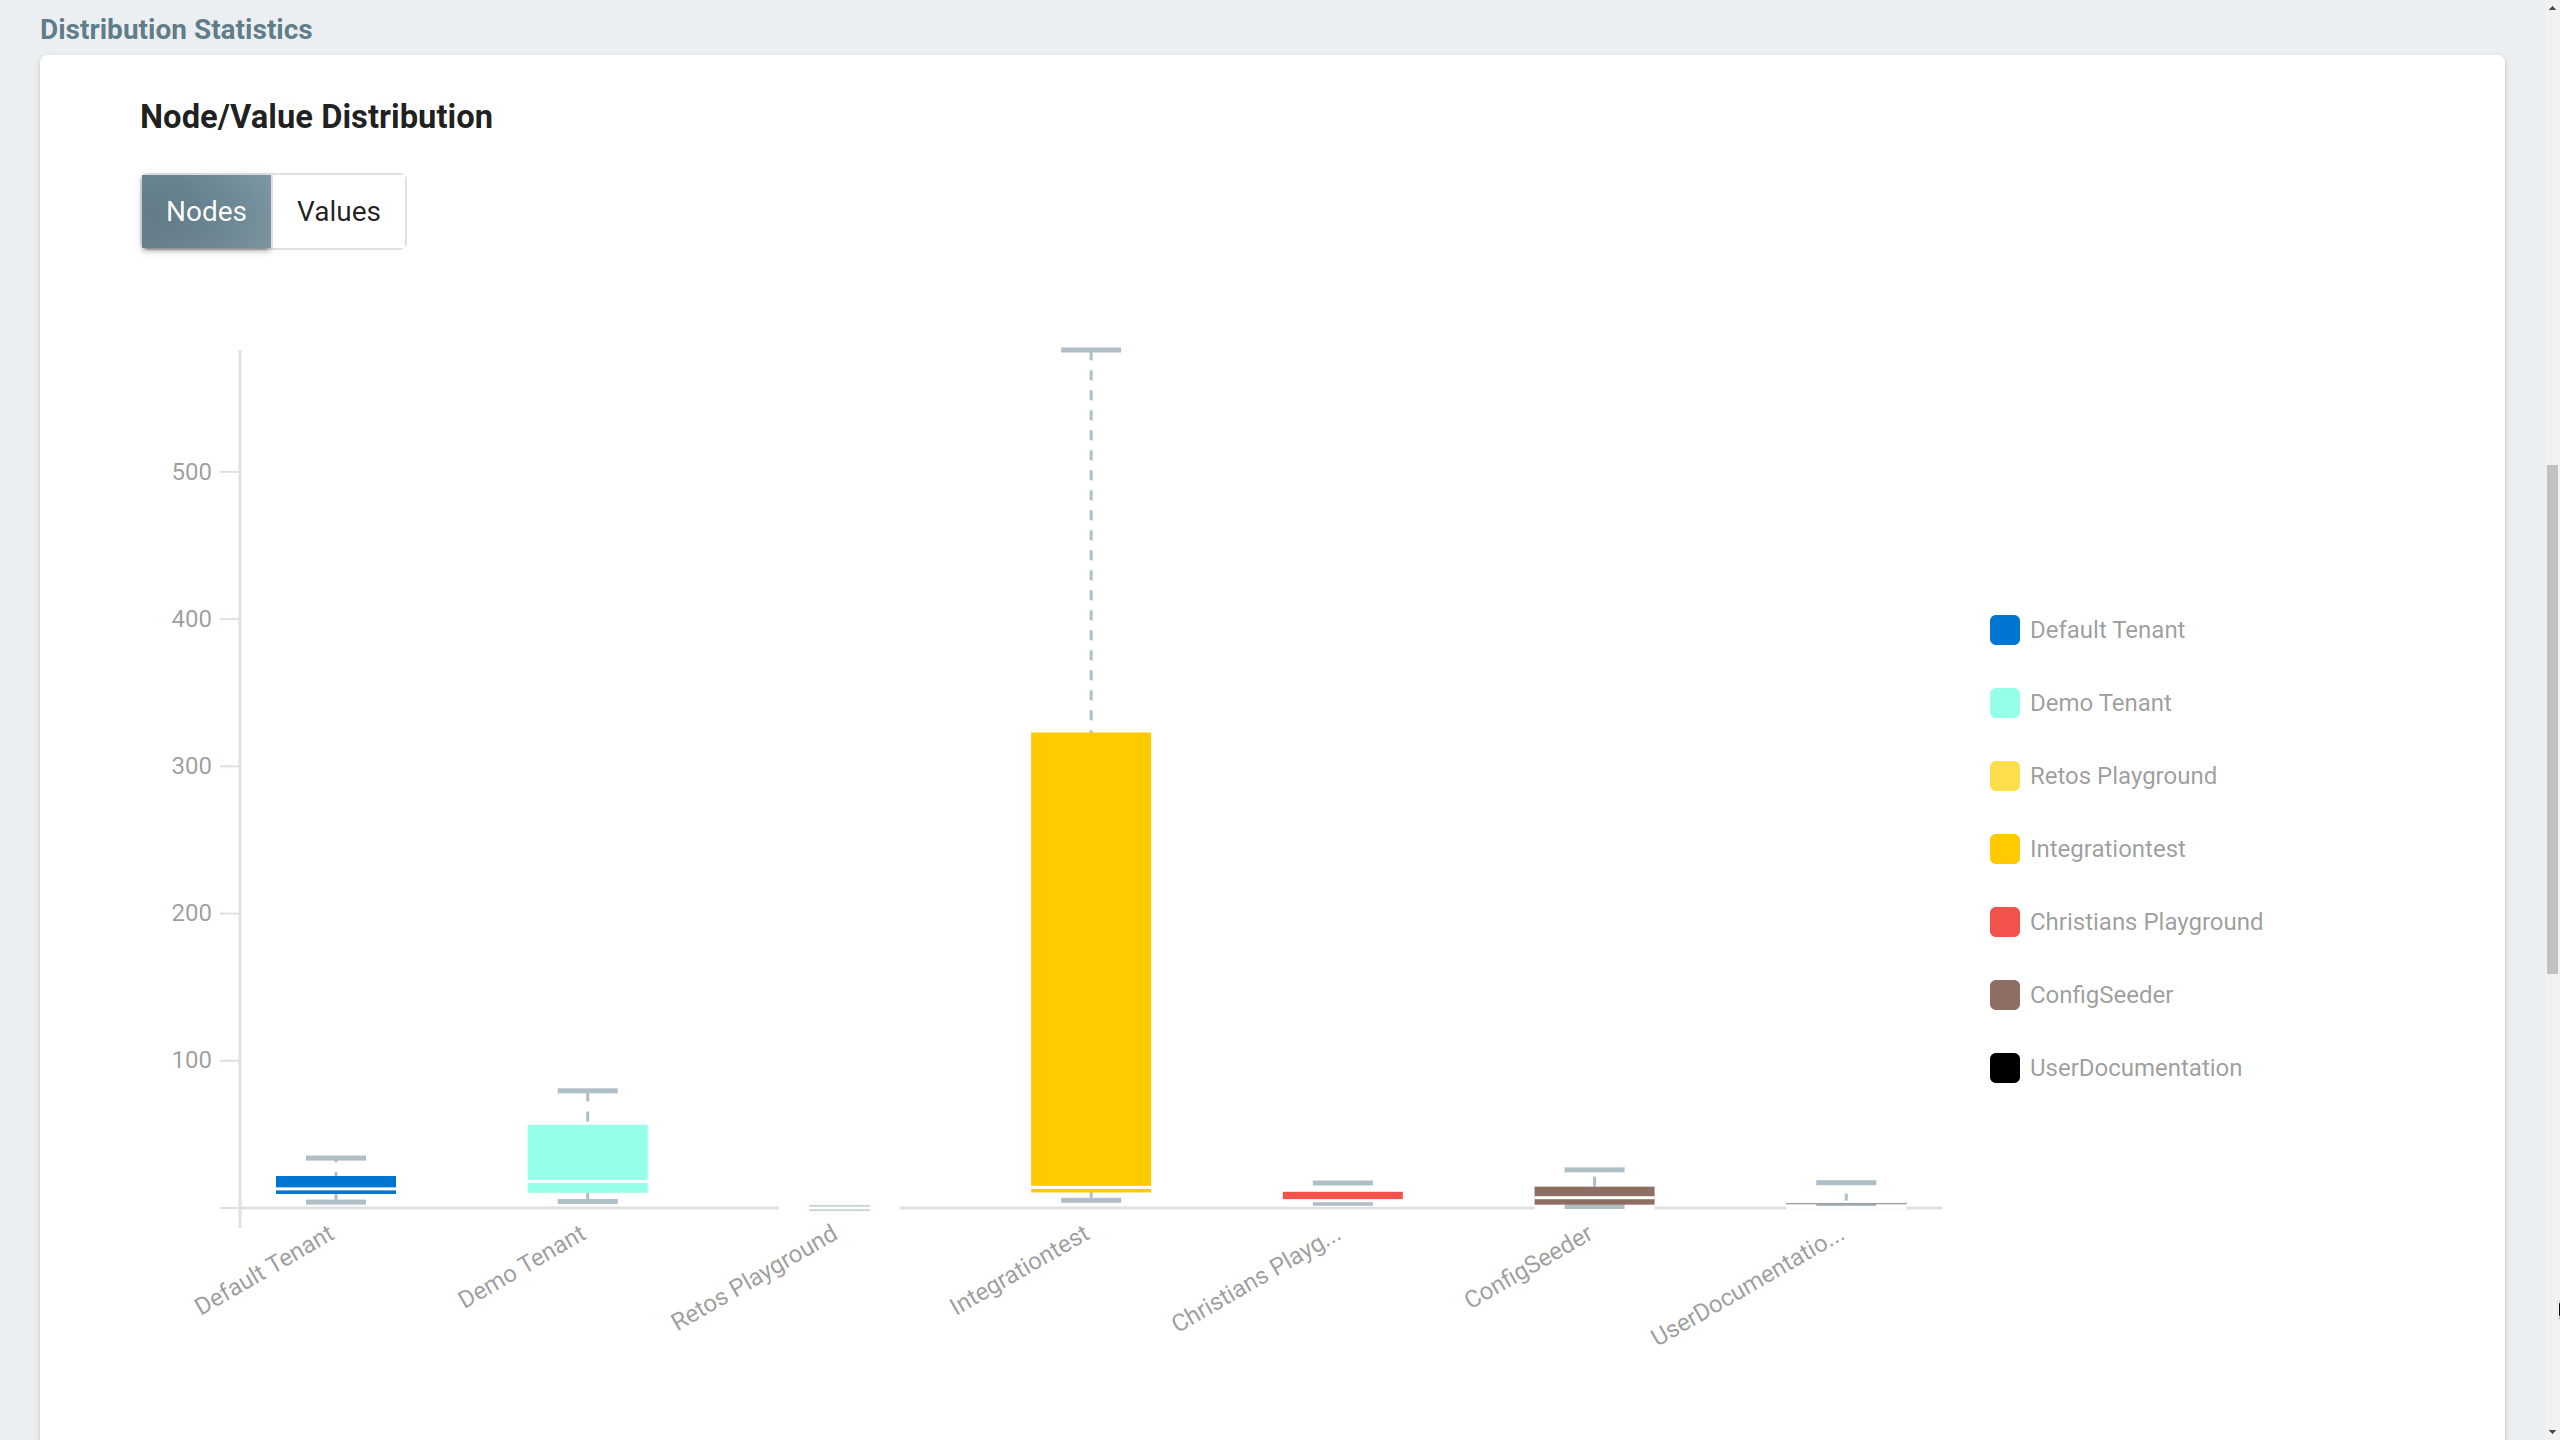
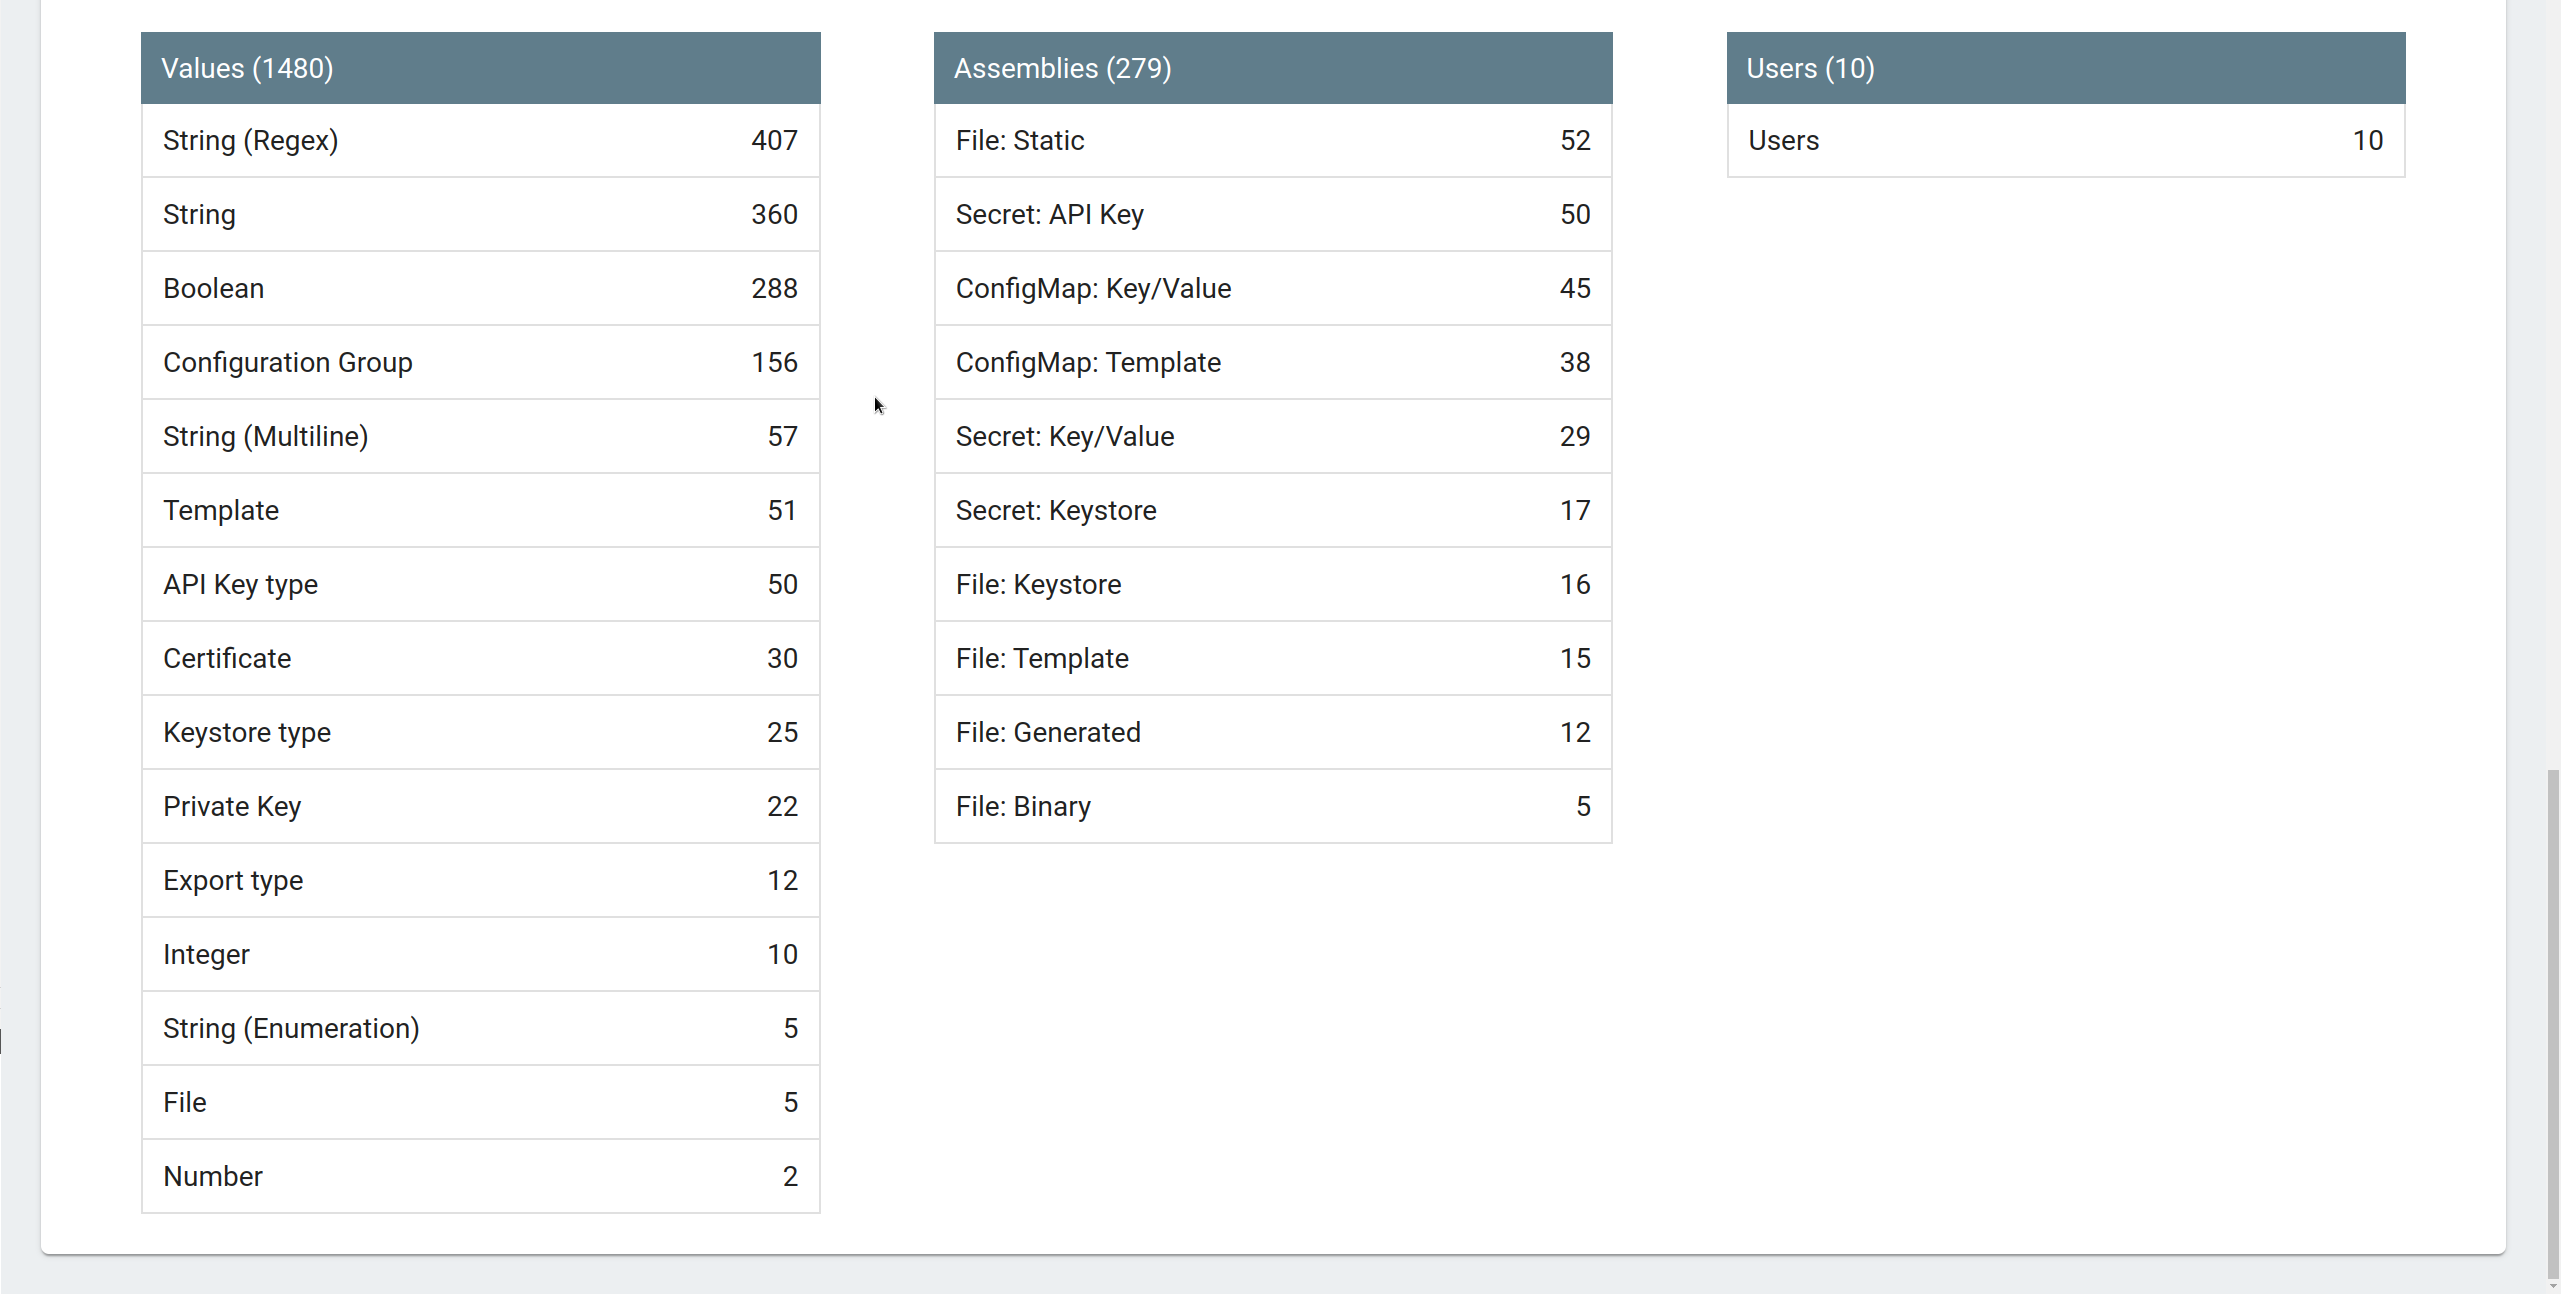
Information shown on the screen:
| Information | Description |
|---|---|
Node Distribution |
Shows how many configuration nodes are stored in the configuration groups |
Value Distribution |
Shows how many configuration values are stored in the configuration groups |
Values |
Shows how many values of what type are stored |
Assemblies |
Shows how many assemblies of what type are stored. This can be relevant if one or both of the connectors are in use. |
Users |
Shows how many users are known to ConfigSeeder® |
5.3.3. Client Connection Statistics
The Client Access Statistics shows which kind of clients have accessed. Admins can easily trace down accesses to the values. It also helps to check if there are still outdated clients accessing ConfigSeeder®.
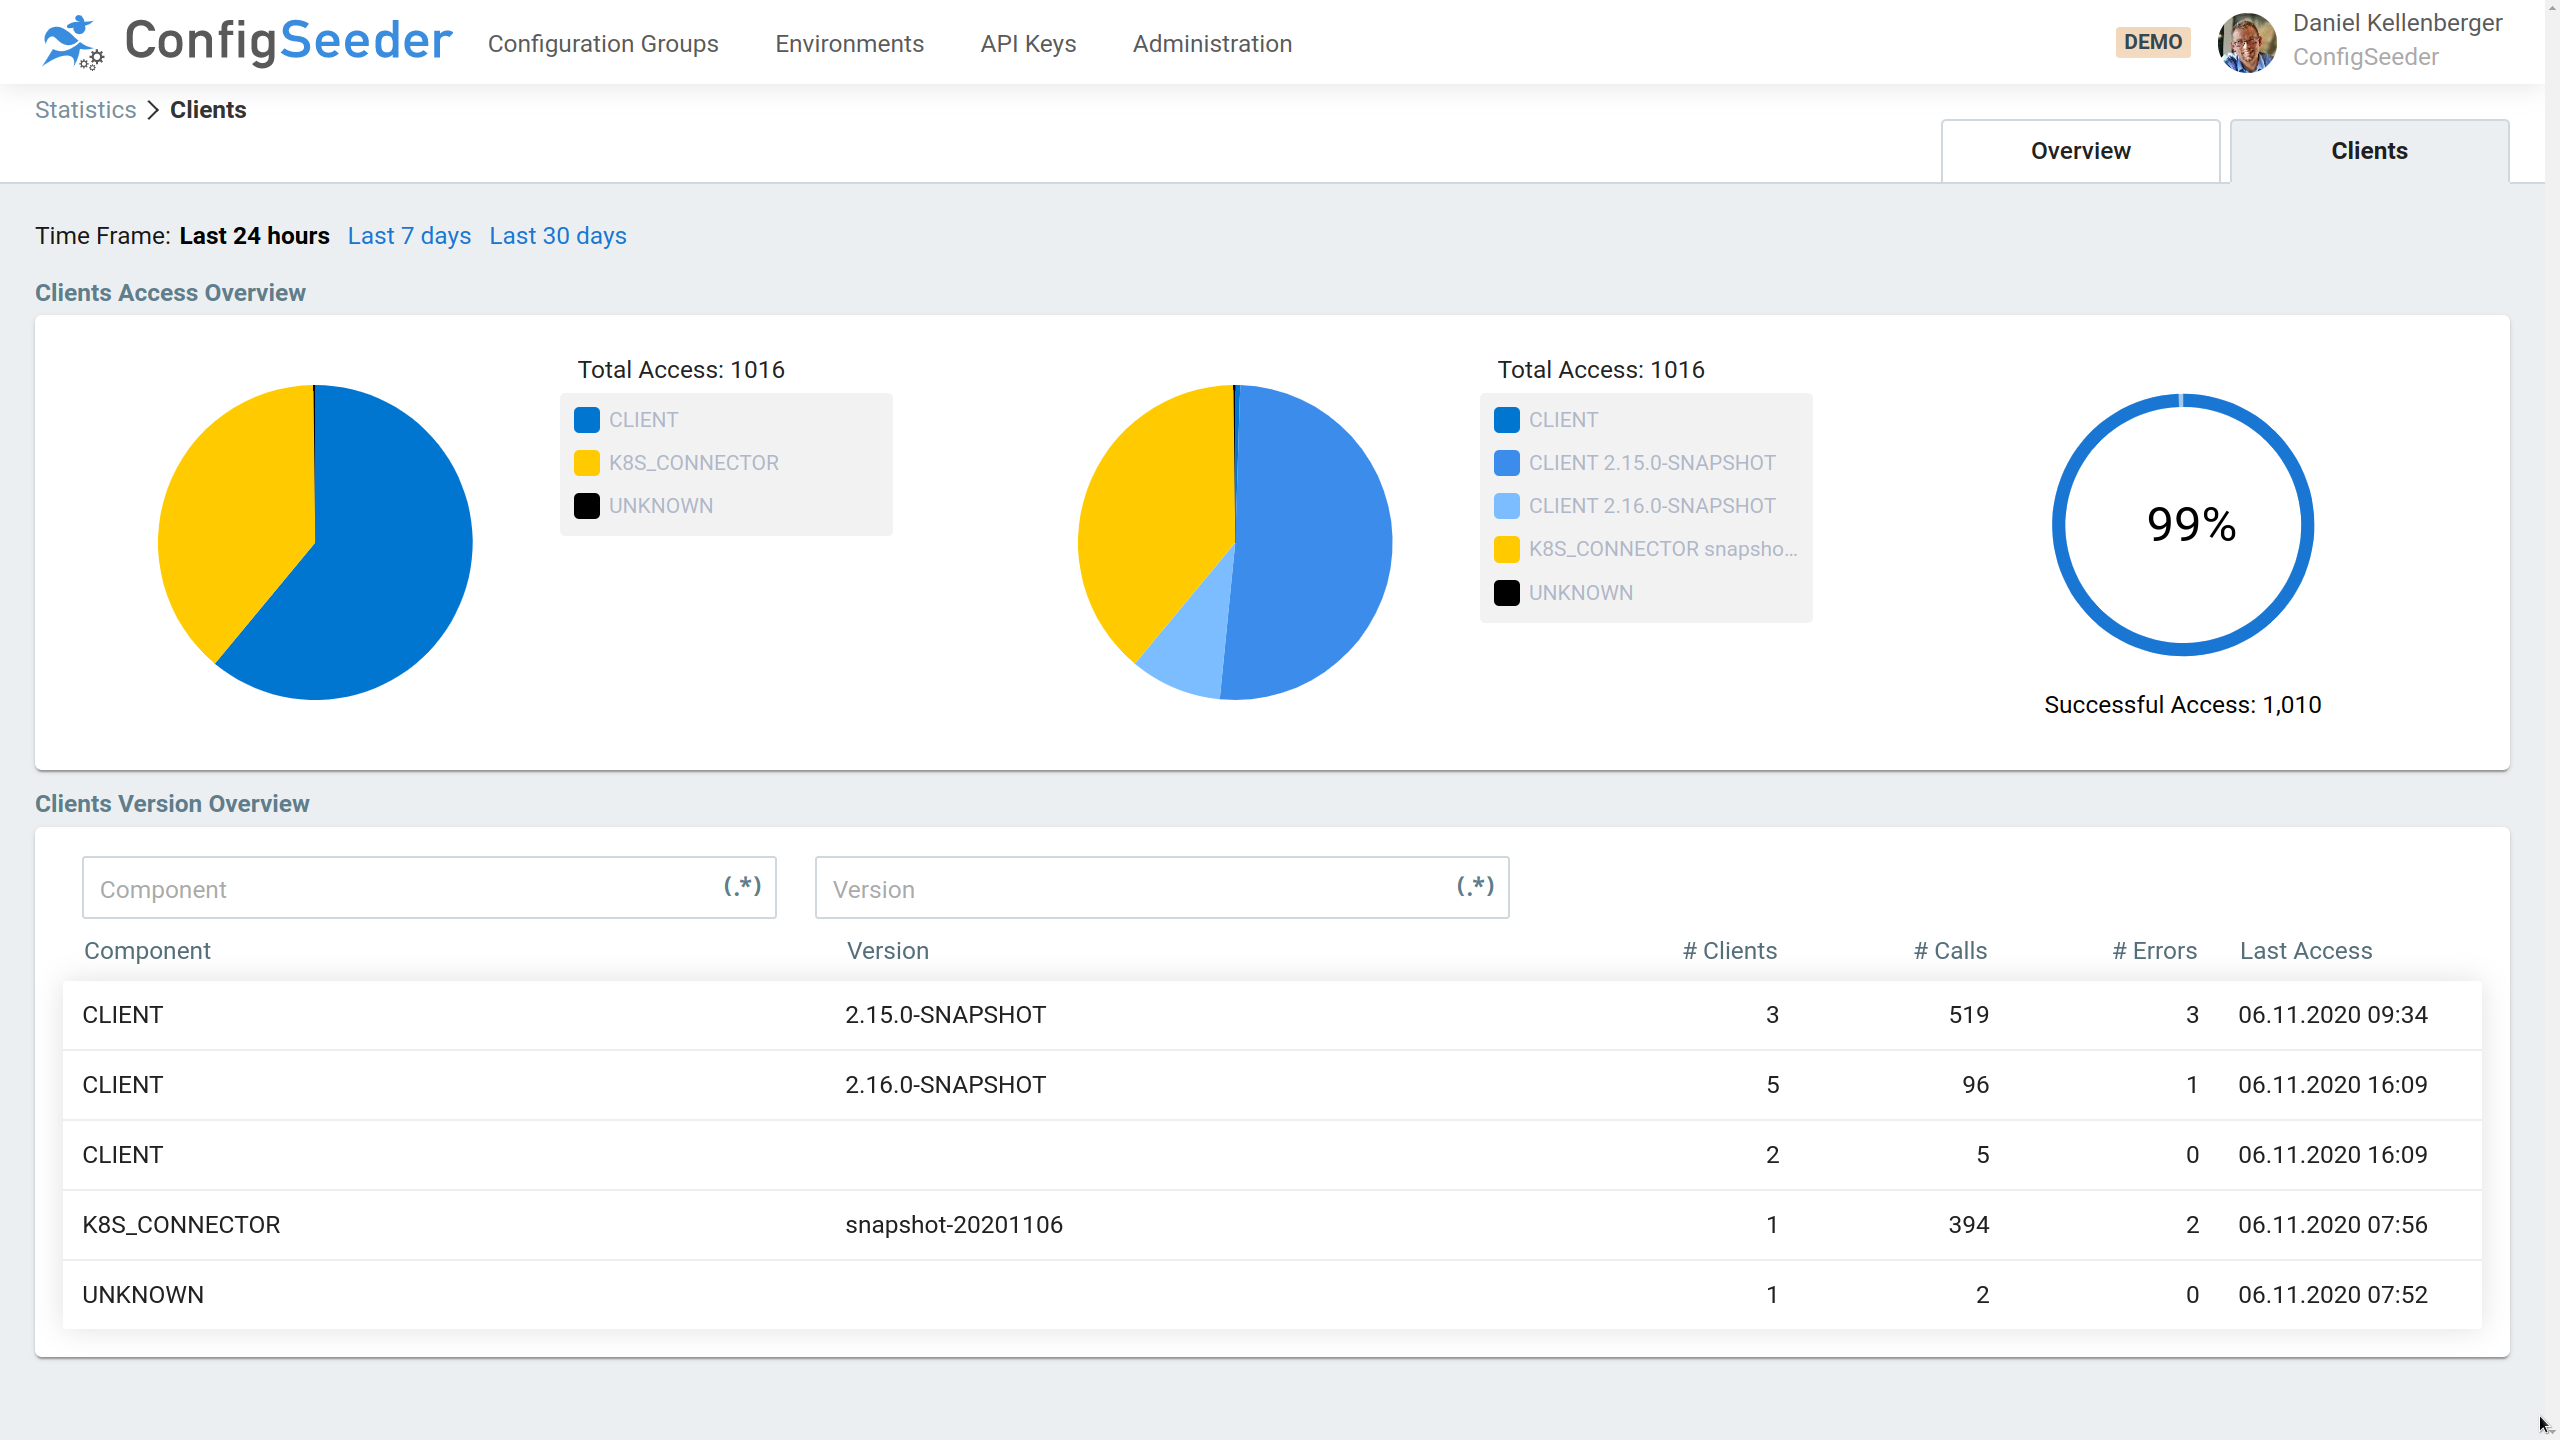
The first pie shows all access separated by client type. The second pie shows the same statistic, but split up by client version.
To get even more details about the clients, click on the entry in the table and get all client instances separated by hostname and identification. By default, clients are generating a random unique Id. Please check the manuals of the clients how you can overwrite the identification for each of the client.
Appendix A: Organize configuration data
A.1. Description
ConfigSeeder® doesn’t define how configuration data must be organized. Like described in the concept part of this document, ConfigSeeder® offers several concepts that can help you to organize your data. It is up to you how these concept are used.
In this section we offer some advice about how your configuration data could be structured
A.2. Recommendations
-
Only configuration data of one application or service should be managed in a configuration group.
If you configure different aspects of an applications in ConfigSeeder® (infrastructure for an application, technical aspects of the application, configuration of business rules), consider to split up the configuration into multiple configuration groups.
-
If configuration properties must be shared between different applications, consider to introduce on or more 'shared' configuration groups that will be used to configure all your applications.
The configuration data retrieved by your application can be composed from data stored in multiple configuation groups. See Retrieve configuration data from multiple configuration groups
-
Don’t create configuration groups for environment specific aspects of your application. Just create the environments that exist and mark the configuration values with the correct environment.
Clearly separate between configuration groups and environment. Create the environments you have, create a configuration group per application or service, mark the configuration values with the correct environment.
A.3. Retrieve configuration data from multiple configuration groups
If your applications share configuration properties like url’s used for calling backend services, you should consider to make these shared properties available to all your applications with a separate configuration group.
In the following example, there will be two configuration groups:
-
Configuration Group
Shared, holding some urls and a default log level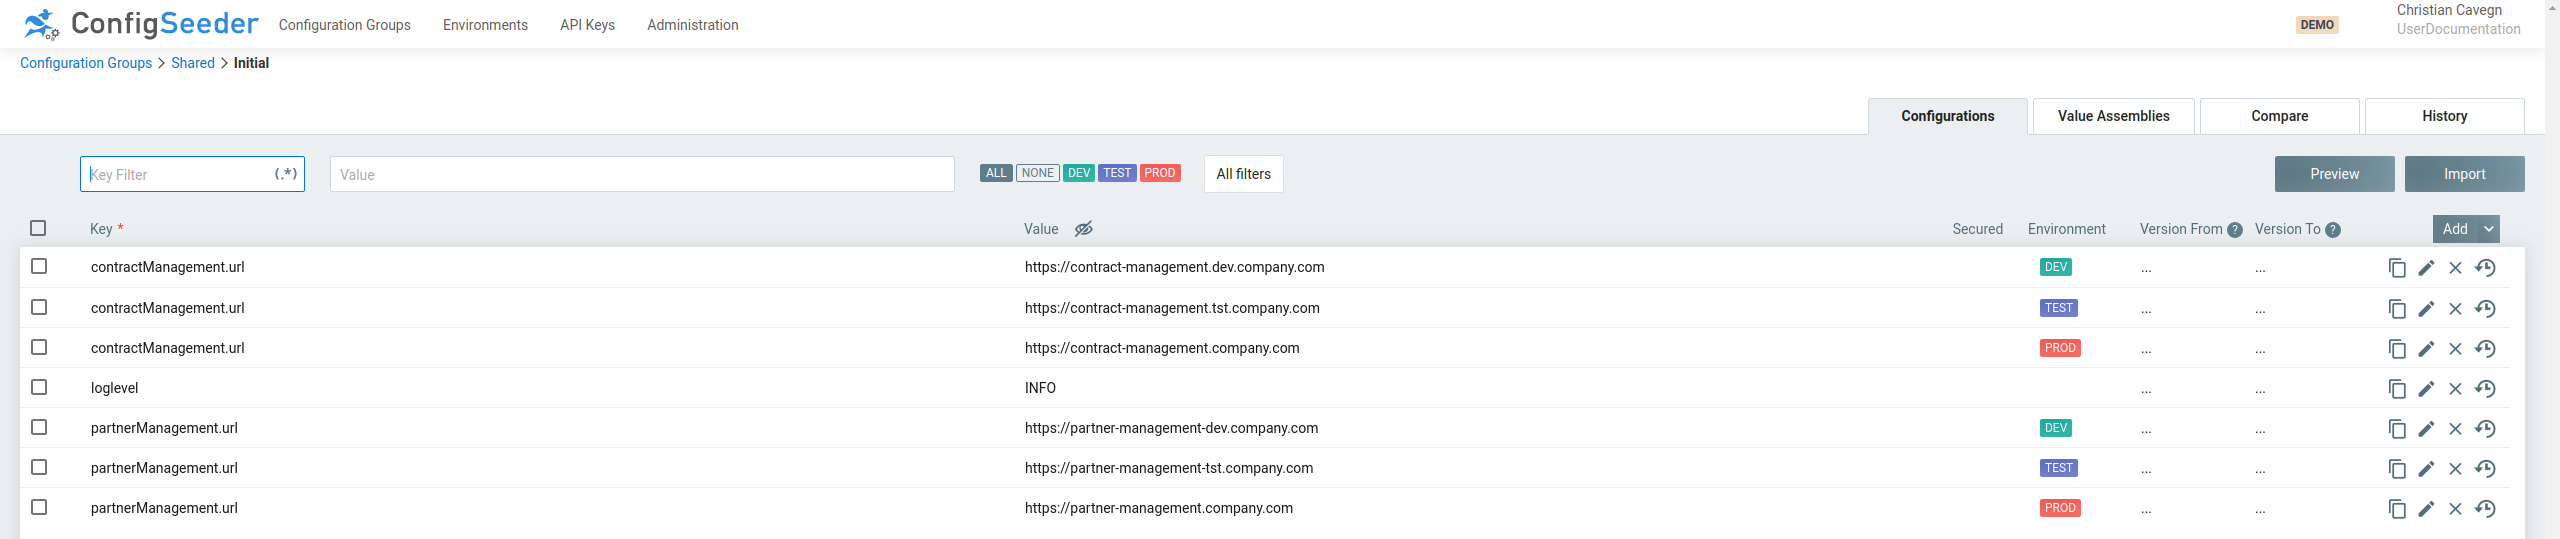
-
Configuration Group
Application, holding application specific properties and overriding some of the shared properties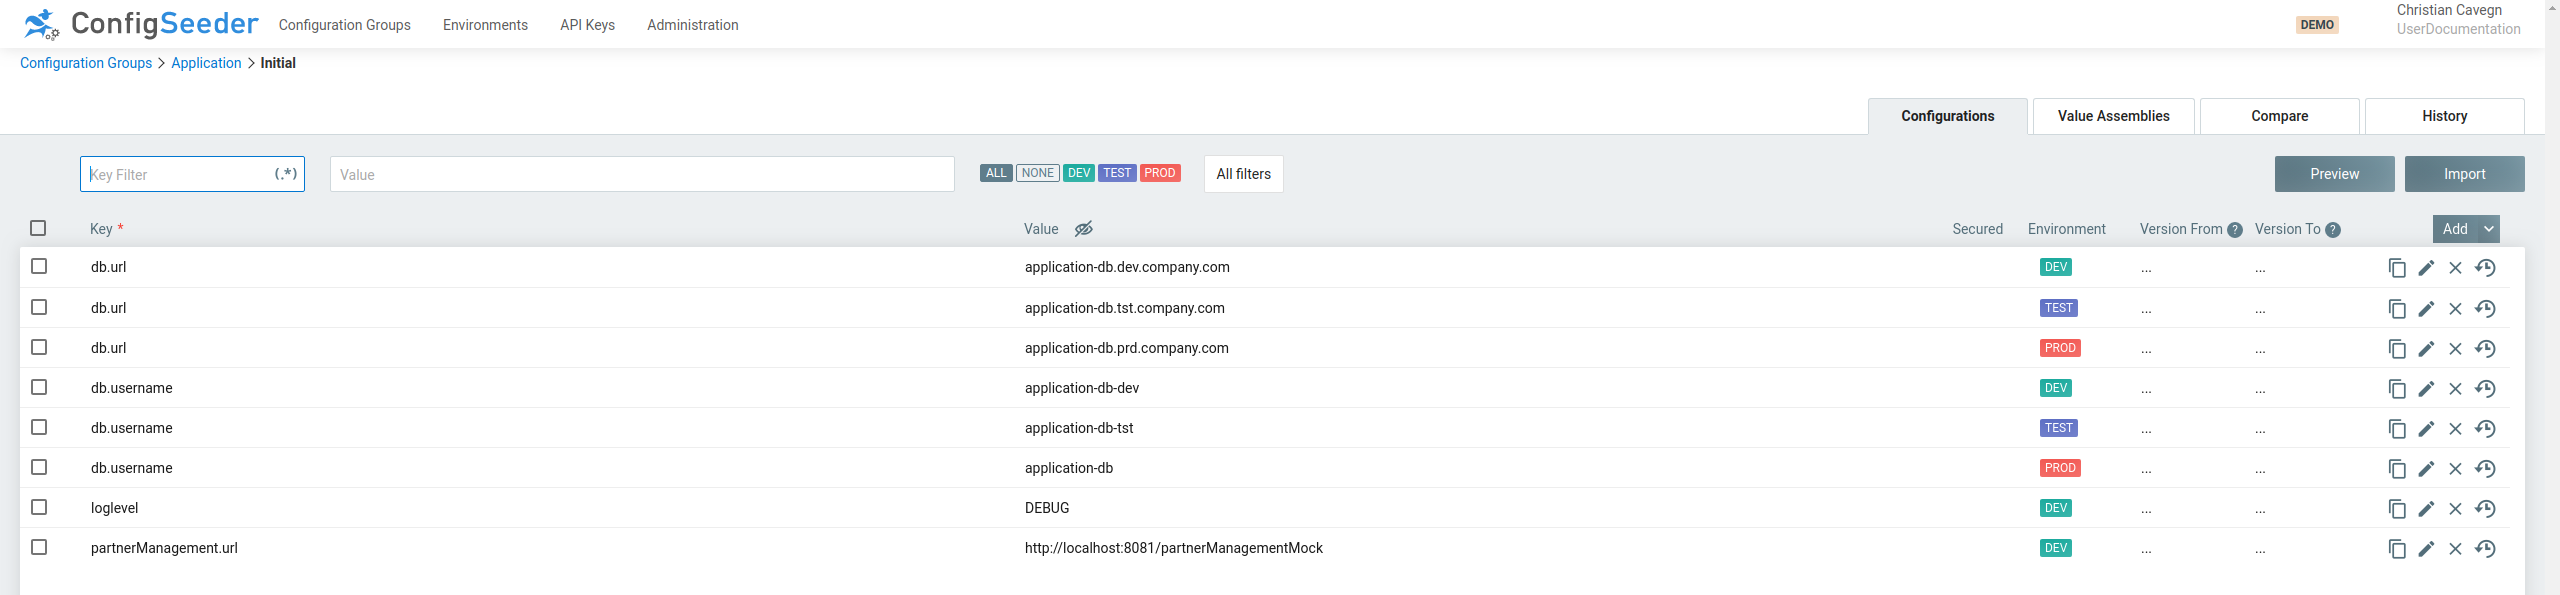
For the environment
DEVtwo values are overwritten:-
The log level is set to
DEBUG -
The url of the partnermanagement is set to a local url
-
To get the whole application configuration for Application, the configuration values from both configuration groups
must be retrieved. This can be tested with the preview.
The order of the entered configuration groups defines their priority.
Correct example - Application has higher priority than Shared:
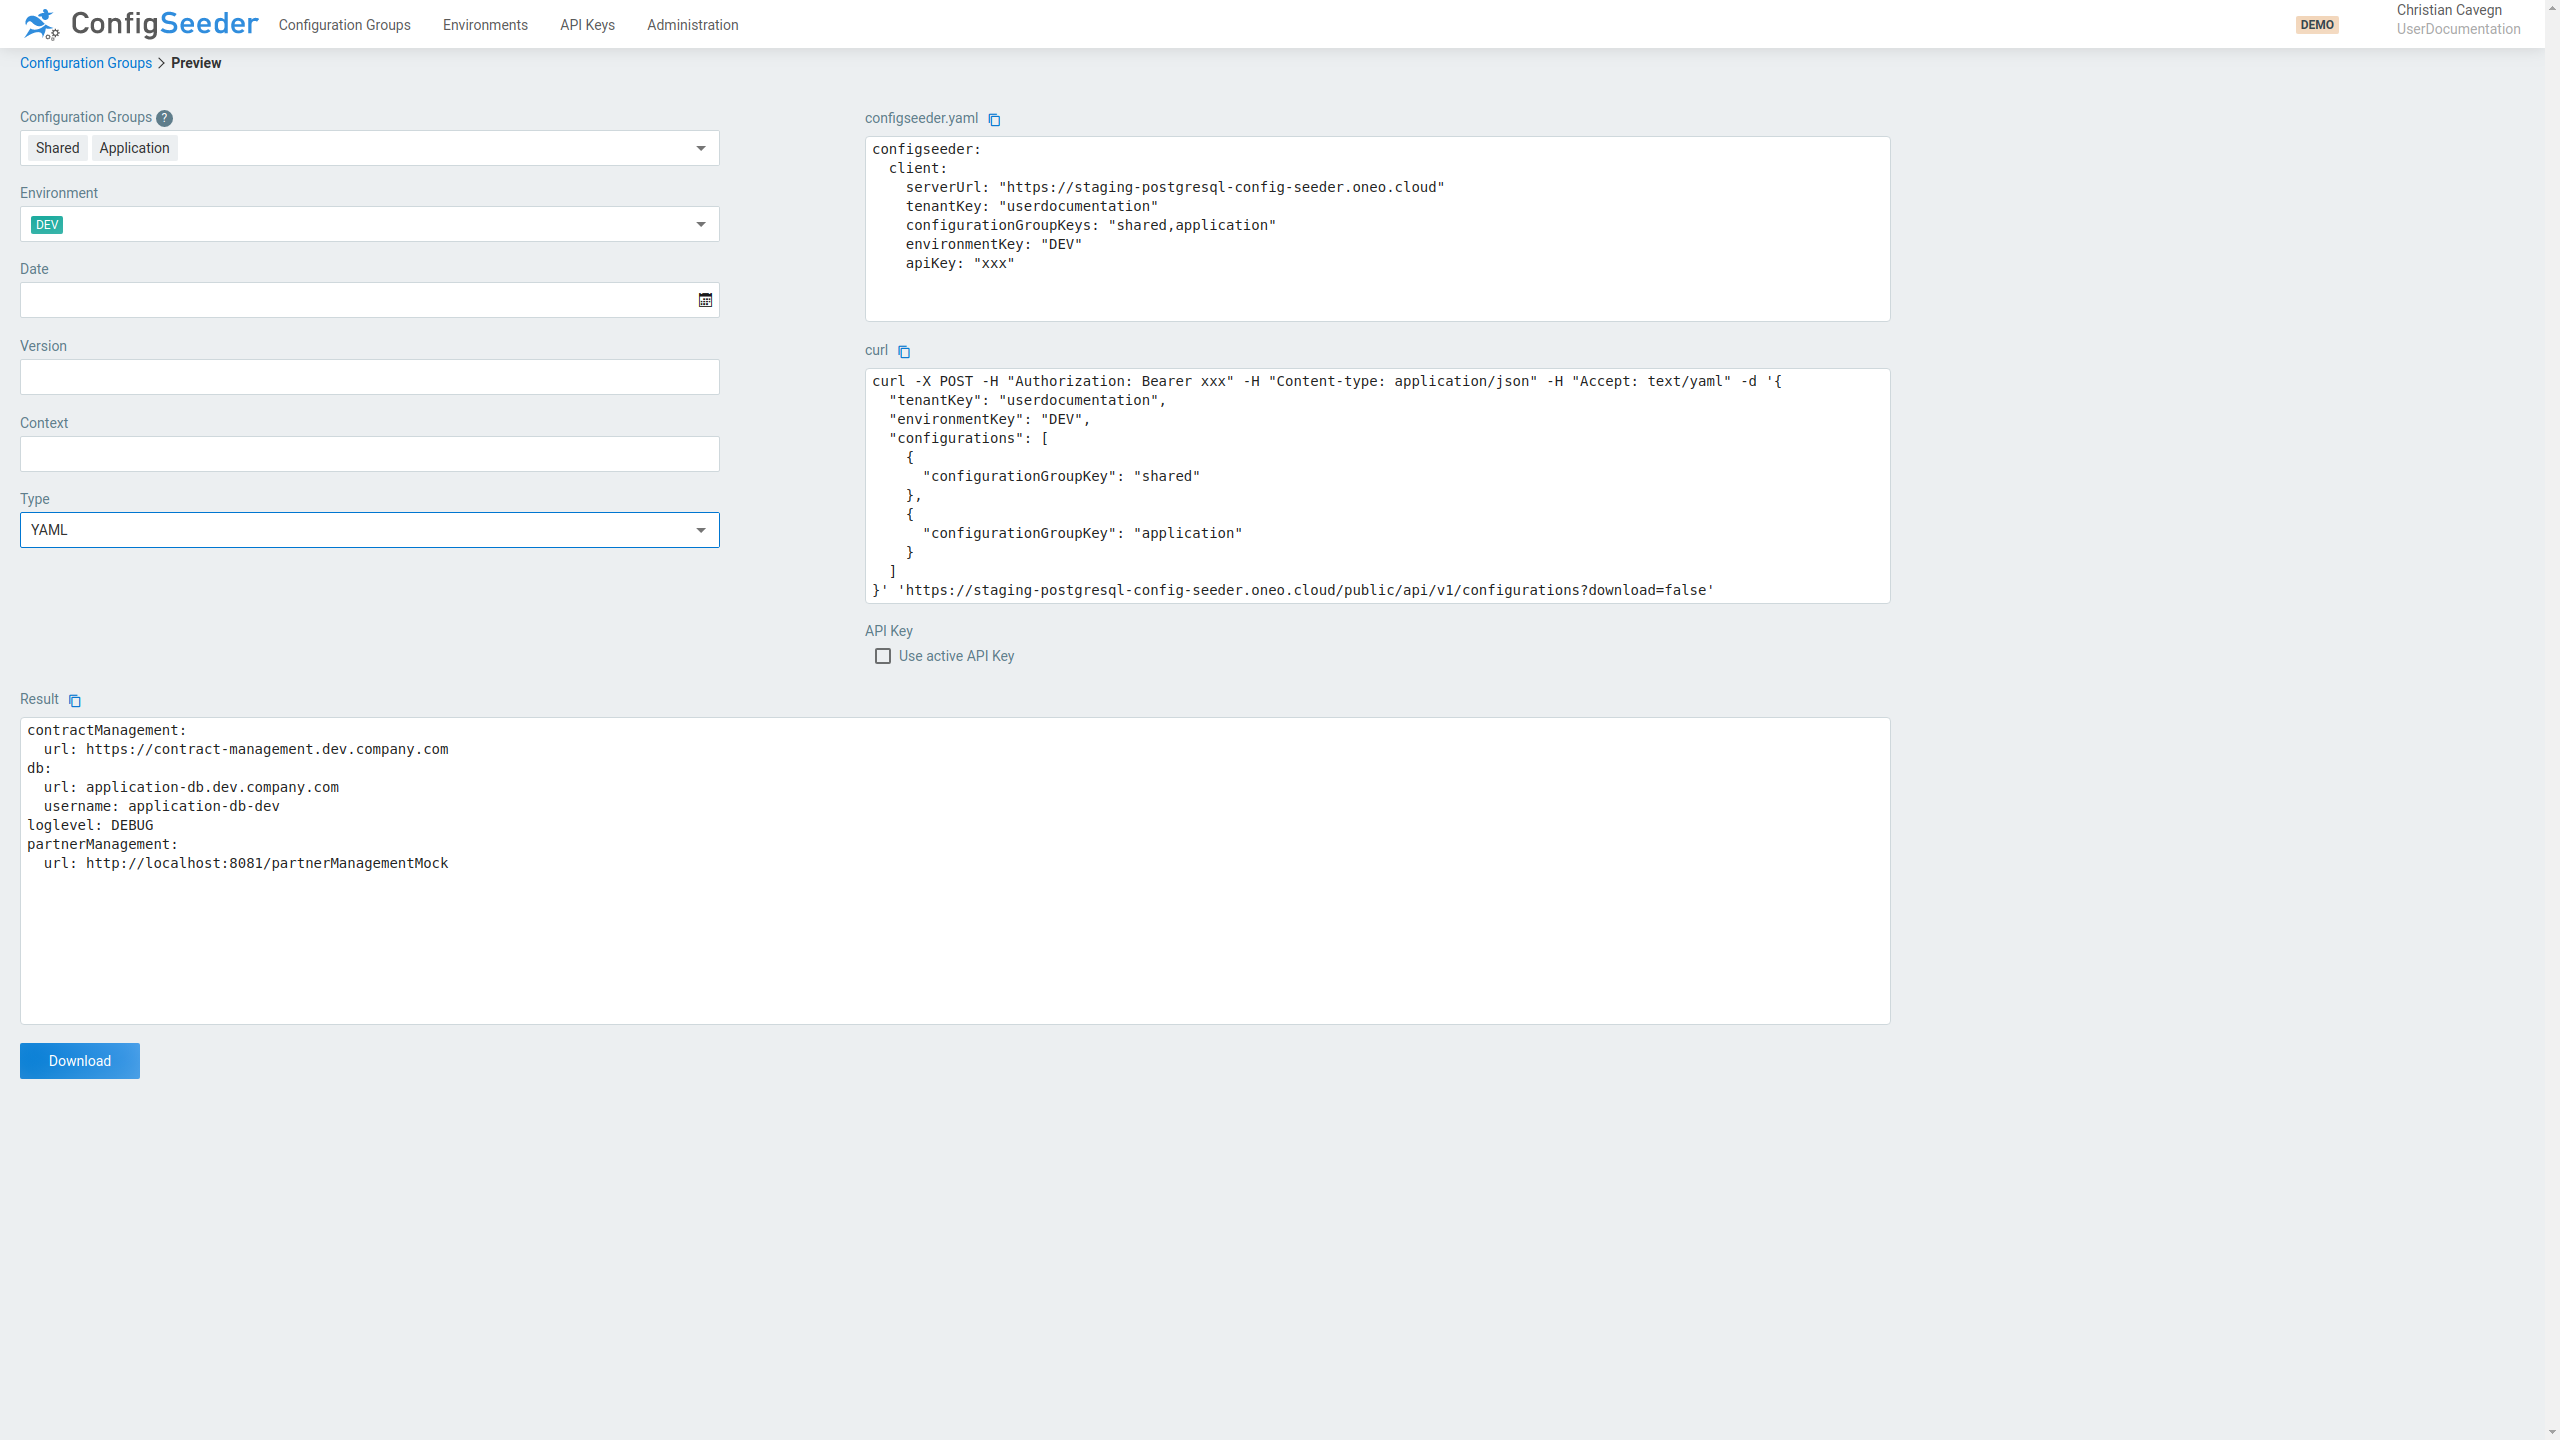
As you can see,
-
the log level is overwritten with
DEBUG -
the url of the partner system is overwritten with the local url
Wrong example - Shared has higher priority than Application:

As you can see,
-
the log level is still overwritten with
DEBUG -
the url of the partner system is still the default value defined in
Shared
|
The order of the configuration groups define their priority. The configuration group entered first has the lowest priority, the configuration group entered last has the highest priority. |
|
A configuration value from a configuration group with lower priority will override a configuration value from a configuration group with higher priority if the filter criteria are more precise. Example:
|