1. Introduction
ConfigSeeder is configuration management tool, not only capable of managing configuration values at a central place, but also manage their validity based on environment, application version, dates or contexts.
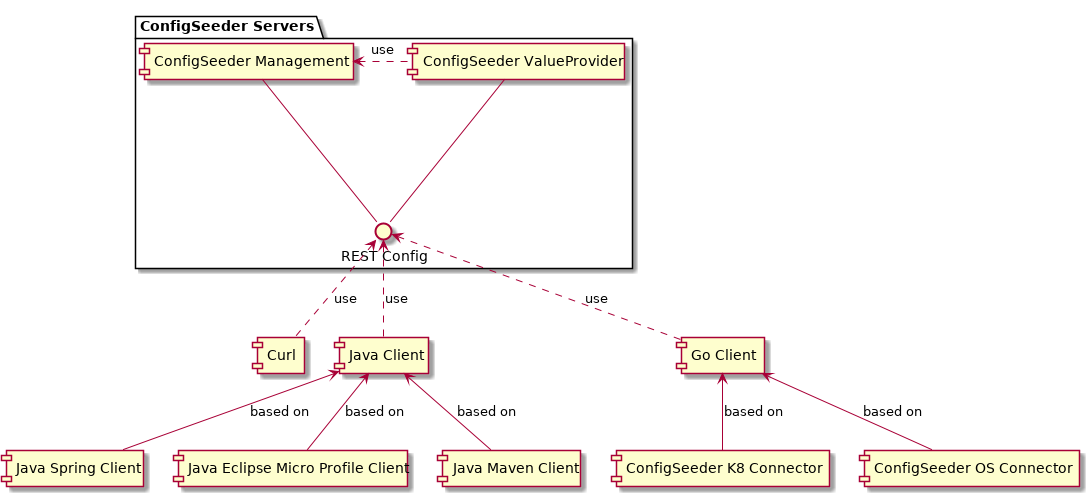
ConfigSeeder consists of different components:
| Name | Purpose |
|---|---|
ConfigSeeder Management |
Core component responsible to manage all configurations and provide configuration value retrieve services |
ConfigSeeder Value Provider |
High availability configuration value replication |
ConfigSeeder Client |
Clients for different languages and technologies.
|
ConfigSeeder Kubernetes Connector |
Component distributing API keys, secrets and config maps from ConfigSeeder (under development) |
ConfigSeeder OS Connector |
Component distributing files and configurations to different hosts. Can run under linux or windows and can optionally run as a service. (under development) |
2. Quickstart
2.1. Start ConfigSeeder Management
-
Download ConfigSeeder H2 Instance from https://download.configseeder.com/
-
Start instance with
java -jar configseeder-server-management-app-h2-<version>.jar, or if you want to have persistence with H2, pass the database folder as follow:java -jar configseeder-server-management-app-h2-<version>.jar --spring.datasource.url=jdbc:h2:file:~/config-server.db. (For further options and configuration consult chapter ConfigSeeder Management Configuration) -
Open your Browser on http://localhost:8080/
-
For providing security, a OIDC capable identity server is required. By default the delivered H2 instance is connected to a Keycloak Instance from Oneo GmbH.
Login with user tenantadmin and password tenantadmin
-
Create your first environments by clicking on the Environment link in the navigation bar. Then click on Create and fill in the form your new environment. (e.g.
DEV,TESTandPROD). The most relevant value is theKeyfield, which will be used in future configurations.It’s a good practice to have no security restriction on any environment beside production. Leave everything on
INHERITEDfor now.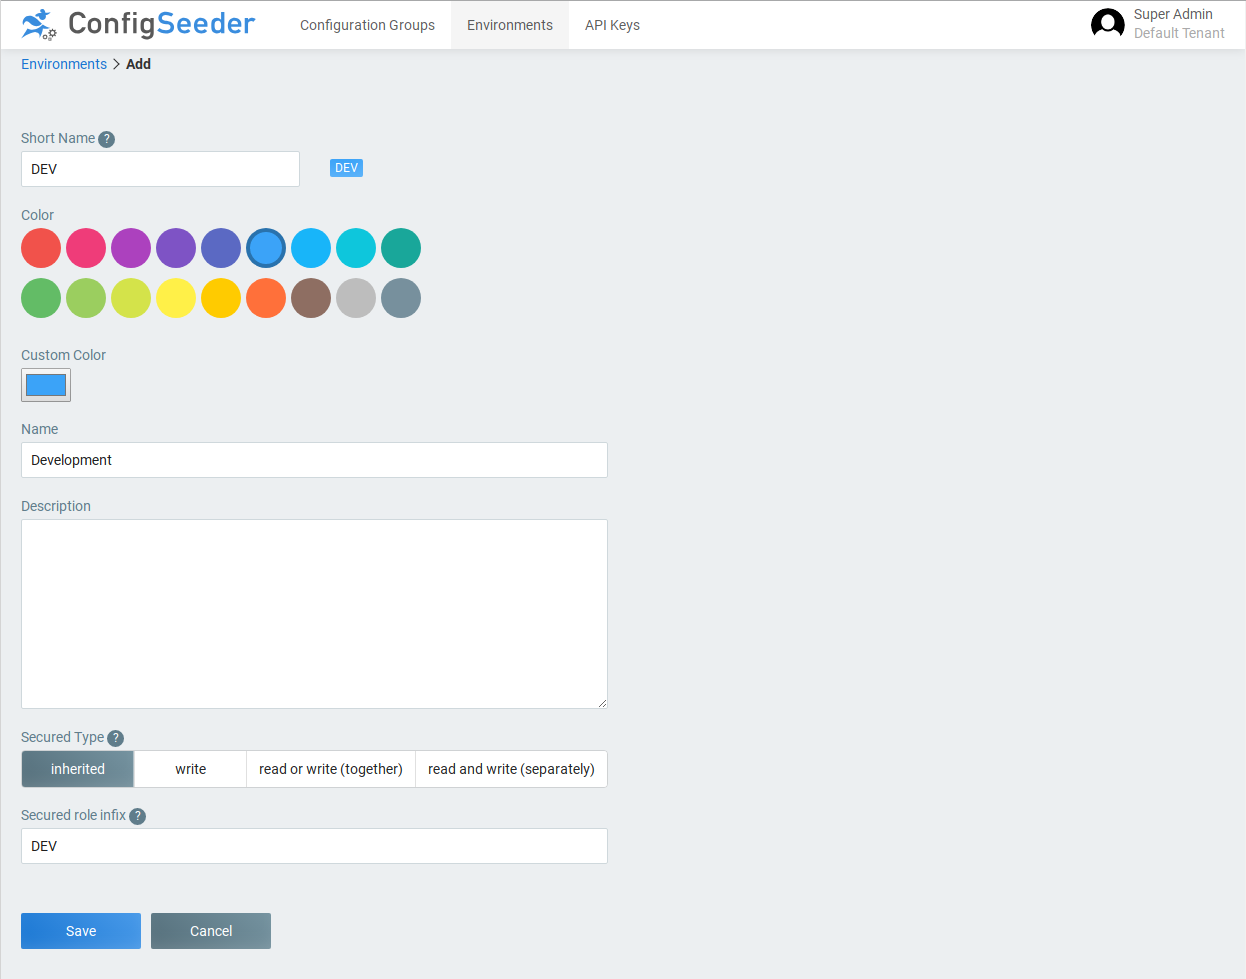
-
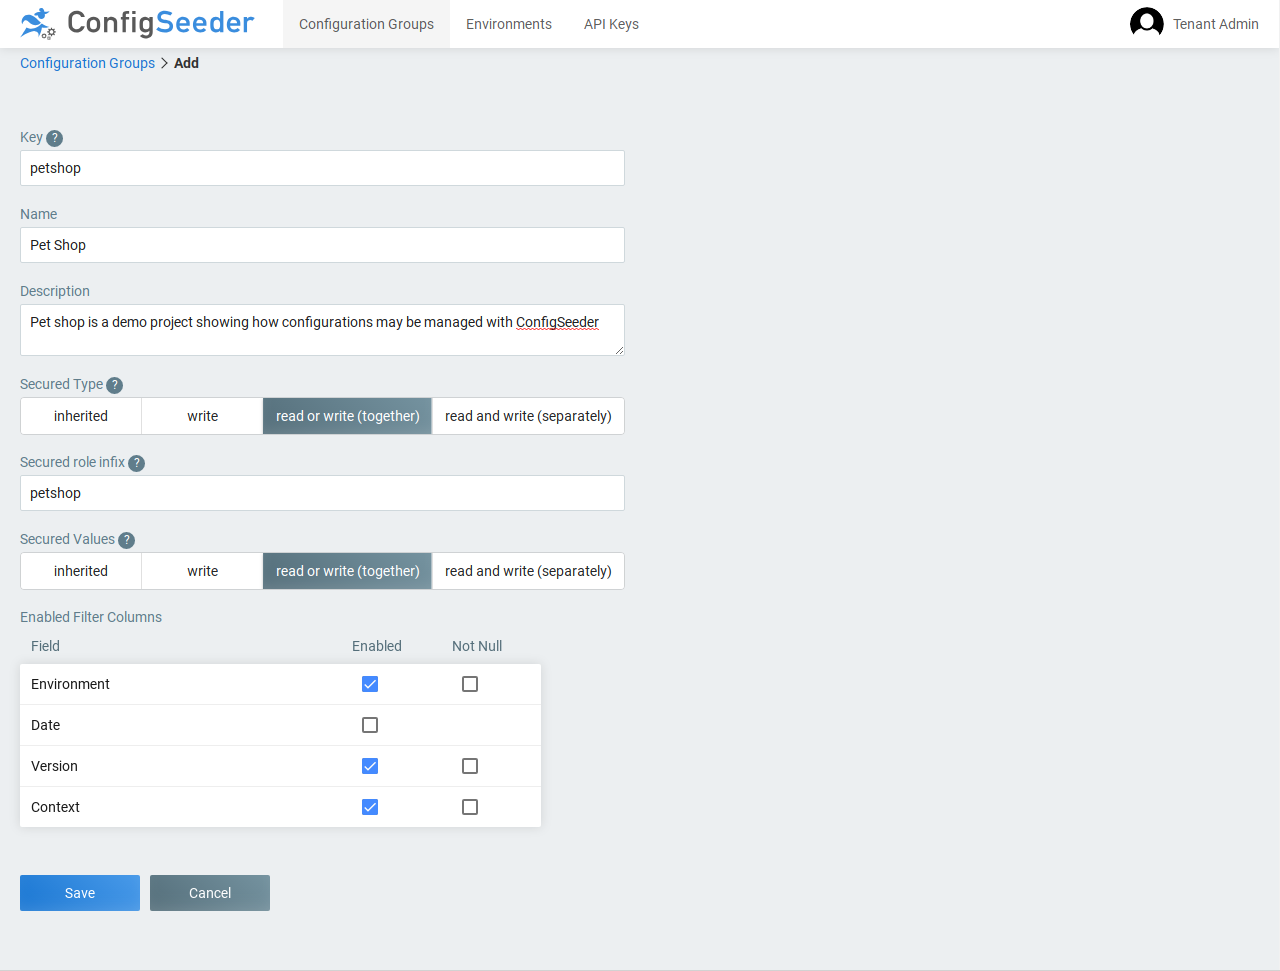
As next create a configuration group. Navigate to Configuration Groups in the navigation bar and as next click on Create. In the form fill in the fields, where the most important part is again the Key field. We encourage to select either version or date for manage different configurations and reduce complexity. In this example, Date is disabled.
-
Now you are ready to add new configurations. Click on your newly created Configuration Group and add your configuration. Depending on the current license different value types are supported. Create a new configuration and fill in the fields as desired. If different values for the same configuration key need to be created, click on the duplicate icon.
-
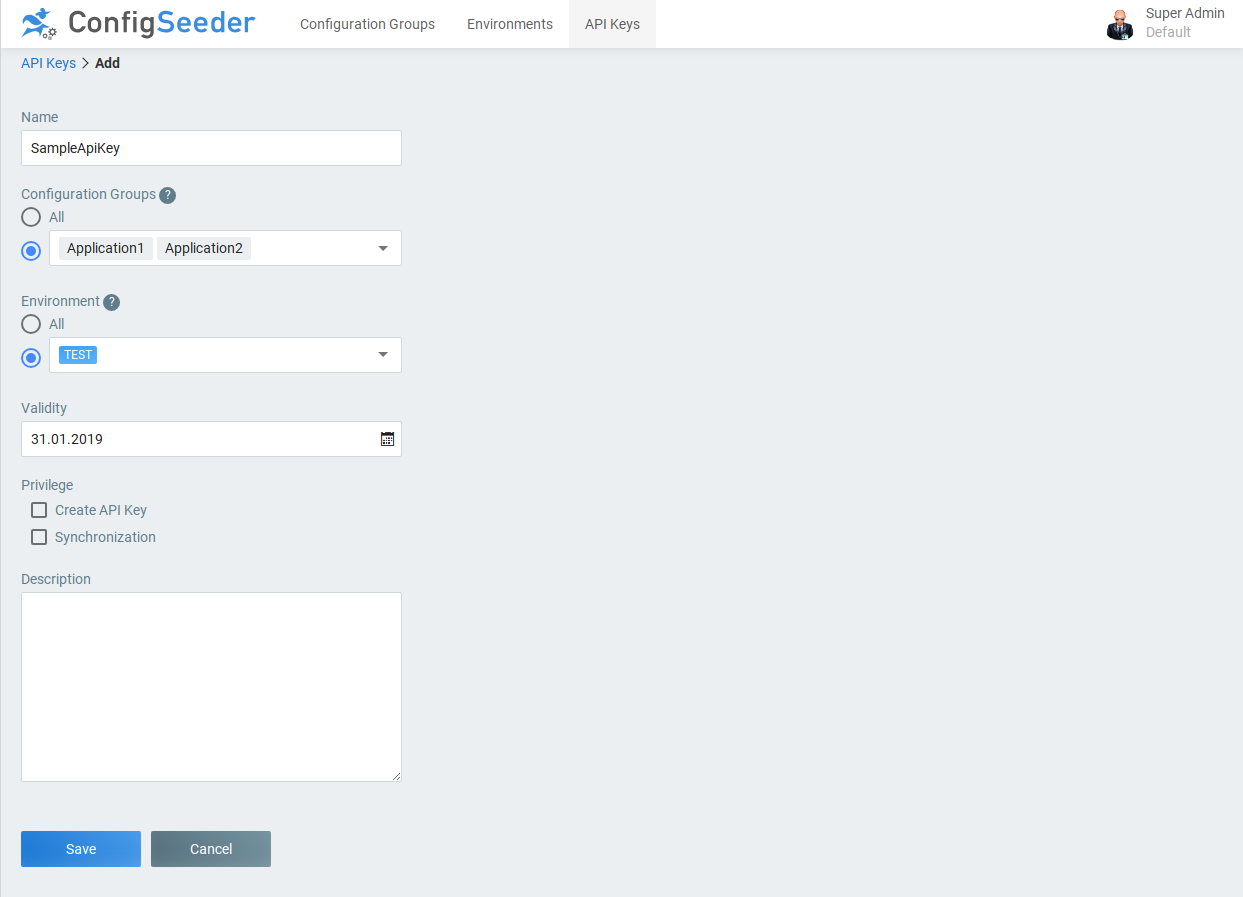
In order to fetch values for your applications, you first need to create an API Key, which will give an application access to your configurations. Navigate to API Key and create a new one by clicking on Create. Define to which Configuration Groups and Environments the new key should grant access to. We also suggest to enter a period of validity as short as possible but no longer than two years.
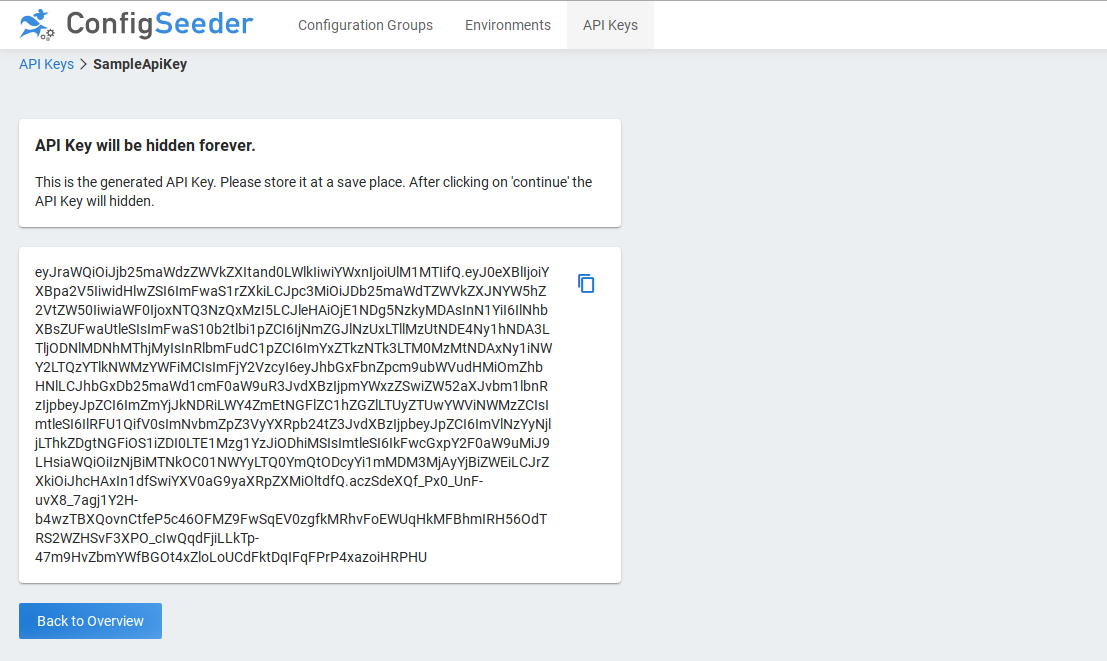
After clicking on Save the generated API Key is shown. You should keep it at a save place.
2.2. Start ConfigSeeder Clients
Time to connect your application to ConfigSeeder. For most of the following clients the general Client Introduction should be read first. Following options to integrate ConfigSeeder exists:
-
Directly connect your application to ConfigSeeder with native clients
-
Indirectly using a ConfigSeeder Connector.
-
Kubernetes Connector
-
OS Connector
3. Applications
3.1. ConfigSeeder Management
3.1.1. Requirements
-
Environment
-
Database (PostgreSQL >= 9.5, SQL Server >= 2012)
-
OIDC or OAuth2 compliant identity server (e.g. Keycloak, Okta)
-
-
System
-
minimal: 512MB; recommended: 2GB
-
minimal: 1 core; recommended: >= 2 cores
-
JRE 1.8
-
-
Browser
-
Chrome >= 56.X.X, Firefox >= 52 and other modern browsers
-
3.1.2. Setup steps
3.1.2.1. Preparations
Prepare before configuring ConfigSeeder Management:
-
Decide which database you want to use (Supported: PostgreSQL, Microsoft SQL Server, Oracle)
-
Get your trial or full ConfigSeeder license (mail at license@configseeder.com, mention: company name, database, number of configuration groups, number of environments)
-
Setup Database (connection url, username, password) (empty database, user with DDL privilege)
-
Identity Provider (urls, client id and secret, available profiles and attributes). Make sure groups or roles are available either as part of the access token or user info endpoint attribute)
-
Define your hostname on which the application should be available
-
If desired prepare a SSL Certificate
-
Download ConfigServer Management instance from https://download.configseeder.com/ (Java JARs or Docker Image). Please be aware that the selection of your database has to match your licence.
3.1.2.2. Configure
Configurations can be passed in three variants and even mixed. We suggest to split up configurations as follow:
-
Non sensitive values: in a file called
configseeder.yaml -
Sensitive values as environment variables
Follow these steps for the installation:
-
Create
configseeder.yaml -
Prepare configurations for:
-
Enable Profile:
spring.profiles.active=setup
-
-
Create a temporary setup user with: daniel.kellenberger@oneo.ch&firstname=Setup&lastname=Account&dataRoles=config_server,config_server_all&functionalRoles=SUPERADMIN" class="bare">http://{host}:{port}/setup/user/login?username=setup&email=daniel.kellenberger@oneo.ch&firstname=Setup&lastname=Account&dataRoles=config_server,config_server_all&functionalRoles=SUPERADMIN
-
Upload License (https://<host>:<port>/ui/license)
-
-
Stop ConfigSeeder Management
-
Cleanup configurations
-
Remove setup profile
spring.profiles.active=setup -
Remove sensitive values from the configuration and pass it as environment variables
-
-
Start ConfigSeeder and save all configurations and scripts
3.1.2.3. General
| Key | M. | Description |
|---|---|---|
|
M |
URL to ConfigSeeder, e.g. https://demo.configseeder.com. |
3.1.2.4. Database
Independent of the configuration database you are using, the configuration options are the same:
| Key | M. | Description |
|---|---|---|
|
M |
JDBC URL to your database.
|
|
M |
Username |
|
M |
Password |
3.1.2.5. SSL Certificates
By default the application runs on port 8080 without encryption. You can easily force SSL connection by providing a SSL certificate.
Follow SSL Certificate if you don’t know how to create a certificate.
| Key | M. | Description |
|---|---|---|
|
Port on which ConfigSeeder should be running. For SSL we suggest port |
|
|
Set to |
|
|
Your keystore format. Our example uses |
|
|
Path to your keystore. E.g. |
|
|
Password to your keystore. In our example: |
|
|
If more than one certificate is defined, use the alias or number. In our example: |
3.1.2.6. Encryption Keys
ConfigSeeder Management has three encryption keys which needs to be configured. We strongly recommend to set your own values.
| Key | M. | Description |
|---|---|---|
|
M |
Private key as a base64 encoded string. Generate using RsaKeyGenerator |
|
M |
Public key as a base64 encoded string. Generate using RsaKeyGenerator |
|
Key identification (defaults to |
|
|
M |
Encryption key to be used to encrypt the configuration values. Generate using AesKeyGenerator |
3.1.2.7. Identity Provider
It is possible to configure multiple OIDC / OAuth2 identity providers, although this is a rare case. While configuring
you application, the <id> placeholder in the key can be any simple string (pattern [a-z]+).
| Key | M. | Description |
|---|---|---|
|
Set to |
|
|
M |
Identification of the application provided by the Identity Provider |
|
M |
Secret of the application provided by the Identity Provider |
|
Defaults to: |
|
|
M |
URL where user will be redirected after authentication to the identity provider. Default value: |
|
M |
Additional scopes. E.g. |
|
M |
Which name will be used to show on the login screen |
|
M |
URI where user should be redirected to log in |
|
M |
URI where a the system can retrieve a token |
|
URI where additional user details can be retrieved from the Identity Provider. This is needed if names, locale, roles or other user attributes should be retrieved |
|
|
M for OIDC |
URI to verify the token signature |
|
M |
Attribute which should be used to fetch the username. Defaults to: |
|
Only set this value, if there are no separate field for firstname and lastname. Define which field should be taken to retrieve it. Defaults to |
|
|
Set the field, if the username is not available on |
|
|
Set the field, if the avatar is not available on |
|
|
Set the field, if the firstname is not available as |
|
|
Set the field, if the lastname ist not available as |
|
|
Set the path where the roles should be extracted from the access token. Example: |
|
|
Set the path where the roles should be extracted from the user info endpoint. Example: |
|
|
Comma separated list of roles which should be assigned to all authenticated users. E.g. |
See ConfigSeeder Management Examples for real world values.
3.1.2.8. Roles
Typically data access roles are generated by the role_infix used on Tenant, Environment and Configuration Group. Note that all data access roles will be prefixed.
| Key | M. | Description |
|---|---|---|
|
Prefix for all data access roles. Defaults to config_server |
|
|
Separator character. Defaults to _ |
|
|
Suffix for all read-specific data roles. Defaults to r |
|
|
Suffix for all write-specific data roles. Defaults to w |
|
|
Infix for all secured marked configuration values. Defaults to sec |
3.1.2.9. Mapping Roles
Not in every company it is possible to create groups or roles according to the need of the ConfigSeeder. The server allows to configure the role mapping where any role returned by the identity provider can be applied to one or many ConfigSeeder roles.
-
Retrieve all existing role mappings:
GET /internal/role-mappings
-
Add a new mapping:
POST /internal/role-mappings { "identityProviderRole": "add-your-role" "configSeederRole": "config_server_<tenant>_<group>...", } -
Delete an existing mapping:
DELETE /internal/role-mappings/<id>
3.1.2.10. Other configurations
Here you will find all non-topic related configurations.
| Key | M. | Description |
|---|---|---|
|
Notification |
SMTP Server Hostname |
|
Notification |
SMTP Server Port |
|
Notification |
SMTP Server Login (if needed) |
|
Notification |
SMTP Server Password (if needed) |
|
Notification |
SMTP Authentication. Values: true or false |
|
Notification |
SMTP Enable StartTLS. Values: true or false |
| Key | M. | Description |
|---|---|---|
|
Number of maximum days an API Key can be valid. Defaults to 2 years ( = 730 days) |
| Key | M. | Description |
|---|---|---|
|
Port on which the server listens (Defaults to 8080) |
|
|
URL to the logo on the left top corner |
|
|
Calendar: First day of week. 0 = Sunday, 1 = Monday |
|
|
Available languages in the UI splitted by comma (Defaults to all supported languages = de,en) |
|
|
Log level on client side. Defaults to INFO |
|
|
Which client logs are shown on server side. Defaults to INFO |
| Key | M. | Description |
|---|---|---|
|
Cron expression to set up scheduling of expiration notifications job (Defaults to 2 A.M.). CronSequenceGenerator |
|
|
M |
Sender of expiration notification |
|
Number of days before expiration date to send notification (Defaults to 14 days) |
|
|
List of email addresses where to send expiration notification separated by , |
|
|
Flag to notify creator of the api key. Defaults to true |
3.1.3. Run ConfigSeeder Management
3.1.3.1. Java
Pass sensitive value as environment variables:
export SPRING_DATASOURCE_PASSWORD="..."
export SERVER_SSL_KEYSTOREPASSWORD="..."
export CONFIGSEEDER_SERVER_SECURITY_JWT_PRIVATEKEY="..."
export CONFIGSEEDER_SERVER_SECURITY_JWT_PUBLICKEY="..."
export CONFIGSEEDER_SERVER_SECURITY_CONFIGURATIONVALUE_ENCRYPTION_SECRET="..."
java -Xms512M -Xmx512M -jar configseeder-server-management-app-<db>-<version>.jar --spring.config.location=/etc/configseeder/configseeder.yaml
You may pass them also as parameters, but then it would be visible with ps / cat /proc/<pid>/cmdline:
java -Xms512M -Xmx512M -jar configseeder-server-management-app-<db>-<version>.jar \
  --spring.config.location=/etc/configseeder/configseeder.yaml
  --spring.datasource.password=... \
  --server.ssl.key-store-password=... \
  --configseeder.server.security.jwt.private-key=... \
  --configseeder.server.security.jwt.public-key=... \
  --configseeder.server.security.configurationvalue.encryption.secret=...
3.1.3.2. Docker
docker run -d -it \
  -v `pwd`/application.properties:/application.properties \
  -e JAVA_OPTS="-Xms512M -Xmx512M"
  --name configseeder \
  -p 8080:8080 \
  configseeder/management-h2:<version>
NOTICE: You may pass secrets as environment parameters, but then it would be visible with ps / cat /proc/<pid>/cmdline. We strongly disadvise.
3.1.4. Example ConfigSeeder Management Configurations
spring.security.oauth2.client.provider.github.authorization-uri=              https://github.com/login/oauth/authorize
spring.security.oauth2.client.provider.github.token-uri=                      https://github.com/login/oauth/access_token
spring.security.oauth2.client.provider.github.user-info-uri=                  https://api.github.com/user
spring.security.oauth2.client.registration.github.client-id=                  0a3f5a2be63c98cb2741
spring.security.oauth2.client.registration.github.client-secret=              1d031b6bf2c5865160319b027636cd88d290b9eb
spring.security.oauth2.client.registration.github.authorization-grant-type=   authorization_code
spring.security.oauth2.client.registration.github.redirectUriTemplate=        {baseUrl}/login/oauth2/code/{registrationId}
spring.security.oauth2.client.registration.github.scope=                      read:user,user:email
spring.security.oauth2.client.registration.github.clientName=                 GitHub
spring.security.oauth2.client.mapping.github.firstname_lastname=              name
spring.security.oauth2.client.mapping.github.username=                        login
spring.security.oauth2.client.default.github.staticRoles= TENANT_ADMIN,DEVELOPER,config_server (1)| 1 | As GitHub brings no role with, we need to statically assign some roles to each user |
spring.security.oauth2.client.provider.keycloak.authorization-uri=            https://keycloak.oneo.ch/auth/realms/config-server/protocol/openid-connect/auth
spring.security.oauth2.client.provider.keycloak.token-uri=                    https://keycloak.oneo.ch/auth/realms/config-server/protocol/openid-connect/token
spring.security.oauth2.client.provider.keycloak.user-info-uri=                https://keycloak.oneo.ch/auth/realms/config-server/protocol/openid-connect/userinfo
spring.security.oauth2.client.provider.keycloak.jwk-set-uri=                  https://keycloak.oneo.ch/auth/realms/config-server/protocol/openid-connect/certs
spring.security.oauth2.client.provider.keycloak.user-name-attribute=          preferred_username
spring.security.oauth2.client.registration.keycloak.client-id=                oneo-config-server
spring.security.oauth2.client.registration.keycloak.client-secret=            oneo-config-server
spring.security.oauth2.client.registration.keycloak.authorization-grant-type= authorization_code
spring.security.oauth2.client.registration.keycloak.redirectUriTemplate=      {baseUrl}/login/oauth2/code/{registrationId}
spring.security.oauth2.client.registration.keycloak.scope=                    openid,profile
spring.security.oauth2.client.registration.keycloak.clientName=               Keycloak
spring.security.oauth2.client.mapping.keycloak.firstname=                     given_name
spring.security.oauth2.client.mapping.keycloak.lastname=                      family_name
spring.security.oauth2.client.mapping.keycloak.username=                      preferred_username
spring.security.oauth2.client.mapping.keycloak.avatar_url=                    avatar
spring.security.oauth2.client.mapping.keycloak.accessTokenRolePaths=          realm_access.roles
3.1.5. Tooling
3.1.5.1. Health Details
Reports about health status of ConfigSeeder can be retrieved on:
$ curl 'https://<your-host-name>/actuator/health' -i -X GET3.1.5.2. Access Metrics
Get access to ConfigSeeder metrics, especially number of requests on the configuration endpoint:
curl 'https://<your-host-name>/actuator/metrics/configseeder.external.timer/' -i -X GETAccess for specific tags (e.g. environment PROD):
curl 'https://<your-host-name>/actuator/metrics/configseeder.external.timer/?tag=environment%3APROD' -i -X GET3.1.5.3. Change Log Levels
As ConfigSeeder is a SpringBoot Application, log levels can be changed at runtime. For this use:
$ curl 'https://<your-host-name>/actuator/loggers/com.configseeder' -i -X POST \
    -H 'Authorization: Bearer <token>'
    -H 'Content-Type: application/json' \
    -d '{"configuredLevel":"debug"}'
Clear your settings to your default:
$ curl 'http://<your-host-name>/actuator/loggers/com.example' -i -X POST \
    -H 'Authorization: Bearer <token>'
    -H 'Content-Type: application/json' \
    -d '{}'
3.1.6. Trouble Shooting
3.1.6.1. OIDC
If you encounter any issue for setup OIDC, change loglevel for com.configseeder=TRACE. Especially com.configseeder.infrastruture.OidcSecurityAspect and com.configseeder.infrastructure.security.ConfigServerOidcUserService will give you more details about what values are transferred.
-
OAuth2AuthenticationException: [invalid_token_response]: Operation timed out (Connection timed out)
Most probably the connection to the OIDC system is blocked by firewall or missing proxy configuration (e.g.-Dhttps.proxyHost=and-Dhttps.proxyPort=and-Dhttps.proxySet=true -
org.springframework.security.oauth2.core.OAuth2AuthenticationException: [invalid_client]
Missing configuration forclient-idorclient-secret
3.2. Value Provider (HA)
3.2.1. Requirements
-
System (per Value Provider instance)
-
minimal: 512MB; recommended: 2GB
-
minimal: 1 core; recommended: >= 2 cores
-
JRE 1.8
-
-
ETCD installation (if used with HA Data store)
-
LoadBalancer (if multiple Value Providers will be used)
3.2.2. Setup Steps
3.2.2.1. Preparations
Prepare before configuring ConfigSeeder ValueProvider:
-
Decide if a HA store should be used (no HA store → each ValueProvider synchronizes on it’s own, ETCD. Please be advised, without an ETCD cluster, HA can not be achieved for some scenarios.)
-
ConfigSeeder Managementis running
3.2.2.2. Configure
Configurations can be passed in three variants and even mixed. We suggest to split up configurations as follow:
-
Non sensitive values: in a file called
configseeder-valueprovider.yaml -
Sensitive values as environment variables
Follow these steps for the installation:
-
Create
configseeder-valueprovider.yam -
Prepare configurations for:
3.2.2.3. SSL Certificates
By default the application runs on port 8080 without encryption. You can easily force SSL connection by providing a SSL certificate.
Follow SSL Certificate if you don’t know how to create a certificate.
| Key | M. | Description |
|---|---|---|
|
Port on which ConfigSeeder should be running. For SSL we suggest port |
|
|
Set to |
|
|
Your keystore format. Our example uses |
|
|
Path to your keystore. E.g. |
|
|
Password to your keystore. In our example: |
|
|
If more than one certificate is defined, use the alias or number. In our example: |
3.2.2.4. Encryption Keys
ConfigSeeder ValueProvider should use the same encryption keys as the management instance.
| Key | M. | Description |
|---|---|---|
|
M |
Private key as a base64 encoded string - same as ConfigSeeder Management |
|
M |
Public key as a base64 encoded string - same as ConfigSeeder Management |
|
Key identification (defaults to |
|
|
M |
Encryption key to be used to encrypt the configuration values - same as ConfigSeeder Management |
3.2.2.5. Synchronisation
In order that the ConfigSeeder ValueProvider is capable of retrieving the values, a synchronization API Key needs to be created in ConfigSeeder Management.
Ensure that the privilege Synchronisation is checked (a synchronisation API key can only be generated by SuperAdmin).
| Key | M. | Description |
|---|---|---|
|
M |
Set to
|
|
M |
ConfigSeeder Management host name |
|
M |
API Key from ConfigSeeder Management, which should be used for synchronisation |
|
Defaults to 5000 msec |
|
|
Defaults to 5000 msec |
|
|
Connect timeout. Defaults to 200 msec |
|
|
Read timeout. Defaults to 5000 msec |
|
|
Filter to include only specific tenants (tenant keys, separated by |
|
|
Filter to include only specific environments (environment keys, separated by |
|
|
Filter to include only specific configuration groups (configuration group keys, separated by |
3.2.2.6. In Memory
Setup in memory instance
| Key | M. | Description |
|---|---|---|
|
M |
Set value to |
|
Be advised that Value Providers which run |
3.2.2.7. ETCD
Setup ETCD instance (persistence and synchronize over ETCD). Master instance will update all slaves.
| Key | M. | Description |
|---|---|---|
|
M |
Comma separated URIs to ETCD instances |
|
Defaults to 5000 msec |
|
|
Needed if authentication is enabled |
|
|
Needed if authentication is enabled |
|
|
Where configseeder values are stored. Defaults to |
3.2.3. Run ConfigSeeder ValueProvider
3.2.3.1. Java
java -Xms512M -Xmx512M -jar configseeder-server-ha-configuration-provider-<db>-<version>.jar \
  --spring.config.location=/etc/configseeder/valueprovider.yaml
  --configseeder.server.ha.etcd.password=... \
  --server.ssl.key-store-password=... \
  --configseeder.server.security.jwt.private-key=... \
  --configseeder.server.security.jwt.public-key=... \
  --configseeder.server.security.configurationvalue.encryption.secret=...
3.2.3.2. Docker
docker run -d -it \
  --mount type=bind,source="$(pwd)"/application.properties,target=/application.properties \
  -e JAVA_OPTS="-Xms512M -Xmx512M"
  -e CONFIGSEEDER_SERVER_HA_ETCD_PASSWORD=... \
  -e SERVER_SSL_KEYSTOREPASSWORD=... \
  -e CONFIGSEEDER_SERVER_SECURITY_JWT_PRIVATEKEY=... \
  -e CONFIGSEEDER_SERVER_SECURITY_JWT_PUBLICKEY=... \
  -e CONFIGSEEDER_SERVER_SECURITY_CONFIGURATIONVALUE_ENCRYPTION_SECRET=... \
  --name configseeder \
  -p 8080:8080 \
  configseeder/ha-configuration-provider:<version>
3.3. ConfigSeeder Clients
3.3.1. Common Setup Steps
All configuration parameters can be passed using a YAML file and be overwritten by system environment variables or start parameters. You can create your configuration manually by following this manual or generate it in ConfigSeeder Management by clicking on the Export button in the configuration management screen.
| It’s strongly suggested to pass all parameters that may be different per environment as a parameters and not part of your artifact. |
| Although it’s possible to have API Keys part of a configuration file, we discourage your saving ApiKey in your file and persist it into your repository. |
-
Create a
configseeder.yamlfile containing all static configuration without any sensitive values (e.g. like API-Keys), dynamic values (like Hostname or Environment).At least configure the environment and one configuration. A minimal configuration looks like this:
configseeder.yamlconfigseeder: client: environmentKey: "DEV" configurationGroupKeys: "demo"It is also possible to configure more settings. A full blown configuration example can be found bellow. Note that . For full reference of all configurations, please refer chapter All available configuration values.
configseeder.yamlconfigseeder: client: tenantKey: "default" environmentKey: "DEV" version: "2.0.24" context: "local" configurations: - key: "group1" selectionMode: "LATEST" - key: "group2" version: 2 initializationMode: "EAGER_ASYNC" refreshMode: "LAZY" refreshCycle: 15000 retryWaitTime: 1000 maxRetries: 3 connectionTimeout: 500 readTimeout: 2000 serverUrl: "https://config-server-demo.oneo.ch" apiKey: "eyJ....KEUg0o"
The keys configurations as well as configurationGroupKeys specifies which configuration group(s) should be loaded. If the configuration is done
with configurationGroupKeys, the client will always load the latest version. When using configurations it can be specified per configuraiton group which
version should be retrieved.
-
Pass all other mandatory parameters (e.g. dynamic or sensitive data like config server host name and API Key) as java parameters or environment variables.
Example for Java Clientsjava -Dconfigseeder.client.serverUrl=https://demo-config-server.oneo.cloud/ -Dconfig-client.api-key=eyJ....KEUg0o -jar <yourapp>.jar
3.3.2. Best practices
-
Always pass API-Key as Java parameter or environment variable.
-
On non-dev instances pass also hostname as parameter instead of fixed configured in
configseeder.yaml -
If you pass the version of your application as config server argument, make sure
configseeder.yamlget’s filtered and use variable@project.version@in the file. Example:configseeder: client: version: "@project.version@" -
If your application will not work with new values from ConfigSeeder received at runtime, just configure the
refreshModewithNEVER
3.3.3. All available configurations
Configs are prefixed with configseeder.client and environment configs with CONFIGSEEDER_CLIENT. Example: configseeder.client.serverUrl and CONFIGSEEDER_CLIENT_SERVERURL.
|
| Config | Environment Variable | Mand./Opt | Description |
|---|---|---|---|
|
|
M |
URL of the config server |
|
|
M |
API Key |
|
|
O |
Key of the tenant |
|
|
M |
Key of the environment |
|
|
O |
Filter: Version of the application |
|
|
O |
Filter: Context |
|
|
O |
Filter: Date Time (Default: |
|
|
(M) |
Name of the configuration group |
|
|
O |
If there are multiple versions: |
|
|
O |
Instead of |
|
|
(M) |
This key can be used instead of the |
|
|
O |
How all values should be initialized. Following options exists: - - - |
|
|
O |
When the values shall be refreshed: - - - - |
|
|
O |
How often values get refreshed (in milliseconds, default: |
|
|
O |
How many milliseconds should be waited before a new request is performed (default: |
|
|
O |
How many times connection retry should be performed (default: |
|
|
O |
How long the client shall wait for initial connection (default: |
|
|
O |
How long an answer from the server shall take max (default: |
|
|
O |
Disable configseeder client with |
3.3.4. Curl
Any configuration can be downloaded with curl and an appropriate API Key from ConfigSeeder. The curl command can be generated in ConfigSeeder Management on the Export view.
For completeness here an example curl statement (it is also possible to retrieve configuration data depending on date or context):
curl -X POST -H "Content-type: application/json" -H "Accept: text/x-java-properties" -d '{
  "tenantKey": "default",
  "environmentKey": "DEV",
  "version": "15.1.0",
  "configurations": [
    {
      "configurationGroupKey": "group1"
    }
  ]
}' 'https://<server>/external/configurations?download=false'
Following accept types are supported:
-
text/x-java-properties(Java Properties Files) -
text/yaml(YAML Files) -
application/x-ini(Windows INI Files) -
text/csv(CSV Files) -
application/json(Fully fledged detail)
3.3.5. Eclipse Micro Profile Config
3.3.5.1. Requirements
-
Application Server supporting
Eclipse Microprofile Config >= 1.1. -
Download matching version of
config-client-microprofile-config-*.jarfrom our maven repository: https://maven.configseeder.com/
3.3.5.2. Configuration
Add config-client-microprofile-config-*.jar as dependency:
<dependency>
  <groupId>com.configserver.client</groupId>
  <artifactId>configseeder-client-microprofile-config</artifactId>
  <version>${configseeder.version}</version>
</dependency>
3.3.5.3. Usage of the configuration values
Following examples show how you can inject a value at startup. Note that this value will never change anymore, although the may have been altered on the ConfigSeeder Management.
// String value
@Inject
@ConfigProperty(name = "BAR", defaultValue = "default value if BAR is not provided")
String bar;

// Boolean value
@Inject
@ConfigProperty(name = "BOOL_PROP", defaultValue = "no")
boolean boolProp;
If you want to retrieve your values at runtime, just inject Config and retrieve the value each time.
@Inject
Config config;

@Inject
@ConfigProperty(name = "server.host.name")
javax.inject.Provider<String> hostName;

private void doSomeOperation() {
   // dynamic optional value
   Optional<String> proxy = config.getOptionalValue("mail.proxy", String.class);

   // dynamic value
   String hostname = config.getValue("mail.host", String.class);

   // dynamic with provider
   String resolvedHostName = hostName.get();

   ...
}
3.3.5.3.1. Best practices
-
Development:
-
Create a file
/src/main/resources-dev/local.properties(or *.yaml) with all properties which are expected. Reason: File has higher priority than the config server and is not part of the default build. -
Include folder
/src/main/resources-dev/only with development profile, so that it’s not part of the regular build artifact.With maven:
<profiles>
  <profile>
    <id>dev</id>
    <build>
      <resources>
        <resource>
          <directory>src/main/resources-dev</directory>
        </resource>
      </resources>
    </build>
  </profile>
</profiles>
-
3.3.6. Spring
3.3.6.1. Requirements
-
Download matching version of
config-client-spring-*.jarfrom our maven repository: https://maven.configseeder.com/
3.3.6.2. Configuration
Add config-client-spring-*.jar as dependency:
<dependency>
  <groupId>com.configseeder.client</groupId>
  <artifactId>configseeder-client-spring</artifactId>
  <version>${configseeder.version}</version>
</dependency>
3.3.6.3. Usage of the configuration values
Following examples show how you can inject a value at startup. Note that this value will never change anymore, although the may have been altered on the config server management instance.
// String value
@Value("${bar.key:my-default}")
String bar;

// Boolean value
@Value("${bar.a-boolean-value}")
boolean boolProp;
If you want to retrieve your values at runtime, just inject Environment and retrieve the value each time.
@Autowired
Environment environment;

private void doSomeOperation() {
   // dynamic value with default
   String proxy = environment.getProperty("mail.proxy", "defaul-proxy.oneo.ch");

   // dynamic value with boolean datatype
   Boolean featureEnabled = environment.getProperty("mail.feature.enabled", Boolean.class);

   ...
}
3.3.6.4. Best practices
-
Development:
-
Create a file
/src/main/resources-dev/application.properties(or *.yaml) with all properties which are expected. Reason: File has higher priority than the config server and is not part of the default build. -
Include folder
/src/main/resources-dev/only with development profile, so that it’s not part of the regular build artifact.With maven:
<profiles>
  <profile>
    <id>dev</id>
    <build>
      <resources>
        <resource>
          <directory>src/main/resources-dev</directory>
        </resource>
      </resources>
    </build>
  </profile>
</profiles>
-
3.3.7. Plain Java
3.3.7.1. Requirements
-
Download matching version of
config-client-core-*.jarfrom our maven repository: https://maven.configseeder.com/
3.3.7.2. Configuration
-
Add
config-client-core-*.jaras dependency:pom.xml<dependency> <groupId>com.configseeder.client</groupId> <artifactId>configseeder-client-core</artifactId> <version>${configseeder.version}</version> </dependency> -
If desired you can create a
/application.propertiesfile which could contain properties not available on the config server or have precendence over the config server.
3.3.7.3. Usage
-
Core ships a
Configclass, which can be used to easily retrieve values using default settings:SimpleConfigExample.javaString stringValue = Config.getString("any.existing.string"); String fallbackValue = Config.getString("any.notexisting.string", "fallback"); Optional<String> optionalValue = Config.getOptionalString("any.optional.string"); Long longValue = Config.getLong("any.existing.long"); Long fallbackLongValue = Config.getLong("any.notexisting.long", 42L); Optional<Long> optionalLong = Config.getOptionalLong("any.optional.long"); Boolean booleanValue = Config.getBoolean("any.existing.boolean"); boolean fallbackBoolean = Config.getBoolean("any.notexisting.boolean", true); Optional<Boolean> optionalBoolean = Config.getBoolean("any.optional.boolean"); -
If you want to configure the
ConfigSeederClientyourself or using a more dynamic way, use:CustomizedConfigSeederClient.javaConfigSeederClientConfiguration configSeederClientConfiguration = ConfigSeederClientConfiguration.fromYaml("/configseeder.yaml"); ConfigSeederClient configSeederClient = new ConfigSeederClient(configSeederClientConfiguration); ... String stringValue = configSeederClient.getString("foo.bar");Make sure you create only one
ConfigSeederClientinstance.
3.3.8. Maven
3.3.8.1. Requirements
-
Download matching version of config-client-maven-plugin-*.jar from our maven repository: https://maven.configseeder.com/
3.3.8.2. Configuration
Add following configuration to your pom.xml:
<build>
  <resources>
    <resource>
      <directory>src/main/resources</directory>
      <includes>
        <include>filtered.properties</include>
      </includes>
      <filtering>true</filtering>
    </resource>
  </resources>
  <plugins>
    <plugin>
      <groupId>com.configseeder.client.maven</groupId>
      <artifactId>configseeder-client-maven-plugin</artifactId>
      <version>${project.version}</version>
      <goals>
         <goal>fetch</goal>
      </goals>
      <executions>
        <execution>
          <phase>initialize</phase>
          <goals>
            <goal>fetch</goal>
          </goals>
        </execution>
      </executions>
      <configuration>
        <serverUrl>https://config-server-demo.oneo.ch</serverUrl>
        <apiKey>ey...Ug0o</apiKey>
        <tenant>demo</tenant>
         <environment>PROD</environment>
         <version>${project.version}</version>
         <configurationGroups>
           <configurationGroup>
             <key>cube</key>
           </configurationGroup>
         </configurationGroups>
       </configuration>
    </plugin>
  </plugins>
</build>
3.3.8.3. Usage
-
Use any property as replacement variable in your filtered files.
-
Make sure files are filtered:
pom.xml<resources> <resource> <directory>src/main/resources</directory> <includes> <include>filtered.properties</include> </includes> <filtering>true</filtering> </resource> </resources> -
Use the variables in your filtered files:
filtered.propertiesfoo.bar=@foo.bar@
-
-
Use any property in your
pom.xmlas variable:pom.xml<dependencies> <dependency> <groupId>org.apache.maven</groupId> <artifactId>maven-plugin-api</artifactId> <version>${my.configseeder.maven-plugin-version}</version> </dependency> </dependency>
3.3.9. Template
ConfigSeeder offers the functionality to replace all variables in a file using the replacement mechanism.
ConfigSeeder analyses the file and will try to resolve all variables. You can choose how a variable is built.
For our Demo case we assume that a variable is built like this: ${variable.key}.
ConfigSeeder will look for the value stored on key variable.key.
The same as for all other configurations, ConfigSeeder needs to know following parameters:
-
On which configuration groups the request shall be performed.
-
Restriction filters like
environment,version,dateor/andcontext -
API Key in order to authenticate.
-
The prefix and postfix of the variables (
${and}) are encoded into the url, see attributesvariablePrefixandvariablePostfix.
A full fledged request may look like this:
curl -X POST \
  --header 'Authorization: Bearer <apiKey>' \
  --header 'Content-Type: multipart/form-data' \
  --header 'Accept: application/octet-stream' \
  --form "configuration=@/tmp/request.json;type=application/json" \
  --form "template=@/tmp/original.sh" \
  --output /tmp/replaced.sh \
  'https://demo.configseeder.com/external/configurations/replace?variablePrefix=%24%7B&variablePostfix=%7D'
Where the files look like this:
{
  "configurations": [
    {
      "configurationGroupKey": "MyConfigurationGroup",
      "selectionMode": "LATEST"
    }
  ],
  "dateTime": "2018-12-11T08:24:59.535Z",
  "environmentKey": "DEV",
  "version": "2.0.0-RC1"
  "context": "test"
}#!/bin/sh
VARIABLE="${variable.key}"
echo $VARIABLE;This will result in a file like:
#!/bin/sh

VARIABLE="Hello World"

echo $VARIABLE;
It is possible to optionally pass a file with additional variables as JSON:
{
  "this.is.my.key": "this is a value",
  "another.key": "another value",
  key1: value1
}
The curl command would look like this:
curl -X POST \
  --header 'Authorization: Bearer <apiKey>' \
  --header 'Content-Type: multipart/form-data' \
  --header 'Accept: application/octet-stream' \
  --form "configuration=@/tmp/request.json;type=application/json" \
  --form "template=@/tmp/original.sh" \
  --form "variables=@/tmp/variables.json;type=application/json" \
  --output /tmp/replaced.sh \
  'https://demo.configseeder.com/external/configurations/replace?variablePrefix=%24%7B&variablePostfix=%7D'
Appendix A: ConfigSeeder Management / ValueProvider
A.1. Configuration Options
This chapter lists all configurations available for customization. As the application is built on top of spring-boot, you can configure your application in many different ways (see also: Spring Boot Externalized Configuration).
We recommend following variants:
-
Passing configuration as environment variables, note that then the variable names needs to be defined in Snake Case.
-
Pass variables with
--prefix. Example forspring.datasource.urluse--spring.datasource.url=jdbc:… -
Pass variables with an externalized configuration
--spring.config.location=./or--spring.config.location=/home/config-server/config.properties(or extensionyml)
A.1.1. AesKeyGenerator
Download ConfigSeeder Util from https://download.configseeder.com/. This util helps you to generate an AES128 or AES256 key. This key will be used to encrypt ConfigurationValues.
java -jar configseeder-utils-<version>.jarAnd select option 1. Follow the instructions shown.
A.1.2. RsaKeyGenerator
Download ConfigSeeder Util from https://download.configseeder.com/. This util is helps you generate a private and public key which will be used to encrypt the API Key issued by the config server.
java -jar configseeder-utils-<version>.jarAnd select option 2. Follow the instructions shown.
A.2. SSL Certificate
It is recommended to run ConfigSeeder Management and ConfigSeeder ValueProvider with a SSL certificate.
This section describes how to create self-signed certificate or signed certificate and how to configure them.
Please replace the password changeit with your desired password.
A.2.1. Self-signed certificate
Create a PKCS12 keystore with:
keytool -genkeypair -alias configseeder-local -keyalg RSA -keysize 2048 -storetype PKCS12 -keystore keystore.p12 -validity 3650
Define a password (e.g. changeit, at least 6 characters) and your hostname in the CN field:
What is your first and last name?
  [Unknown]: localhost
What is the name of your organizational unit?
  [Unknown]:
What is the name of your organization?
  [Unknown]:
What is the name of your City or Locality?
  [Unknown]:
What is the name of your State or Province?
  [Unknown]:
What is the two-letter country code for this unit?
  [Unknown]:
Is CN=localhost, OU=Unknown, O=Unknown, L=Unknown, ST=Unknown, C=Unknown correct?
  [no]:  yes

Enter key password for <configseeder-local>
  (RETURN if same as keystore password):
This will generate you a file named keystore.p12 which can be used by ConfigSeeder Management and ConfigSeeder ValueProvider
A.2.2. Signed certificate
These steps assume that you have already a key and a signed certificate:
openssl pkcs12 -export -inkey keystore.key -in keystore.crt -out keystore.p12 -passsword pass:changeit -name configseeder
Note: If no alias was defined, use the number 1 as alias name in the configuration
A.2.3. Configuration
Now configure the application to use the certificate and password.
server.port=8443 (1)
security.require-ssl=true (2)
server.ssl.key-store-type=PKCS12 (3)
server.ssl.key-store=/path/to/keystore.p12 (4)
server.ssl.key-store-password=notset (5)
server.ssl.key-alias=configseeder (6)
| 1 | Port on which the application gets served |
| 2 | Tell security to require requests over HTTPS |
| 3 | The format used for the keystore. In our example, PKCS12 |
| 4 | The path to the keystore containing the certificate (alternative: classpath:keystore.p12) |
| 5 | The password used to generate the certificate |
| 6 | The alias mapped to the certificate (in our example either configseeder or 1) |
Appendix B: Configure Keycloak as Open ID Provider
This chapter explains how to setup Keycloak to work with the config server.
B.1. Setup a new client
-
Add new realm
-
Name:
ConfigServer -
Create
-
-
Realm Settings > General
-
Display name:
config-server-review
-
-
Realm Settings > Login
-
Everything:
Off(or according to your needs) -
Login with email:
On
-
-
Realm Settings > Email
-
Configure a Mailbox E-Mail with a valid E-Mail Address. Example:
-
Host:
mail.domain.com -
Port:
587 -
From Display Name:
Keycloak -
From:
keycloak@domain.com -
Enable StartTLS:
ON -
Enable Authentication:
ON -
Username:
keycloak@domain.com -
Password:
…
-
-
-
Clients > Create
-
Client ID:
config-server -
Client Protocol:
openid-connect -
Save
-
-
Clients > config-server > Settings
-
Access Type:
confidential(with this an additional TabCredentials) will be shown after save -
Valid Redirect URIs: Configure here your URLs. Use Placeholder
at the end. Example:https://config-server.domain.com/
-
-
Client > config-server > Credentials
-
Here you can regenerate the secret if desired
-
-
Clients > Mappers >
Add Builtin([x] mandatory, [o] optional)-
[x] family name, [x] given name, [x] profile, [x] locale, [x] full name, [x] picture, [o] nickname, [x] email, [x] username
-
Add selected
-
B.2. Setup Roles
-
Roles >
Add Role-
Add all functional roles (
SUPERADMIN,TENANTADMIN,APPLICATIONMANAGER,DEVELOPER,READER) -
Add all data roles (depends on your desired configuration group access setup)
-
Create your own roles you want at the end to assign to the user
-
B.3. Setup Users
TODO finish user documentation
-
Add User
-
Add "username", "firstname", "lastname", "email verified"
-
Save
-
Tab "Credentials"
-
Add "new Password", "Password confirmation", Temporary: Off
-
Reset Password
-
Assign Roles
B.4. Fetch needed values for configuring config-server
-
authorization-uri,token-uri,user-info-uriandjwk-set-urifrom: Realm Settings > Endpoints > OpenId Endpoint Configuration -
client-idfrom: Clients > Client ID -
client-secretfrom: Clients > {Client} > Credentials > Secret
Example Keycloak Configuration:
spring.security.oauth2.client.provider.keycloak.authorization-uri=   https://<keycloak-server>/auth/realms/<client-id>/protocol/openid-connect/auth
spring.security.oauth2.client.provider.keycloak.token-uri=           https://<keycloak-server>/auth/realms/<client-id>/protocol/openid-connect/token
spring.security.oauth2.client.provider.keycloak.user-info-uri=       https://<keycloak-server>/auth/realms/<client-id>/protocol/openid-connect/userinfo
spring.security.oauth2.client.provider.keycloak.jwk-set-uri=         https://<keycloak-server>/auth/realms/<client-id>/protocol/openid-connect/certs
spring.security.oauth2.client.provider.keycloak.user-name-attribute= preferred_username

spring.security.oauth2.client.registration.keycloak.client-id=       <client-id>
spring.security.oauth2.client.registration.keycloak.client-secret=   <client-secret>
spring.security.oauth2.client.registration.keycloak.authorization-grant-type= authorization_code
spring.security.oauth2.client.registration.keycloak.redirectUriTemplate= {baseUrl}/login/oauth2/code/{registrationId}
spring.security.oauth2.client.registration.keycloak.scope=           openid,profile
spring.security.oauth2.client.registration.keycloak.clientName=      Keycloak

spring.security.oauth2.client.mapping.keycloak.firstname=            given_name
spring.security.oauth2.client.mapping.keycloak.lastname=             family_name
spring.security.oauth2.client.mapping.keycloak.username=             preferred_username
spring.security.oauth2.client.mapping.keycloak.avatar_url=           picture
spring.security.oauth2.client.mapping.keycloak.accessTokenRolePaths= realm_access.roles